System Roles
The System Roles page is designed to empower administrators to efficiently handle system roles within ADOGRC. You can create, edit, and delete system roles, and assign individual users and entire user groups to system roles. Additionally, you can import and export system roles.
What are System Roles for?
System roles serve two functions in ADOGRC. You can use them to:
Grant access to ADOGRC features. For example, you can specify whether users can create matrix charts or which application scenarios are available to them in ADOGRC.
Assign user rights for the available metamodel elements (= metamodel rights). For example, you can specify whether users can create models of a certain type or only open them read-only.
About the System Roles Page Layout
The System Roles page consists of two panes, the catalogue and the workspace:
Catalogue: The catalogue is the left pane of the System Roles page. Select a system role here to show its details and assigned members in the workspace.
Workspace: The workspace is the right pane of the System Roles page. You can edit details of system roles here, such as the name and description. Additionally, you can add or remove members from system roles.
Default System Roles
The default system roles are always available when you are using the ADOGRC Standard Application Library.
Here are the default system roles:
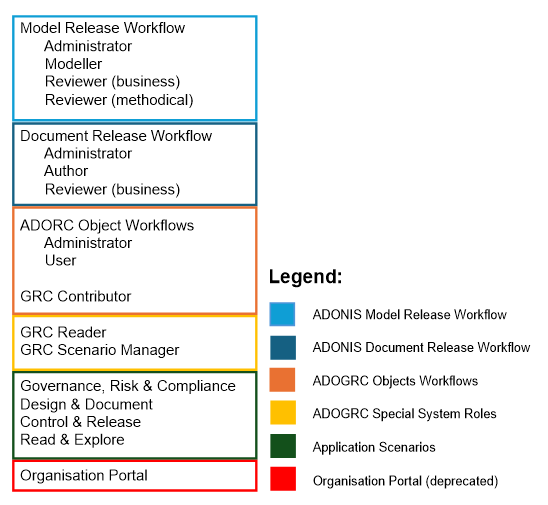
Model Release Workflow
Modeller: Modellers create and submit models to review. They can also create new versions of models which have already been released in order to adapt them.
Reviewer (business, methodical): Reviewers perform methodical reviews and business reviews of the submitted models.
Administrator: Administrators can execute all transitions. They are responsible for the maintenance of the release process. Only Administrators can archive models.
Document Release Workflow
Author: Authors create and submit documents to review. They can also create new versions of already released documents in order to adapt them.
Reviewer (business): Reviewers perform business reviews of the submitted documents and release them.
Administrator: Administrators can execute all transitions. They are responsible for the maintenance of the release process. Only Administrators can archive documents.
Application Scenarios
Governance, Risk & Compliance: Members of the named user role "ADOGRC - GRC Scenario" will have access to the "Governance, Risk & Compliance" application scenario. This scenario provides access to the ADOGRC start page, dashboards and analysis templates.
Design & Document: Members of the system role "Design & Document" will have access to the "Design & Document" application scenario. Via this scenario they will be able to model and create transparency in a structured way.
Control & Release: Members of the system role "Control & Release" will have access to the "Control & Release" application scenario. The purpose of this scenario is to let users review and release processes with a single click.
Read & Explore: Members of the system role "Read & Explore" will have access to the "Read & Explore" application scenario. The purpose of this scenario is to give users read access to compliance data, let users read processes, explore working instructions and process handbooks.
The "Read & Explore" application scenario is read-only. Users have no write access to repository content (including all models and objects and their relations).
To be able to use the Governance, Risk & Compliance application scenario, a user must participate in at least one ADOGRC release workflow. This means they need one or more ADOGRC workflow system roles and the GRC Contributor system role assigned. If the role assignment is not correct, a (!) will be shown next to the application scenario role. The ADOGRC application scenario is a named user system role and assigned to an individual user.
ADOGRC-specific System Roles
There are three system roles which unlock special functionality in ADOGRC:
GRC Scenario Manager: This role allows a user to batch assign a GRC Object Scenario to multiple objects at once. When you select a number of objects, from the right-click context menu select More > Assign GRC Scenario > and pick am object scenario from the list. All objects will be assigned to this GRC object scenario, existing assignments to the same or other object scenarios will not be changed. From the same menu it is possible to remove an object from all GRC object scenarios by selecting Remove all scenario assignments.
GRC Contributor: This role allows a user to participate in ADOGRC release workflows as a responsible person for a certain workflow states and transitions. Which workflows are allowed depends on the ADOGRC workflow system roles the user has assigned (see below).
When a user is assigned the GRC Contributor system role, they must also be assigned to at least one ADOGRC workflow otherwise the configuration is invalid and the user will not be able to log in.
- GRC Reader: This role unlocks additional dashboards for ADOGRC objects in the Read & Explore application scenario.
When a user is assigned the GRC Reader system role, they must also be assigned the Read & Explore application scenario otherwise the configuration is invalid and they will not be able to log in.
ADOGRC Workflow Roles
The workflow system roles are used to give users access to the ADOGRC workflow functionality, such as performing transitions and creating new versions of objects. These system roles are automatically provided by the ADOGRC Standard Application library. There are two roles for each ADOGRC workflow:
User:
The User role is the standard role assigned to every user who will be executing object release workflow transitions.Administrator:
The Administrator role allows to intervene in workflows which have already been started. This includes actions such as declining/rejecting an object out of its normal workflow procedure and is especially helpful in cases where an object is "stuck" in a certain state due to external factors (e.g. if the currently responsible employee left the company).
The Administrator and User role should not be assigned together. Having both system roles can lead to confusion in some cases e.g. when a user has the Decline transition available from their position in the workflow (= responsible person for the object) but at the same time there is a Decline transition for the Administrator role (= available for all objects).
Additional ADOGRC Workflow Roles (Legacy Workflows)
For some workflow system roles there are additional system roles which enable supporting features for the ADOGRC workflows on the user interface and are required to use the respective workflow. This means that a user always needs both roles to be able to participate in the workflow. The reason for having these roles separate are purely technical, from the point of view of the functionality they provide, they are one.
To assign a user properly to such a workflow, e.g. the Control Execution workflow, they need both the workflow system role ADOGRC - Release Workflow: Control Execution / User and the corresponding additional workflow role GRC-Release Workflow: Control Execution.
Starting with ADOGRC 13.0, new workflows will no longer have a separate additional workflow system role.
Typical Role Assignments
The following table lists a few examples for typical role assignments of a user participating in the respective ADOGRC workflows and activities:
| Typical role assignments for workflow | Roles needed by the user |
| Risk Master Data |
|
| Risk assessment |
|
| Control Master Data |
|
| Control testing |
|
| Control execution |
|
| Control objective Master Data |
|
| Control objective assessment |
|
| Processing Activity Master Data |
|
| Initiative |
|
| GRC-Reader |
|
Organisation Portal
- Organisation Portal: Typically only one technical user account will have this system role. This user account is used when users access the Organisation Portal via the link on the ADOGRC login page.
The Organisation Portal is read-only. Users have no write access to repository content (including all models and objects and their relations).
Starting with ADONIS 15.0 and ADOGRC 12.0, the Organisation Portal, and hence the system role "Organisation Portal", are no longer available to new customers. Existing customers with licences that include the Organisation Portal may continue to use it and will have access to the system role "Organisation Portal".
The system role "Organisation Portal" must not be assigned in combination with other system roles.
Create System Role
To create a new system role
Go to the System Roles page and click Create system role.
In the Unique name box, type a name for the system role, and then click Create. This language-independent name uniquely identifies the system role.
In the Details form in the middle, fill out the role details:
Select Default role if this system role should apply to all users on login.
Enter a name for each language ADOGRC supports. These names will be visible on the user interface.
Enter a description.
Click Add members and add user groups or individual users from the user catalogue. Then, click Add.
Click Save.
The new system role is added to the System roles catalogue.
Edit System Role
To edit a system role:
Go to the System Roles page.
In the System roles catalogue on the left side, select the system role you want to edit. The details of the system role and the assigned members will be shown in the workspace.
Modify the role data as required.
Click Save.
Modifying role data is restricted to user-created system roles. The predefined default system roles provided with ADOGRC are read-only and cannot be changed; you can only assign or remove members.
You can find more information about the various role data in the section Create System Role.
Manage System Role Members
To manage system roles members:
Go to the System Roles page.
In the System roles catalogue on the left side, select the system role whose members you want to manage. The details of the system role and the assigned members will be shown in the workspace.
Now do one of the following:
To assign members to a system role, click Add members and add user groups or individual users from the user catalogue.
To remove an individual member from a system role, click
 Remove member.
To remove all members from a system role at once, click Remove all.
Click Save.
Assign Permissions to System Roles
Various permissions can be assigned to system roles. When you assign members to a system role, they are granted all of the permissions of that system role, permitting or restricting them access to specific features and actions within ADOGRC.
Default System Roles: ADOGRC provides default system roles with pre-defined permissions that cannot be modified. These system roles grant users access to different application scenarios and release workflows in ADOGRC.
Modules: You can assign modules (plug-ins) to system roles to grant access to specific features in ADOGRC. For example, this allows you to manage permissions for creating matrix charts or performing Excel imports. To assign these modules, head over to the Settings page.
Manage Metamodel Rights: Metamodel rights allow you to control access to metamodel elements, such as model types and attributes, in ADOGRC. To assign metamodel rights to a system role, head over to the Rights page.
Delete System Role
To delete a system role:
Go to the System Roles page.
In the System roles catalogue on the left side, find the system role you want to delete.
Hover over the system role, click
 More, and then click
Delete.
More, and then click
Delete.
The predefined default system roles created by ADOGRC are read-only and cannot be deleted.
Import System Roles
To import system roles:
Go to System Roles > More options, and then click Import system roles.
Click Browse and select the file with the system roles you want to import. You can also drag a file from your computer to the Drag and drop files here to upload area. Then, click Next.
Optional: If the import file is encrypted, enter the password and click OK.
Select the system roles you wish to import. To quickly select all system roles, click Select all. Then, click Next.
Optional: Select Including metamodel rights to import all metamodel rights together with the system roles.
From the Conflict strategy, if a system role in the file does already exist in the repository list, select the behaviour if a system role already exists:
Insert (new system role data from the import file is added, data existing in a different form is updated): Inserts the system role, combining information from both sources (default selection).
Overwrite (the system role from the import file replaces the one from the database): Overwrites the system role in the database.
Ignore (the system role in the database remains untouched): Ignores the data in the import file, preserving the original system role.
Click Import. The system roles are imported.
When the import is complete, a success message appears. Close the message to complete the process.
Export System Roles
To export system roles:
Go to System Roles > More options, and then click Export system roles.
Select the system roles you wish to export. To quickly select all system roles, click Select all. Then, click Next.
Optional: Select Export with metamodel rights to export all metamodel rights together with the system roles.
Optional: Select Protect export file with password to encrypt the export file.
Click Export. The system roles are exported.
When the export is complete, a success message appears. Close the message to complete the process.
Copy Role Info to Clipboard
To copy system role information to the clipboard:
Go to the System Roles page.
In the System roles catalogue on the left side, find the system role whose info you want to copy.
Hover over the system role, click
More, and then click Copy
role info to clipboard.
A JSON representation of the system role, including details such as the mfbID required for
creating a user mapping for specific authentication mechanisms, will be copied to your clipboard.