ADOGRC Setup Guide
This document will guide you through the setup process of ADOGRC. As ADOGRC is based on ADONIS, the steps to setup ADONIS are required and additionally the ADOGRC-specific steps outlined in this document.
Preparation
This document is designed to give an overview of all the necessary configurations for a standard ADOGRC installation.
Installation Checklist
Before You Start
Read the ADOGRC Hardware/Software Requirements to make sure that all system requirements are met.
Keep the installation medium ready.
Keep the ADOGRC Application library and the ADOGRC license file ready. Optionally also keep the sample migration packages ready.
Consult the ADONIS Installation Manual on how to setup the software.
Read through this document to learn which ADOGRC specific changes must be applied compared to a standard ADONIS setup.
Content of the Release Package
Customers are provided with a release package of ADOGRC by their respective BOC consultant. This package contains all necessary files to set up ADOGRC Standard.
The ADOGRC package contains the following folders:
01 Installation Manual
Installation Manual
This is the ADONIS Installation Manual and describes all necessary steps to get a new installation up and running. The setup process is the same for ADONIS and ADOGRC, however, there are some additional steps specific to an ADOGRC installation which are detailed in this document.Database Manuals
For a regular installation the database can be created and prepared automatically by the command line tool provided by BOC. You can find details and parameters in the respective Database Manuals in this folder. In case you need more control over how exactly the database is created, it is possible to create a database manually using only SQL scripts and the tools provided by the Database System vendor. This folder contains manuals for MS SQL Server, Oracle and PostgreSQL, the scripts can be found in "02 Application Server\dbinfo"
02 Application Server
BOC
This folder contains the BOC Application Server component which you can install with the provided setup program or by manually copying the files to a location of your choice.dbinfo
This folder contains SQL scripts with which you can create an ADOGRC database manually without the aid of the tool provided by BOC.
03 Web Application
- This folder contains the ADOGRC web client as well as a sample configuration for Apache Tomcat and 3rd-party tools.
04 Sample Data
- This folder contains sample data of ADONIS and ADOGRC illustrating its use.
Setup of ADOGRC
The installation of the ADOGRC server and webserver components follows the same steps as the ADONIS setup described in the ADONIS Installation Manual with the additional steps outlined below.
Database Setup
To successfully create a new database for ADOGRC, you can use the command line tool provided by BOC. In addition to the Application Server files you need the ADOGRC Application library and the ADOGRC License.
Information and examples on how to create a database can be found in the respective Database Manual of your database system in the folder "\01 Installation Manual\"
Select the Standard ADOGRC library shipped with the release package in the folder "\02 Application Server\BOC\ADOGRC 13.4.0_ADONIS 16.5\data" or a custom library provided by your BOC consultant.
Select the ADOGRC license provided by your BOC consultant.
Technical Users and Roles
ADOGRC Technical Users and Roles are needed to execute background jobs and provide further functionality. In order to import these into an existing database, use the provided packages located in the Sample Data folder.
Import the users from the package "\04 Sample Data\Users\ADOGRC 13.0.0 - Technical Users.axr". For information on how to import users, please refer to the relevant section of the ADOGRC Administration Manual
Import the roles from the package "\04 Sample Data\Roles\ADOGRC 13.0.0 - Technical Roles.axr". For information on how to import users, please refer to the relevant section of the ADOGRC Administration Manual
Starting with ADOGRC 13.1, ADOGRC will check on startup if the necessary technical users and system roles are available. If not, the system will automatically create them.
Configuration of Technical Users
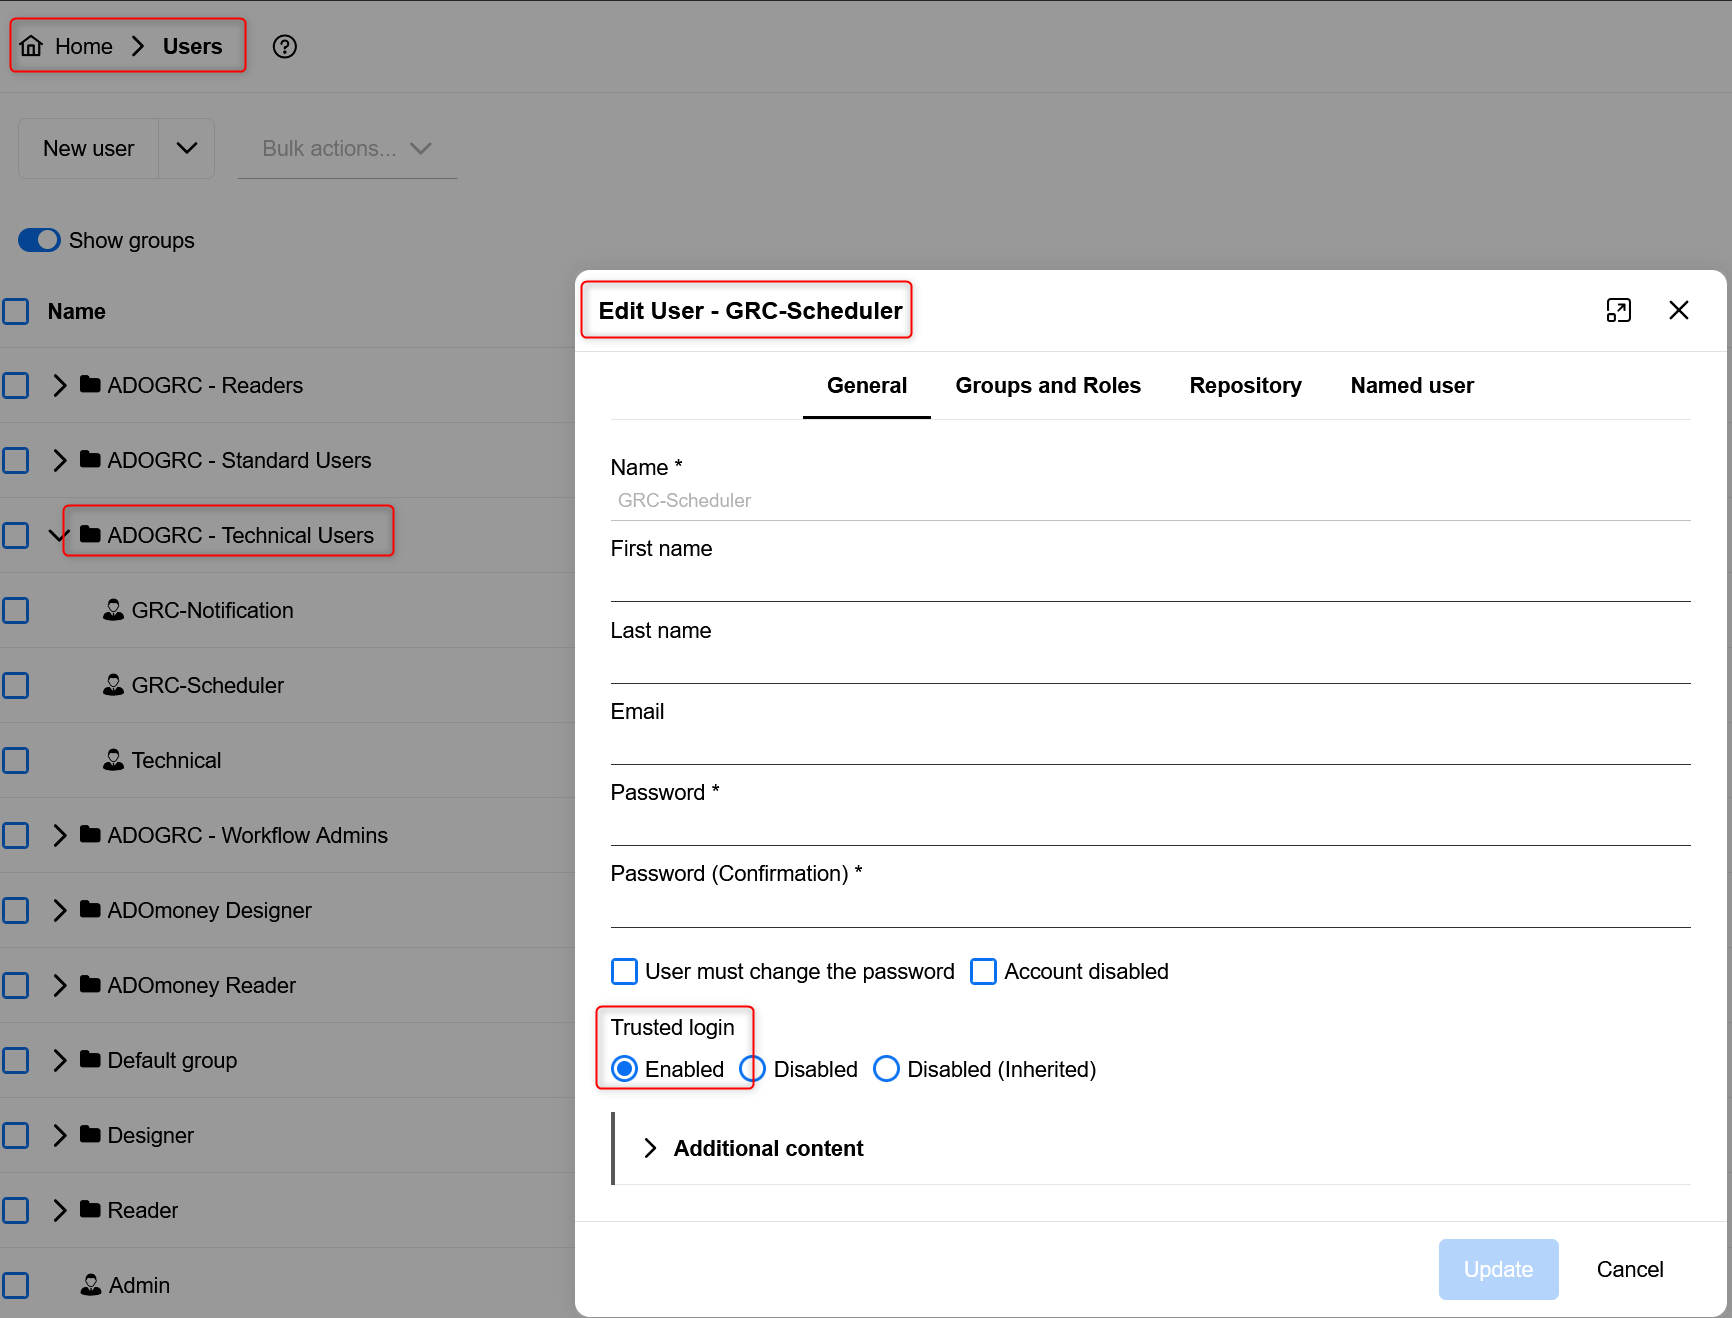
The ADOGRC Technical Users provide crucial services for ADOGRC and therefore have to be configured correctly to run ADOGRC successfully. ADOGRC uses three technical users: GRC-Scheduler, GRC-Notification and Technical.
Verify that the Technical Users have Trusted Login permissions
Trusted login allows the Technical Users to provide background services without supplying a password. This is required for ADOGRC to work correctly and is the default setting for these users. For more information on the Trusted Login setting, see the corresponding section of the ADOGRC Administration Manual.
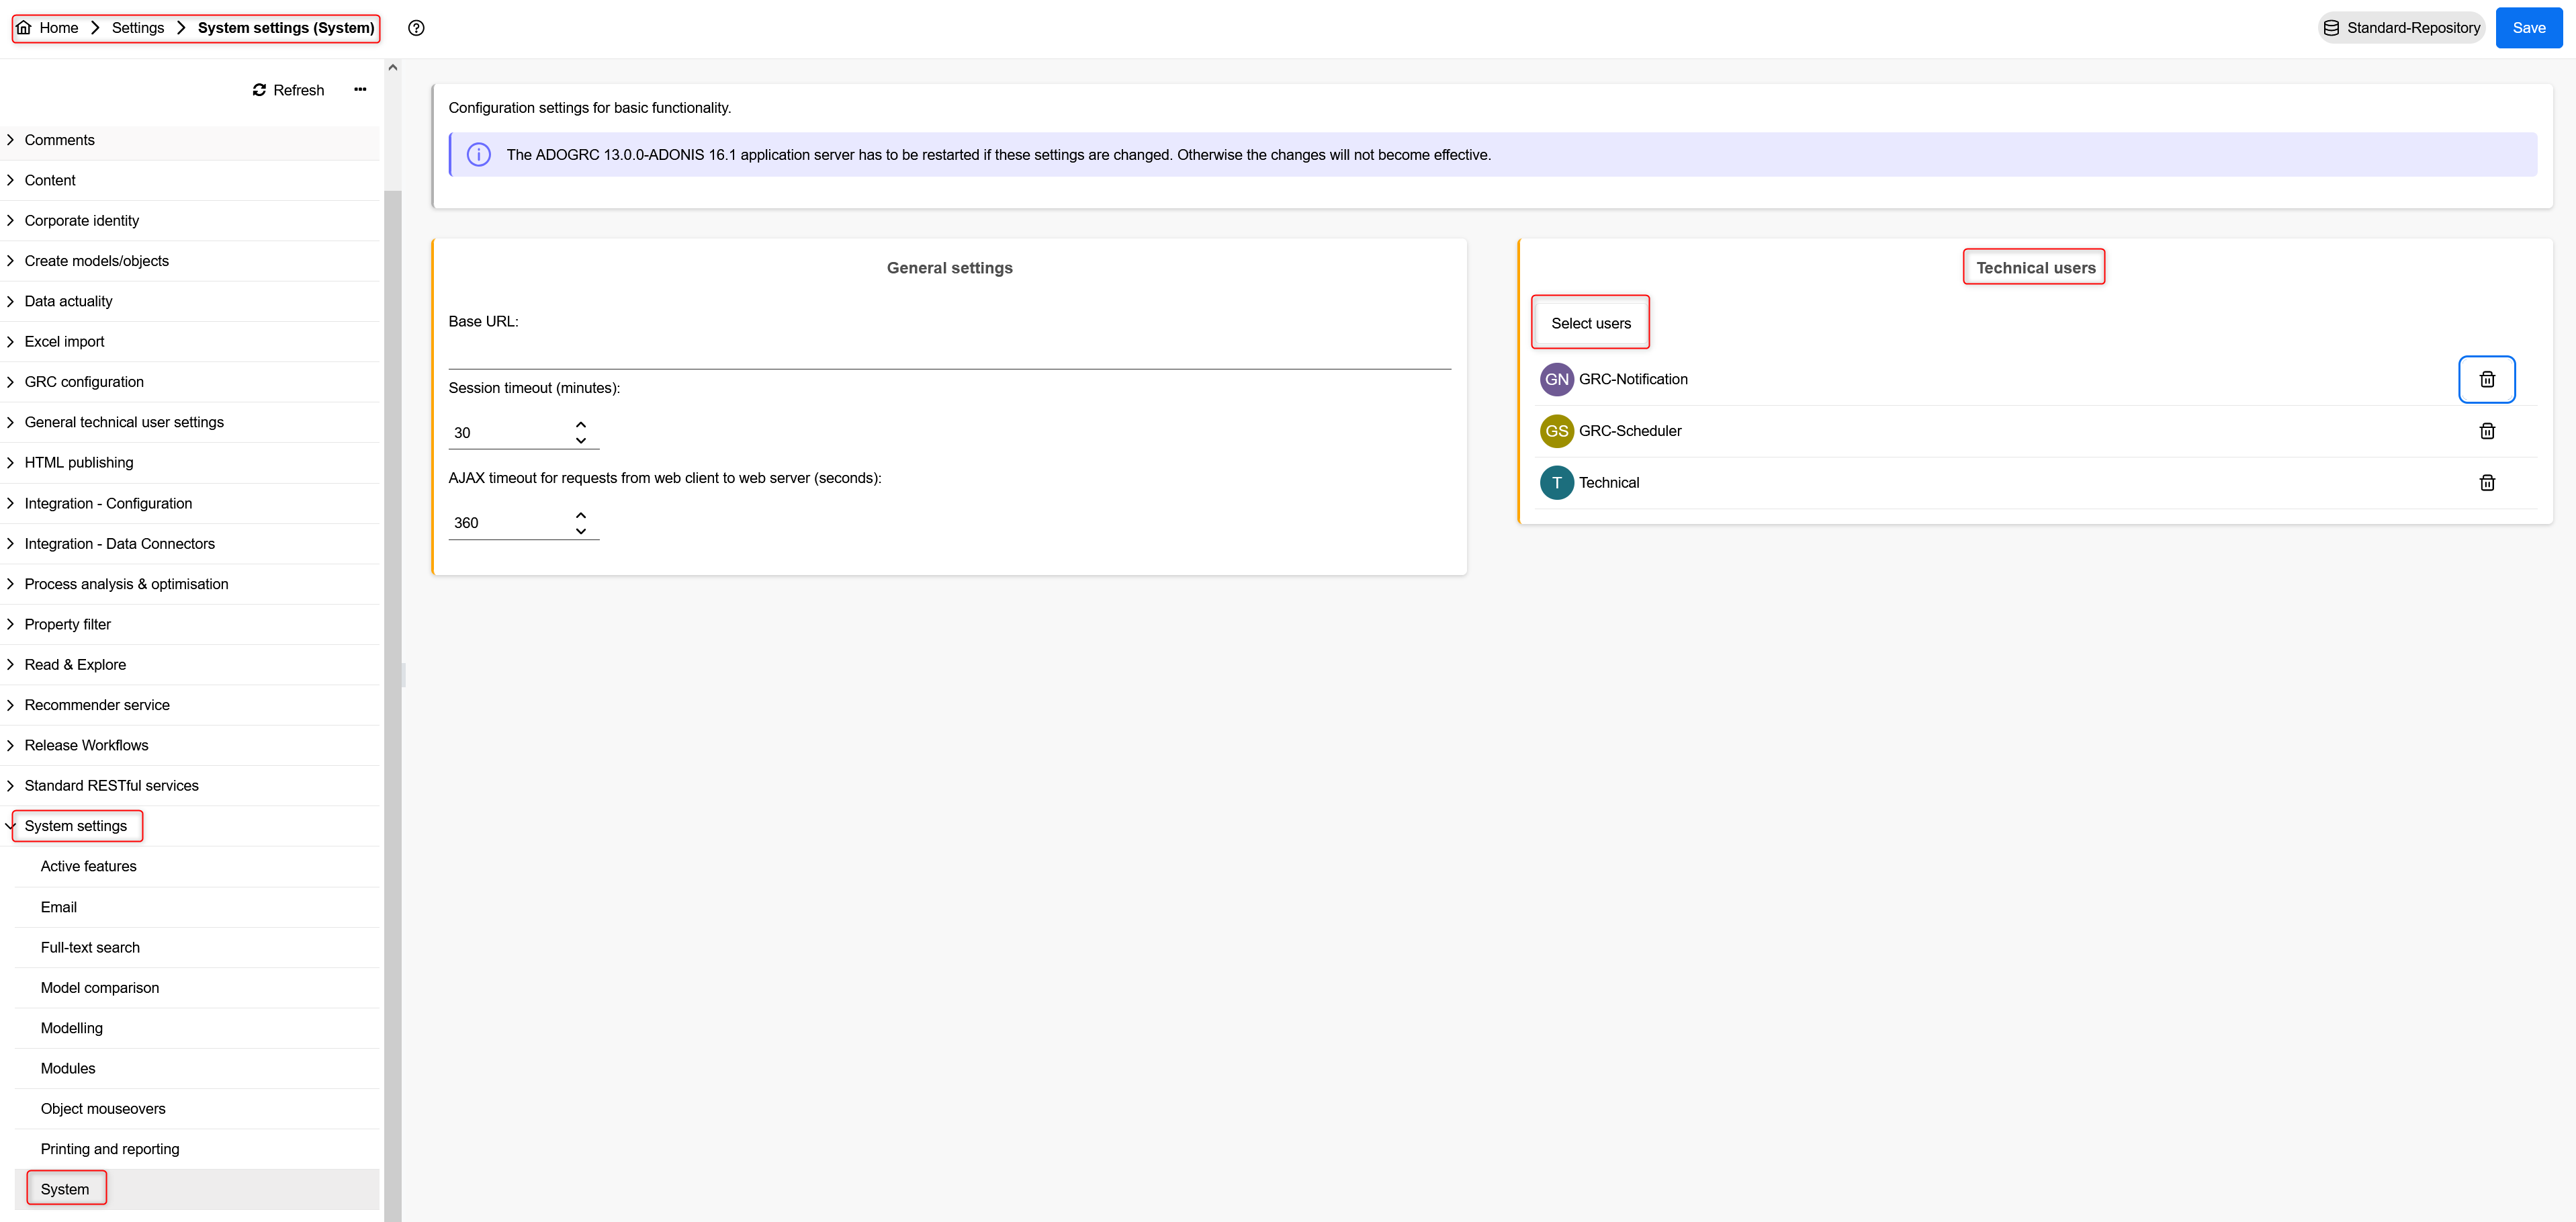
Verify that the Technical Users have been configured correctly in the System Settings
Technical Users have to be set in the System Settings. This is the default configuration for ADOGRC. For more information on this setting, see the corresponding section in the ADOGRC Administration Manual.
Verify that the Technical Users have been configured correctly in the ADOGRC Settings
The Technical Users also need to be set in their respective ADOGRC settings: Configuration of GRC-Notification, Configuration of GRC-Scheduler and General Technical User Settings.
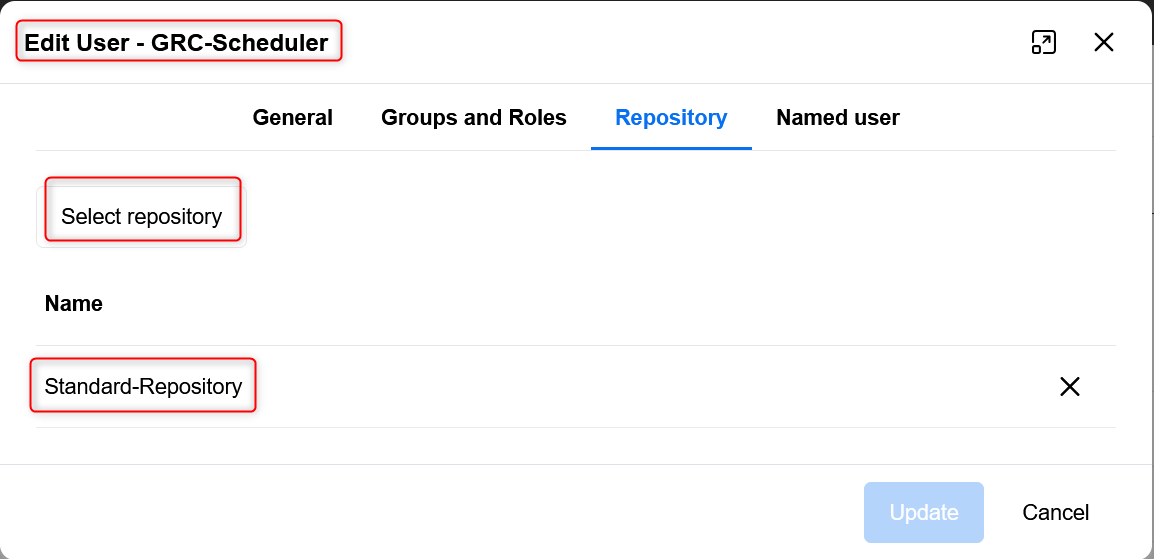
Verify that the Technical Users are assigned to all Repositories where they should perform their services.
The Technical Users need access to the objects they for which they are executing tasks. Assign the repositories to these users as described in the ADOGRC Administration Manual.
Verify that the Technical Users are assigned to the necessary system roles
In order to be able to schedule objects for workflow tasks and notify users about pending actions, the Technical Users need the necessary Workflow Roles to perform their tasks. For more information on these system roles, see the corresponding sections of the ADOGRC Administration Manual.
The Technical, GRC-Scheduler and GRC-Notification technical users need the Administrator system role of every active workflow to be able to execute actions on ADOGRC objects as well as the ADOGRC (CIP) Initiative Release Workflow.
For more information on how to assign system roles, see the relevant section of the ADOGRC Administration Manual. Alternatively, you can assign system roles to an individual user in the User Management.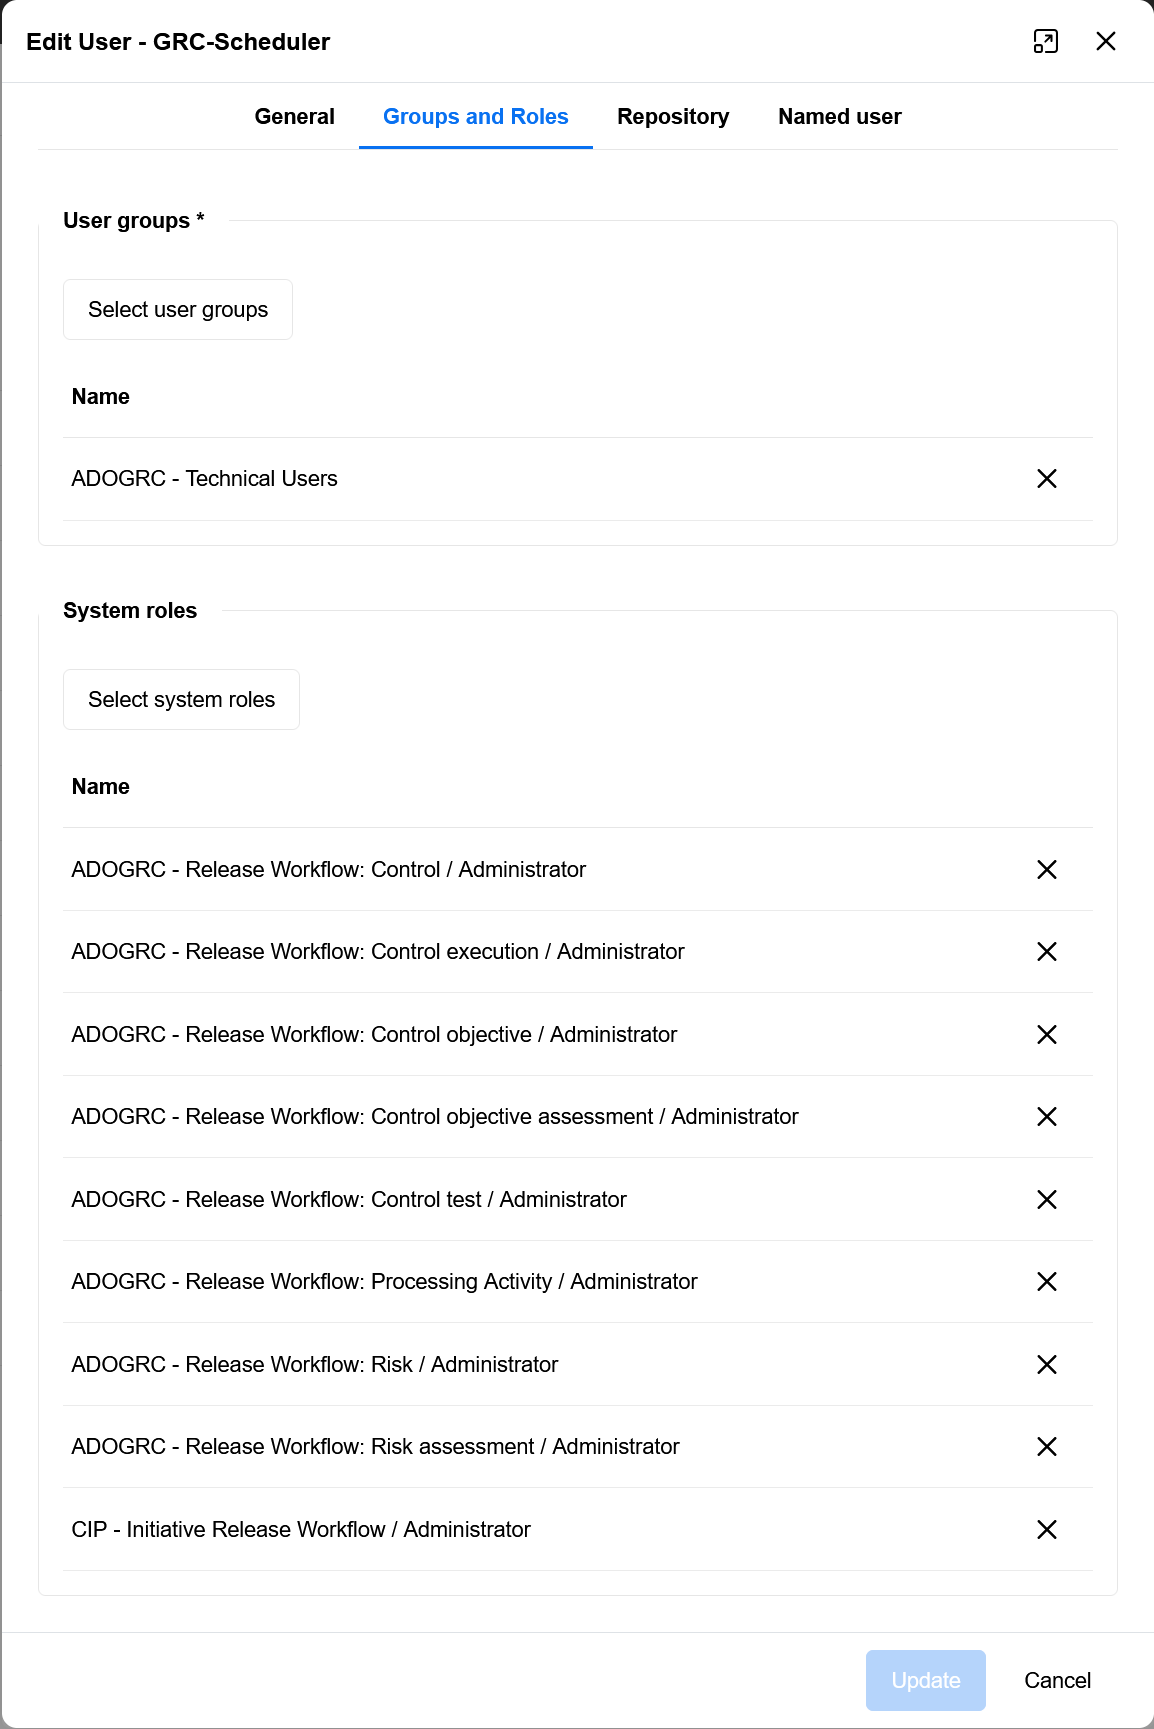


After changes to the configuration of the Technical Users and Roles, a restart is required.
Optional: Import ADOGRC Sample Data
ADOGRC provides Sample Data which can be imported into an existing database. The Sample Data package also includes the Technical Users and Roles described above so there is no need to import them separately.
Import the Sample Data from the package "\04 Sample Data\Migration Package\ADOGRC 13.0.0 - Sample Data Migration Package.axr". For information on how to import a migration package in the Repository Management in the ADONIS + ADOGRC Administration, please refer to the relevant section of the ADOGRC Administration Manual
Configuration of ADOGRC System Roles
ADOGRC allows for fine-grained configuration of roles which should match a user's role in the customer's organisation and processes. It is crucial to configure these roles properly so each user has the appropriate permissions to complete their tasks in the ADOGRC workflows. For more information on the system roles provided by ADOGRC, see the corresponding section of the ADOGRC Administration Manual.
ADOGRC Workflow Variants
Some ADOGRC workflows support multiple variants how the approval of the workflow is handled. These configurations can be implemented by BOC, please contact your BOC consultant for more information.
ADOGRC also supports implementation of various customizations according to the customer's needs. For such customer-specific customizations, it is necessary to set up a separate project with BOC Specialists delivering a solution to the customer's specifications. Please contact your BOC consultant for more information on these advanced topics.
Settings in the Web Client
The settings below are already pre-configured in the web client shipped with ADOGRC. If a customer with ADONIS at some point changed the file adoxx_web.properties in "/Tomcat Installation Folder/webapps/ADONIS version/adoxx_web.properties" and restored this file while setting up ADOGRC it is important the verify that the settings below are (re)applied.
ADOGRC Scheduler and Notification Users
To enable the ADOGRC scheduler and notifications, the file "adoxx_web.properties" has to be adapted so the GRC-Scheduler and GRC-Notification users are added to the list of job users

ADOGRC Notifications Maximum Mail Size
ADOGRC sends notifications to users with reminders for upcoming and current tasks and includes a link to each object so the user can directly open the relevant object in ADOGRC. If there are a lot of objects for which notifications are needed, it may be necessary to increase the maximum mail size in the mail settings section of the adoxx_web.propterties file.
The default max mail size is 50 kb and should be enough for emails containing up to 100 links. Per 100 additional object links, this limit should be increased by 50 kb (e.g. for 300 links a max size of 150 kb should be set).
Please note that setting the size too small prevents the mail from being sent, it will not be truncated.

Configuration of ADOGRC Features
Certain ADOGRC features, such as dashboards, can be configured to meet the requirements of the users and adapt to their preferences. For details on the configuration of these features, see the corresponding section of the ADOGRC Administration Manual.