Search & Analysis
With the search function of ADOIT, you can quickly locate specific models and objects. Extended search options and filters let you refine results for structured analysis and reporting.
Search in ADOIT is available in two modes: new search experience and classic search. Both let you locate content, save and share queries, and export results. They differ, however, in their specific features:
New search experience: New search experience is a modern search mode with an updated UI. It supports transitive searches with nested filters, so you can follow connections between artefacts (objects and models) step-by-step. It also includes personalisation options, such as recent searches.
Classic search: Classic search is the previous search mode for users who prefer the older interface. It allows filtering results by topic.
Start Your Search
You can start a search from the toolbar at the top of the screen:
- Click Find
 to open
the search pane.
to open
the search pane.
By default, the search opens in new search experience . If you prefer, you can switch to classic search at any time.
Switch Search Modes
To switch between new search experience and classic search:
- Click the New search experience button
 .
.
ADOIT remembers your preference and opens your last selected search mode the next time you start a search.
Using New Search Experience
Read on to learn more about new search experience, the default search mode in ADOIT. The following sections explain how to use the main functions.
Run a Basic Search
To run a simple search:
![]()
In the Search box, type the text you want to search for.
Press <Enter> or click Show results.
Optionally, you can:
Use quotation marks to search for an exact phrase.
Toggle Search in documents to include document contents in the search.
Search Results
The search shows:
All models (including saved analyses) and objects that contain the search term in Name, Description, First name or Last name.
All documents in the database with the search term in the file name or document text (if Search in documents is enabled).
Models and objects appear as rows in a table, with their properties shown in columns.
Depending on the Application Library and product configuration, other properties may also be used to find matches.
Show or Hide Columns
To change which columns are displayed:
- At the top right of the search results, click
 Select columns, and then
choose the columns you want.
Select columns, and then
choose the columns you want.
Restrict to Folders
To restrict the search to certain groups:
Click Restrict to folders.
In the dialogue that opens, select one or more groups in the Models or Objects areas.
Click OK. The search is now limited to these groups.
If you use filters, folder restrictions only apply to elements from the first level (selected via the Select element list). Elements found via criteria are not restricted and will be displayed regardless of the folder filter.
Use Filters
You can refine your search with filters:
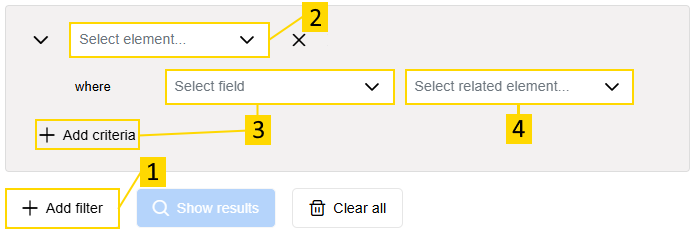
Click + Add filter to start building your filter.
From the Select element list, choose a model type or object type.
To dig deeper, click + Add criteria (available after selecting an element), then pick a property (attribute or relation) from the Select field list.
Depending on the property:
Attributes: Select an operator and usually a value.
Relations: Select the related element.
Click Show results to update the results.
You can add multiple criteria within one filter, and combine several filters. Use Clear all to remove all filters and start again.
The steps above outline the general procedure for applying filters. Check out the following sections for common use cases and examples of how to apply filters in specific scenarios.
Filter by Type
To show only models or objects of a specific type, click + Add filter, choose the type from the Select element list, and click Show results.
You can search without a term to return all elements of the selected type, or additionally enter a search string in the Search box to find a specific object or model.
Example: Filter by Type
To display a list of all Application Components in the repository:

- Click + Add filter and select the object type Application Component.
- Click Show results.
Filter by Attribute
After adding a filter for a model or object type, click + Add criteria. From the Select field list, choose an attribute, then select an operator and value (if required).
Example: Filter by Attribute
For the planning of your application architecture you want to know which Application Components will be decommissioned within the next five years. Proceed as follows:

Click + Add filter and select the object type Application Component.
Click + Add criteria, and choose Valid until from the Select field list.
To get those Application Components that will be decommissioned within the next five years, from the Select operator list, choose is before and a date five years in the future.
Click Show results.
All Application Components that will be replaced within the next few years are now displayed.
Filter by Relation
After adding a filter for a model or object type, click + Add criteria. From the Select field list, choose a relation, then select the related class.
Example: Filter by Relation
To display a list of all Application Components which are served by System Software:

- Click + Add filter and select the object type Application Component.
- Click + Add criteria, and choose Served by from the Select field list.
- From the Select related element list, choose System Software.
- Click Show results.
Add Nested Filter
After creating a relation-based filter, a new option + Add nested filter becomes available. This allows transitive searches. You can refine the results further by filtering the related class by one of its properties (attribute or relation).
Example: Add Nested Filter
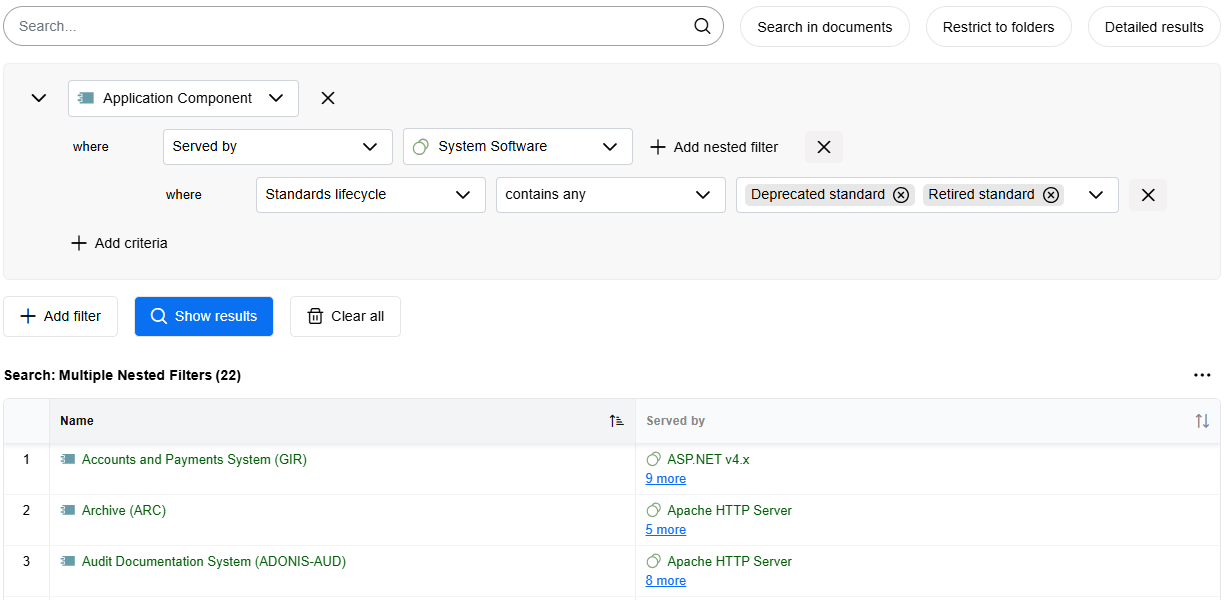
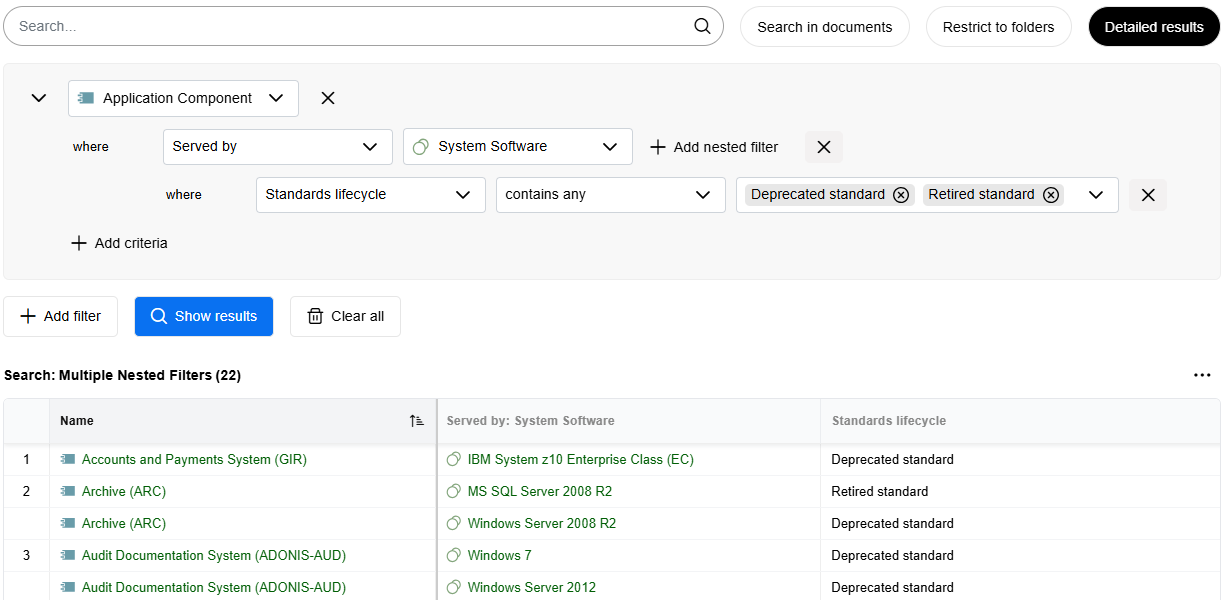
You are looking for all Application Components which are served by System Software which is approaching the end of its lifecycle or already retired. Proceed as follows:

- Click + Add filter and select the object type Application Component.
- Click + Add criteria, and choose Served by from the Select field list.
- From the Select related element list, choose System Software.
- Click + Add nested filter.
- To define the nested filter, choose Standards lifecycle as the field, set the operator to contains any, and select Deprecated standard and Retired standard as values.
- Click Show results.
Combine Filters
Filters, criteria, and nested filters can be combined to refine search results:
- Within a filter, you can select multiple criteria (+ Add criteria). Use the dropdown list
and
 to combine them
with and (logical AND) or or (logical OR).
to combine them
with and (logical AND) or or (logical OR).
Example: Select Multiple Criteria Within a Filter
You want to find all Application Components that are served by System Software and also realise Capabilities. Proceed as follows:
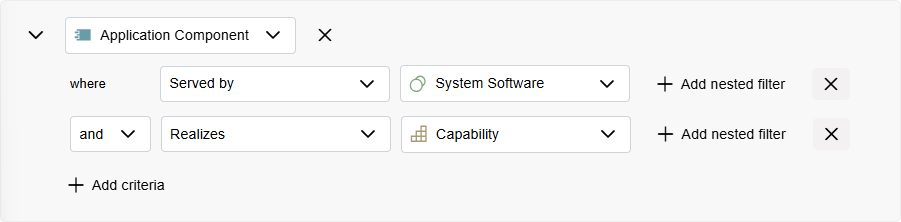
- Click + Add filter and select the object type Application Component.
- Add the first criterion: click + Add criteria, choose the relation Served by from the Select field list, and select System Software from the Select related element list.
- Add another criterion. Keep and selected, choose the relation
Realizes, and select Capability as the related element.
- Click Show results.
- For nested filters (+ Add nested filter), you can also select multiple nested filters for a single criterion and combine them using and (logical AND) or or (logical OR).
Example: Select Multiple Nested Filters for a Single Criterion
You want to find all Application Components that are served by System Software which is approaching the end of its lifecycle or already retired, based on two different properties. Proceed as follows:
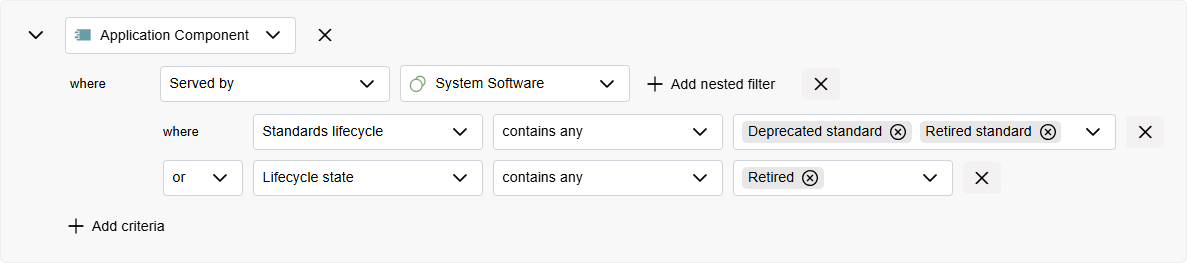
- Click + Add filter and select the object type Application Component.
- Click + Add criteria, choose the relation Served by from the Select field list, and select System Software from the Select related element list.
- Add the first nested filter: click + Add nested filter, select the attribute Standards lifecycle, set the operator to contains any, and select Deprecated standard and Retired standard as values.
- Add another nested filter. Select or to display elements that match
at least one of the nested filters. Choose the attribute Lifecycle state, set the operator to
contains any, and select Retired as the value.
- Click Show results.
- When combining multiple filters, the combination is always or (logical OR). This is automatically applied when you add a new filter (+ Add filter); no selection is possible.
Example: Combine Multiple Filters
You want to display a list of all Application Components and Application Interfaces in the repository. Proceed as follows:

Click + Add filter and select the object type Application Component.
Click + Add filter again and select the object type Application Interface.
Click Show results.
All elements matching either filter are now displayed.
Save Search
You can save searches for later use and to share them with other users:
After running a search, click Save.
Enter a name and, optionally, a description for your search.
Click Save. Your search is now available in your saved searches.
Additional Options
The following additional options are available:
- To create a copy of an already saved search, click the down arrow symbol
in the Save button and select
Save as from the drop-down menu.
Export Search Results
You can export the results of a search to an Excel file (XLSX format):
- After running a search, click Export.
The search results will be exported including all visible columns.
Detailed Results
When you extend your search by using a nested filter (see Use Filters), you can restructure the search results to focus on the related elements:
- Enable Detailed results, and then click Show results.
In the search results, a row appears for each element from the lowest level (unlike the standard search results, where a row appears for each element from the first level). The different levels are separated by bold vertical dividers. For each level, the searched properties are displayed in their own columns.
Detailed results let you display custom properties of lower-level elements in columns
(![]() More > Select columns),
which is not possible in standard search results.
More > Select columns),
which is not possible in standard search results.
This is best explained with an example:
Example: Detailed Results
Consider that you are looking for all Application Components which are served by System Software which is approaching the end of its lifecycle or already retired.
In the standard search results, each Application Component that matches the criteria is shown in its own row. An additional column Served by holds the related System Software elements.
When you enable Detailed results and click Show results, the focus shifts: each matching System Software element is displayed in its own row. In this row, the related Application Component is shown first, followed by a bold divider column, and then the System Software along with its Standards lifecycle property in a separate column.
Recent & Saved Searches
Below the search results, you'll find your recent and saved searches:
Use the
 Show list and
 Show tiles icons to switch
between list view and tile view.
Show tiles icons to switch
between list view and tile view.Each search displays key details:
Recent searches show the name and the time they were last run. Saved searches show the name and the time they were saved.
In
tile view, recent
searches also show the number of results.Saved searches display privacy status
 and favourite status
 . In
list view, they also show
the description and owner.
. In
list view, they also show
the description and owner.
Reuse Search
To reuse a search:
- Simply click it; the search criteria will be restored.
Delete Search
To delete a search:
- Click the More button
 , and
then click Delete.
, and
then click Delete.
Edit Saved Search
To change the name and description of a saved search:
- Click the More button , and
then click Edit.
Manage Favourites for Saved Searches
To add or remove saved searches as favourites:
- Click the More button , and
then select Add to favourites or Remove from favourites.
You can easily recognise favourites by the star icon
![]() .
.
Manage Access to Saved Searches
To make a saved search available to other users or stop sharing it:
- Click the More button , and
then select Change to public or Change to private.
Private saved searches show a lock icon
![]() .
.
Share Saved Search
You can generate a URL for a saved search. This way you can e.g. easily share it with your colleagues via email.
To generate a URL:
Click the More button
, and
then click Share.Now do one of the following:
Share the URL by email. In the Add people box, start typing the username or email address of a user, and then select the one you want when you see it. If the recipient is not a user or has no email address associated, you need to enter the full email address. Add additional recipients as needed. In the Include a message box, you can add a personal message if you want. When you are done, click Share and the message will be sent.
Paste the URL wherever you need it. Click Copy to directly copy the URL to the clipboard, or copy the URL manually from the Copy link box.
If the search is private, it will be made public (= become visible to all users) when you generate a URL for it.
Filter Saved Searches
To fine-tune which types of saved searches are displayed:
- Click All, and then select the option you want.
You can view all saved searches, only your favourites, only public or only private ones, or restrict the list to those created by you.
Find Saved Searches
To find a saved search:
- In the Search... box, type the text you want to search for.
All saved searches that contain the search string in their name are shown.
Using Classic Search
Read on to learn more about classic search, if you prefer the older interface. The following sections explain how to use the main functions.
Execute Search
To execute a search:
![]()
In the Search box, type the text you want to search for.
Press <Enter>.
Optionally you can also:
- Use quotes to search for an exact set of words.
Search Results
The search results consist of:
All models (including saved analyses) and objects containing the search term in their Name, Description, First name or Last name and:
All documents in the database which contain the search term (inside the document or in the file name).
The models and objects are presented as table rows in the search results, while the table columns hold their properties. Found search terms are highlighted in yellow in the search result.
Depending on the Application Library and product configuration, a different set of properties than Name, Description, First name and Last name may be considered to find matching objects or models.
Display Hits in Documents
In order to display hits in documents:
- In the search results, click the icon
 in the column Referenced
representation.
in the column Referenced
representation.
All hits in the document are listed in a separate dialogue along with their immediate context.
The object type for documents depends on the Application Library and product configuration. By default, imported files are Representations in the ArchiMate Application Library.
Select Columns
By default, only the properties Name and Description are displayed for the models and objects in the search result. For modelling objects and models, the model name is additonally displayed as a link. To select which columns are displayed:
The button
is activated in the
header of any column by mouseover. Click this button to open a drop-down menu.Select the menu entry Select Columns, and then do one or more of the following:
To display additional properties, select them in the list.
To display all properties, select the Select all check box.
To display the model name as a link in a separate column for modelling objects and models, select the Show model name check box. For repository objects, this column remains blank.
To display the folder path for repository objects and models, select the Show group path check box. For modelling objects, this column remains empty because they are not maintained in the Object Catalogue.
Click OK.
Column Order
The columns are arranged as follows:
On the left, the Type and the Name are displayed.
Next, the Model and Group path columns are displayed.
This is followed by the Description column.
Next, the Referenced representation column is displayed (only if objects containing this attribute are found).
Next, the First name and Last name columns are displayed (only if user objects are found).
If you select additional properties, they are displayed to the right.
If a property is contained in multiple model or object types, it is shown only once. For example, descriptions of different object types are all shown in the Description column.
Filter Results by Topic
In order to filter the search results so that only a topic-specific selection of model or object types is displayed:
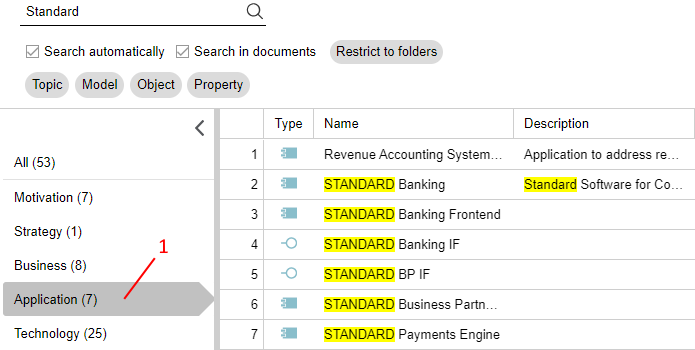
- Click the corresponding topic in the list to the left of the search results (1). The selected topic is highlighted.
In order to switch back to the overview of all topics:
- Click All.
Example
You are looking for an Application Component, but your search returns too many results of different architectural levels. Among others, Business Processes and Requirements are returned. Proceed as follows:
- Enter the search string into the input field and press <Enter>.
- Select the topic Application Layer Elements so that only relevant object types are displayed in the search result.
Available Topics
Motivation: Search for Requirements, Meanings, Assessments, Outcomes, Principles and Goals.
Strategy: Search for Capabilities, Resources, Value Streams and Course of Actions.
Business: Search for Business Processes, Products, Business Objects, Business Actors, Business Interactions, Representations, Contracts and Business Roles.
Application: Search for Application Collaborations, Application Components, Application Interfaces and Application Services.
Technology: Search for Artifacts, Devices, Nodes, System Software, Technology Collaborations and Technology Services.
Physical Elements: Search for Facilities, Distribution Networks, Equipments and Materials.
Implementation and Migration: Search for Gaps, Work Packages, Plateaus and Deliverables.
Composite: Search for Groupings and Locations.
From Search to Analysis
Use the extended search options and filters to narrow down your search results.
Refine Criteria
In order to refine your search:
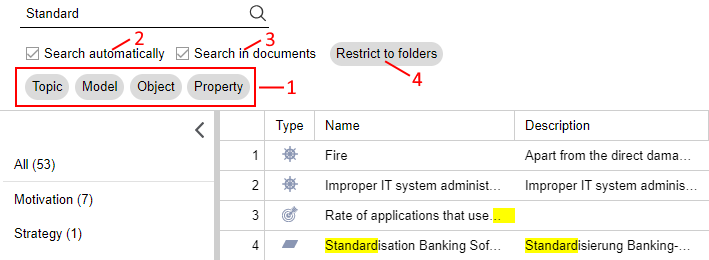
- Select a filter like Topic or Model to narrow down your search results (1).
Optionally you can also:
Remove a filter by clicking the "x" icon included in the respective button.
Add or remove rows of filters by clicking the "+" and "x" icons.
Toggle Search automatically (2). If this check box is selected, ADOIT automatically adjusts the search results whenever you edit a filter.
Toggle Search in documents (3). Deselect this check box so that the search results are limited to only models and objects.
Click the Restrict to folders button (4) to restrict the search to specific model groups and object groups:
In the Models and Object areas, select groups to search.
Click OK.
Example
You are looking for an Application Component, but your search returns too many results. Proceed as follows:
Enter the search string into the input field and press <Enter>. The search results are displayed.
Click the filter Object and select the object type Application Component from the drop-down list. Confirm with OK.
As a result, only Application Components are displayed now. The search term may be contained in their Name or Description.
Available Filters for Data Analysis
The following filters are available:
Topic
Use this drop-down list to only display a topic-specific selection of model and object types in the search results. Additionally, you can display all models or all objects. For details please refer to the section Filter Results by Topic.
Model
Use this drop-down list to only display certain model types in the search results.
Object
Use this drop-down list to only display certain object types in the search results.
Property
Use this drop-down list to only display properties which contain a specific property value in the search results. This process is broken into two steps:
First select a property from the drop-down list.
Then select, depending on the property, an operator and a specific property value.
When defining the filter Property, the following operators may be used:
Available Operators
Equals (
=): Returns a match if the search value corresponds exactly to the property value.Like (~): Returns a match if the search value is contained in the property value.
Not Equals (
≠): Returns a match if the search value does not exactly correspond to the property value.Greater (
>): Returns a match if the search value is greater than the property value.Greater or Equals (
≥): Returns a match if the search value is greater than or equal to the property value.Smaller (
<): Returns a match if the search value is smaller than the property value.Smaller or Equals (
≤): Returns a match if the search value is smaller than or equal to the property value.Colon (:): Returns a match if the search value is contained in a document. See Search in Documents only.
Analysis without Search Term
You can analyse the models and objects saved in the database without entering a search term. In order to do so:
Select any of the filters Topic, Model or Object to display all models/objects of a type.
Select the filter Property to display all properties of a type which contain a specific property value.
Example
To display a list of all Application Components in the database, proceed as follows:
- Do NOT enter a search term.
- Click the filter Object and select the object type Application Component from the drop-down list. Confirm with OK.
Search in Documents only
You can search so that the search results are limited to only hits in documents in the database. In order to do so:
Click the filter Object and select the object type Representation from the drop-down list. Confirm with OK.
Click the filter Property and select the check box Referenced representation . Confirm with OK. A dialogue window opens.
Select the operator :, and then enter the search term. Confirm with OK. All documents which contain the search term are now displayed.
The object type for documents depends on the Application Library and product configuration. By default, imported files are Representations in the ArchiMate Application Library.
Combine Filters
You can combine multiple filters to create complex queries.
Add Multiple Conditions to a Filter
When you specify a filter, you can select multiple conditions from the respective drop-down list. The search result contains all elements that match at least one condition (logical OR operator).
Example
To display a list of all Application Components and Application Interfaces in the database, proceed as follows:
- Do NOT enter a search term.
- Click the filter Object and select the object types Application Component and Application Interface from the drop-down list. Confirm with OK.
Combine Multiple Filters within a Row
You can combine multiple filters in a row to narrow down the search results. The search result contains only elements which meet all conditions set in this row (logical AND operator):
Choosing a topic determines which model/object types are available.
Choosing a model type determines which object types and model properties are available.
Choosing an object type determines which object properties are available.
Example
You want to know which Application Components manipulate the Business Object "Partner". Proceed as follows:
Click the filter Object and select the object type Application Component from the drop-down list. Confirm with OK.
Click the filter Property and select the check box Accesses in the chapter Relationships. Confirm with OK. A dialogue window opens.
Choose equals (icon =) and enter the search term "Partner". Confirm with OK.
As a result, only Application Components which manipulate the Business Object "Partner" are displayed now.
Combine Multiple Rows of Filters
You can combine multiple rows of filters. The search result contains all elements that match the conditions specified in any row (logical OR operator).
Example
For the planning of your application architecture you may want to know which Application Components and Application Interfaces will be replaced within the next few years. Proceed as follows:
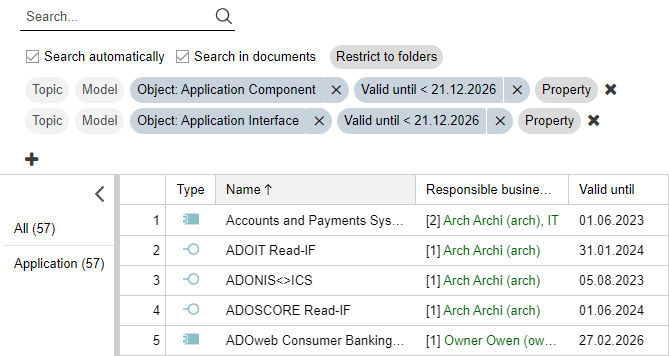
Click the filter Object and select the object type Application Component from the drop-down list. Confirm with OK.
Click the filter Property and select the check box Valid until in the chapter Lifecycle. Confirm with OK. A dialogue window opens.
To get those Application Components that will be replaced within the next five years, choose smaller (icon <) and a date five years in the future. Confirm with OK.
Add a row of filters by clicking the "+" icon.
Now repeat the above steps for the object type Application Interface.
All Application Components and all Application Interfaces that will be replaced within the next few years are now displayed.
Clear Search Results
In order to clear the search results:
- Click the Clear search button
 .
.
Save Search Query
You can save a search query to run it again later and share it with other users:
Click the Save button
 .
.Type a name and description for the new query.
Click Save.
Alternatively, you can create a copy of an already saved search query:
- Click the Save as button
 .
.
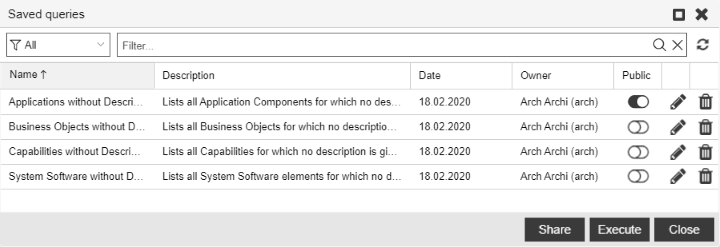
Manage Saved Queries
You can do administrative tasks for saved queries, such as modify, delete, publish, or run a saved query. To manage your saved queries:
- Click the My Searches button
 .
.
A support dialogue opens. The following options are available:
Run Saved Query
To run a saved query:
- Select the query you want, and then click Execute.
Make Saved Query Available to Other Users
To make a saved query available to other users:
- Click the Publish button
 .
.
Stop Sharing a Saved Query
To stop sharing a saved query:
- Click the Unpublish button
 .
.
Normally, users can only stop sharing their own queries. Your ADOIT administrator may also designate power users that can unpublish queries from other users. The administrator must grant the "Saved queries (advanced options)" module in order to accomplish this.
Generate URL for Search Query
You can generate a URL for a search query. This way you can e.g. easily share it with your colleagues via email.
To generate a URL:
Select the search query, and then click the Share button.
Now do one of the following:
Share the URL by email. In the Add people box, start typing the username or email address of a user, and then select the one you want when you see it. If the recipient is not a user or has no email address associated, you need to enter the full email address. Add additional recipients as needed. In the Include a message box, you can add a personal message if you want. When you are done, click Share and the message will be sent.
Paste the URL wherever you need it. Click Copy to directly copy the URL to the clipboard, or copy the URL manually from the Copy link box.
If the search query is private, it will be published (= become visible to all users) when you generate a URL for it.
Edit Saved Query
To change the name and description of a saved query:
- Click the Edit button
 .
.
Delete Saved Query
To delete a saved query:
- Click the Delete button
 .
.
Filter Saved Queries by Type
To fine-tune which types of saved queries are displayed:
Click the button
 , and then
select the option you want:
, and then
select the option you want:My lists all saved queries that you have created.
Public lists all search queries that you or other users have published.
All lists all saved queries.
Search
To find saved queries:
In the Filter... box, type the text you want to search for.
Press <Enter> or click the icon
 .
.
All saved queries that contain the search string in their name or description are displayed.
To clear the search filter:
- Click the icon
 .
.
Assign Saved Query to My User
From time to time it may become necessary to assign a published saved query to a new user (user leaves organisation, but the saved search query needs to be edited or deleted, etc.).
To assign the saved query to your user:
Select the query you want, and then click Assign to me.
When you're prompted to assign the query to your user, click Yes.
Your ADOIT administrator must designate you as a power user so that you can assign yourself published saved queries from other users. The administrator must grant the "Saved queries (advanced options)" module in order to accomplish this.
Export Search and Analysis Results
In order to export the search results as an Excel file (XLSX format):
Click the Export button
 , and
then select the desired export configuration:
, and
then select the desired export configuration:Excel (grouped): A separate Excel sheet is created for each topic. Table attributes are shown only to a limited extent: Brackets indicate how many rows the attribute contains.
Excel (grouped with table attributes): A separate Excel sheet is created for each topic. All columns and rows of table attributes are displayed.
Excel (current view): The appearance of the Excel spreadsheet corresponds to the display in ADOIT. Table attributes are shown only to a limited extent: Brackets indicate how many rows the attribute contains.
Excel (current view with table attributes): The appearance of the Excel spreadsheet corresponds to the display in ADOIT. All columns and rows of table attributes are displayed.