Welcome to ADONIS!
This Quick Start Guide helps you get started as an administrator in a productive ADONIS environment. It focuses on the first setup decisions that matter most in production and points you to the relevant Online Help pages when you need detailed step-by-step instructions.
You don’t need to follow the steps in the exact order described here. Simply review them, then prioritise the setup decisions that matter most for your productive environment.
Before You Start
As an administrator, you prepare the productive ADONIS setup that other users rely on. Before you start configuring the environment, identify these basic setup decisions:
- Which authentication connector productive users will log in with
- Which user groups should exist for your main kinds of users
- Which system roles those users will need
- Whether users should work in one shared repository or in multiple repositories
- Whether your environment uses the release workflow or not
ADONIS Administration includes the central components for these tasks, including Users, Rights, System Roles, Repositories, Authentication, and Tools.
You do not need prior experience with a test account to use this guide. If you are new to the role, this guide gives you a simple starting point and points you to the relevant documentation for more detail.
A valuable tip
Start with visible setup decisions, not abstract planning. In practice, that means: identify the productive login connector, create the first reusable user groups, assign the first system roles, and decide whether users should work in one repository or several.
Open and Login Into the ADONIS Administration
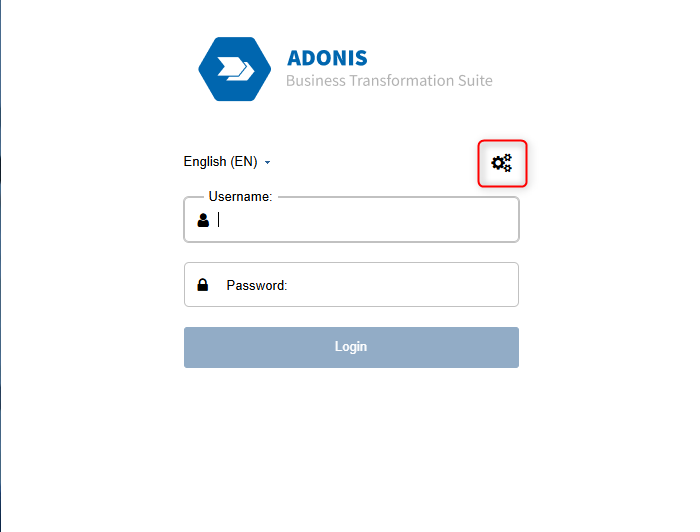
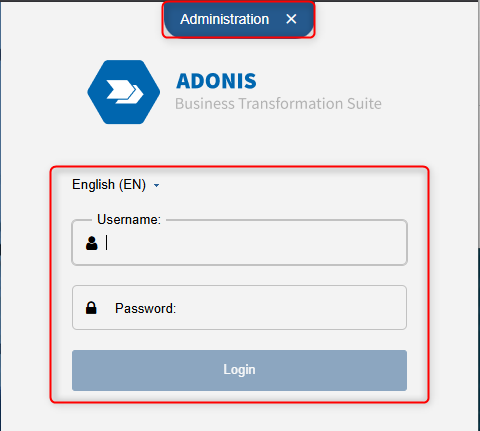
- Open the ADONIS URL your users use to log in.
- Click Administration in the UI, or append
/admin.viewto the URL. - Log in with an account that has access to the Administration Toolkit component.
If nobody can open the Administration
To open ADONIS Administration, a user needs access to the Administration Toolkit component. ADONIS also creates a super admin account during installation. If a normal admin account cannot open Administration, first check internally whether a super admin account is available and whether the required Administration Toolkit access has been assigned correctly.
Orientation
Explore the Administration Area
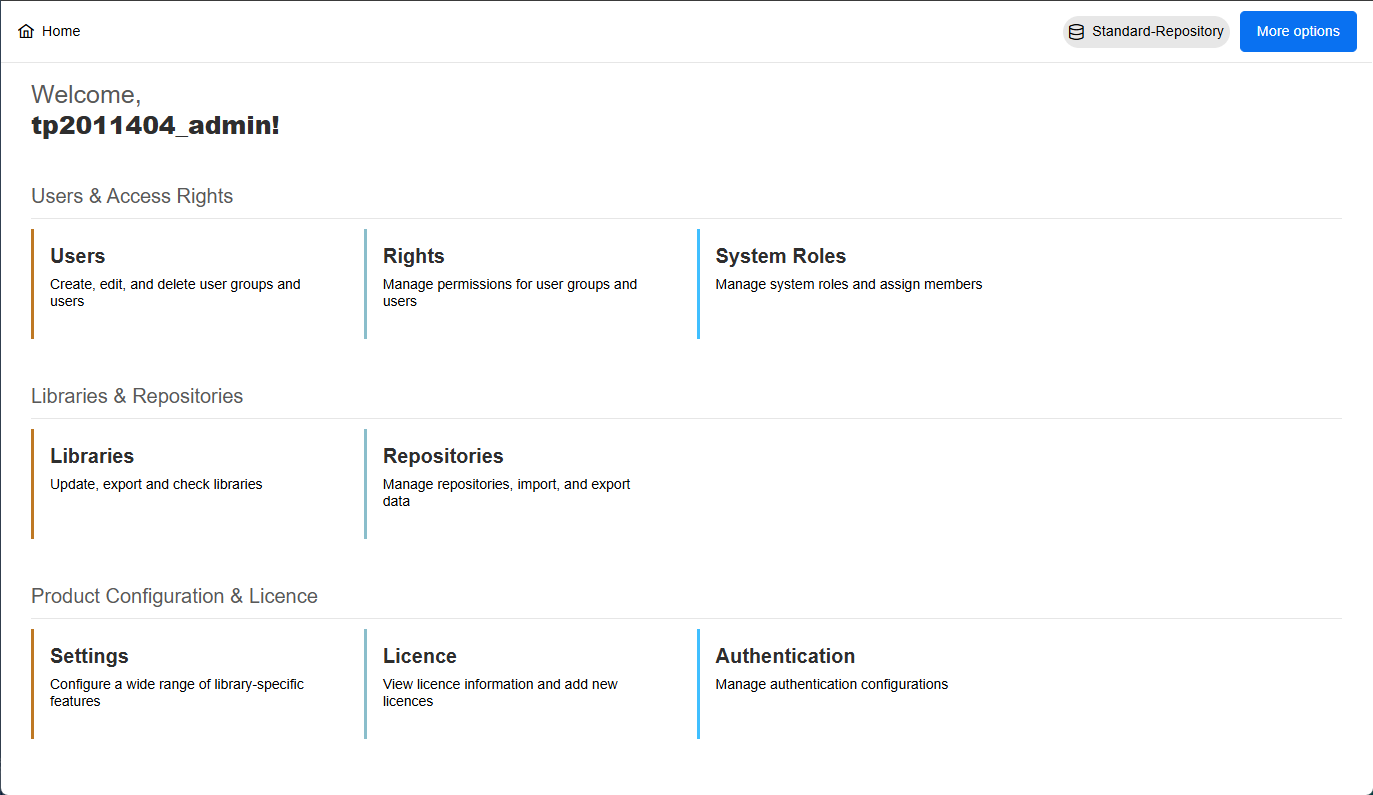
This is your administration workbench. After login, you start on Home. ADONIS groups the administration area into Users & Access Rights, Libraries & Repositories, and Product Configuration & Licence.
The most relevant components for most productive admins are:
- Users for managing users and user groups
- Rights for managing content permissions
- System Roles for managing functional access and metamodel rights
- Repositories for managing working areas in the database
- Authentication for configuring login mechanisms
- Tools for additional administration settings, accessible via More options
Helpful videos to get started
To make it easier for you to get started and test, we have selected a video from our tutorial series with useful first steps:
For more details, see Take a Look Around and Administration Help.
Expected result
You know where the most important administration tasks are located before you start changing productive setup.
Understand Authentication and Access Flow
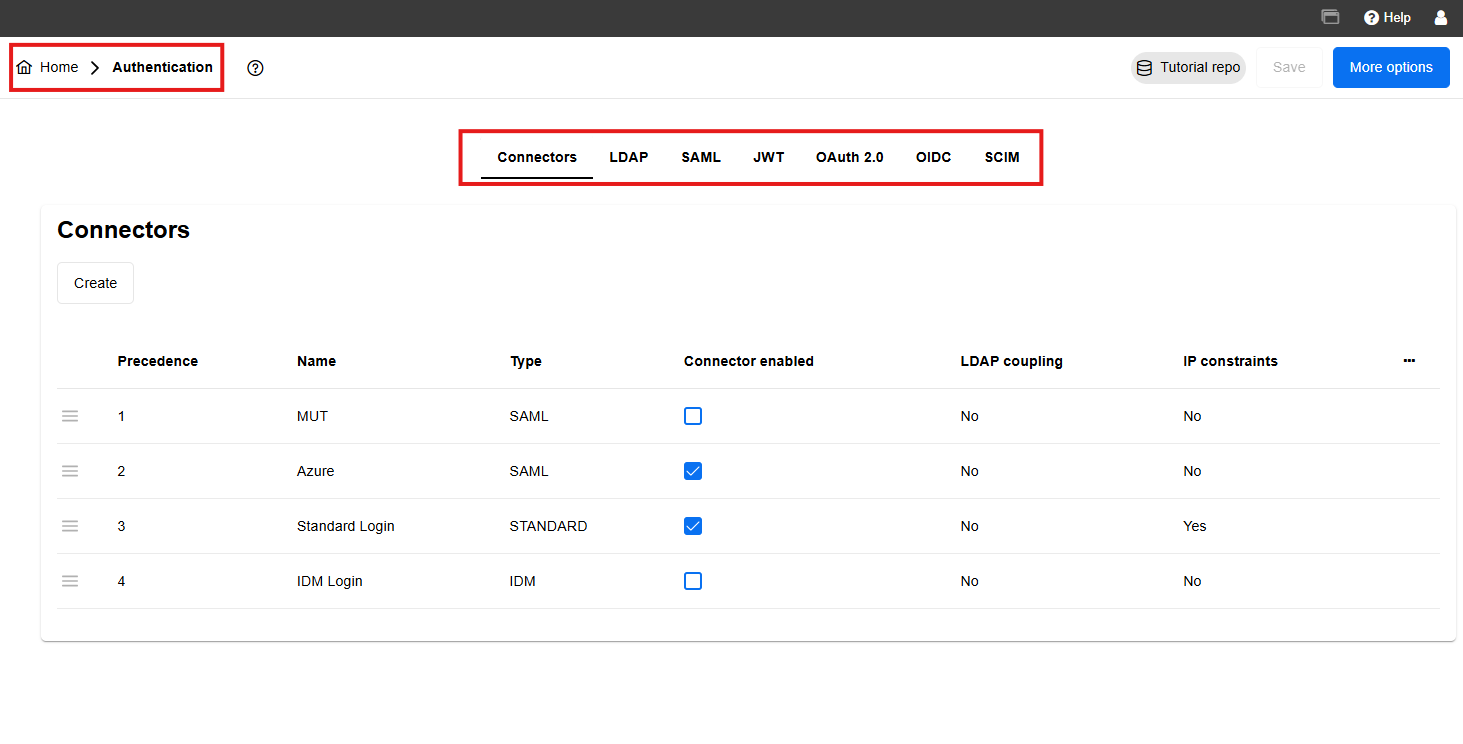
Before you prepare users, rights, or repositories, first identify which authentication connector productive users will use to log in. In ADONIS, authentication is configured on Authentication > Connectors. Connectors can be used individually or in combination.
Each connector has a Type, Precedence, and connector-specific configuration such as Properties, Constraints, LDAP Coupling, and User Mapping. Connector types include STANDARD, IDM, SAML, and OIDC. User Mapping can assign user groups, system roles, and repositories based on external user properties.
Fast Path to Understand Functionalities
- Open Authentication > Connectors.
- Check which connectors are enabled.
- For the connector productive users are expected to use, note:
- The Type
- The Precedence
- Whether User Mapping is configured
- If User Mapping is configured, check whether it assigns:
- User groups
- System roles
- Repositories
- Write down one sentence that explains the login path, for example:
- “Users authenticate via SAML and are mapped to ADONIS groups and roles through User Mapping.”
- “Users authenticate via STANDARD and are managed directly in ADONIS.”
Expected result
You can explain which connector users log in with and whether productive access after login is assigned directly in ADONIS or via mapping from an external identity source.
Our recommendation
Do not treat authentication and authorization as the same thing. Authentication explains how users get into ADONIS. Rights and system roles determine what they can access afterwards.
For more details, see Authentication in the Online Help. If your environment uses SAML, continue with the SAML Guide.
Follow the Documentation (Recommended)
Use the Administration Help as your central reference for the detailed behaviour of Users, Rights, System Roles, Repositories, Settings, and Authentication.
Prepare Users and User Groups
Once you understand how users enter the environment, prepare the user structure that will later receive rights, system roles, and repository access.
In this guide, main kinds of users means the main kinds of people who will work in the environment, for example:
- Users who only read content
- Users who model and edit content
- Users who review content
- Users who administer the environment
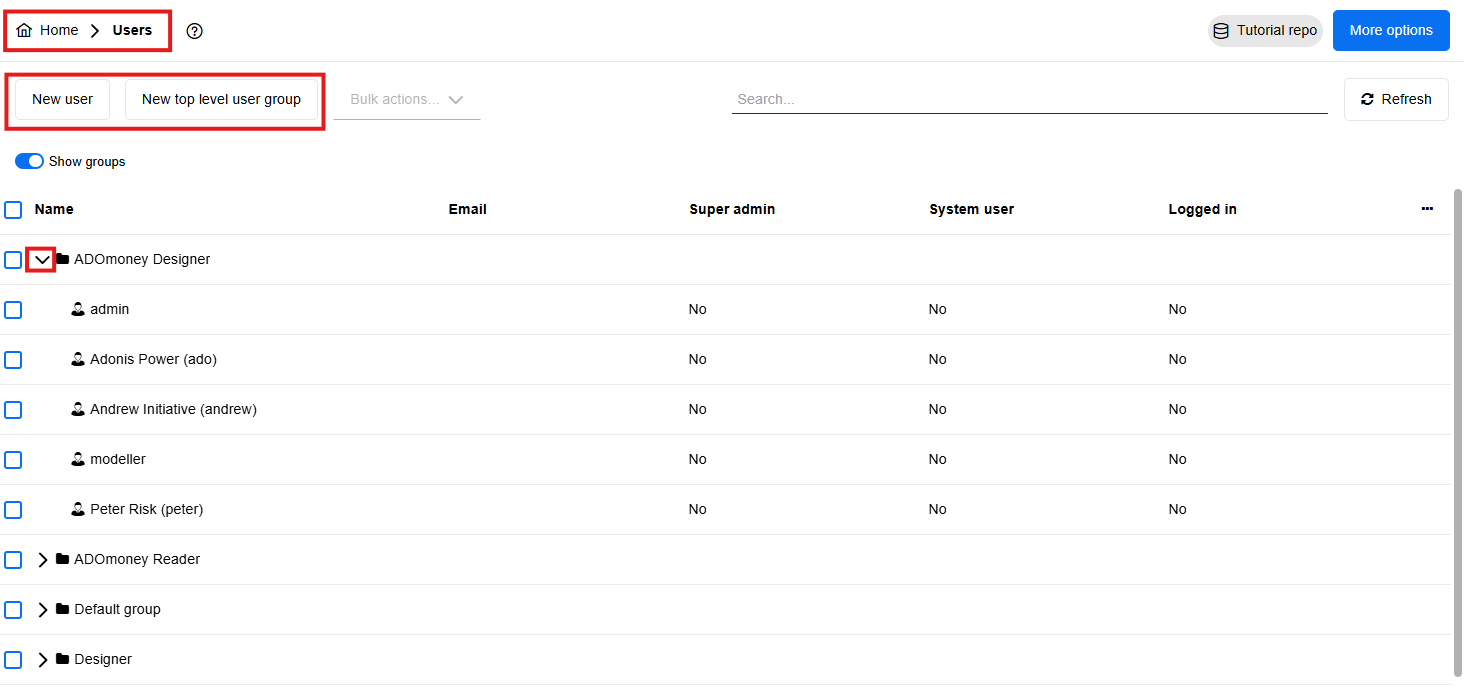
In ADONIS, the Users page is where administrators create, edit, and delete users. When creating a user, ADONIS requires you to assign at least one user group and at least one repository as the user’s working place. You can also assign system roles. A user can belong to more than one user group and can have access rights to more than one repository.
Fast Path to Understand Functionalities
- Open Users.
- Create or review the user groups that represent your main user types, for example:
- Administrators
- Modellers
- Reviewers
- Readers
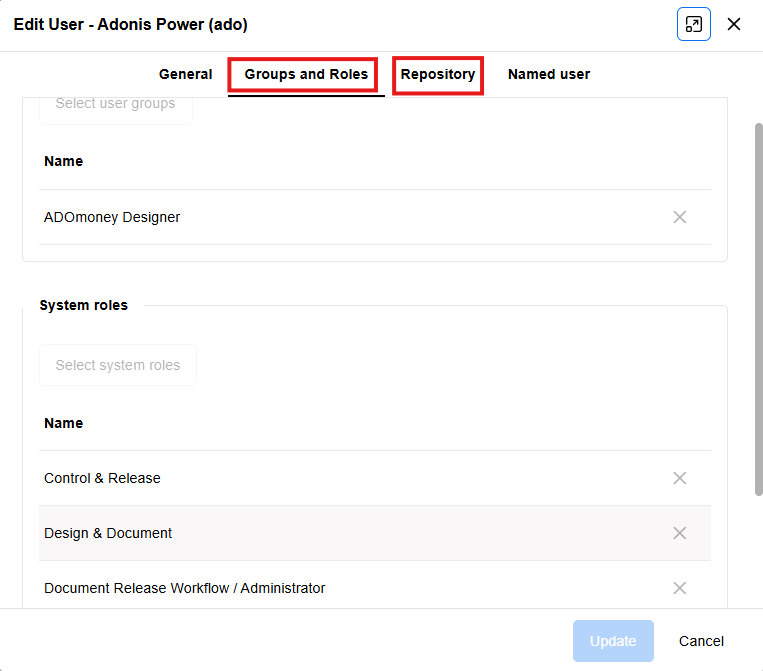
- Open one sample user in each group and check:
- Which user groups are assigned
- Which system roles are assigned
- Which repositories are assigned
- If one user needs additional access, first check whether an existing user group can be used before assigning a special setup directly to that person.
- Write down one sentence for each user group explaining what kind of users belong there.
Expected result
For each sample user, you can show the assigned user groups, system roles, and repositories that define the user’s productive access.
A reusable group structure means a small number of role-based user groups that can be assigned to many users, for example Readers or Modellers. An individual setup for one person means assigning extra access directly for one user instead of solving it through those reusable groups. In this chapter, users and user groups define who exists. The next step is to define what they can access and which functions they can use.
For more details, see Users in the Online Help.
Build a Reliable Access Model with Rights and System Roles
In ADONIS, content access and functional access are configured separately.
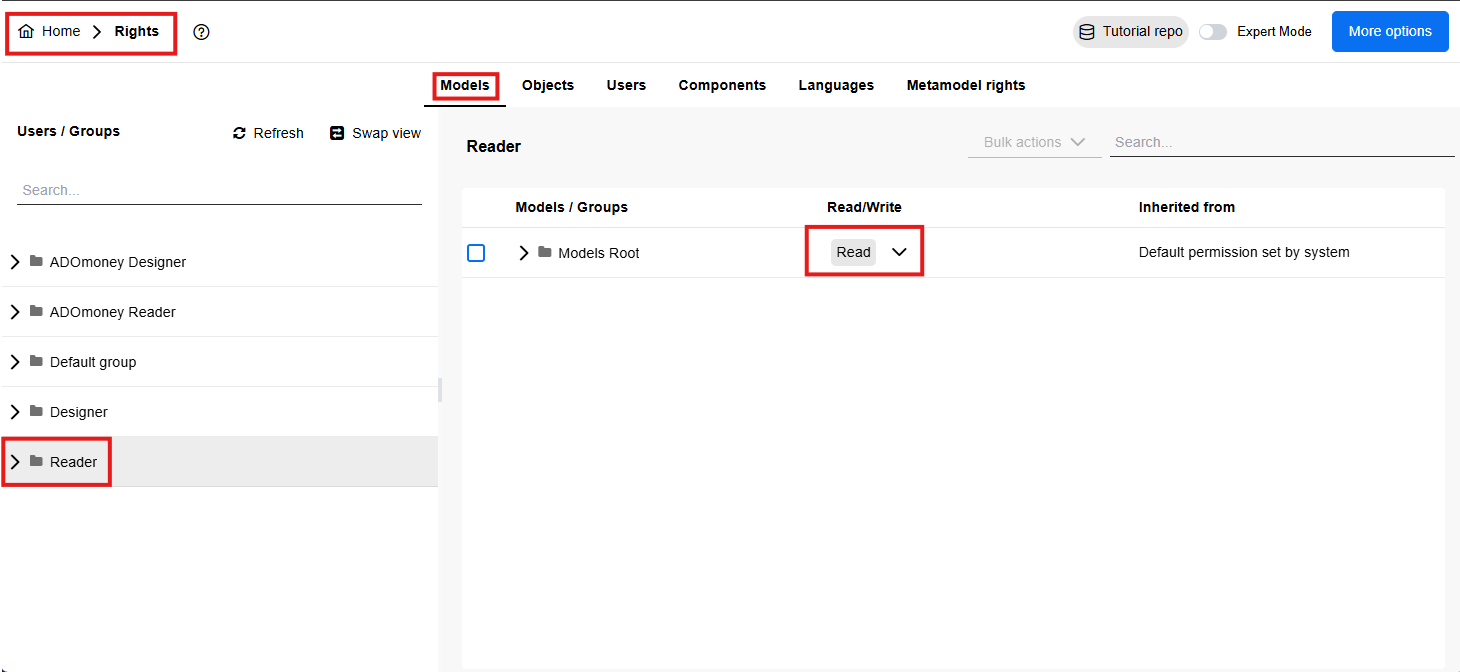
- On the Rights page, you manage permissions for content such as Models, Objects, Languages, Users, and also access to Components.
- On the System Roles page, you manage functional access such as Modules, Metamodel, Release Workflows, Reporting Board, and Validation.
System roles serve two functions: they grant access to ADONIS features and they assign metamodel rights.
A productive access model should not only give people access. It should also limit access to what is needed for their role and separate responsibilities where control matters. In practice, this means it is better to separate readers, modellers, reviewers, and administrators clearly than to give broad access to everyone.
Fast Path to Understand Functionalities
- Open Rights and select the group Readers.
- On the Models tab, check whether the group has the intended permission status.
- Repeat the same check on the Objects, Users, Languages, and Components tabs.
- Repeat steps 1–3 for Modellers, Reviewers, and Administrators.
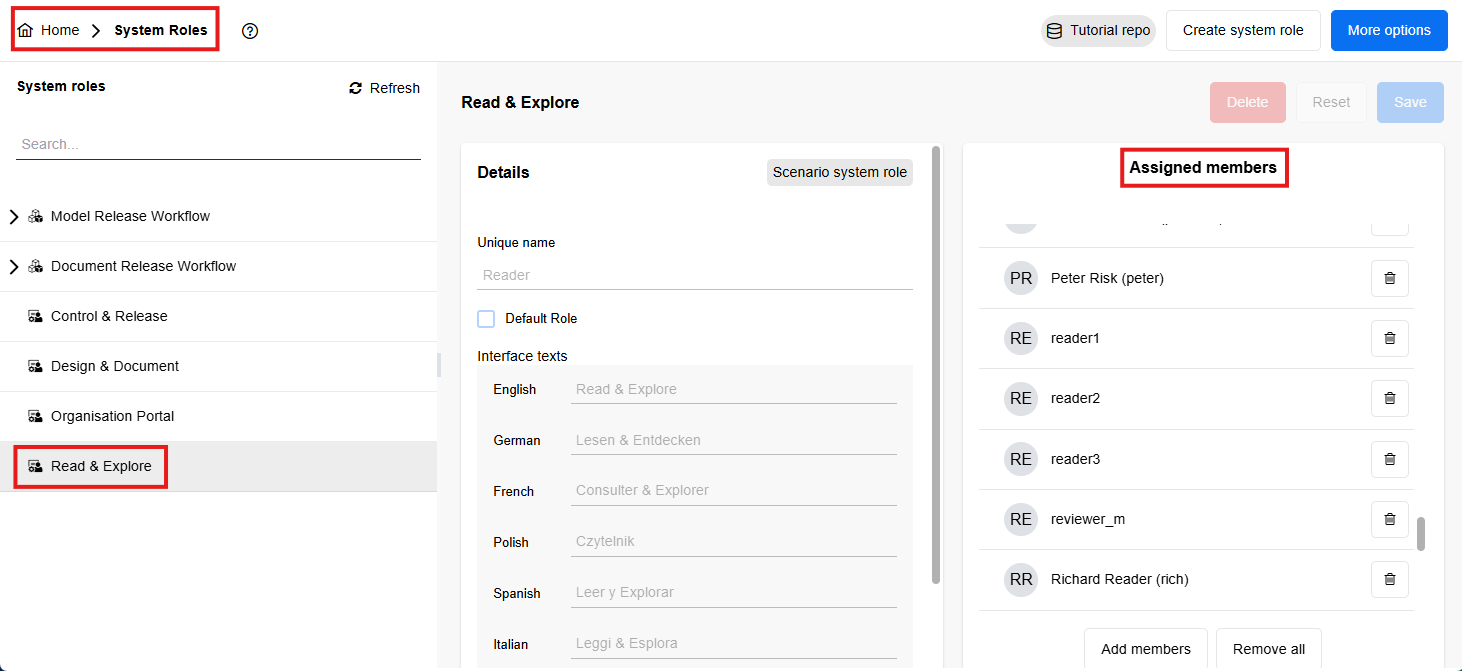
- Open System Roles and list which roles are assigned to each of these groups.
- If your environment uses the default application scenarios, verify:
- Readers have access to Read & Explore
- Modellers have access to Design & Document
- Users who review or release content have access to Control & Release
- Test one user account from each group before rollout.
Expected result
You have checked both layers of access using visible ADONIS objects:
- Content permissions on the Rights page
- Scenario and workflow access via System Roles
Our recommendation
Use groups as the default design principle and keep one-person exceptions to a minimum.
If Your Organisation Uses Release Workflows
Use this subsection only if your environment uses the model release workflow for process models. You can ignore Document Release Workflow unless your organisation also governs documents through ADONIS.
Treat Control & Release separately: it is the scenario users need in order to review and release with a single click. It is not the same thing as the workflow role itself.
Fast Path for release workflow setup
- Open Licence and check whether your environment uses a licence that includes the required components for your release setup.
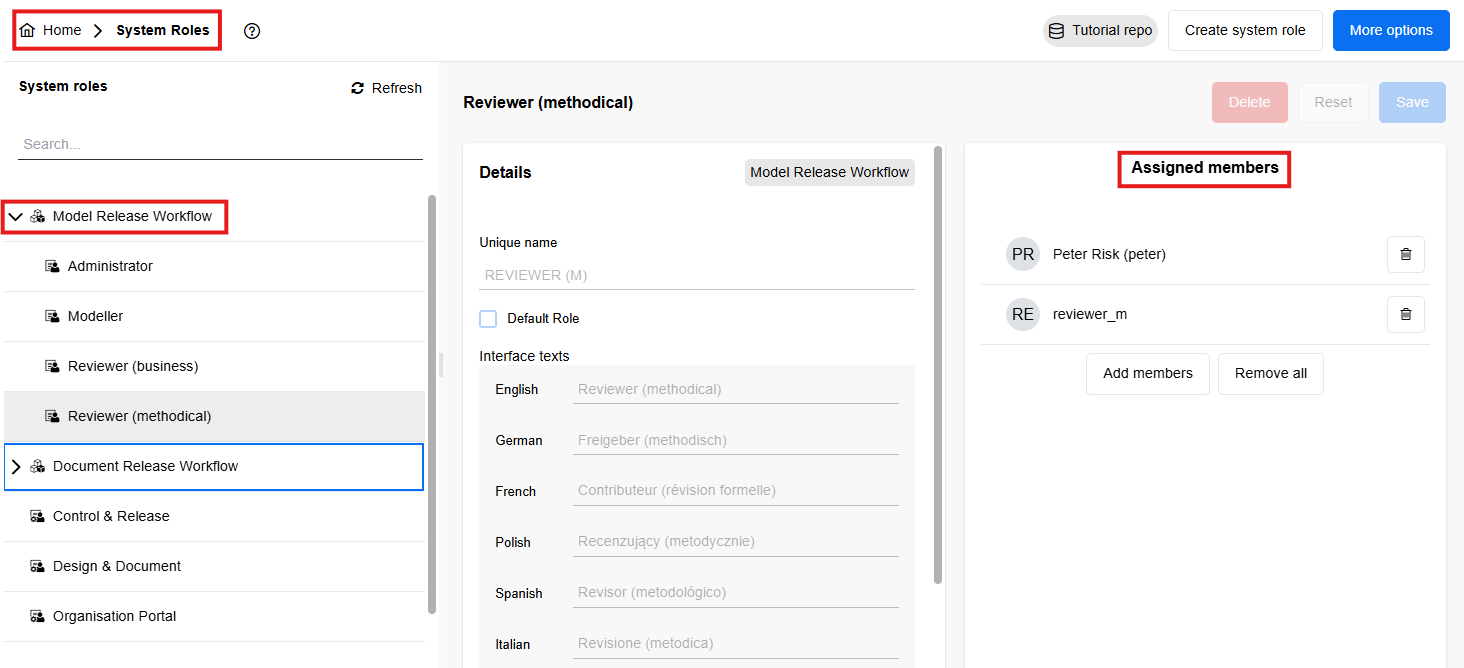
- Open System Roles.
- Decide which of these are relevant for your environment:
- Model Release Workflow for process-model release
- Document Release Workflow for document release
- Control & Release for the user scenario that reviewers and releasers will work in
- For each relevant role, check which user groups or individual users are assigned as members.
- Write down one simple mapping, for example:
- “Modellers — Model Release Workflow + Design & Document”
- “Reviewers — Model Release Workflow + Control & Release”
- “Admins — Model Release Workflow + Control & Release”
- If your organisation does not use document release, do not assign Document Release Workflow just because it appears in the list.
Expected result
You can explain which release-related system roles and scenarios are relevant in your environment and which users or user groups are assigned to them.
For more details, see Rights, System Roles, and, if relevant, Release Workflows in the Online Help.
Prepare Repositories for Productive Work
In ADONIS, a repository is the working place in the database where users create, store, and maintain related models and objects. A library may contain one or more independent repositories, and each user must be assigned to at least one repository.
A process repository is not only a storage location. It shapes whether users work in one shared knowledge space or in intentionally separated working areas.
Best-practice guidance
Use one shared repository when users should work in the same BPM environment and reuse the same models and objects.
Use multiple repositories when you intentionally want separate working places, for example because:
- Different business areas should not create and maintain content in the same repository
- The same users do not need to see or maintain all content
- Governance responsibility is intentionally split
- You want a repository specifically for testing or learning
Fast Path to Understand Functionalities
- Open Repositories.
- Count how many repositories already exist.
- For each repository, write one sentence that answers:
- Who works here
- What kind of content belongs here
- Why this repository exists separately
- If a repository exists separately, check whether that separation is intentional, for example because of different ownership, stricter access separation, or staged rollout.
- Verify that the users and user groups who should work there are actually assigned to that repository.

Expected result
You can explain the purpose of each repository and who is supposed to work there.
Our recommendation
Do not create multiple repositories only because multiple teams exist. Multiple repositories help when you need meaningful separation. If the separation is weak, they can make governance and reuse harder instead of easier.
For more details, see Repositories in the Online Help.
Essentials Accomplished!

At this point you can:
- Identify how productive users enter ADONIS
- Open a user and check user group, system role, and repository assignment
- Separate content permissions from functional access
- Verify whether release workflow access is relevant in your environment
- Explain why your environment uses one repository or multiple repositories
Our Recommendation
If you are new to the admin role, do not try to understand every configuration area at once. Start with users, rights, system roles, and repositories first. These are usually the most relevant foundations for productive administration.
Follow the Documentation (Recommended)
Use the Administration Help whenever you need step-by-step support for a specific admin activity.
Capability-Building
Make Administrative Changes Traceable with the Audit Log
Use the audit log when you want administrative changes to be visible afterwards. ADONIS allows you to enable the administration audit log, record the author of changes, and export the entries as CSV. If Log author is enabled, actions can be traced to the administrator who performed them.
Logging is not only useful when something goes wrong. It also helps organisations document important administrative actions, investigate problems later, and maintain control over changes to accounts and privileges. That is why enabling the audit log early adds value even in the first setup phase, not only after the environment is already live.
Fast Path to Understand Functionalities
- Go to Home > More options > System Preferences.
- Open the Audit Log tab.
- Enable Logging enabled.
- Enable Log author if you want each logged change to show which administrator performed it.
- Save the settings.
- When you want to review changes, go to Users > More options > Export audit log and export the entries for the required time range.

Expected result
You can later export a CSV file that shows which administrative changes were made during a defined time range and, if author logging is enabled, which administrator performed them.
Our recommendation
Enable the audit log early. That way, your initial productive setup work is captured from the start rather than only later.
For more details, see Audit Log and Export Audit Log in the Online Help.
Preserve a Stable Baseline (Optional but Recommended)
Use this section only after the first productive setup is stable. In this guide, a stable baseline means a setup state where:
- The intended authentication method is known
- The productive user groups exist
- The first system roles are assigned
- The intended repository structure is decided
ADONIS provides concrete export actions for this:
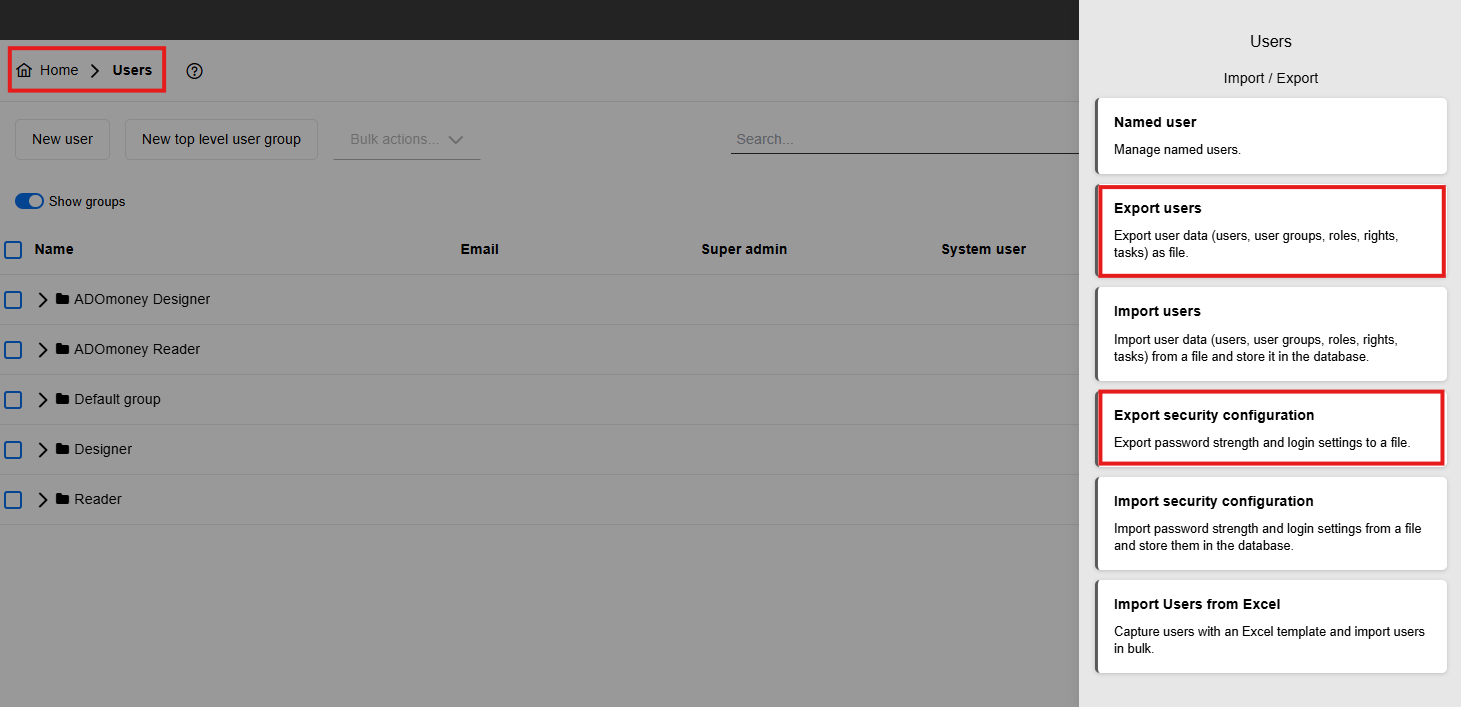
- Export security configuration
- Export users
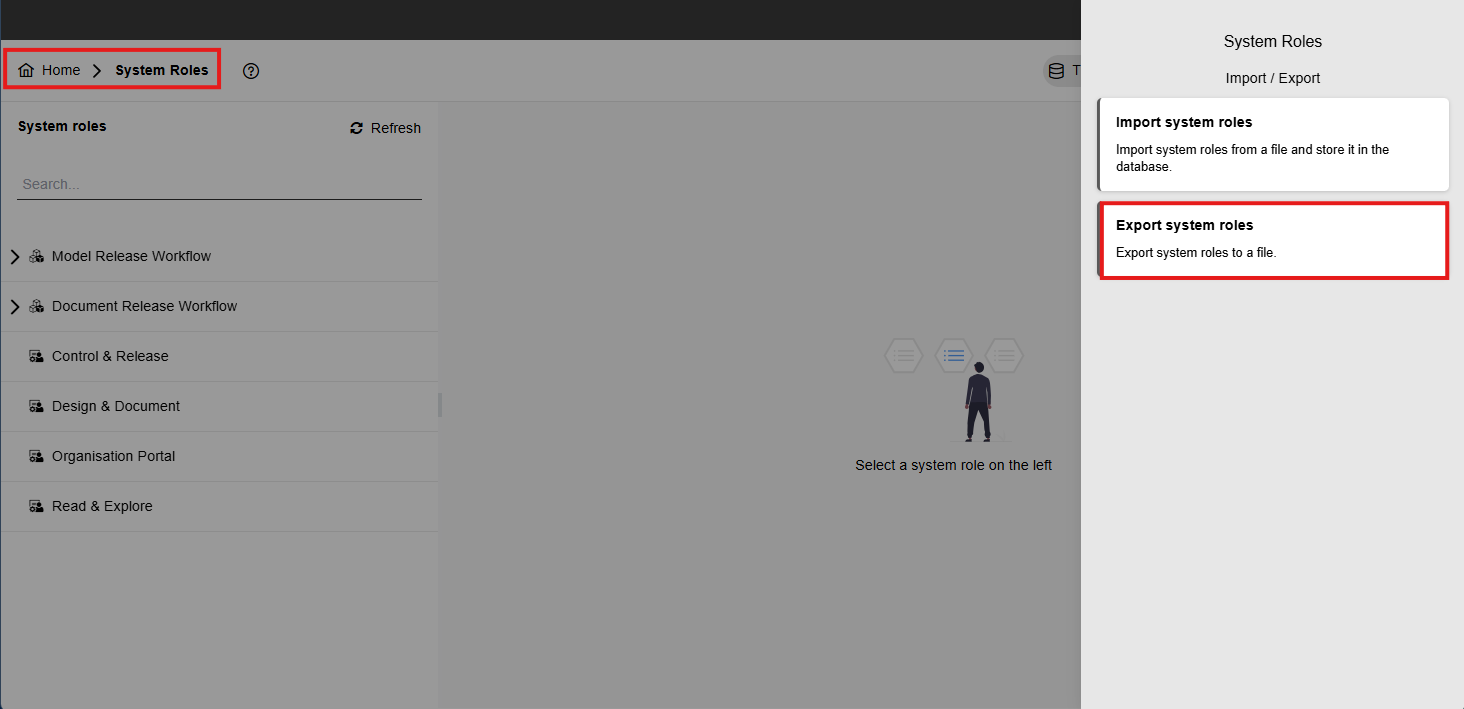
- Export system roles
Fast Path to Understand Functionalities
- Go to Users > More options > Export security configuration after password and login settings are final.
- Go to Users > More options > Export users after the first productive user structure is in place.
- Go to System Roles > More options > Export system roles after the productive role model is stable.
- Store these exports together and label them with the setup state they represent, for example:
- “Productive baseline after initial admin setup”
- “Productive baseline before rollout wave 2”
Expected result
You have one concrete export package that represents the stable state of security configuration, users, and system roles.
Our recommendation
Create this baseline after a stable milestone, not while you are still changing core setup frequently.
For more details, see Export Security Configuration, Export Users, and Export System Roles in the Online Help.
Continue Learning with Self-Service Resources
Congratulations, you made it to the end of this ADONIS Quick Start Guide for productive administrators. You have completed the first steps to start working in a structured way in your productive ADONIS environment.
To keep building confidence and solve questions independently, use the following self-service resources:
When you Need Practical Product Help
Use the BOC Support Center and the ADONIS Online Help when you need step-by-step guidance for concrete tasks such as user management, permissions, repositories, settings, authentication, or troubleshooting.
When you Want to Learn Visually
Use the ADONIS tutorial videos if you prefer to see workflows in action rather than read through longer documentation.
When you Want to Understand the Administration Area Better
Use the Administration Help pages as your main reference for all detailed administrative capabilities and configuration options.
Suggested Self-Service Learning Path
A practical next-step sequence is:
- Use this Quick Start Guide for your first productive admin tasks.
- Use the ADONIS Administration Help whenever you get blocked in a specific activity.
- Use the BOC Support Center when you need additional product help or FAQs.
- Use the tutorial videos when you want to see the workflow visually.
- Deepen your understanding of your productive setup step by step as new admin tasks come up.
Need More Help?
If you still have questions after using the self-service resources above, contact your internal ADONIS administrator, IT department, or your BOC contact person.