Translation
The following sections provide an overview of functions for translating models, objects and groups.
Start Translation
Depending on what needs to be translated, the translation process is started in different ways.
Translate Models and Objects
You can translate specific models and objects, or you can translate entire groups and all the models and objects in them. In order to do so:
Select the items you want to translate.
Now do one of the following:
To translate specific models and objects, right-click the selection, point to More, and then click Translate
 .
.To translate entire groups, right-click the selection, point to More, point to Translate, and then click Translate models or Translate objects
 .
.
The translation editor opens.
Translate Names of Groups
In order to translate the names of groups:
In the Explorer, select the model groups or object groups you want to translate.
Right-click the selection, point to More, point to Translate, and then click Translate groups
 .
.
The translation editor opens.
Structure of the Translation Editor
The translation editor is a specialised tabular editor, designed for translating models, objects and groups quickly and efficiently or for updating existing translations.
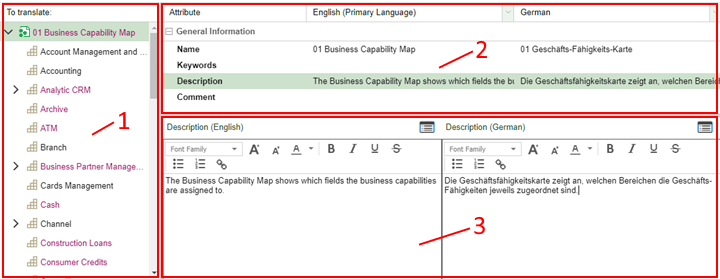
The translation editor is structured as follows:
Item Selection Widget (1)
The elements selected for translation are displayed as a hierarchical tree structure.
Model Translation
Models including their objects and relations are displayed.
Object Translation
Objects including their relations are displayed.
Group Translation
Groups are displayed.
Only outgoing relations (icon
![]() ) that
have Notebooks are displayed in the translation editor.
) that
have Notebooks are displayed in the translation editor.
Elements that contain attributes which have to be translated are highlighted. This facilitates recognising necessary translations.
Select an element from the tree to browse its attributes in the Attribute Selection Widget (2).
Attribute Selection Widget (2)
All attributes of the currently selected element which are relevant for translation are displayed in a table structure.
Every row of this table represents a single Notebook chapter or attribute.
The first table column contains the name of the element.
The second column contains the text in the Primary Language (as defined in the Application Library) by default.
The third column contains the text in another language.
Table entries which are highlighted and marked by an indicator icon (
 )
have to be translated: The content in this cell has either not yet
been translated or it is older than the text in the Primary
Language.
)
have to be translated: The content in this cell has either not yet
been translated or it is older than the text in the Primary
Language.If a cell has to be translated, the name in the first column of the row as well as the parent Notebook chapter are highlighted too. This facilitates recognising necessary translations.
Select an attribute from the table to translate it in the Content Translation Widget (3).
The Primary Language is the language which is defined as the main language in the Application Library.
Content Translation Widget (3)
The actual translation of the selected attribute takes place in this widget. For single-line text attributes the new value can be entered into a text field. For translating multi-line attributes rich text editing support is available.
Translate Content
In order to translate content in the translation editor:
Select an element from the tree view to browse its attributes.
Select an attribute from the table to translate it.
Enter the translation in the appropriate text field.
Confirm by clicking the Save button
 in
the menu bar of the translation editor.
in
the menu bar of the translation editor.
Besides translating text, you can also:
Set up language specific links.
Make documents available in different language versions. In order to so, click the Upload file icon
 .
.
Once you have edited a highlighted entry, it is marked as translated (= not highlighted anymore). This also applies to its parent elements unless they still contain other children which have to be translated.
Select Languages for Translation
In order to select which languages are displayed in the translation editor:
Click the button
 in
the header of the column of which you want to change the language.
in
the header of the column of which you want to change the language.Select the desired language from the drop-down list.
This function is especially useful when three or more languages are in use. It allows you to translate between any two of them.
Navigation Shortcuts
Content in the tree can be shown or hidden by clicking the “+” and “-“ icons next to the elements. The following additional options are available:
Switch between Tree and Attributes
Press <Ctrl> + <Enter>.
Expand/Collapse Selected Node
Press <Ctrl> + <Shift> + <Alt> + <Left Arrow/Right Arrow>.
Navigate in Tree/Attributes
Press <Ctrl> + <Shift> + <Alt> + <Up Arrow/Down Arrow>.
Filter Translated Elements
Press <Ctrl> + F.
Save Translation
Press <Ctrl> + S.
Click the button
![]() in the
menu bar of the translation editor to open an overview of all available
keyboard shortcuts of the translation editor.
in the
menu bar of the translation editor to open an overview of all available
keyboard shortcuts of the translation editor.
Get Write Access
Elements only allowing read access are marked by a small lock icon
(![]() ). This
is e.g. the case if they are currently being edited by another user when
you start the translation. In order to try to get write access to these
elements later:
). This
is e.g. the case if they are currently being edited by another user when
you start the translation. In order to try to get write access to these
elements later:
Select the locked element from the tree view. Instead of the attributes of the selected element an information message is displayed.
Click the highlighted link to try to get write access.
Filter Translated Elements
In order to only display elements that need to be translated in the translation editor:
- Click the button
 in
the menu bar of the translation editor.
in
the menu bar of the translation editor.
As long as the filter is active, elements which are marked as translated are not shown in the translation editor.
Show/Hide Relations
In order to show or hide relations in the translation editor:
- Click the button
 in
the menu bar of the translation editor.
in
the menu bar of the translation editor.
As long as the filter is active, relations are not shown in the translation editor.
Automatically Translate Content
In order to automatically translate elements:
Click the icon
in
the menu bar of the content translation widget. A dialogue window
with a translation proposal opens.Confirm with OK to accept the proposal.
The availability of this function depends on the configuration of your ADOIT installation.
Multiple Languages and Fallback Behaviour
The following rules apply:
Rule 1
If a value has been set in a particular language, this value always applies to that language.
Rule 2
If a value has NOT been set in a particular language, the value in the Primary Language applies.
Rule 3
If a value has NOT been set in a particular language, and the value has NOT been set in the Primary Language, a value set in another language applies.
The Primary Language is the language which is defined as the main language in the Application Library.
The fallback behaviour is best explained with an example:
Consider that multiple languages are in use: English, German and French. French is the Primary Language.
Create a model "Kundenbetreuung" in German. The model is called:
German: "Kundenbetreuung" (see Rule 1)
French: "Kundenbetreuung" (see Rule 3)
English: "Kundenbetreuung" (see Rule 3)
Next, translate the name of the model to "Service Clients" in French. The model is now called:
German: "Kundenbetreuung" (see Rule 1)
French: "Service Clients" (see Rule 1)
English: "Service Clients" (see Rule 2)
Next, translate the name of the model to "Customer Service" in English. The model is now called:
German: "Kundenbetreuung" (see Rule 1)
French: "Service Clients" (see Rule 1)
English: "Customer Service" (see Rule 1)