Sprawdzanie poprawności
Funkcja sprawdzania poprawności w ADONIS pozwala na sprawdzenie, czy modele oraz obiekty są zgodne z regułami modelowania. Jeśli reguły modelowania nie zostały zachowane, ADONIS NP wyświetli odpowiednie powiadomienia.
Przykłady wskazówek modelowania
- Każdy Diagram procesów biznesowych powinien mieć co najmniej jedno Zdarzenie Początkowe i Zdarzenie Końcowe.
- Zadania powinny być nazywane z wykorzystaniem rzeczowników odczasownikowych np. "Zapłacenie rachunku", "Wysłanie dokumentów".
Istnieje szereg kategorii reguł modelowania, które z kolei składają się z jednej lub więcej kontroli.
Przypisanie danej kategorii kontroli zależy od konfiguracji instalacji systemu ADONIS. Ustawienia kontroli mogą być konfigurowane w ADONIS Administration.
Uruchamianie sprawdzania
Można uruchomić wszystkie kontrole jednocześnie lub też uruchomić je według kategorii. W trakcie sprawdzania poprawności modelu lub obiektu, widżet "Sprawdzanie poprawności" pojawia się po prawej stronie okna programu. Następnie ma miejsce sprawdzanie poprawności, po czym pojawiają się wyniki.
Sprawdzanie poprawności modelu
Aby sprawdzić model, należy:
Otworzyć model w edytorze graficznym.
Kliknąć przycisk
Sprawdzanie poprawności na pasku menu modelu, a następnie wybrać Wszystko lub Według kategorii....
Jeśli wybrana została opcja Według kategorii... pojawi się okno dialogowe, w którym należy wybrać jedną lub więcej kategorii i potwierdzić wybór przez OK.
Sprawdzanie poprawności obiektu
Aby sprawdzić obiekt, należy:
Otworzyć Notatnik obiektu.
Kliknąć przycisk
Więcej na pasku menu Notatnika, kliknąć Sprawdzanie poprawności
, a następnie wybrać Wszystko lub Według kategorii...
Jeśli wybrana została opcja Według kategorii... pojawi się okno dialogowe, w którym należy wybrać jedną lub więcej kategorii i potwierdzić wybór przez OK.
Nawigowanie po wynikach
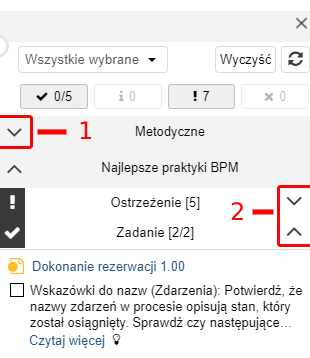
System ADONIS pokazuje wyniki sprawdzania poprawności na oddzielnej stronie dla każdego modelu lub obiektu.
W ramach strony rezultaty są pogrupowane w kategorie (np. BPM Najlepsze praktyki) na następnie wg. powiadomień (np. Błędy lub Ostrzeżenia).
Aby nawigować po wynikach należy:

- Kliknąć na ikony
lub
aby zwinąć lub rozwinąć wybrane kategorie (1) lub powiadomienia (2).
Filtrowanie wyników
Aby przefiltrować rezultaty sprawdzania, należy:
- Click the To-dos
, Information
, Warnings
or Errors
buttons.
You can show or hide results.
Zmiana kategorii
Aby zmienić wyświetlane kategorie:
Kliknij przycisk Wszystkie wybrane.
Z listy kategorii wybierz Wszystkie lub ogranicz wybór do określonej kategorii.
Kliknij OK, aby odświeżyć widżet "Sprawdzanie poprawności".
Wyświetlanie całości tekstu powiadomienia
Podczas sprawdzania poprawności modeli lub obiektów notyfikacje są często wyświetlane w formie skróconej, aby lepiej wykorzystać dostępną przestrzeń.
Aby pokazać pełny tekst powiadomienia:
- Kliknij Więcej.
Aby tylko wyświetlić podgląd powiadomienia:
- Umieść kursor myszy na ikonie żarówki
.
Wyświetlenie modelu/obiektu
Aby zobaczyć model lub obiekt, do którego odnosi się powiadomienie należy:
- Kliknąć na tytuł powiadomienia.
Model zostanie otwarty (jeśli jeszcze nie był). Jeśli wybrano obiekt, zostanie on podświetlony.
Zaznaczanie Zadań jako wykonane
Zadania są sprawdzeniami, które wymagają weryfikacji przez użytkownika. Jeśli wyniki są pozytywne należy oznaczyć Zadanie jako wykonane. W tym celu:
- Zaznacz kratkę przy nazwie Zadania.
Status jest zapisywany i staje się widoczny dla innych użytkowników w widżecie ,,Sprawdzanie poprawności''.
Automatyczne naprawianie błędów
ADONIS pozwala na automatyczne naprawianie niektórych błędów. W tym celu:
- Kliknij Napraw Automatycznie widoczne w powiadomieniu.
Uzupełnienie atrybutów obowiązkowych
ADONIS wyświetla ostrzeżenia, dopóki wszystkie atrybuty obowiązkowe modelu lub obiektu zostaną uzupełnione. Atrybuty te są podane w powiadomieniu. Aby je uzupełnić należy:
- Kliknąć na nazwę danego atrybutu.
Spowoduje to otwarcie notatnika, w którym odpowiedni atrybut zostanie wybrany. DO NOT TRANSLATE
Rozwijanie i ukrywanie widżetu ,,Sprawdzanie poprawności''
Możesz ukryć widżet ,,Sprawdzanie poprawności'', aby zwiększyć obszar roboczy. Widżet Sprawdzanie poprawności możesz rozwinąć w dowolnym momencie:
Aby ukryć widżet, kliknij ikonę
w lewym górnym rogu widżetu.
Aby pokazać widżet ponownie, kliknij ikonę
.