Set up Access to Role-Specific Scenarios
ADOIT is organised into a number of so-called application scenarios that accommodate different stakeholders' needs. In order to set up access to these scenarios, you need to prepare the appropriate system roles. This involves the following steps:
As the ADOIT administrator of the ADO Money Bank you have already set up a modelling environment for your company. Now you want to set up access to the application scenarios
"Design & Document"
"Control & Release"
"Explore & Contribute"
for your colleagues. The following training tasks will familiarize you with the typical activities in this context.
Available application scenarios vary depending on the application library and the licence. All examples and descriptions in this tutorial refer exclusively to the ArchiMate Application Library.
Access to the Organisation Portal and to the EA workflow is also role-specific and therefore set up in a similar way. Please refer to the sections Set Up Access to the Organisation Portal and Set up Access to EA Workflow for details.
Create System Roles and Assign Users
Similar to rights, system roles define and limit the possibilities of users within ADOIT. In particular, system roles grant or deny access to certain ADOIT web client features and metamodel elements.
Your next task is to set up a system role structure that contains users with access to different application scenarios. In order to do this you have to create the following system roles:
System role "Explore & Contribute Members":
Unique name: E&C
Members: User group "Reviewer"
Interface texts: Explore & Contribute Members
Description: Members of this system role will have access to the "Explore & Contribute" scenario. Via the "Explore & Contribute" scenario users can get a quick overview of architecture artefacts in ADOIT and contribute to the gathering of enterprise architecture information.
System role "Design & Document Members":
Unique name: D&D
Members: User group "Architect"
Interface texts: Design & Document Members
Description: Members of this system role will have access to both the "Explore & Contribute" scenario and the "Design & Document" scenario. Via the "Design & Document" scenario they will be able to design services and architectures and to plan initiatives.
System role "Control & Release Members" (only if the EA workflow is enabled):
Unique name: C&R
Members: User group "Reviewer"
Interface texts: Control & Release Members
Description: Members of this system role will have access to the "Control & Release" scenario. The purpose of the "Control & Release" scenario is to let users review and release objects with a single click.
Create System Role
In order to create a system role:
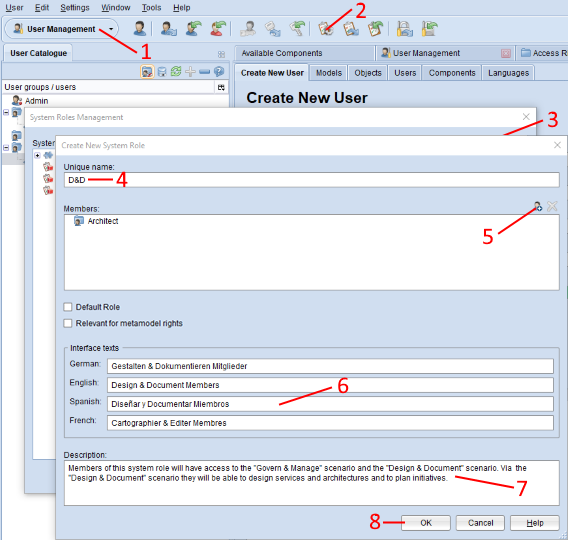
Open the User Management component via the component selection (1).
In the User Management tab, click the Manage system roles button
 (2).
(2).Click the Create new system role... button
 (3).
(3).In the Unique name box, type a name for the system role. This language-independent name uniquely identifies the system role (4).
Click the Add members... button
 and add
system role members from the user catalogue (5). Click OK.note
and add
system role members from the user catalogue (5). Click OK.noteYou can assign system roles to user groups or individual users.
In the Interface texts area, type a name for every language ADOIT supports. Interface Texts are texts that are visible on the user interface (6).
In the Description box, type a description of the system role (7).
Click OK (8). The new system role is added to the System roles catalogue.
Optionally you can also:
Select the check box Default role so that this system role is applied to all users on login.
Select the check box Relevant for metamodel rights so that you can edit the metamodel rights of the system role.
Assign Web Modules to System Roles
You can assign web modules (plug-ins) to system roles to grant permissions for functionalities in the web client. This allows you to define different scenarios for different user groups or users.
Assign the following web modules to the system role "Explore & Contribute Members" by ticking the appropriate check boxes:
- Explore & Contribute
Do not change the other settings.
Next, assign the following web modules to the system role "Design & Document Members":
Design & Document
Application Portfolio Management (Design & Document)
Master Planning (Design & Document)
Risk Management (Design & Document)
Technology Management (Design & Document)
Do not change the other settings.
Next, assign the following web modules to the system role "Control & Release Members" (only if the EA workflow is enabled):
- Control & Release
Do not change the other settings.
To check if the newly assigned users have access to the right scenarios:
Start the web client and log in as a user of the group "Reviewer". Do you have access to the "Explore & Contribute" and "Control & Release" scenarios?
Log out and log in as a user of the group "Architect". Do you have access to the "Design & Document" scenario?
With this step you have accomplished setting up access to the standard application scenarios in ADOIT for your users.
Assign Web Modules
In order to assign web modules to a system role:
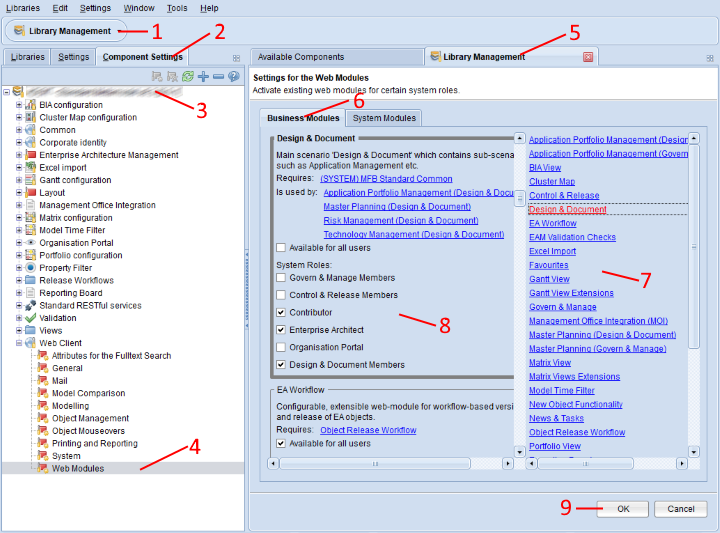
Open the Library Management component (1) and switch to the tab Component Settings (2).
Double-click the appropriate library in the Component Settings catalogue to open the list of components available for configuration (3).
Double-click the entry called “Web Modules” in the node Web Client (4). The settings open in the Library Management tab (5).
Select the Business Modules tab (6). This tab contains all web modules that can be assigned to users. In contrast, the System Modules are necessary for the operation of the web client and always activated for every user.
Select a web module from the list of web modules (7).
Activate or deactivate a web module for all users or for users with specific system roles by ticking the appropriate check boxes (8).
Confirm with OK (9).
The ADOIT application server has to be restarted if these settings are changed. Otherwise the changes will not become effective.