Admin Page
The Admin Page allows you to edit authentication settings, monitor the status of the ADOIT web client and perform maintenance tasks.
Open Admin Page
To open the Admin Page:
Open a web browser and navigate to "http://<SERVER_NAME>:<TOMCAT_PORT>/ADOIT13_0/admin.view".
Enter your credentials (if needed) and log in.
To open the Admin Page, a user has to fulfill the following requirement:
- The user must have access rights to the Administration Toolkit.
If you are running the web client locally, the URL should look like this:
http://localhost:8000/ADOIT13_0/admin.view
Authentication
Use this page to edit authentication settings. To open the Authentication page:
- On the toolbar at the top of the screen, click More
 , and then
click Authentication.
, and then
click Authentication.
To ensure the security of client connections to the Admin Page, we strongly recommended to enable SSL communication in the web client if you plan on editing the authentication configuration. Install ADOIT according to the Installation Manual and configure SSL/TLS support on Tomcat.
To edit these settings, you need experience with JSON. If you need help, contact your ADOIT consultant.
The following functionalities are available:
SAML Settings
Modify the global basic configuration parameters for SAML connectors.
Security Settings
Adapt the brute force protection settings.
For details on how to configure the parameters please refer to section "Configure Brute Force Protection Settings" in the Installation Manual.
Licence Warnings
Configure Licence Warnings - automated email notifications when most of the available named users are already assigned for a specific scenario and action should be taken to extend the licence.
Language
Select the language for user group names, system role names etc. to be used in user mappings.
Upload Certificates
Upload certificates to use for signing and encryption during
authentication and for data synchronization with a directory service. To
reference an uploaded certificate, you can use the simple file name
without any path information (e.g. BOC.jks).
Tracing
Turn on authentication trace logging in order to have additional authentication details logged in the web server logs. This is useful in the setup phase for authentication mechanisms such as SAML. Tracing will automatically be turned off on web server restart.
Reset Configuration
Reset the authentication settings to the factory settings. Any previously applied modifications will be lost.
Download Template
Download a sample configuration with all authentication parameters explained. You can copy the required code from the sample and use it as necessary.
Connectors
All authentication mechanisms (= connectors) of the ADOIT web client are listed here. The authentication mechanisms can be used separately or in combination.
In principal, the following authentication mechanisms are available:
Standard (= the standard login page)
IDM
SAML
Each of these authentication mechanisms can be configured to use LDAP coupling to fetch additional user data from a directory service.
The following settings are available:
Edit Connector
Click the button
 .
.Delete Connector
Click the button
 .
.Add Connector
Click the Add button
 .
.
Save Changes
Save changes made on this page. Once the changes are saved on the Admin Page, they take effect immediately. A restart is not required.
Configure Self-Service Password Reset
Self-service password reset lets ADOIT users reset their own passwords without having to contact their ADOIT administrator each time. They can simply click the "Forgot Password?" link on the login page, and will then receive an email with a link to reset their password.
Availability
This functionality is available if the mail component is configured and the Standard connector is used (= standard login page where the user can enter his or her username and password).
For details on how to configure the mail component please refer to the section Mail.
The following users CANNOT reset their password themselves:
ADOIT Administrators (users with global administrator rights)
Technical users
Users from an external user management system
Users without email address
Configuration
On the Admin Page, you can enable/disable the self-service password reset and configure how long a password reset link is valid. By default, this feature is enabled and the expiry time of the link is 30 minutes.
To configure the password reset properties:
- On the Authentication page, edit the Standard Login connector and save the changes afterwards.
Here is the relevant code snippet:
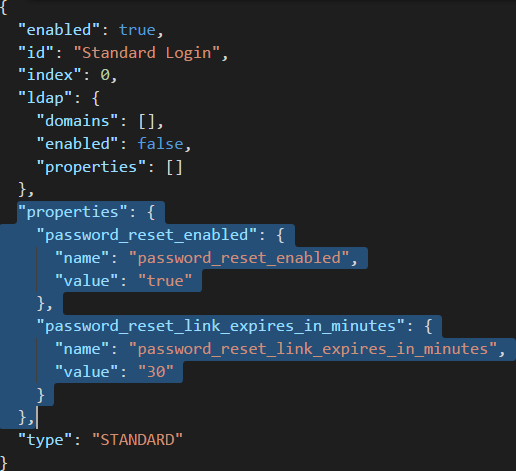
The following child properties of the property "nameduse" need to be
added or modified:
notification-recipient-email
JSON object with the property
"name": "password_reset_enabled"and"value"which may be"true"or"false"(to enable/disable password reset in self-service).password_reset_link_expires_in_minutes
JSON object with the following properties:
"name": "password_reset_link_expires_in_minutes"and"value"specifying how long a link is valid in minutes (default:"30").
Configure Licence Warnings
On the Admin Page, you can configure an automated email notification when most of the available named users are already assigned for a specific scenario and action should be taken to extend the licence.
Availability
This functionality is available if the mail component is configured.
For details on how to configure the mail component please refer to the section Mail.
Configuration
To configure the license warnings:
Open a web browser and navigate to http://<SERVER_NAME>:<TOMCAT_PORT>/ADOIT13_0/admin.view.
Enter your credentials (if needed) and log in. The user must have access rights to the Administration Toolkit.
On the toolbar at the top of the screen, click More
, and then
click Authentication.Click the License Warnings button. Edit the settings and save the changes afterwards.
The following parameters are available:
notification-recipient-email
Enter the email address that should receive the notifications.
notification-threshold
Specify the notification threshold. Enter the percentage of named users already assigned for a specific scenario that, when exceeded, triggers a license warning.
notify-on-threshold-exceeded
Specify whether a notification is sent when the number of named users for a scenario has exceeded the configured threshold. Possible values are
"true"or"false".notify-on-threshold-recovery
Specify whether a notification is sent when the number of named users for a scenario has dropped below the configured threshold. Possible values are
"true"or"false".
Authentication > LDAP
Use this page to edit LDAP settings. To open the LDAP page:
- On the toolbar at the top of the screen, click More , point to
Authentication, and then click LDAP.
To ensure the security of client connections to the Admin Page, we strongly recommended to enable SSL communication in the web client if you plan on editing the authentication configuration. Install ADOIT according to the Installation Manual and configure SSL/TLS support on Tomcat.
To edit these settings, you need experience with JSON. If you need help, contact your ADOIT consultant.
The following functionalities are available:
Upload Certificates
Upload certificates to use for signing and encryption during
authentication and for data synchronization with a directory service. To
reference an uploaded certificate, you can use the simple file name
without any path information (e.g. BOC.jks).
Download Template
Download a sample configuration with all authentication parameters explained. You can copy the required code from the sample and use it as necessary.
Domains
All configured domains are listed here.
The following settings are available:
Edit Domain Configuration
Click the button
.Delete Domain Configuration
Click the button
.Add Domain Configuration
Click the Add button
.
LDAP Settings
Modify the general parameters that apply to all domains.
Save Changes
Save changes made on this page. Once the changes are saved on the Admin Page, they take effect immediately. A restart is not required.
Authentication > OAuth 2.0
Use this page to edit OAuth 2.0 settings. To open the OAuth 2.0 page:
- On the toolbar at the top of the screen, click More , point to
Authentication, and then click OAuth 2.0.
The following functionalities are available:
Upload Logos
Upload logos to represent client applications. You can use these logos when you configure client data.
General Settings
Select the OAuth 2.0 enabled check box to enable OAuth 2.0.
Clients
All configured clients are listed here. The following settings are available:
Edit Client Configuration
Click the button
. The Client
Data form appears.Delete Client Configuration
Click the button
.Add Client Configuration
Click the Add button
. The Client
Data form appears.
Save Changes
Save changes made on this page. Once the changes are saved on the Admin Page, they take effect immediately. A restart is not required.
Client Data
When you add a new client or edit an exisiting client on the OAuth 2.0 page, the Client Data form appears. You can enter and edit the following data:
Type: Select the client type. Confidential clients are e.g. centralized, server based applications, which are capable of securely storing client secrets. Public clients are e.g. purely client based applications and native apps which are not capable of securely storing client secrets.
ID: The ID of the client system. Must be unique among the clients, should be kept simple as special characters need to be URL encoded.
Name: The name of the client application. Will be shown on the user interface.
Redirect URI: The URL of a redirect endpoint inside the client application which will be called by the authorization server when issuing an authorization code.
Logo: Select a logo to represent the client application (must be uploaded first on the OAuth 2.0 page). Will be shown on the user interface.
Access Token Validity (Seconds): The time in seconds how long an access token is valid until it expires. Default: 1800s = 30 minutes.
Refresh Token Validity (Seconds): The time in seconds how long an refresh token is valid until it expires. Default: 1209600s = 14 days.
Secret: The secret to use for client authentication. You can click Generate to generate a new secret or manually specify one.
Click Save after completing the Client Data form, and then click Save changes to save the OAuth 2.0 page.
Licence Overview
This page shows you at a glance the total number of available licences as well as the number of licences currently in use. You can also find out quickly about all active ADOIT users including the time of login and the time of the last action. To open the Licence Overview page:
- On the toolbar at the top of the screen, click More , and then
click Licence Overview.
If you have questions about the different types of licenses or the difference between concurrent users and named users, please refer to the sections Product Licences vs. Scenario Licences and Named Users vs. Concurrent Users.
You can control whether actual login names are shown in this widget by
setting the parameter ADOXX_WEB_TRACK_LOGINS in the file
adoxx_web_conf.js to true/false. This file can be found in the folder
“<ADOIT installation>\conf”.
Server
This page allows you to perform various maintenance tasks. To open the Server page:
- On the toolbar at the top of the screen, click More , and then
click Server.
The following functionalities are available:
Restart Environment
Restart the application server and the web application. All users will be logged out. As soon as the application server is up and running again, and the web application is completely initialised, login is possible again.
Restart Web Application
Restart the web application. All web client users will be logged out. As soon as the web client is completely initialised, login is possible again.
Re-intialise search index
Reinitialize the search index if you if you are encountering problems with the search function in ADOIT. Depending on the number of models and objects in the database this process may take a few minutes.
Start LDAP synchronisation
Start the synchronization of users with an LDAP-compliant directory service according to the configuration specified on the Admin Page. The synchronization is triggered for all configured domains. During the synchronization, a progress bar provides information on the current status. After the synchronization, all newly synchronized users and any error codes are displayed for each domain.
noteFor questions about the necessary steps to enable synchronization, please refer to the Installation Manual.
Clear LDAP Cache
When synchronization of users with an LDAP-compliant directory service is enabled and the option
recursiveNodeLookupis enabled for one or more LDAP properties, ADOIT is caching results to speed up performance. To detect changes in the directory structure, this cache is automatically cleared when the web application is restarted, when you start LDAP synchronization here on the Admin Page, or when a periodic synchronization of users with LDAP is triggered.Use this button to clear the LDAP cache if
recursiveNodeLookupis enabled, there are changes in the directory structure, and you want to make sure that users that log in to the ADOIT web client for the first time will be assigned correctly to system roles, user groups and repositories.
Support > Information
This page allows you to download support packages in different sizes. A support package contains log files of the application server, log files of the web server including the web application as well as configuration files within an encrypted Zip archive. To open the Information page:
- On the toolbar at the top of the screen, click More , point to
Support, and then click Information.
The following sizes are available:
Support Package SMALL
Downloads log files from the last 24 hours.
Support Package MEDIUM
Downloads log files from the last week.
Support Package LARGE
Downloads all log files.
Download Support Package when Access to the Admin Page is not possible
You can still download the support package when the Admin Page cannot be reached in case of an error. In order to do so:
- Open a web browser and navigate to "http://<SERVER_NAME>:<TOMCAT_PORT>/ADOIT13_0/supportinformation".
<SERVER_NAME> is the name of the server machine, <TOMCAT_PORT> is the port at which Apache Tomcat is accessible (by default this is 8000).
If you are running the web client locally, the URL should look like this:
"http://localhost:8000/ADOIT13_0/supportinformation"
You can modify the URL to only download log files from a certain time period. In order to do this, add ?logType=<PARAMETER> to the URL. The following parameters that correspond to the package sizes listed above are available: "small", "medium" and "large".
If you are running the web client locally and you want to download log files from the last 24 hours, the URL should look like this:
"http://localhost:8000/ADOIT13_0/supportinformation?logType=small"
Please provide these log files when you contact our support team.
Support > Debug Mode
This page allows you to activate the global debug mode. The global debug mode influences various details in the behaviour of the application and can be used for error analysis. To open the Debug Mode page:
- On the toolbar at the top of the screen, click More , point to
Support, and then click Debug Mode.
The global debug mode should never be permanently enabled! It is recommended to only activate the global debug mode on request of a BOC employee.
Support > Maintenance
This widget allows you to enable maintenance mode. Maintenance mode eases the planning of maintenance windows. To open the Maintenance page:
- On the toolbar at the top of the screen, click More , point to
Support, and then click Maintenance.
When maintenance mode is enabled, no further logins to the web application will be allowed and a corresponding message will be displayed. The Admin Page of the ADOIT web client is excluded from maintenance mode and can still be used.