Migrate Models and Objects
This scenario will teach you how to migrate models and objects between two ADOIT instances. You will learn how to:
When a model is exported, all objects used in this model are exported as well. Therefore it is possible to skip migrating objects when migrating models. However, there is a catch: When you import the AXR file containing the model data into another ADOIT instance, objects that are not yet in the database are placed in the standard object group. Any folder structure designed for managing objects in the Object Catalogue is lost.
If you want to migrate all data between two ADOIT instances, the migration of complete repositories is the preferred variant, as this ensures that all relations between the models and objects are considered as well. Please refer to the sections Export an Entire Repository and Import an Entire Repository for details.
You are the ADOIT administrator and at the same time an IT architect of the ADO Money Bank. In the next few days you will telecommute as your duties take you out of office. During this time you want to analyse a part of the modelling data and prepare a series of reports.
Unfortunately, you cannot access the ADOIT instance of the ADO Money Bank while you are away on business. Therefore, you choose to export a set of models and objects and import it on a standalone installation on your laptop computer.
Backup Objects
By exporting objects and object group information to AXR files you can save data from your ADOIT database externally and, if desired, import it to other databases.
Create the following object group as a subordinated element of the standard object group:
- 03 Object Export
Optionally you can use the web client to create objects in this group. For more information on how to create objects, please refer to the User Manual.
Now export the newly created object group. Create the following export file:
- objects.axr
Export Objects
In order to export objects:
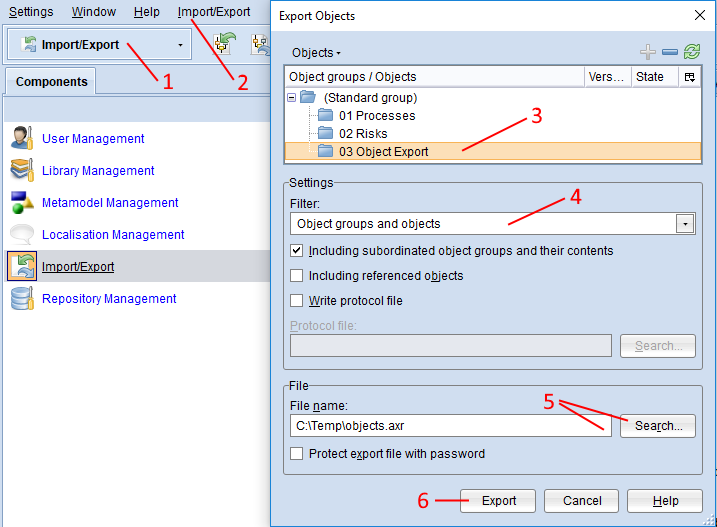
Open the Import/Export component via the component selection (1).
Select menu Import/Export – menu entry Export objects… (2). A selection dialogue appears.
Select all objects and/or object groups you wish to export (3). By clicking on an object group, all objects included in this group are also automatically selected.
From the drop-down list Filter choose, whether to export only objects, only object groups or both (4).
Enter the path and name of the future export file into the field File name (either manually or via the support dialogue Search…) (5).
Confirm with Export (6). The data is exported and a confirmation box appears.
Click Show messages >> to verify if all the selected objects and/or object groups have been correctly exported.
Optionally you can also:
Select Including subordinated object groups and their contents to include the entire hierarchy below a selected object group into the export. Depending on the selection in the Filter list, object groups with the contained objects will be exported, or object groups only.
Select Including referenced objects to include all objects referenced out of the selected objects into the export.
Select Write Protocol File to create a log file during the process of the export. It is saved as a plain text file in the file system.
Select the check box Protect export file with password to encrypt the export file.
Backup Models
By exporting models and model group information to AXR files you can save data from your ADOIT database externally and, if desired, import it to other databases.
Create the following model group as a subordinated element of the standard model group:
- 03 Model Export
Optionally you can use the web client to create models in this group. For more information on how to create models, please refer to the User Manual.
Now export the newly created model group. Create the following export file:
- models.axr
Export Models
In order to export models:
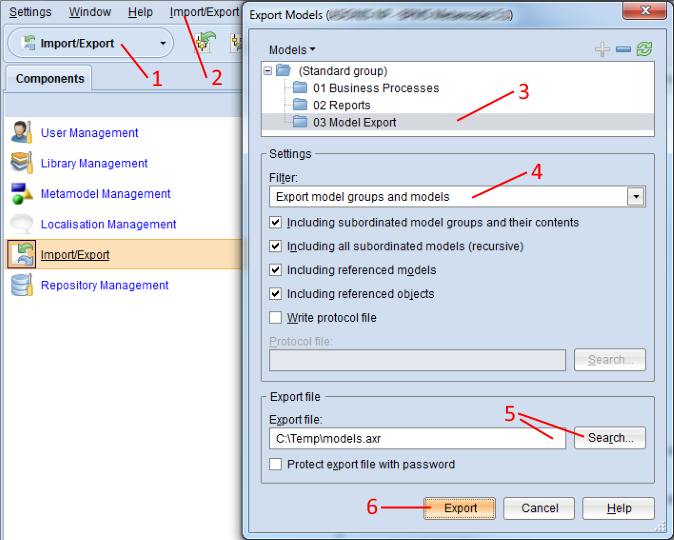
Open the Import/Export component via the component selection (1).
Select menu Import/Export – menu entry Export models… (2). A selection dialogue appears.
Select all models and/or model groups you wish to export (3). By clicking on a model group, all models included in this group are also automatically selected.
From the drop-down list Filter choose, whether to export only models, only model groups or both (4).
Enter the path and name of the future export file into the field Export file (either manually or via the support dialogue Search…) (5).
Confirm with Export (6). The data is exported and a confirmation box appears.
Click Show messages >> to verify if all the selected models and/or model groups have been correctly exported.
Optionally you can also:
Select Including subordinated model groups and their contents to include the entire hierarchy below a selected model group into the export. Depending on the selection in the Filter list, model groups with the contained models will be exported, or model groups only.
Including all subordinated models (recursive) to include all sub models referenced out of the selected models (without restriction of the reference depth). Sub models are connected to the selected models via a relation class with the parameter Is subreference enabled.
noteThe check box Including all subordinated models (recursive) is not available if the library contains no relation classes with the parameter Is subreference enabled.
Select Including referenced models to include all models referenced out of the selected models into the export.
Select Including referenced objects to include all objects referenced out of the selected models into the export.
Select Write Protocol File to create a log file during the process of the export. It is saved as a plain text file in the file system.
Select the check box Protect export file with password to encrypt the export file.
Migrate Objects
The object import has the objective to import externally saved object information into the ADOIT database.
To simulate migration to another ADOIT instance, start the Administration Toolkit with a newly created database. Refer to the Installation Manual for instructions on how to create and initialize a database.
Import the backup file to your database. Select the following file you exported in the previous example scenario:
- objects.axr
Import all elements of the backup file. Select the standard object group as the target of the import. Do not change the other settings.
Import Objects
In order to import objects:
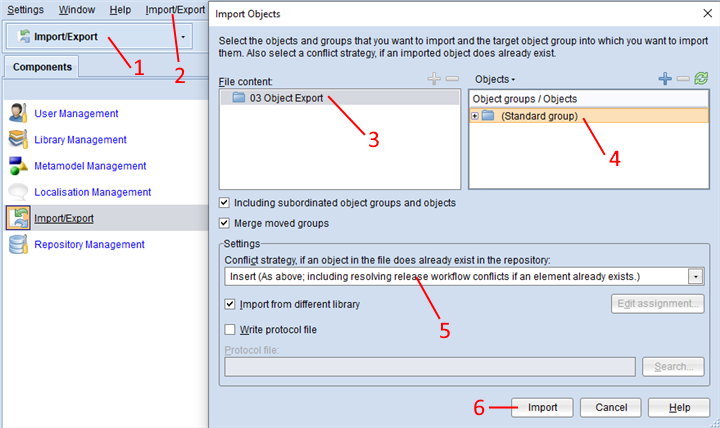
Open the Import/Export component via the component selection (1).
Select menu Import/Export – menu entry Import objects… (2). A file selection dialogue appears.
Enter the path and name of the import file into the field File name (either manually or via the support dialogue Search…).
Confirm with Import. If the import file is encrypted, enter the password and click OK. Another dialogue window containing detailed import settings appears.
Select the objects and/or object groups you wish to import (3).
Select the object group into which the data shall be imported (4).
Define the behaviour if an object / object group to be imported already exists in the database (5). You can choose to:
insert the import object and combine the information from both sources,
insert including resolving release workflow conflicts (as above, but ADOIT additonally checks whether the content from the import file violates the integrity of a release workflow) [default selection],
overwrite the object in the database or
ignore the import object and preserve the original object.
noteInsert including resolving release workflow conflicts is only available if a release workflow is enabled and should always be used instead of the insert option. Use insert only if requested by a BOC employee.
Confirm with Import (6). The data is imported and a confirmation box appears.
Click Show messages >> to verify if the import was successful.
Click Close. Another dialogue box appears. You will be asked whether you want to update the database catalogue statistics or not. Click Yes and update the statistics.
Optionally you can also:
Select Including subordinated object groups and objects to include the entire hierarchy below a selected group into the import – not only the selected hierarchy level.
Select Merge moved groups when you import a backup and some groups have been moved to another location in the meantime. The groups and all contained artifacts will be merged at the new location (artefacts according to the selected conflict strategy). When this option is disabled, the imported groups are created at the old location. Contained artifacts will be merged at the new location if they exist in both groups, or created in the old location if they only exist in the import groups.
Select Import from different library so that ADOIT performs a check whether the content from the import file derives from the same version of the existing library. Activate this option, if you are not sure.
Select Write Protocol File to create a log file during the process of the import. It is saved as a plain text file in the file system.
Migrate Models
The model import has the objective to import externally saved model information into the ADOIT database.
Import the backup file to your database. Select the following file you exported in the previous example scenario:
- models.axr
Import all elements of the backup file. Select the standard model group as the target of the import. Do not change the other settings.
With this step you have accomplished migrating models and objects between two ADOIT instances. Check if all backup files were imported correctly. If not, verify that you performed all steps of the migration procedure correctly.
Import Models
In order to import models:
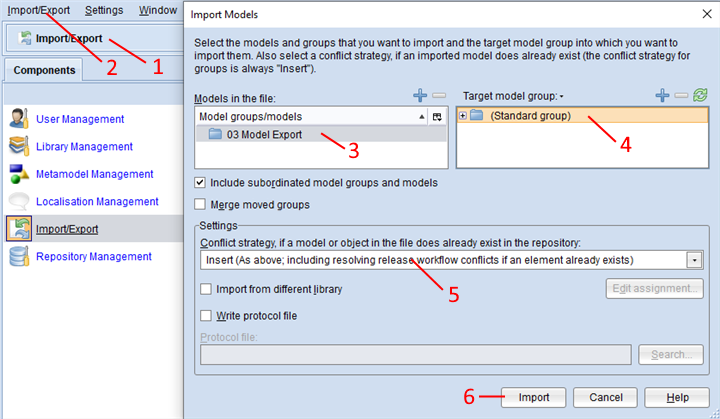
Open the Import/Export component via the component selection (1).
Select menu Import/Export – menu entry Import models… (2). A file selection dialogue appears.
Enter the path and name of the import file into the field File name (either manually or via the support dialogue Search…).
Confirm with Import. If the import file is encrypted, enter the password and click OK. Another dialogue window containing detailed import settings appears.
Select the models and/or model groups you wish to import (3).
Select the model group into which the data shall be imported (4).
Define the behaviour if a model / model group to be imported already exists in the database (5). You can choose to:
insert the import model and combine the information from both sources,
insert including resolving release workflow conflicts (as above, but ADOIT additonally checks whether the content from the import file violates the integrity of a release workflow) [default selection],
overwrite the model in the database or
ignore the import model and preserve the original model.
noteInsert including resolving release workflow conflicts is only available if a release workflow is enabled and should always be used instead of the insert option. Use insert only if requested by a BOC employee.
Confirm with Import (6). The data is imported and a confirmation box appears.
Click Show messages >> to verify if the import was successful.
Click Close. Another dialogue box appears. You will be asked whether you want to update the database catalogue statistics or not. Click Yes and update the statistics.
Optionally you can also:
Select Including subordinated model groups and models to include the entire hierarchy below a selected group into the import – not only the selected hierarchy level.
Select Merge moved groups when you import a backup and some groups have been moved to another location in the meantime. The groups and all contained artifacts will be merged at the new location (artefacts according to the selected conflict strategy). When this option is disabled, the imported groups are created at the old location. Contained artifacts will be merged at the new location if they exist in both groups, or created in the old location if they only exist in the import groups.
Select Import from different library so that ADOIT performs a check whether content from the import file derives from the same version of the existing library. Activate this option, if you are not sure.
Select Edit Assignment. This button becomes available, when Import from different library is active and the meta model elements in the file (model, object, relation and endpoint types plus their attributes) do not perfectly match the metamodel elements in the library used. This enables manual assignment of import elements to the library elements. Please refer to the section Apply Metamodel Mapping for details.
Select Write Protocol File to create a log file during the process of the import. It is saved as a plain text file in the file system.