Validation
The validation functions in ADONIS allow you to check whether models and objects comply to the modelling guidelines. If the modelling guidelines are violated, ADONIS shows corresponding notifications.
Examples of Modelling Guidelines
There are several check categories, which, in turn, consist of one or several individual checks.
The provision of check categories and individual checks depends on the configuration of your ADONIS installation. They can be configured in the ADONIS Administration Toolkit.
Run Checks
You can either run all checks at once or run checks by category. When you validate a model or object, the "Validation" widget opens at the right side of the program window. The checks are run and the results are displayed.
Validate Model
To validate a model:
Open the model in the graphical editor.
Click the Validate button
 in
the menu bar of the model, and then click either All or By category....
in
the menu bar of the model, and then click either All or By category....In case you chose By category... in step 2, a dialogue is displayed. Select one or more categories and confirm with OK.
Validate Object
To validate an object:
Open the Notebook of the object.
Click the More button
 in the
menu bar of the Notebook, point to Validate
, and then click either All or
By category....
in the
menu bar of the Notebook, point to Validate
, and then click either All or
By category....In case you chose By category... in step 2, a dialogue is displayed. Select one or more categories and confirm with OK.
Navigate through Results
ADONIS displays the results of the checks on a separate page for each model or object.
Within a page, the results are grouped by category (e.g. BPM Best practice) and then type of notification (e.g. Errors or Warnings).
In order to navigate through the results:
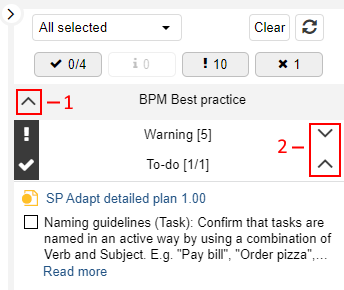
- Click the
 and
and
 icons to collapse or expand
categories (1) and types of notifications (2).
icons to collapse or expand
categories (1) and types of notifications (2).
Filter Results
In order to filter the results of the checks:
- Click the buttons
 ,
,
 ,
,
 or
or
 .
.
You can show or hide errors, warnings, notes and ToDos.
Change Categories
To change which check categories are displayed:
Click the All selected button.
From the list, either Select all categories or restrict the validation to certain categories.
Click OK to refresh the "Validation" widget.
Display Full Text of Notification
When you check models and objects, notifications are often only displayed in abbreviated form for space reasons.
To display the full text of a notification:
- Click Read more.
To only display the hint in the notification:
- Move the mouse pointer over the light bulb
 .
.
Display Model/Object
In order to display the model or object to which a notification refers:
- Click the title of the notification.
The model is opened (if currently closed). If an object is selected, it is highlighted in the model.
Mark ToDo as Completed
ToDos are checks which have to be verified manually. If your check yields a positive result, you can mark the ToDo as completed. In order to do so:
- Select the check box within the notification.
The checked state is saved and will be visible to all users in the "Validation" widget.
Fix Error Automatically
ADONIS can fix certain errors automatically. In order to do so:
- Click Fix automatically within the notification.
Fill Mandatory Attributes
ADONIS provides a warning when not all mandatory attributes of an object have been filled. The affected attributes are listed in the notification. In order to fill a mandatory attribute:
- Click the attribute in question.
The Notebook of the object opens. You jump directly to the selected mandatory attribute.
Show or Hide "Validation" Widget
You can hide the "Validation" widget to increase your workspace, and show it again at any time:
To hide the widget, click the icon
 at the top left corner of the
widget.
at the top left corner of the
widget.To show the widget again, click the icon
 .
.