After the Installation
The following shortcuts will show up on the start menu entry of ADONIS 15.0 (after a complete installation):
Manuals
The ADONIS user documentation in English and German.
Administration Toolkit
Used by a ADONIS-Administrator for example to create users or assign rights among other tasks.
Create a new database
A tool used to create new ADONIS databases.
Now you should proceed with the following steps:
Create Database
After the installation of ADONIS, a database has to be created (see "Create Database").
Import Sample Users
Are you using the ADONIS BPMS Application Library? Then import the sample users in the Administration Toolkit now. The sample users contain the default user groups . With these, and with the default system roles , your users will get access to the models and objects in the repository, the different application scenarios of ADONIS, and more.
The default system roles are always available and don't need to be imported when you are you using the ADONIS BPMS Application Library.
Start the Administration Toolkit with the default user "Admin" (password: "password") and the name of the previously installed ADONIS 15.0 database.
Import the sample users into the ADONIS database (User Management - Import users). The respective file "ADONIS 15.0 - Sample Users with Rights.axr" can be found in the folder "04 Sample Data/Users" on the installation medium. When importing the sample users you have to activate the following options:
Recursive
Including system roles
Including metamodel rights
Assign current repository automatically
Create a user in the Administration Toolkit for every person who wants to work with ADONIS (User Management - Create user).
Add the users to the appropriate user groups and system roles depending on their tasks in ADONIS. The sample users can serve as a template for this.
You can import the ADONIS Standard Migration Package instead of the sample users. This package contains an extended set of users and example models. The example models serve to illustrate the modelling of business processes and working environments with ADONIS. The respective file can be found in the folder “04 Sample Data/Migration Package“ on the installation medium.
Default User Groups
The following user groups comprise the default user groups:
Designer
Members of the user group "Designer" will have write access to the standard model group and the standard object group. For users who model in ADONIS.
Reader
Members of the user group "Reader" will only have read access to the standard model group and the standard object group. For users who read processes or review and release processes in ADONIS. This user group may also hold a technical user account. This user account is used when users access the Organisation Portal via the link on the web client login page.
Starting with ADONIS 15.0, the Organisation Portal is no longer available to new customers. Existing customers with licences that include the Organisation Portal may continue to use it.
Default group
Typically this user group will only hold technical user accounts. These user accounts are used when synchronizing objects between ADONIS and another BOC Management Office product and in other special scenarios.
Default System Roles
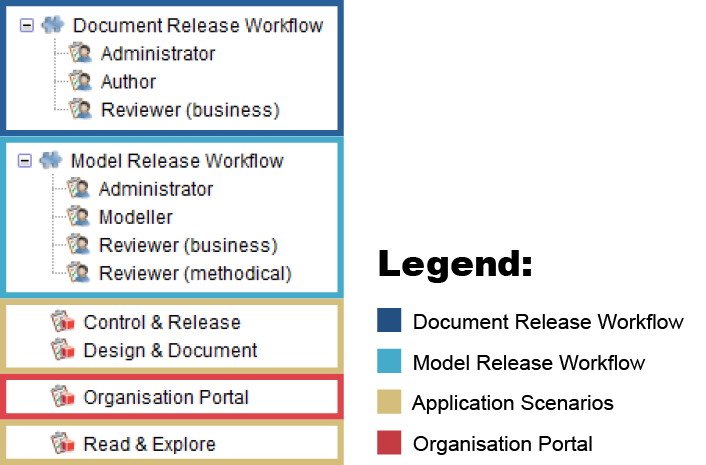
Here are the default system roles:

Document Release Workflow
Author
Authors create and submit documents to review. They can also create new versions of already released documents in order to adapt them.
Reviewer (business)
Reviewers perform business reviews of the submitted documents and release them.
Administator
Administrators can execute all transitions. They are responsible for the maintenance of the release process. Only Administrators can archive documents.
Model Release Workflow
Modeller
Modellers create and submit models to review. They can also create new versions of models which have already been released in order to adapt them.
Reviewer (business, methodical)
Reviewers perform methodical reviews and business reviews of the submitted models.
Administator
Administrators can execute all transitions. They are responsible for the maintenance of the release process. Only Administrators can archive models.
Application Scenarios
Design & Document
Members of the system role "Design & Document" will have access to the "Design & Document" scenario. Via the "Design & Document" scenario they will be able to model and create transparency in a structured way.
Control & Release
Members of the system role "Control & Release" will have access to the "Control & Release" scenario. The purpose of the "Control & Release" scenario is to let users review and release processes with a single click.
Read & Explore
Members of the system role "Read & Explore" will have access to the "Read & Explore" scenario. The purpose of the "Read & Explore" scenario is to let users read processes, explore working instructions and process handbooks.
The "Read & Explore" scenario is read-only. Users have no write access to repository content (including all models and objects and their relations).
Organisation Portal
Organisation Portal
Typically only one technical user account will have this system role. This user account is used when users access the Organisation Portal via the link on the web client login page.
The Organisation Portal is read-only. Users have no write access to repository content (including all models and objects and their relations).
The Organisation Portal, and hence the system role "Organisation Portal," are no longer available to new customers starting with ADONIS 15.0. Existing customers with licences that include the Organisation Portal may continue to use it and will have access to the system role "Organisation Portal".
Install Web Client
In order to host ADONIS as a web application, the web client has to be installed and configured next (see "Install Web Client").