Configure Apache Tomcat Web Server
You have to ensure that the memory settings and encoding settings (UTF-8) for Tomcat are set up properly according to the needs of ADONIS NP.
Configure Apache Tomcat Web Server Service Settings
In order to configure the Apache Tomcat service settings:
- Open the folder “<Tomcat installation>/bin” and execute the file
tomcat9w.exe.
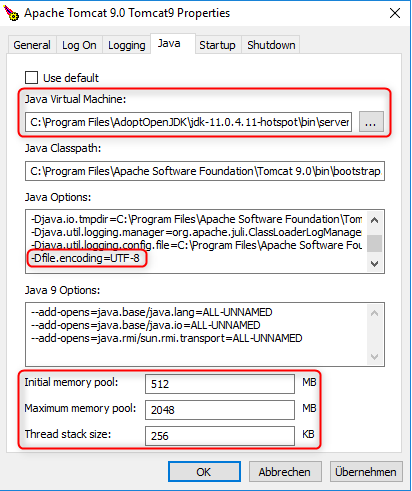
Modify the values of the “Java” tab as described here:

In the Java Virtual Machine box, specify the path to
jvm.dllin the folder “<Java installation>”. For example: "C:\Program Files\AdoptOpenJDK\jdk-11.0.4.11-hotspot\bin\server\jvm.dll".The parameter "-Dfile.encoding=UTF-8" is needed to ensure that write-back functionality from the ADONIS NP web client to the ADONIS NP database is working with all characters. Add this parameter within the Java Options box.
An initial memory pool size of 512MB is recommended. A standard maximum memory pool size of at least 2048MB is recommended. The thread stack size should be set to 256KB.
Configure Apache Tomcat Web Server Settings
In order to set the encoding of Tomcat to UTF-8:
- Open the folder “<Tomcat installation>/conf” and edit the file
server.xml.
A preconfigured server.xml file can be found in the folder “03 Web Client\02 Sample
Configuration” on the installation medium.
- Here you will find a line similar to:
<Connector port="8000" ...>
- Add the parameter URIEncoding="UTF-8" if it is not present yet. The line should afterwards look like:
<Connector URIEncoding="UTF-8" port="8000" ...>
- Adapt the “protocol” parameter:
<Connector URIEncoding="UTF-8" port="8000" protocol="org.apache.coyote.http11.Http11NioProtocol"...>
- Enable GZIP compression for performance optimisation. This means that all files that the web server sends to the browser after a request are automatically compressed. This works as follows:
<Connector URIEncoding="UTF-8" port="8000" ... compression="on" compressionMinSize="1024" noCompressionUserAgents="gozilla, traviata" compressibleMimeType="text/html,text/xml,
text/css,text/plain,text/javascript, image/jpeg"/>
Are you using an integrated environment in which requests coming to Tomcat are enriched with user authentication data before being forwarded to Tomcat (Identity Management scenario)? In this case it is recommended to restrict the IP addresses that are allowed to connect to the Tomcat instance for security reasons. In order to do this, the following section has to be added to the configuration:
<Valve className="org.apache.catalina.valves.RemoteAddrValve" allow="<HOST_IP>"/>
This can be added either directly in the server.xml file below the definition of the Engine
(<Engine name="Catalina">) or for a specific Host or Context. <HOST_IP> has to be changed to the
allowed IP address(es). For more information, please refer to
http://tomcat.apache.org/tomcat-9.0-doc/config/valve.html.
(Optional) Change the Password for the Tomcat Manager
Due to security reasons the default password for the Tomcat Manager page should be changed during installation. Note that this might not be necessary when using an already existing Tomcat installation.
In order to change the password later:
- Open the folder “<Tomcat installation>/conf“ and edit the file
tomcat-users.xml. Look for the following section:
<tomcat-users>
- If you set a password for the Tomcat Manager during installation, an entry that looks similar to the following is inserted below it. If not, add this entry and adjust the name and password.
<user name="Admin" password="password" roles="manager-gui" />
The "manager-gui" role is required to operate the Tomcat Manager page.