Rights
User groups, but also single users, are equipped with a set of rights defining and limiting their possibilities within ADONIS. This is where the Rights page comes into play. It provides a centralised location for ADONIS administrators to manage and assign permissions, ensuring that users only have the necessary access to carry out their tasks.
The Rights page consists of two panes, the catalogue and the workspace:
Catalogue: The catalogue is the left pane of the Rights page. Select a user group or user here to show its permissions in the workspace.
Workspace: The workspace is the right pane of the Rights page. You can pick different permission categories such as "Models" or "Objects" here. All elements in the selected category will be listed, and you can view or modify permissions in the Read/Write column for the chosen user group or user.
You can also select "Metamodel Rights" for editing in the workspace, which represent a special case: These permissions are set at the system role level and not at the user group or user level.
User Access Rights in ADONIS: An Overview
The starting point for access to certain parts of ADONIS are the users:
Users can belong to one or more user groups
Users (or user groups) are assigned one or more system roles
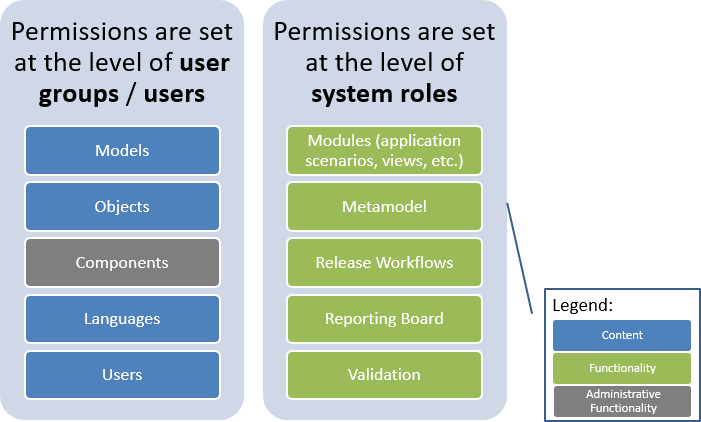
Permissions for Content
Permissions for content are mainly set at the level of user groups or directly at the user level:
Models
Objects
Languages
Users
For information on how to manage access to content, see Set Permissions for Content.
Permissions for Functionalities
Permissions for functionalities are mainly set at the level of system roles:
Modules (application scenarios, charts, etc.)
Metamodel
Release Workflows
Reporting Board
Validation
Further Information
For further information on how to manage access to functionalities, see these topics:
Default System Roles: With the default system roles your users get access to the various application scenarios of ADONIS and release workflows.
Modules: Assign modules (plug-ins) to system roles to grant access to ADONIS features. This allows you to control, for example, whether users can create matrix charts or perform an Excel import.
Manage Metamodel Rights: With metamodel rights you can control who has access to metamodel elements like model types or attributes in ADONIS.
Set Permissions for Content
Discover how to manage access to models, objects, users, and specific components and languages in ADONIS. These permissions are configured at the user group or user level.
View or Change Permissions
Here is what you need to do to view or change the permissions of a user group or user for specific content:
Go to the Rights page.
Begin by selecting the user group or user whose permissions you want to view or modify:
Select any user group or user from the Users / Groups catalogue on the left.
Note that permissions are usually not assigned to a single user, but to user groups (and then inherited by all users in these groups). This reduces administrative effort.
Next, select a tab to display the appropriate category of permissions:
Models, Objects and Users: All groups and the elements they contain
Components: The "Administration Toolkit" component and all of its sub components (= ADONIS Administration), as well as the "Modelling Toolkit (Web)" component (= ADONIS)
Languages: All languages supported by ADONIS
The elements in the category will be listed in the tab.
To find out which permissions apply to an element:
The current permission status for each element is displayed in the Read/Write column (or, for components, in the Access column).
If you cannot see the element you want, expand the hierarchy of groups and entries to display all elements. You can also use the search box to quickly find a specific element.
The permission status appears in bold if the permission was set explicitly in this place. If the permission was set elsewhere and inherited, the source of the permission is indicated in the Inherited from column.
To change the permissions for a specific element:
In the Read/Write or Access column, click
 Change Permissions, and
then select a permission.
Change Permissions, and
then select a permission.Available permissions include No access, Read, Write, and other standard permissions depending on the element selected (see Standard Permissions).
If you require finer control than what the standard permissions offer, you can leverage extended rights (see Set Extended Rights for Content).
Note that permissions are usually not assigned for single models or objects, but for model groups or object groups (and then inherited by all models or objects in the groups). This reduces administrative effort.
To change permissions for multiple elements at once:
- Select the check boxes to the left of the elements, click Bulk actions, and then select the permission you want.
The Metamodel Rights tab represents a special case. These permissions are set at the system role level (see Manage Metamodel Rights).
Set Extended Rights for Content
In most cases, standard permissions (Read, Write, etc.) are sufficient for controlling access to content in ADONIS. If standard permissions are not sufficiently granular for your needs, you can use extended rights. With extended rights, you have precise control over every action, allowing you to permit, forbid, or make them dependent on inheritance.
You can change extended rights while viewing the permissions of a user group or user. Extended rights are available for elements on the Models and Objects tabs.
For an overview of all available actions when assigning detailed rights, see Detailed Rights - All Available Actions.
To set extended rights for a specific element:
In the Read/Write column, click
Change Permissions, and then
select Extended rights....To view all available types of limited write access, expand the Read ... with translation option and Write entries in the list.
To change the authorisation of an action, select the action, and then select the desired status:
Select Allow to permit the action explicitly.
Select Forbid to forbid the action explicitly.
To reset permissions for all actions back to inherited, select Inherit all.
Use Expert Mode
Expert Mode extends the user interface. When you select a tab to view a category of permissions, additional permissions are displayed as extra columns in the workspace:
- Change Rights: Change Rights allows a user to change the user rights associated with this element. This permission is available on the Models, Objects, and Users tabs.
To allow a user to change the access rights of users/user groups to models and objects, "Change rights" must be activated on both sides: On the side of the users and on the side of the models/objects. By default, "Change rights" is set to allowed for model/object groups and set to denied for user groups.
Example: Members of the user group "Admin" should be able to change the access rights of the user group "Architects" to models in the group "Reports". The access rights of the user group "Admin" must be set as follows: "Change rights" to allowed on the user group "Architects" and the model group "Reports".
- Trusted Login: Trusted login means that a user can perform actions without having to enter a user name and password, for example when the user is authenticated against an external user management system. Only relevant in specific ADONIS scenarios, this permission is exclusive to the Users tab: It is only available for user groups (for inheritance) and users.
You can only view or change the permission status of "Trusted login" for the user group or user currently selected in the "Users / Groups" catalogue on the left.
To enable "Trusted Login" for a specific user, it's best to do this on the Users page: Open the user for editing and on the General tab, under Trusted Login, select Enabled.
To enable "Trusted login" for a user group for inheritance, you must do so here on the "Rights" page: Select the user group in the catalogue on the left, and then adjust the permission status in the workspace on the right.
To switch Expert Mode on or off:
- Click the Expert Mode button
 .
.
To set extended rights for a specific element in Expert Mode:
In the Change Rights or Trusted Login column, click
Change Permissions, and then
select the desired status:Select Allowed to permit the action explicitly.
Select Denied to forbid the action explicitly.
Select Default (inherited) to make the authorisation dependent on the next higher hierarchy level.
Swap View
The Rights page allows you to control access to ADONIS content. Typically, you would start by selecting a user group or user and managing their permissions on Models, Objects, etc.
However, you can take a different approach by swapping the view:
- Click the Swap View button
 .
.
When you swap the view, the content becomes the starting point:
The Models and Objects catalogues are displayed in the pane on the left.
The user groups and users are shown in the workspace.
When it comes to managing permissions, the process is simple:
- Select a model group, model, object group, or object, and then define which user groups or users have access to it.
Example
To help you understand the difference between the two approaches, consider these two scenarios:
Starting from a User Group
You want to know what actions a particular user group can perform on content in ADONIS. By selecting the user group, you can easily see their permissions for each item.
Starting from a Model Group
You want to manage access to a particular model group, and you need to know which users have access to it. By selecting the model group, you can easily see the users who have permission to view or modify it.
The Inheritance Concept of Permissions for Content
Rights can be inherited in hierarchies. This means, that it is not necessary to set rights on all ADONIS elements explicitly, but that rights set in a certain place also automatically apply to all subordinated structures and content – as long as there is no explicit right set there. If a subordinated element has explicit rights, this overrides the automatic inheritance (and starts a new rights hierarchy).
How Permissions for Content Combine
A user's permissions are based on:
Permissions from user group memberships
Permissions assigned explicitly to the user
The user's effective permissions are the combination of the user and user group permissions. The following rules apply:
Users with Explicit Permissions
- Permissions assigned explicitly to a user override permissions inherited from groups.
Example
If a user has Read permission and is a member of a group with Write permission, the user's effective permission is Read.
The Maximum Right
- If the user is a member of multiple user groups, and no explicit permissions have been assigned to the user, the maximum right applies: Even if the action is allowed only in one single of these groups, then the user has this permission.
Example
If a user is a member of a group with Write permission and another group with Read permission, the user's effective permission is Write.
If a user is a member of a group with Read permission and another group with No Access permission, the user's effective permission is Read.
Inheritance of "No Access"
If the No access permission is set on an element, that permission is automatically applied to all subordinated elements - even if other explicit permissions are set there.
Changing the permissions on the subordinate element does not affect the effective permissions. The actual permissions will not be applied until the No access permission in a superior hierarchy level is removed.
Example
If a user is a member of a group with No Access permission to a model group, the user's effective permission is No Access to this model group and all subordinate groups.
Types of Permissions for Content
ADONIS provides two types of permissions for content: standard permissions and extended rights.
Standard Permissions
The following standard permissions can be assigned to user groups or users for accessing content, such as a models or objects:
No Access: This element is not available for the user (it is invisible for them in the various lists and catalogues).
Read: The user can access this element, but is not allowed to make changes or to save potential changes.
Read & Translate: The user may translate the attribute values into other content languages. This permission is only available for models and objects.
Write: The user may create, delete and edit the element as they want.
Default (inherited): No permissions are set explicitly for this element. The actual permissions that apply to this element are inherited from a higher hierarchy level.
If Write is allowed, Read and Read & Translate will also be allowed. See Dependent Rights for an explanation of how some permissions do not only apply for themselves.
Additional standard permissions include:
- Access / No access: The user may or may not use the "Administration Toolkit" component and all of its sub components (= ADONIS Administration), as well as the "Modelling Toolkit (Web)" component (= ADONIS). This permission is only available for components.
Extended Rights
Extended rights include:
- Write (partial): The user may perform some manipulations while others are forbidden; read access is not limited. For example, a user may be allowed to create models in a model group, but not allowed to delete models from this group. See Detailed Rights - All Available Actions to find out which types of limited write access exist for the different categories of permissions such as Models or Objects.
If write access to an element is limited by forbidding some writing actions through extended permissions, the effective rights status will be Write (partial)..
Information about Inheritance
Rights can be either explicitly assigned or inherited. The column Inherited from indicates the origin of the rights:
- [Empty]: The field in the column remains empty if the right was explicitly set in this place.
Additionally, the permission status is displayed in bold in the Read/Write or Access column.
Model/Object/User Group <Name>: The right was set in a higher hierarchical level (group) and applies here. For example: Model Group 01 ADOmoney Bank or User Group Reader.
Release workflow configuration: This right results from a user's release workflow role.
Default permission set by system: No rights are set explicitly for this element and no rights have been inherited. The default rights set by ADONIS apply.
Special Cases Involving Permissions for Content
When it comes to permissions for content, some special cases are possible that must be considered by ADONIS administrators but can also be used purposefully.
Dependent Rights
Some authorisations do not only apply for themselves, but are as well dependent from each other for logical reasons. Therefore many right states automatically trigger other certain states:
Read forbidden: Also Write and, if available, Read & Translate are forbidden automatically.
Write allowed: Also Read and, if available, Read & Translate are allowed automatically.
Read & Translate allowed: Also Read is allowed automatically.
Read & Translate forbidden: Also Write is forbidden automatically.
Assign Global Administration Rights
As an ADONIS administrator, you may grant global administration rights to an individual user.
Users with global administration rights can perform the same administrative tasks as the super user Admin, with one exception: Only the user Admin has full access to all files in the database (see section File Management).
To grant global administration rights:
Go to the Rights page.
In the Users / Groups catalogue on the left, select the user to whom you want to assign global administration rights.
Go to the Components tab.
In the workspace, find the "Administration Toolkit" component.
In the Access column, click
Change Permissions, and then choose Assign global administration rights. When prompted to
continue, click Yes.
The user is granted write access to all model groups, models, user groups and users.
Object Ownership
In ADONIS rights can be dynamically set via relations. For example, a user can be assigned ownership of a repository object.
You can find more information about these settings in the section Object Owners.
Manage Models and Objects
The Rights page provides tools that let you efficiently manage your repository content, including models, model groups, objects, and object groups.
Adjust Model Groups and Object Groups
Model groups and object groups can be created, deleted, copied, pasted, and more:
Go to the Rights page.
Select either the Models or Objects tab, depending on what you want to adjust.
Find the model groups or object groups you want to adjust.
To adjust a single group, hover over the group, click
 More, and then select the
option you want:
More, and then select the
option you want:New model group | New object group
Rename
Delete
Cut and paste
You can also cut or delete multiple groups at once:
- Select the check boxes to the left of the groups, click Bulk actions, and then select Cut or Delete.
Adjust Models and Objects
Models and objects can be deleted, cut, and pasted:
Go to the Rights page.
Select either the Models or Objects tab, depending on what you want to adjust.
Find the models or objects you want to adjust.
Choose one of the following actions:
To adjust a single model or object, hover over it, click
More, and then select
the option you want.To adjust multiple models or objects at once, select the check boxes to the left of them, click Bulk actions, and then select the option you want.
The following options are available:
Cut (and then paste into a group)
Delete
Recycle Bin
Use the recycle bin on the Rights page to recover models and objects in case an import operation fails. The recycle bin in ADONIS 16.0 is specifically designed to hold models and objects that are lost due to unexpected errors, such as when a repository import fails or times out.
It's important to note that models and objects deleted in a regular manner in ADONIS or in the ADONIS Administration are not stored in the recycle bin. They are removed immediately and cannot be restored.
The recycle bin is only displayed in ADONIS 16.0 if it contains items. It retains only the models and objects themselves; model groups and object groups containing these models and objects are not preserved. You have the option to restore items from the recycle bin or to permanently delete them.
Search
To help you quickly find what you want, both the catalogue on the left and the workspace on the right offer a search function:
- In the Search box, type the text you want to search for.
Export Rights
For backup purposes, user rights can be saved into an external AXR file.
To export user rights:
Go to Rights > More options, and then click Export rights.
Optional: Select Protect export file with password to encrypt the export file.
Click Export. The data is exported.
When the export is complete, a success message appears. Close the message to complete the process.
Import Rights
This procedure allows you to import user rights into the ADONIS database.
To import rights:
Go to Rights > More options, and then click Import rights.
Click Browse and select the rights file you want to import. You can also drag a file from your computer to the Drag and drop files here to upload area.
Click Import. The rights are imported.
Optional: If the import file is encrypted, enter the password and click OK.
When the import is complete, a success message appears. Close the message to complete the process.
Manage Metamodel Rights
Discover how to manage access to metamodel elements such as model types or attributes in ADONIS. These permissions are configured at the system role level.
To which Metamodel Elements Can I Assign Metamodel Rights?
Metamodel rights allow you to assign user rights to the following metamodel elements:
Model types
Classes (= object classes)
Relations (= relation classes)
Attributes
Additionally, you can restrict target classes of relations.
For Which System Roles Can Metamodel Rights Be Configured?
No metamodel rights can be configured for the default system roles created by ADONIS. Instead, create your own system roles, change the metamodel rights, and assign the appropriate users.
View or Change Metamodel Rights
Here is what you need to do to view or change the metamodel rights of a system role:
Go to the Rights page and select the Metamodel Rights tab.
Begin by selecting the system role whose metamodel rights you want to view or modify:
Select any system role from the System Roles catalogue on the left.
If metamodel rights are not enabled for the selected system role yet, click Enable metamodel rights.
Next, select a tab to display the appropriate category of metamodel rights:
Classes: All object types, and their attributes and relations
Model Types: All model types, and their attributes and relations
The elements in the category will be listed in the tab.
To find out which metamodel rights apply to an element:
The current permission status for each element is displayed in the Rights column.
If you cannot see the element you want, expand the hierarchy of classes or model types to display all elements. You can also use the search box to quickly find a specific element.
The permission status appears in bold if the permission was set explicitly in this place. If the permission was set elsewhere and inherited, this is indicated by the addition of (inherited) next to the permission status.
To change the metamodel rights for a specific element:
In the Rights column, click
Change Permissions, and
then select a permission.Available permissions include Not set, No access, Read, Read & translate and Write (see Types of Access Permissions to Metamodel Elements).
If you want to grant limited write access to metamodel elements, you can leverage extended rights (see Set Extended Rights for Metamodel Elements).
To change metamodel rights for multiple elements at once:
- Select the check boxes to the left of the elements, click Bulk actions, and then select the permission you want.
Look up examples that illustrate how changing metamodel rights affects working with ADONIS in the chapter Impact of Restricting Access to Metamodel Elements.
Set Extended Rights for Metamodel Elements
You can change extended rights while viewing the metamodel rights of a system role.
Extended rights allow you to grant limited write access to metamodel elements. For example, you can specify that users with a specific system role can create models, but cannot delete models.
To set extended rights for a specific metamodel element:
In the Rights column, click
Change Permissions, and then select Extended rights....To view all available types of limited write access, expand the Write entry in the list.
To change the authorisation of an action, select the action, and then select the desired status:
Select Allow to permit the action explicitly.
Select Forbid to forbid the action explicitly.
No extended rights can be assigned on target classes of relations.
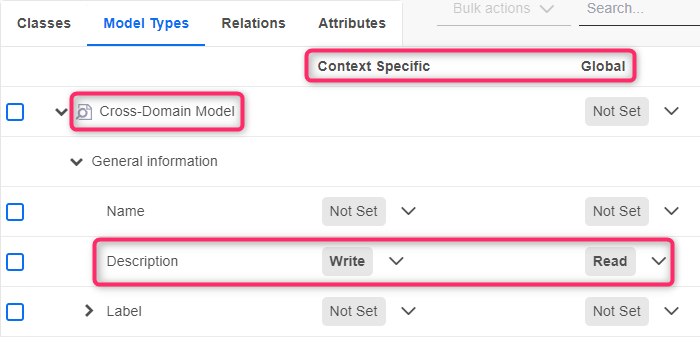
Global Rights vs. Context-Specific Rights
In ADONIS, rights to metamodel elements can be set globally as well as context-specific. Global rights are identical everywhere an element is used. Context-specific rights overwrite global rights in the context of a specific model type, class etc.
Example
Access to the Description attribute has been globally set to read access for users with a specific system role. They cannot edit the description of models, objects or relations.
However, in the context of the Cross-Domain Model, they have write access to the Description attribute. Therefore, the users can edit the description of Cross-Domain Models.
Standard View
By default, when viewing the metamodel rights of a system role, you will see:
the global rights that apply to classes and model types - these rights are identical everywhere those elements are used
the context-specific rights for attributes and relations - these rights apply in the context of the class or model type you are looking at
Use Expert Mode
When Expert Mode is enabled, the user interface is extended:
Besides Classes and Model Types, you will also see the metamodel rights categories (= tabs) Relations and Attributes
In the workspace, you can edit context-specific or global metamodel rights
The most significant change in contrast to the standard view is the ability to restrict access not only to attributes and relations within specific classes or model types, but also globally.
To switch Expert Mode on or off:
- Click the Expert Mode button
.
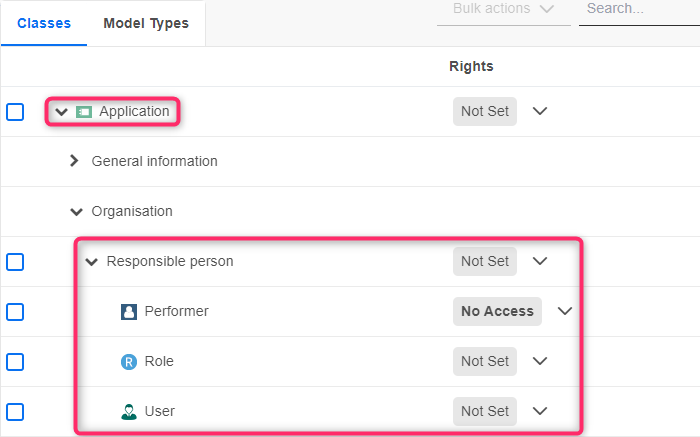
Restrict Target Classes of Relations
In context of models and objects, you can specify for outgoing relations which target classes are available to members of a system role.
Possible permissions are: Users have access to a target class (Not Set) or not (No Access). Other types of permissions are not available for target classes.
Example
Starting from the source object Application, you can define e.g. for the relation Responsible person, that Roles and Users are available as target objects, but Performers are not.
Types of Access Permissions to Metamodel Elements
These types of access can occur:
No Access: This element is not available for the user (it is invisible for them in the various lists and catalogues).
Read: The user can access this element, but is not allowed to make changes or to save potential changes.
Read & Translate: The user may translate the attribute values into other content languages.
Write (with Extended Rights Create, Delete and Edit): The user may create, delete and edit the element as they want. You can specify which actions are allowed by assigning extended rights.
Not Set: No rights are set explicitly for this element.
The following permissions CANNOT be assigned for attributes: Read & translate and the extended rights Create, Delete and Edit.
For target classes of relations, you can ONLY specify whether users have access to them (Not Set) or not (No Access).
Combining Permissions to Metamodel Elements
When a user is a member of multiple system roles which are relevant for metamodel rights, the following rules apply:
The least restrictive permissions applies ("Read" and "Write" results in "Write").
Any explicit permissions override "Not Set" ("Read" and "Not set" results in "Read").
Visualisation of the Source of Metamodel Rights
Metamodel rights can either be assigned directly or indirectly via inheritance. The source of the right is indicated alongside the permission granted for a metamodel element:
- No additional information: The right was set explicitly in this place and is also valid here. For example: Read.
Additionally, the permission status is displayed in bold in the Rights column.
- (inherited): The right was set globally and applies in the context of this specific model type, class etc., because no context-specific rights are set. For example: Read (inherited).
Show Only Set Rights
While viewing the metamodel rights of a system role, all metamodel elements are displayed by default. However, you can change the view to only display metamodel elements with explicitly set rights. To change the view:
- Click Show only set rights.
Enable or Disable Metamodel Rights
For each system role, you can easily control whether editing metamodel rights is allowed or not.
Enable Editing Metamodel Rights
Go to the Rights page and select the Metamodel Rights tab.
Select the system role whose metamodel rights you want to modify, and then click Enable metamodel rights.
Disable Editing Metamodel Rights
Go to the Rights page and select the Metamodel Rights tab.
Select the system role for which it should not be possible to edit metamodel rights, and then click Disable metamodel rights.
Copy Metamodel Rights
While viewing the metamodel rights of a system role, you can copy metamodel rights:
from metamodel element to metamodel element
from system role to system role
Copy Metamodel Rights from Element to Element
To copy metamodel rights from one metamodel element to another:
In the workspace, find the source element, which can be an attribute, model type, class, or relation.
Next to the permission you want to copy, click
Change Permissions, and then
select Copy rights.Find the target element of the same type as the source element (e.g., attribute to attribute).
Next to the permission you want to overwrite, click
Change Permissions, and then
select Paste rights.Repeat steps 3 - 4 to paste the permission to other target elements.
Copy Metamodel Rights from System Role to System Role
To copy metamodel rights from one system role to another:
In the System Roles catalogue on the left, find the source role.
Hover over the source role, click
More, and then select Copy
metamodel rights….Find the target role.
Hover over the target role, click
More, and then select Paste
metamodel rights….Repeat steps 3 - 4 to paste the permission to other target roles.
Reset Metamodel Rights
While viewing the metamodel rights of a system role, you can reset the metamodel rights of individual metamodel elements or entire system roles.
Reset Metamodel Rights of an Element
To reset the metamodel rights of a metamodel element back to the default:
In the workspace, find the attribute, model type, class, or relation whose permissions you want to reset.
Next to the permission you want to reset, click
Change Permissions, and then
select Reset Rights.
Reset Metamodel Rights of a System Role
To reset the metamodel rights of a system role back to the default:
In the System Roles catalogue on the left, find the system role whose permissions you want to reset.
Hover over the system role, click
More, and then select Reset
metamodel rights….