ADONIS Process Automation
Welcome to the ADONIS Process Automation user manual!
ADONIS Process Automation is powered by the leading BPM suite ADONIS. It enables you to execute your workflows, ensuring that the processes are managed under one roof and the quality is at the highest standard. Model and document your processes in ADONIS, assess them using Insights dashboards, evaluate changes with the ADONIS simulation component and inspect the automation potential with the ADONIS analysis features. Deploy the processes from ADONIS directly to your preferred workflow engine, such as TIM. For human workflows, TIM Solutions is the preferred partner for ADONIS Process Automation.
Key Features
- Modelling processes for automation
- Reusable workflow - automate existing or design new processes
- Assessment of processes based on their automation potential
- Syntax validation of processes before execution
- One-click deployment
- Monitoring process execution
- Low-code/No-code definition of forms and workflows
Explore this user manual to learn what ADONIS Process Automation can do for you!
Setup and Latest Features
Contact your Administrator for support with the ADONIS Process Automation installation process.
Check the Release History section to see which new features were introduced in the latest releases.
About This Manual
This manual gives instructions on how to assess your process portfolio for automation potential, how to document process automation parameters, and how to decide which workflow engine is best suited based on the type of process you want to automate.
You will receive in-depth instructions on how to design processes for TIM. This covers the main parts of process design, storing automation variables and deploying the process to TIM. Once you have modelled and deployed the process, your users can start their processes directly from ADONIS.
ADONIS can be used to automate processes in any workflow engine that you want to use. Check the Different Types of Workflows section to read more on different types of workflows and workflow engines.
Learn More
ADONIS Process Automation Marketplace
Process Automation Overview
Process automation can help you and your organisation improve process efficiency and transparency. Employees can focus on the most important tasks while customers get services and products faster. Process automation reduces costs by reducing human errors and time consumption, while making processes more robust and reliable. In the end, automated processes are also easier to monitor and streamline through the organisation.

Process automation starts in ADONIS. ADONIS is your BPM Portfolio's single source of truth. In ADONIS, you will use an object-oriented approach to design and document all of your processes. You will assign risks, controls, ownerships and all other important aspects so you can evaluate their quality and automation potential.
Once the appropriate processes are selected (based on automation potential, benefits and costs), you can proceed to add necessary parameters and deploy the processes to TIM where you can build forms and implement the automated process. Once you have started your processes, you can monitor their operation directly in TIM dashboards and get an overview in the Insights dashboard of the automated process in ADONIS.
In the next chapters, you will learn how to automate your procedures effortlessly and with little to no coding.
Assessing Automation Potential in ADONIS
Before you start automating your processes, you need to asses the automation potential of your processes. Most important aspects of the process automation potential are documented in the Process object's Notebook.
Potential Candidates for Process Automation
There are many different processes that can be automated. For example:
- Employee onboarding
- Budget request and approval
- IT/Hardware requests
- Vacation requests
- Invoicing and payment processes
- GDPR related requests
- ...
The aim is to find those processes that are stable, high in volume and standardized. With maturity and precise documentation in ADONIS, this decision is easier. You choose the processes that are relatively low in complexity, predictable and frequent while maintaining low automation costs.
Are you unfamiliar with process documentation, and need instructions on how to use Notebooks in ADONIS? Check out the Add Information to Models & Objects section in the ADONIS User Manual.
Documenting Process Automation Potential
In order to document your Processes in ADONIS, you have to access the Process' properties:
- Open your Process object's Notebook (double click the object).
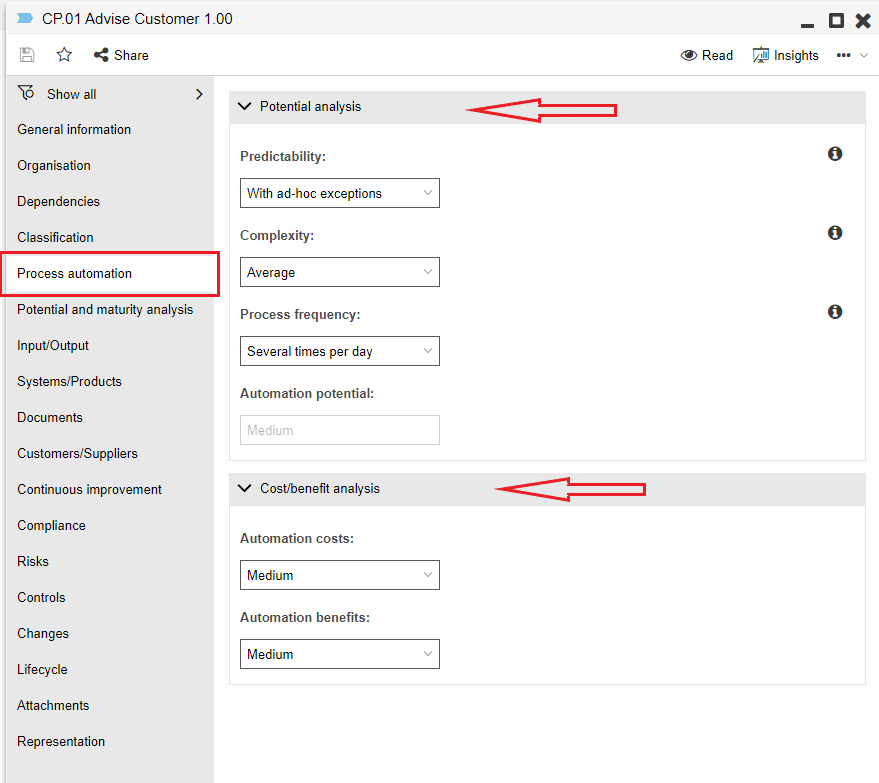
- Edit the following properties in the "Process automation" chapter:
- Predictability
- Complexity
- Process Frequency
- Automation costs
- Automation benefits
Another property in this chapter, the Automation potential, will be calculated automatically.
If you want to enter data for more processes, it is advisable to use the tabular editor.
Select the Process objects you want to edit and open the tabular editor, then choose the columns from the "Process Automation" chapter and edit the attributes as needed.

Need instructions on how to use the tabular editor? Check out the Tabular Editor: Large-Scale Attribute Editing section in the ADONIS User Manual.
Analysing Process Automation Potential
You can analyse the automation potential of multiple processes at once by creating charts (for single processes you can also look at their Notebook).
Need instructions on how to create charts? Check out the Working with Charts section in the ADONIS User Manual.
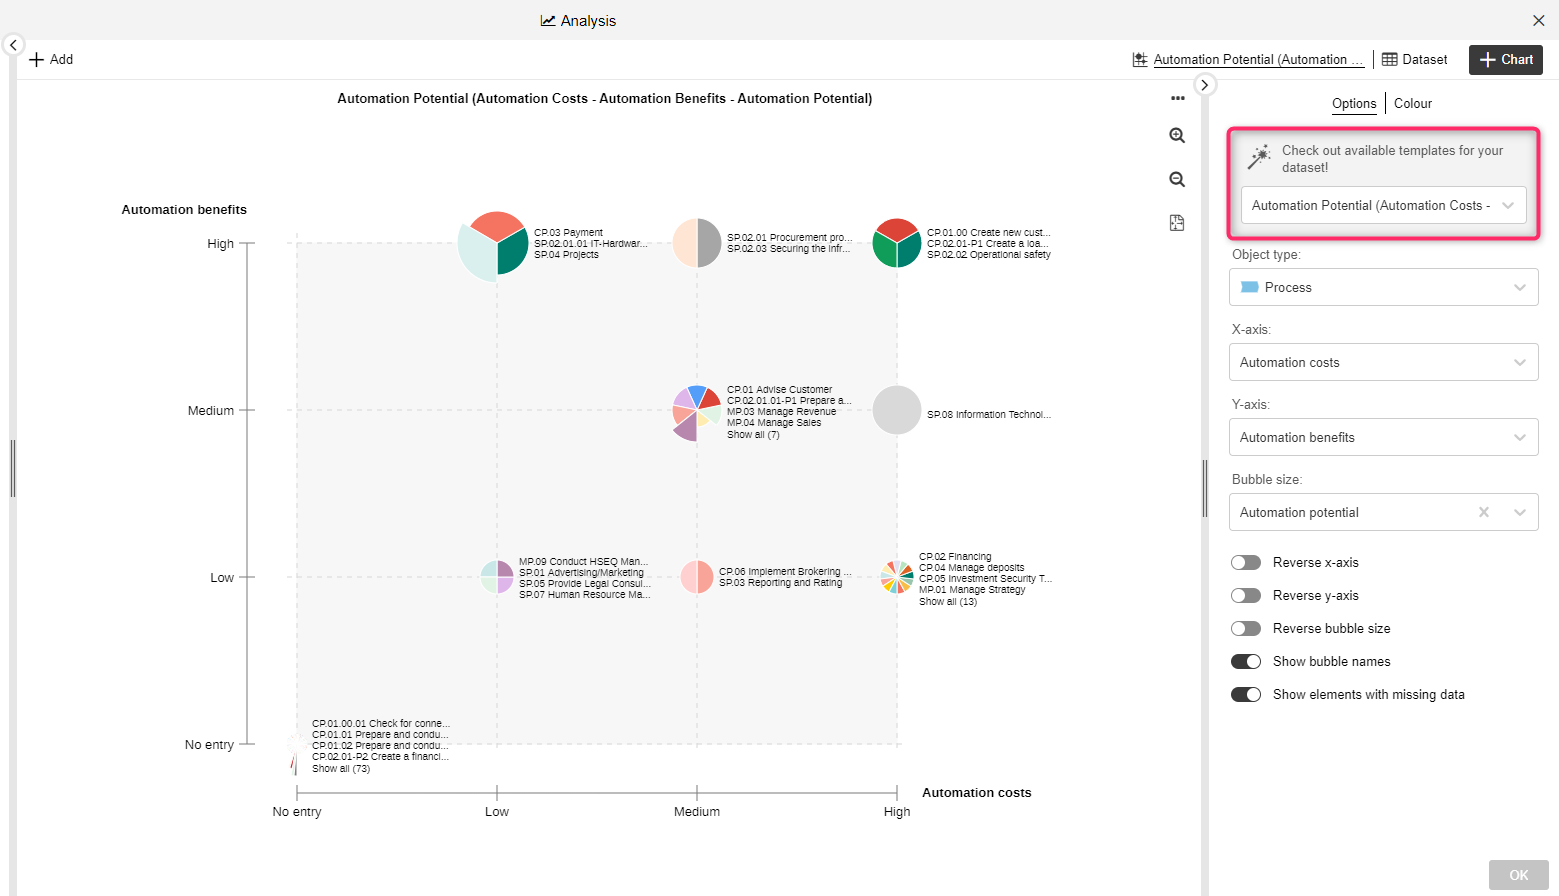
To start your analysis, choose the processes you want to analyse (= those you want to automate) and create a bubble chart. Select the "Automation Potential (Automation Costs - Automation Benefits - Automation Potential)" template and observe your processes to find out which processes have high automation benefits and low automation costs.
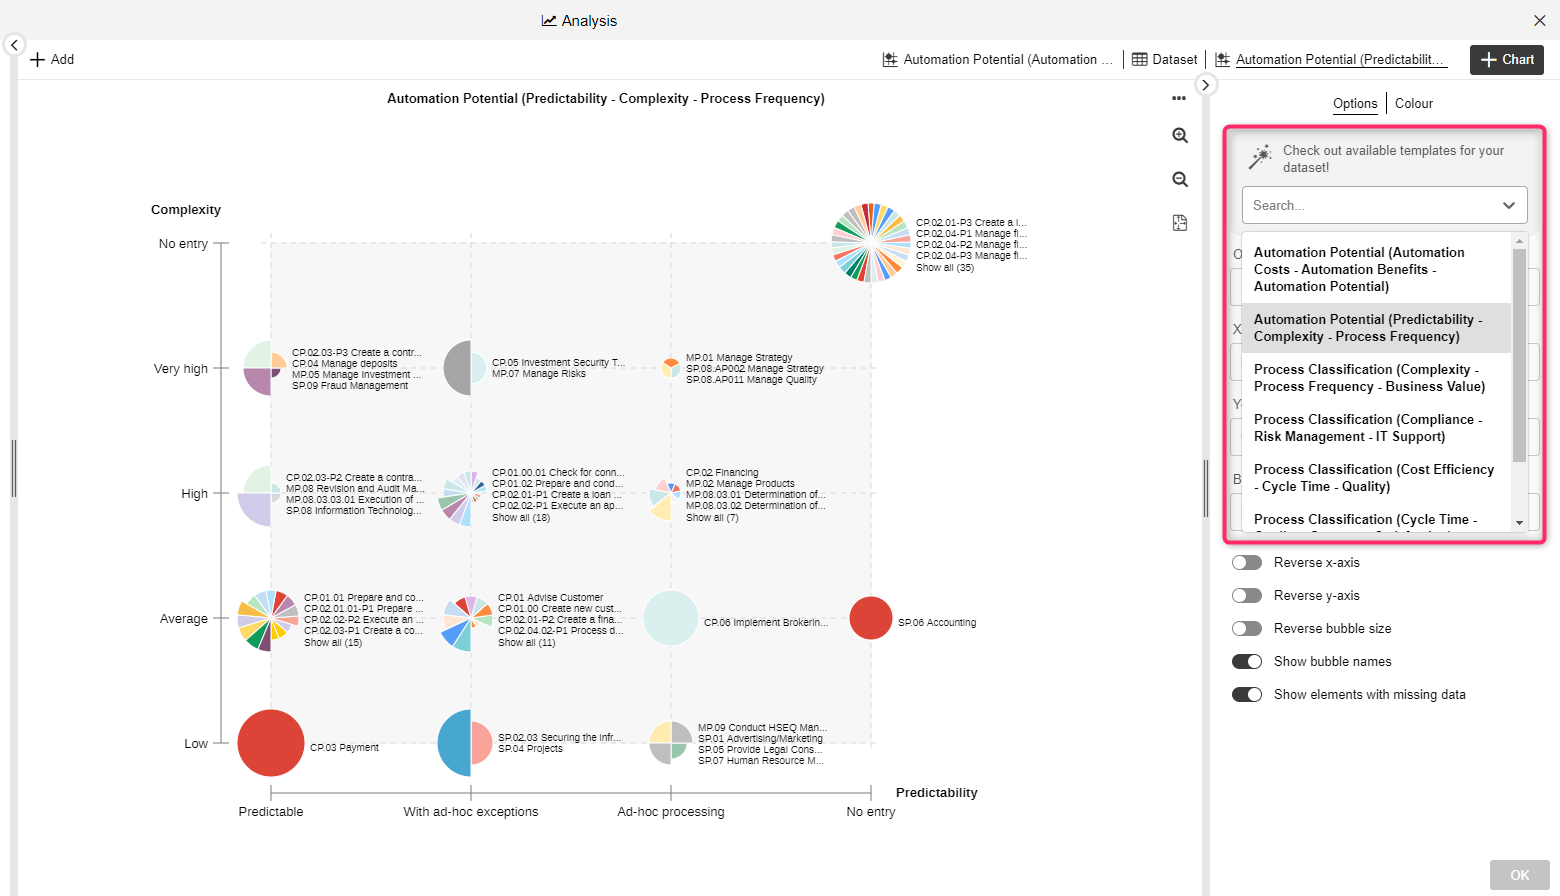
Next, add another bubble chart to your analysis. Select the "Automation Potential (Predictability - Complexity - Process Frequency)" template to find out which processes have a high predictability and process frequency while having a low complexity.
ADONIS Process Automation with TIM
In the following sections we will cover the specific steps you need to take to automate a Human Workflow in TIM. You will need to model a Business Process Diagram in ADONIS and assign various variables in order to ensure that TIM can handle the process.
Process Modelling for Process Automation in TIM
We will start from the point of an already modelled process (a Business Process Diagram) and use a basic process of requesting IT hardware as an example.
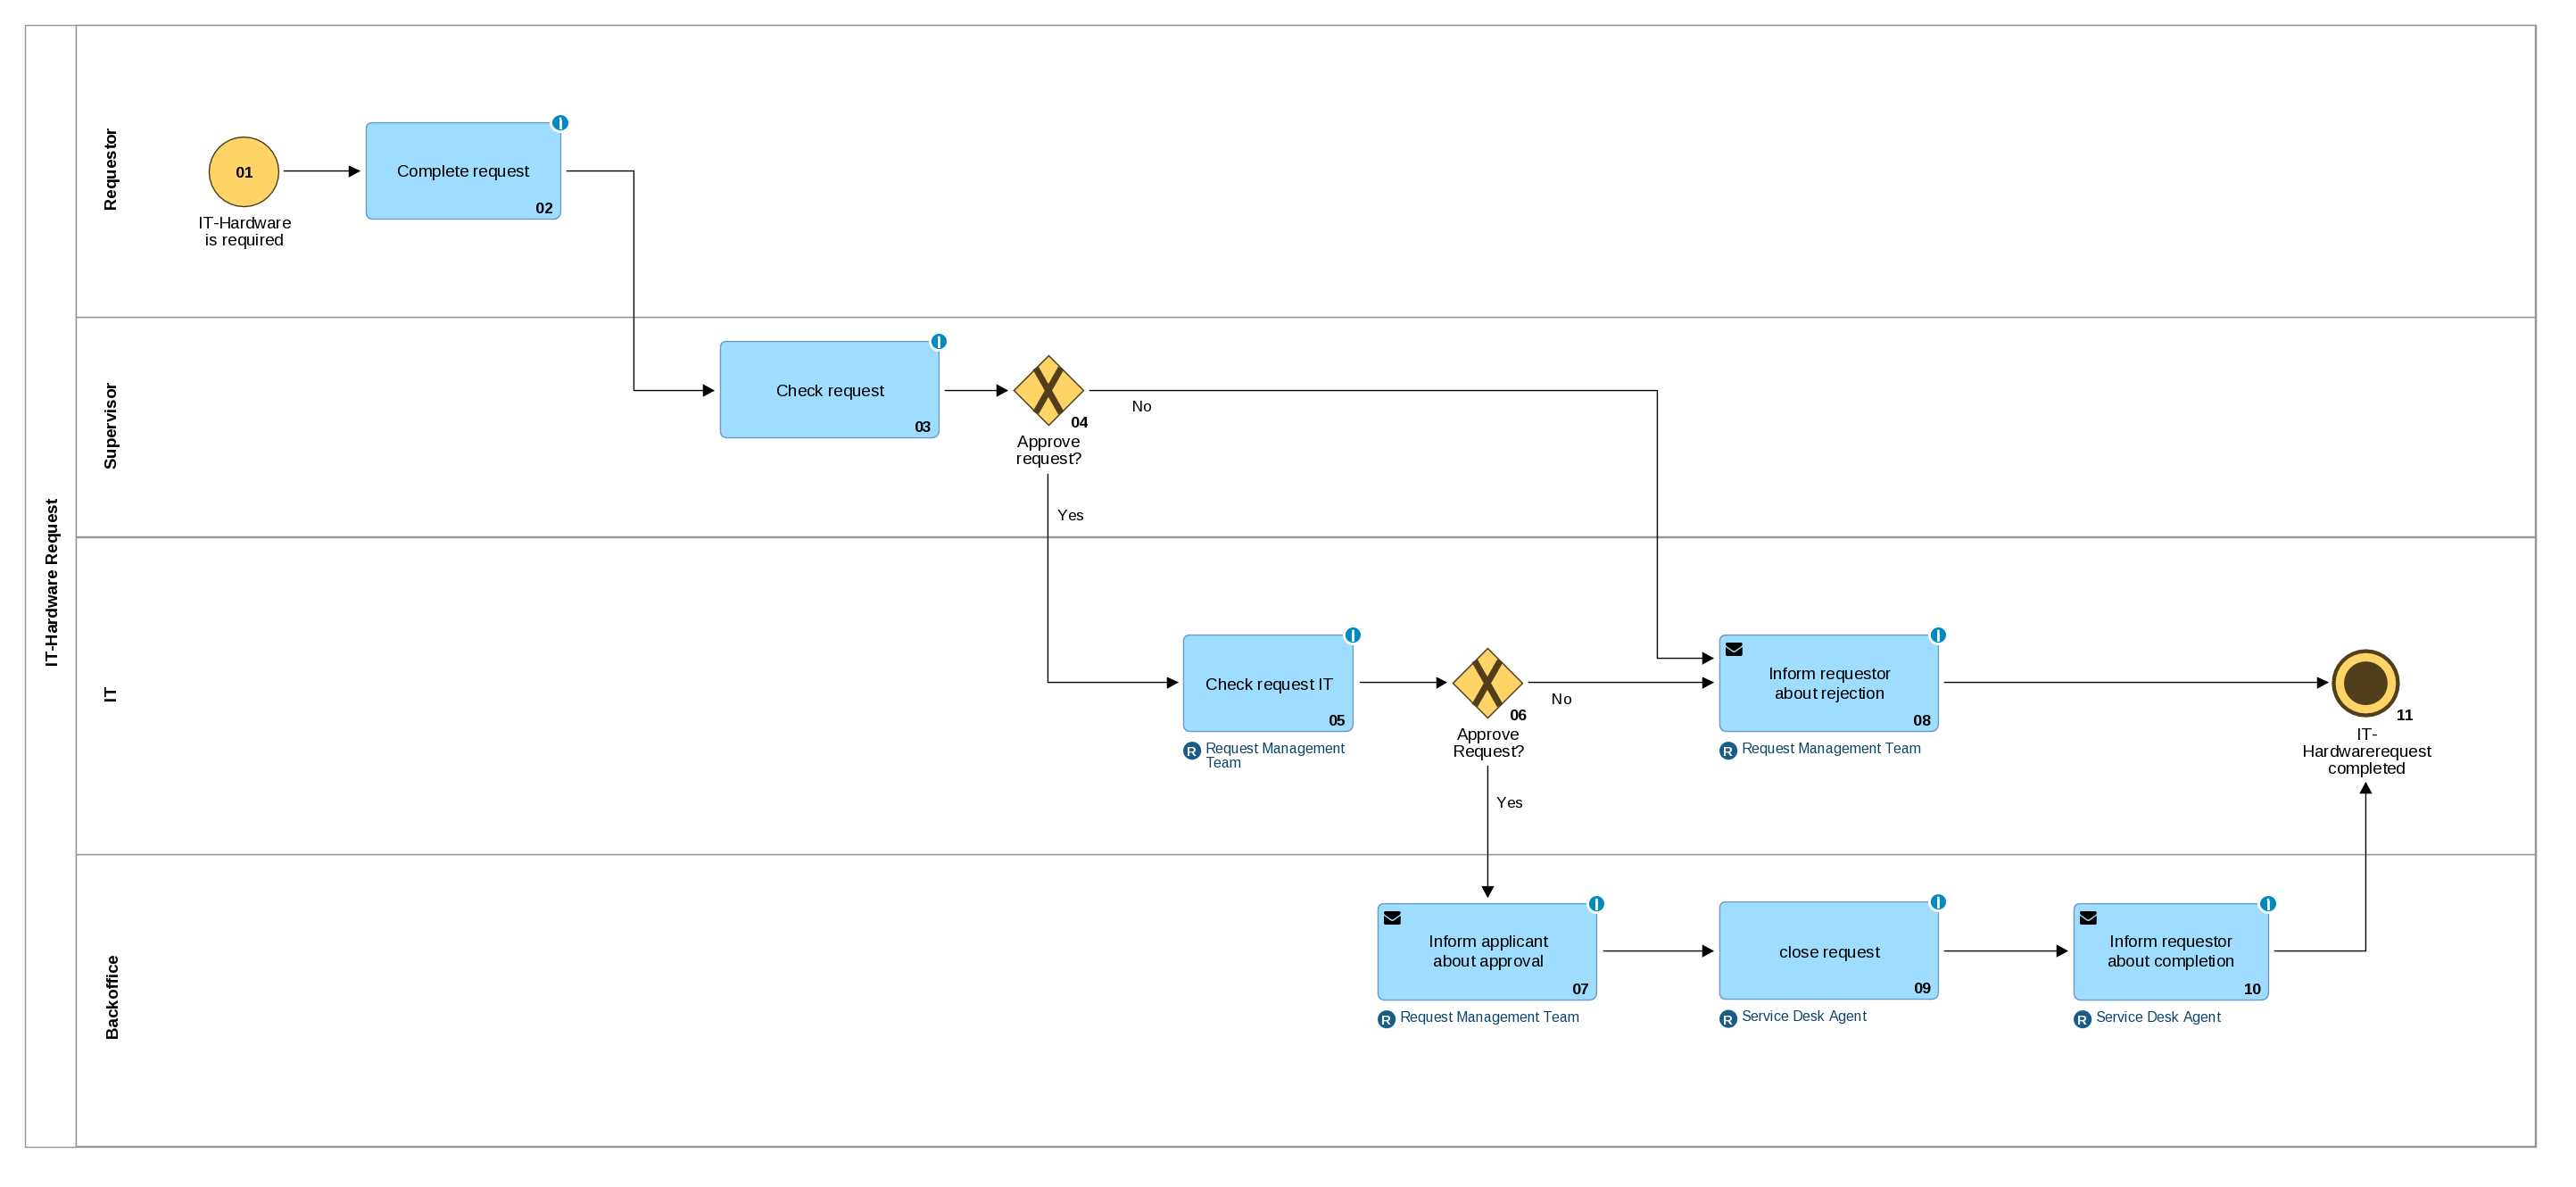
Need instructions on how to model processes in ADONIS? See Create Models in the ADONIS User Manual.
Assigning User Groups
User groups in TIM define user rights regarding the automated processes. Use Lanes to define who is responsible for specific tasks in the process, and assign groups in the Start Event object to define who is the manager of the process, who is allowed to start the process and who can deploy the process to TIM.
Lanes and Pools
A Business Process Diagram has to have a Pool and Lanes assigned:
- the Pool name defines how the process is named in TIM
- Lanes are associated with the user groups in TIM
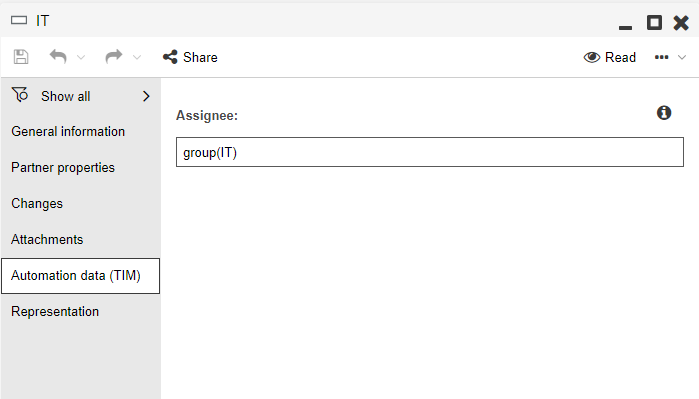
Select the Lane you want to edit, open the Notebook chapter Automation data (TIM) and add "group(<my-group-name>)" to the Assignee field. Repeat this step for all of the Lanes in your process.
Because groups are not always called the same as the Lane, the Lane name can remain clear and concise. The Assignee field indicates the user or group in charge of the tasks within the Lane.
Start Events
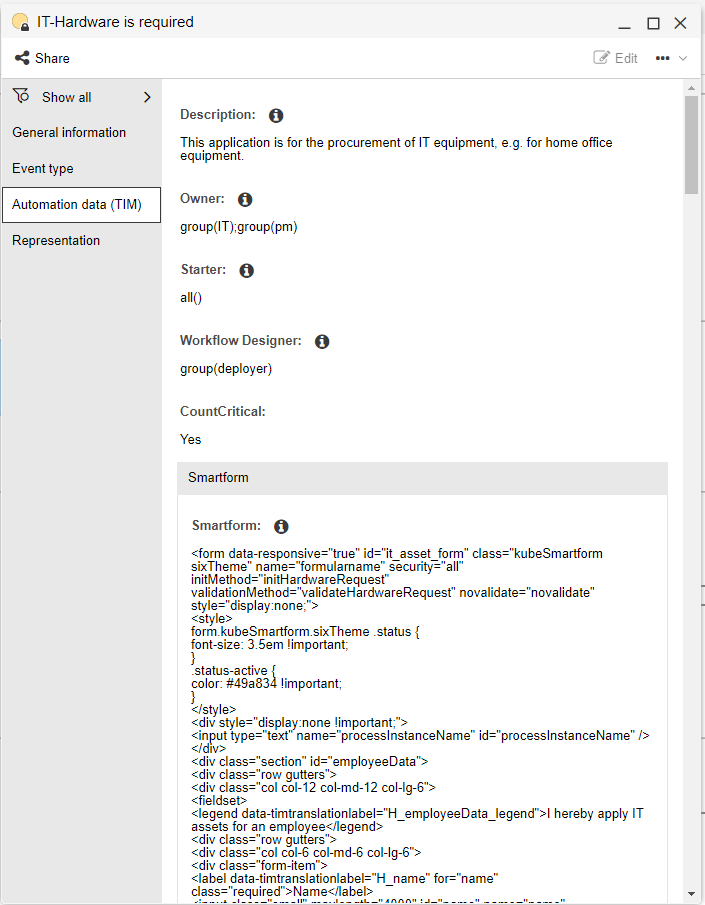
In the properties of the Start Event you will define additional user groups. Using the same "group(<my-group-name>)" logic as before, you will set the following properties in the Notebook chapter Automation data (TIM):
- Owner
- Assign process owner rights for named users and groups to manage a process in the automation engine.
- Starter
- Assign process starter rights for named users and groups to start a process in the automation engine. If everyone should be able to start the process, add "all()" to the field.
- Workflow Designer
- Assign process deployer rights for named users and groups to publish a process to automation engine. Limits who can change productive workflows and deploy them to TIM.
- CountCritical
- Must be enabled to calculate the Critical Path Method, i.e. the CPM status that indicates the schedule of the process through traffic-lights in TIM. This way the process manager can keep track of the whole process. The CPM function is only available to users who have the process owner and process manager roles.
Building a Smartform
To be able to execute the process in TIM, you need to build a Smartform. Smartforms are HTML forms and contain all required data for processing the process. These forms are attached to a process definition. In a started instance a smartform can be viewed at any time and data can be entered and changed.
To learn how to use TIM and build forms and executable workflows, please go through the user guides available in the TIM documentation:
- TIM User Guide
- TIM Process Designer Guide
- Smartform Designer (low-code/no-code approach to create Smartforms)
Assigning Automation Data to Tasks
In the properties of Task objects in ADONIS you can assign parameters for process execution, such as:
- Processing times
- Subtasks of the activities
- Email configuration
- Action Handlers
Read on to learn more about these parameters.
Processing Times
For human tasks, you can define the expected duration on the Task level. This is linked to the business calendar in TIM which is defined in TIM Administration.
Need instructions on how to administer your TIM company profile? See the TIM Administration Guide.
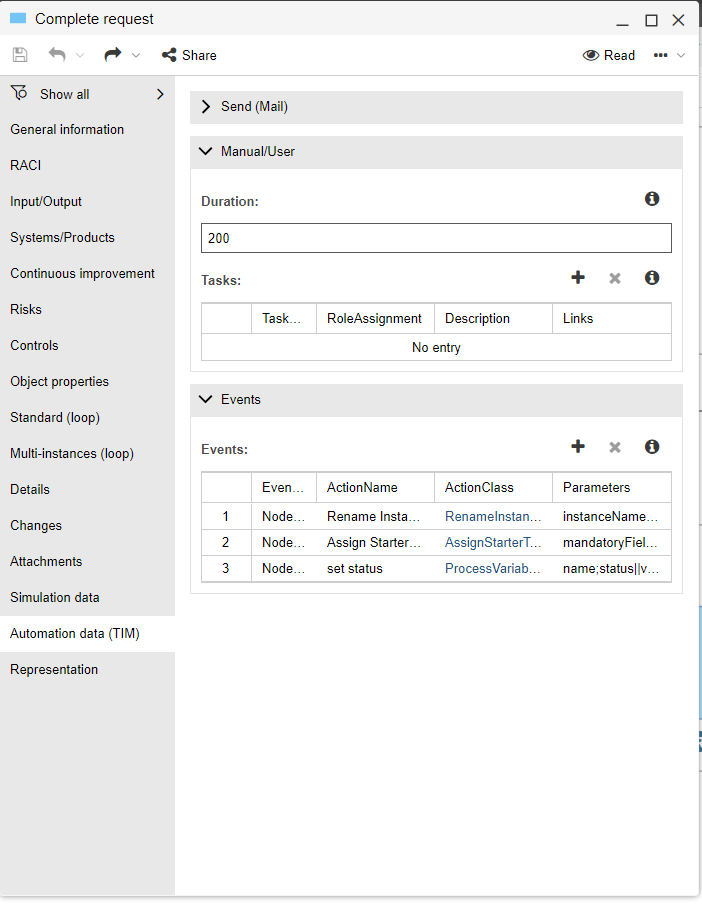
Open the Task's Notebook and, in the "Automation Data (TIM)" chapter, edit the Duration parameter in the "Manual/User" group. Enter the duration in the format HMM (keep in mind that 24 hours can mean three working days if your calendar is set to 8 working hours).
Tasks (subtasks)
The Tasks parameter is a legacy parameter in TIM which allows you to define subtasks within an activity. It is not represented in the Business Process Diagram in ADONIS, but it is present in the Task object's Notebook. In TIM you can define extra steps that need to be done in the form if there is a need.
To edit the Tasks parameter variables in ADONIS, open the Task's object Notebook and, in the "Automation Data (TIM)" chapter, edit the Tasks parameter in the "Manual/User" group. Double click the fields in the table to add the following variables:
| Attribute Name | Attribute Description |
|---|---|
| Description | Further instructions for processing the Task can be given here. This description will be displayed as soon as the Task is generated by the system. |
| Links | Links can be added here, which are displayed to the user when editing the Task. |
| TaskName | The Name of the Task. |
| RoleAssignment | The role assignment of the activity can be overridden for this Task. |
Send (Mail)
If an activity can be done automatically by the system, for example when an email is sent, you need to change the type of the activity.
Open the Business Process Diagram in the graphical editor. Click on the Task and the Hover Modelling Assistant opens. Click on the Change properties icon and choose Send.
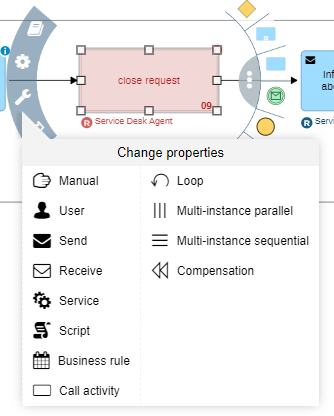
The mail node (= a Task of the "Send" type) is a basic function in TIM to send standard emails. These can be emails to external individuals and groups, as well as notifications to process participants and decision makers. These emails can contain process information or prompt specific users to complete a task in the system.
To set the mail node properties in ADONIS, open the Task object's Notebook and, in the "Automation Data (TIM)" chapter, add the following variables in the "Send (Mail)" group:
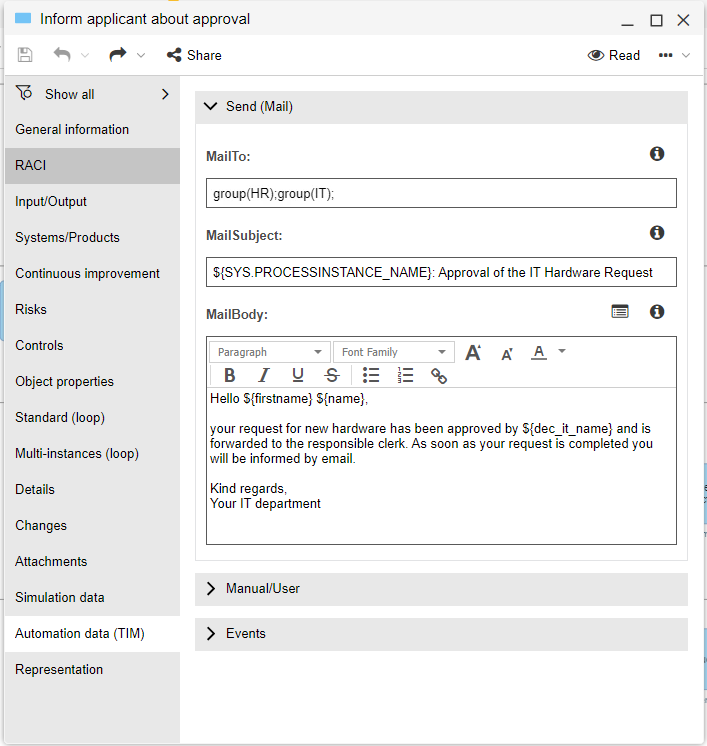
| Attribute name | Attribute Description |
|---|---|
| MailTo | The recipients can be defined here. Groups and user definitions ["group(<my-group-name>)" or "user(<my-user-name>)] can be used. In addition, fixed email addresses or distribution lists can also be used here (e.g. it-asset@yourcompany.com). |
| MailSubject | The subject of the email can be freely assigned. In the screenshot above, a variable is also referenced (the name of the process run). These variables can be used in the subject or in the text and are always masked with a $ {…}. As soon as the email is sent, the variable placeholders are replaced by their actual value. Further information on the variables can be found on the VariablesHelper page in the TIM documentation. |
| MailBody | The email text can be designed in any way. Variables can also be used. The Mail Nodes page in the TIM documentation explains how to define HTML emails and other settings. |
Events
Events are special functions that can be executed as soon as a certain process step is reached or exited. These events are called ActionHandlers and the system supports a whole range of pre-made ones.
For the full list of ActionHandlers see the ActionHandler page in the TIM documentation.
There are a number of pre-made ActionHandlers. New ActionHandlers are often created for special functionalities in projects. The maintenance of ActionHandlers in the process always works in the same way. ActionHandlers are readily available for ADONIS, please contact your ADONIS administrator to import them to the object repository.
To set ActionHandler properties in ADONIS, open the Task object's Notebook and, in the "Automation Data (TIM)" chapter, add the following variables in the "Events" group:
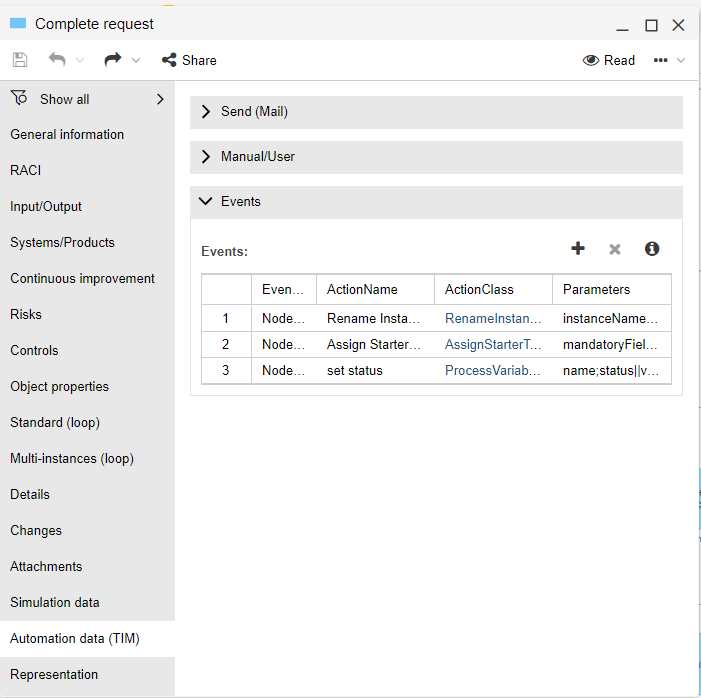
| Attribute name | Attribute Description |
|---|---|
| EventType | Specifies whether the ActionHandler should be executed when the activity is reached (input node) or when it is exited (output node). |
| ActionName | Can be chosen freely. Serves for a better overview of the list of events. |
| ActionClass | Defines which ActionHandler is to be executed. It can be copied from the ActionHandler page. |
| Parameter | Depending on the ActionHandler, parameters must be passed. The description can be found on the ActionHandler page. In this context, the parameter 'mandatoryFields' and a freely chosen variable name has to be entered. |
Non-exclusive gateway
In order for the validation to be successful, when modelling Non-exclusive Gateways, make sure you always converge the paths again. Open the Non-exclusive Gateway's Notebook and, in the Object properties chapter, select "Converging".
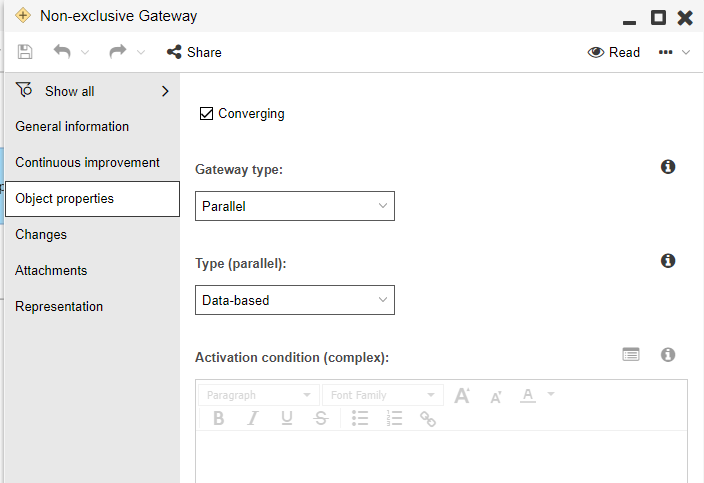
Decisions on Exclusive Gateway
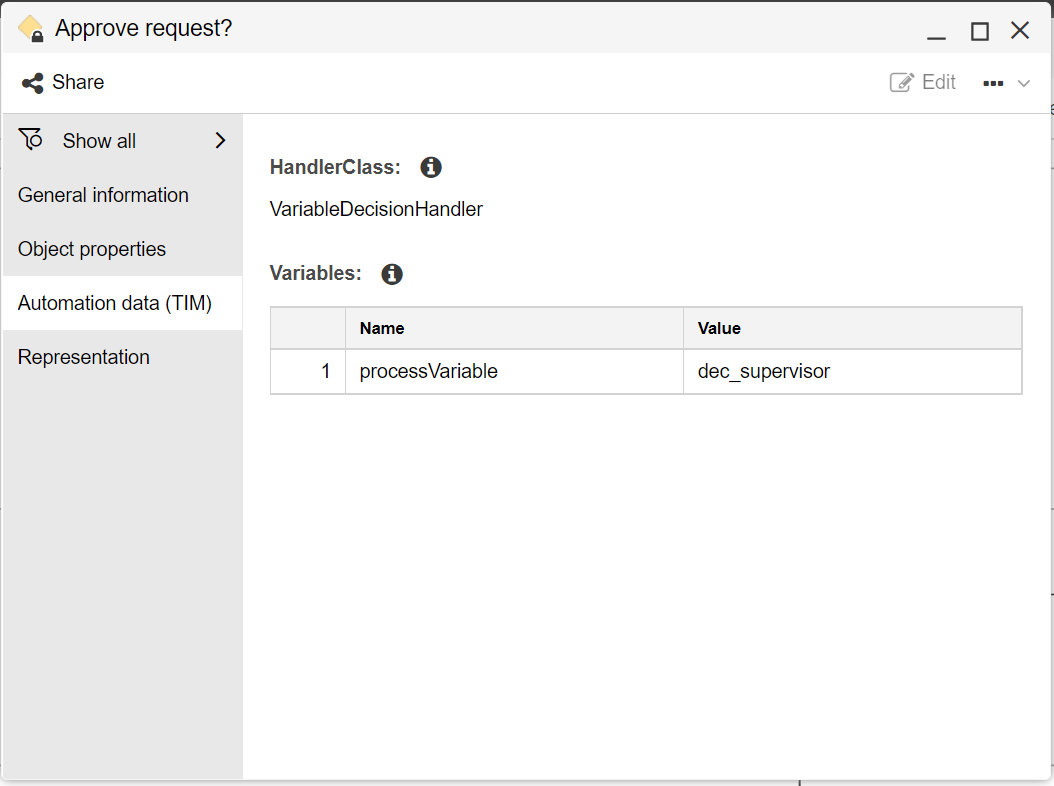
TIM needs to know which of the two paths to take after an Exclusive Gateway. This parametrization is only possible in conjunction with a smartform. If no ActionHandler is assigned to an Exclusive Gateway, the system automatically creates a popup so that the decision can be made.
To set ActionHandler properties in ADONIS, open the Exclusive Gateway's Notebook and, in the "Automation Data (TIM)" chapter, edit the following properties:
| Attribute name | Attribute Description |
|---|---|
| HandlerClass | Java class name of serverside decisionhandler (optional class list out of TIM). Example value: com.dooris.bpm.actionhandler.VariableDecisionHandler. |
| Variables | Collection of variables for decisionhandler calls. A variable is a key/value pair. Name - Name of key-value pair parameter. Example value: variableName. Value - Value of key-value pair parameter. Example value: newVariable. |
Sequence Flows after Exclusive Gateway
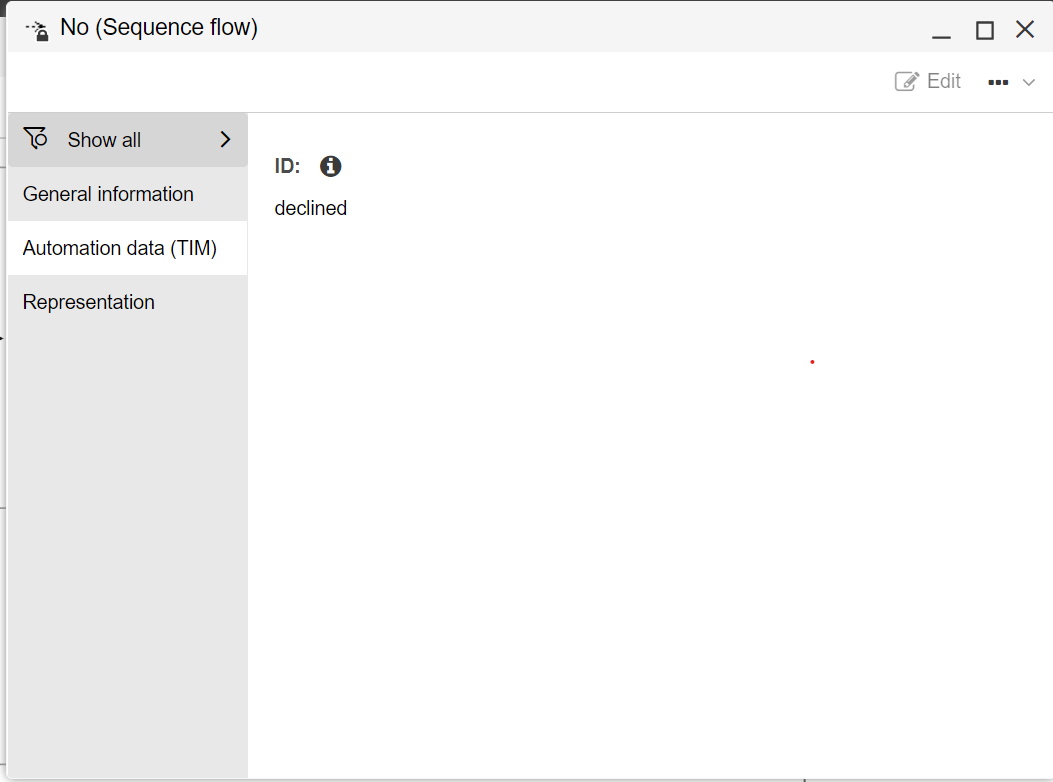
Parameterization is required at the outgoing Sequence Flows of an Exclusive Gateway. Each Sequence Flow must be given the value that the variable assumes when making a decision. This must be done for each outgoing sequence flow. The ID is the value of the process variable set in the Smartform (value=“ID”).
To set the ID in ADONIS, open the Sequence Flow's Notebook and, in the "Automation Data (TIM)" chapter, insert the value of the variable into the field 'ID'.
Deploying the Process to TIM
Once you have assigned the user groups, you can deploy your process to TIM:
- Open the Business Process Diagram in the graphical editor, click Automate, and then click Deploy Process in TIM.
ADONIS will automatically run a validation in the background to check if all necessary preconditions for process deployment have been met. You can also manually trigger validation at any point during modelling.
If the process is valid, another window will open.
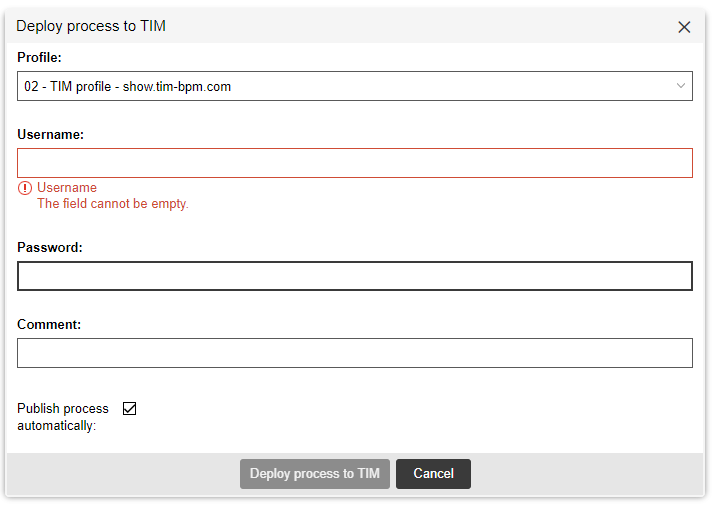
Profiles are defined in the Administration Toolkit by your administrators. From the dropdown menu, select the profile you want to deploy the process in. Enter the user credentials and click Deploy process to TIM. If everything is correctly input, your process will be available in TIM.
Starting the Process
Now that the processes you automated have been modelled, reviewed, validated, released and deployed, you want your organisation to use them. You can, for example, create a high-level overview of the automated processes and post it as the start model in the Read & Explore Scenario.
Need instructions on how to model a process landscape? See Processes in the ADONIS User Manual.
Are you an ADONIS administrator? Then you can define a start model for the Organisation Portal and Read & Explore scenario. Check out the Configure Organisation Portal and Read & Explore Scenario sections in the ADONIS Administration Manual. As of ADONIS 15, users may also chosse their own start model.
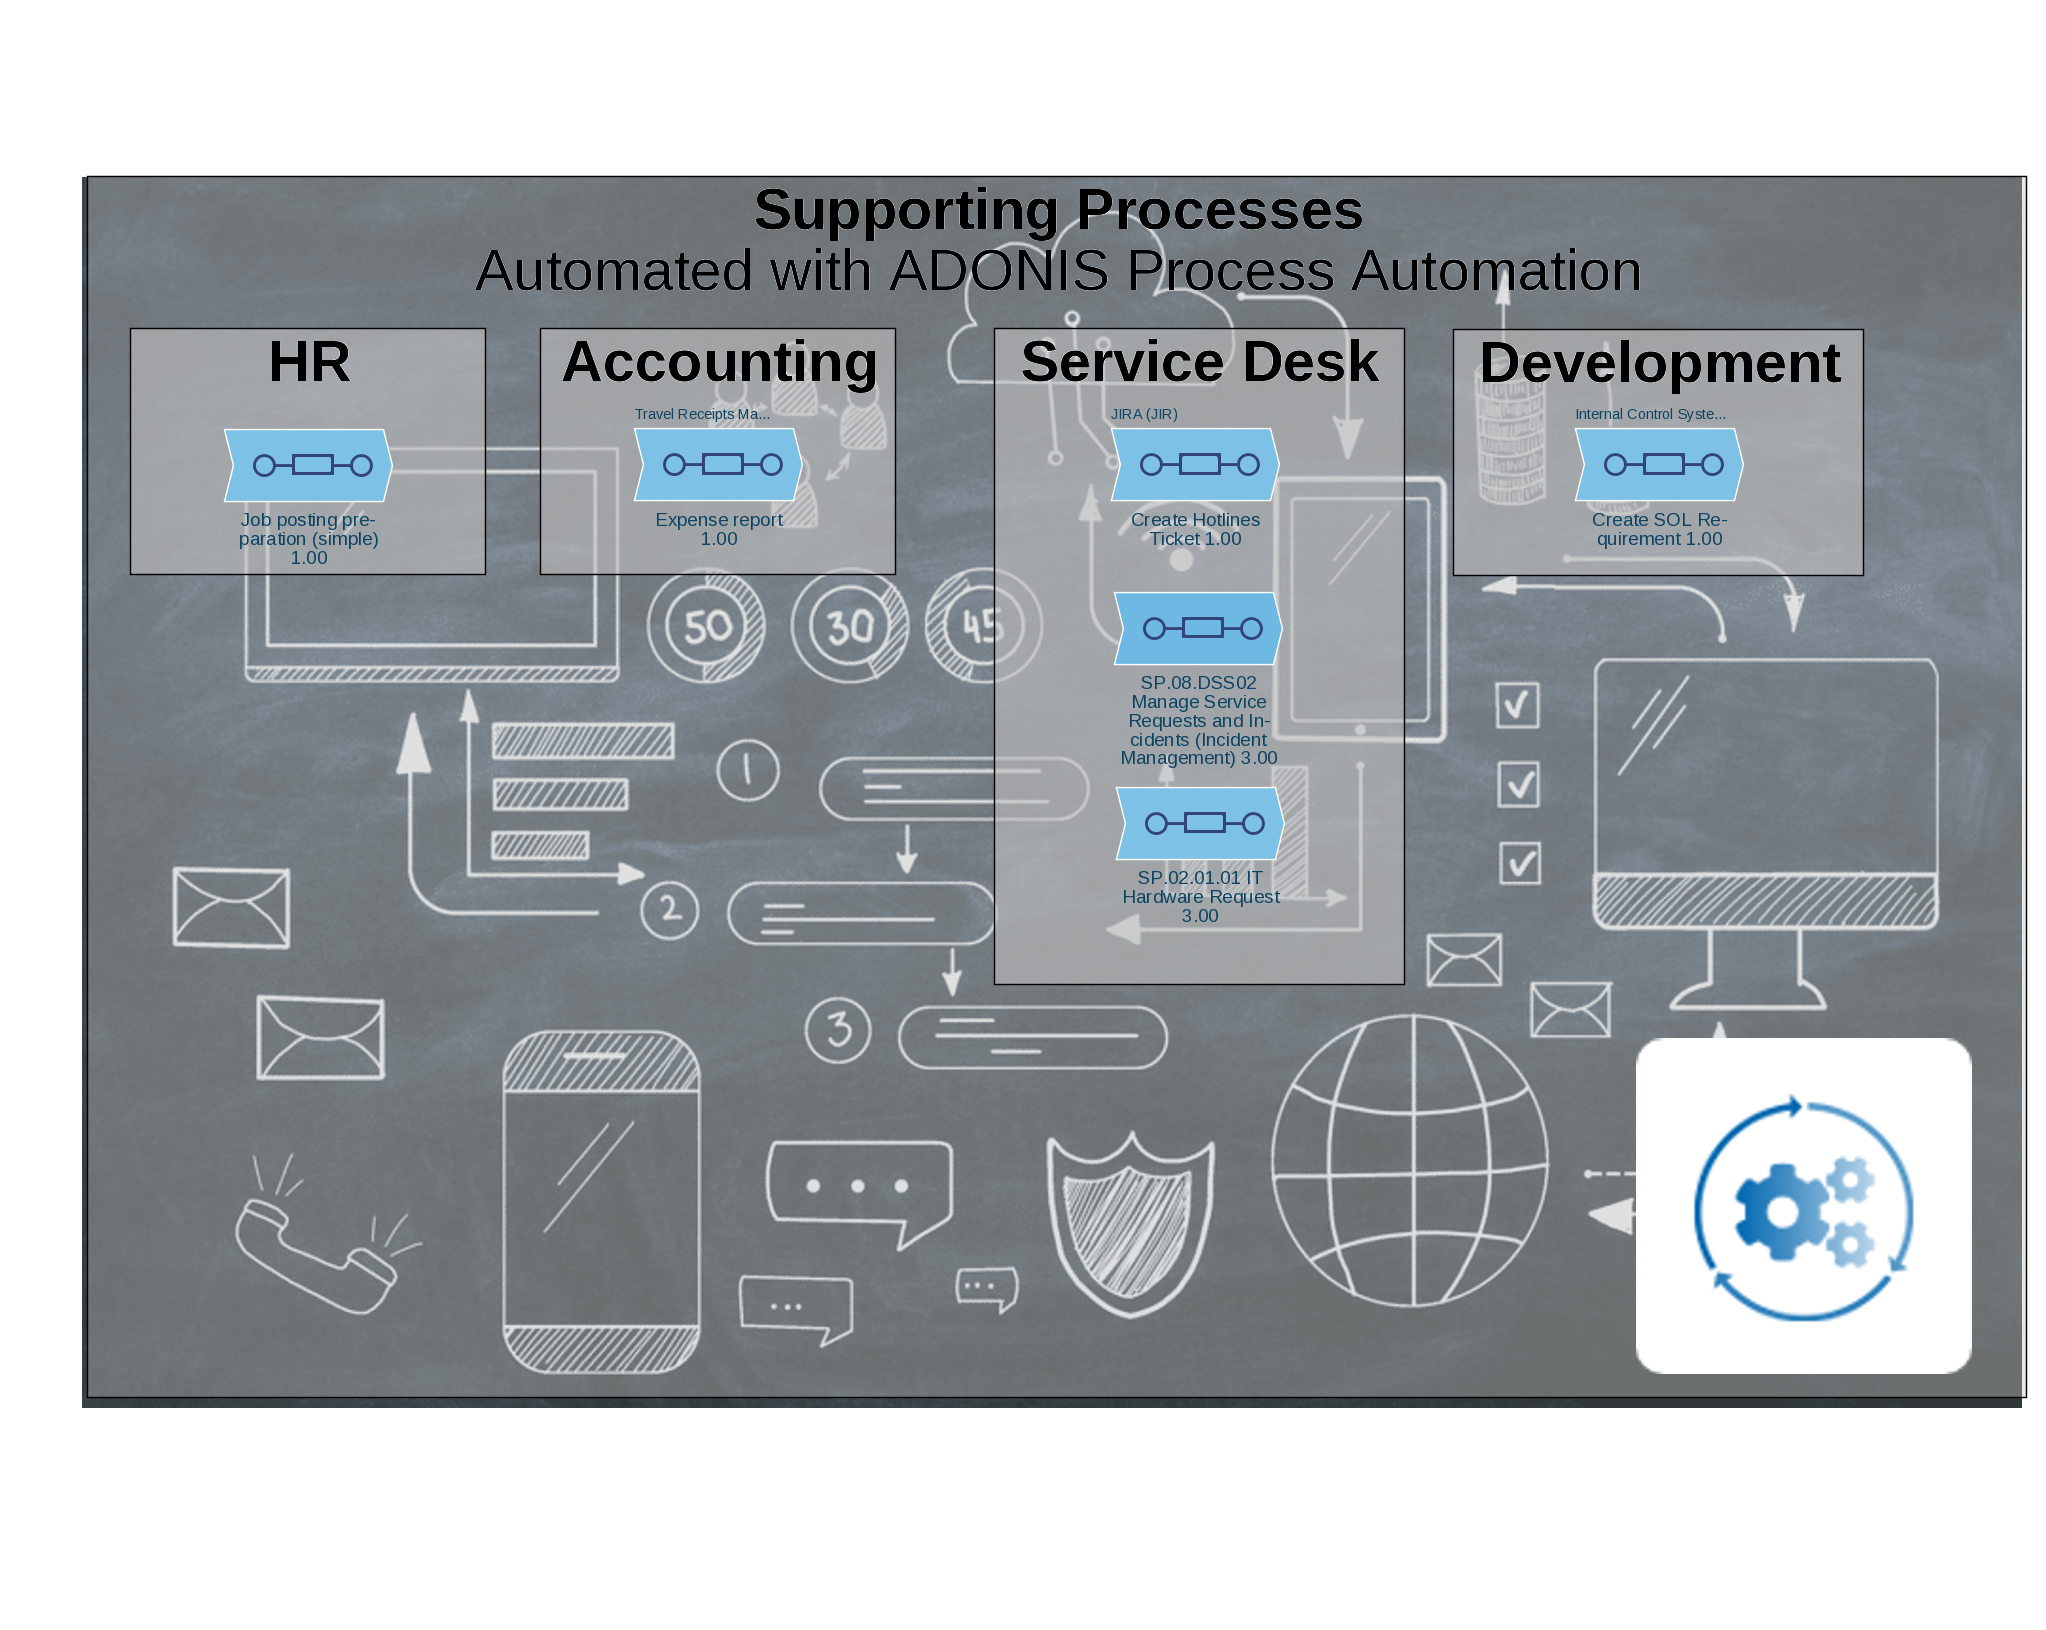
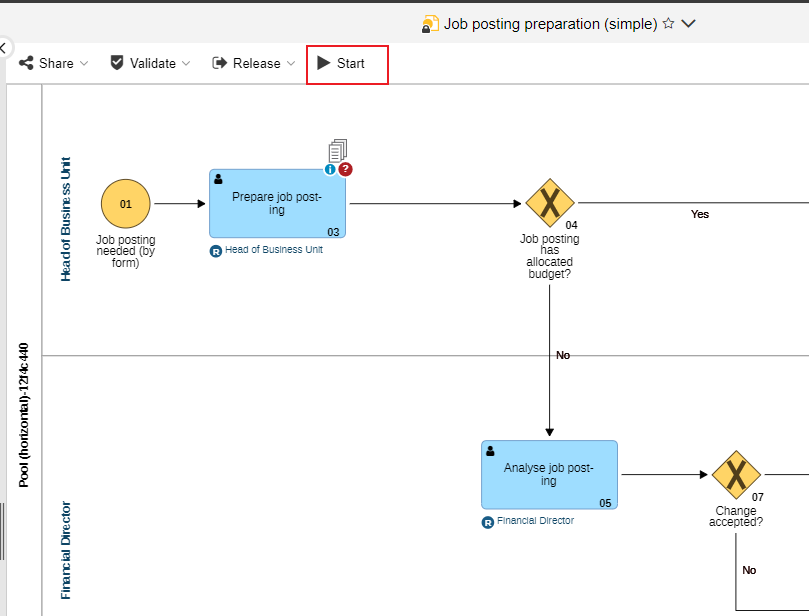
You can start the process from the model. The Start button at the top of the graphical editor prompts the variable from the Process instantiation attribute and starts the process in TIM. Process instantiation attribute is defined in the Process Automation chapter in the Notebook of the Business Process Diagram, as the URL to start the process in the automation engine.
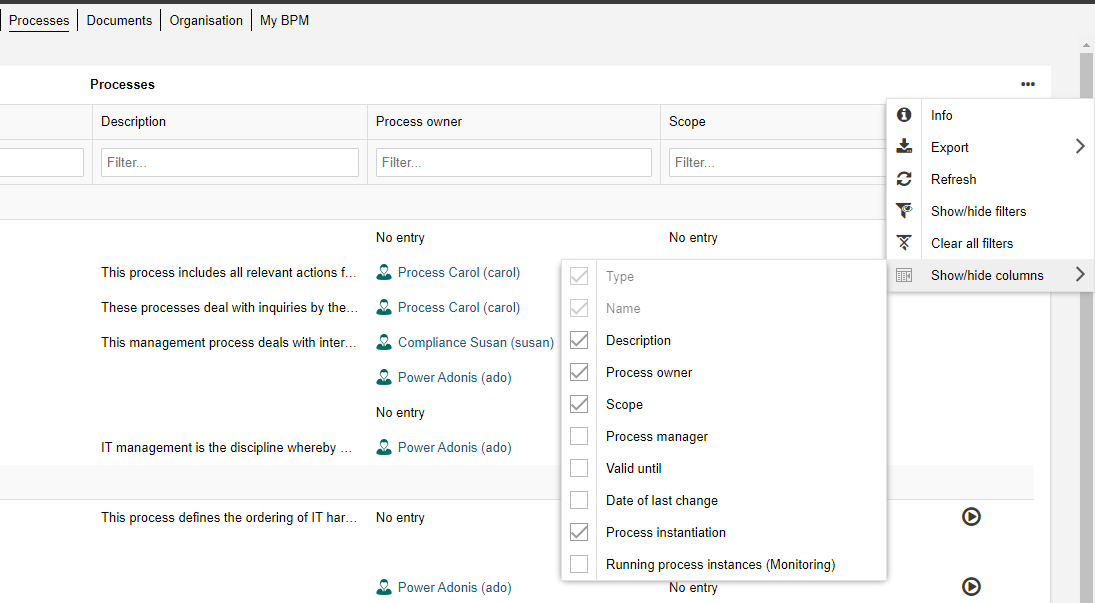
You can also start the process directly from the start page of the Read & Explore scenario. Switch to the Processes tab. Click the More button, point to Show/hide columns, and then select the "Process instantiation" column.
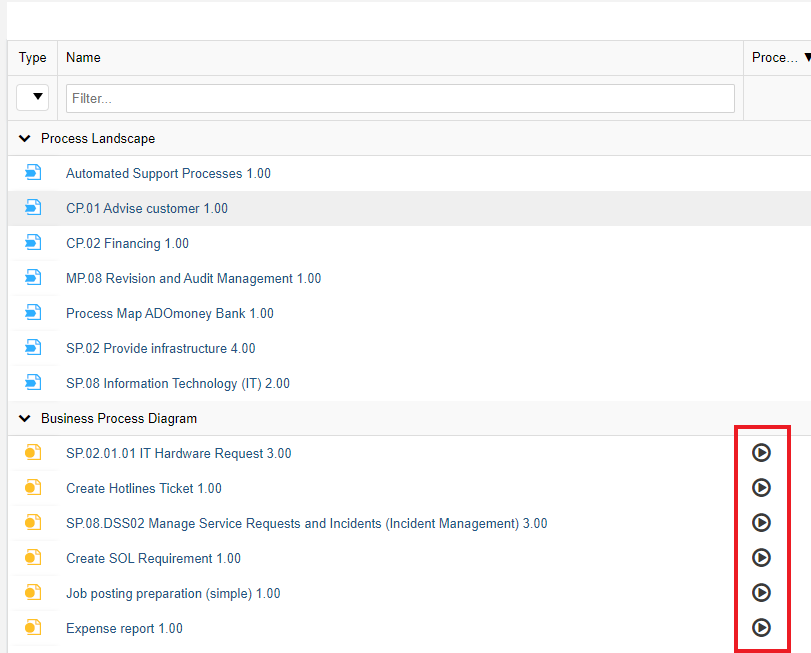
The Play button will appear in the column "Process instantiation" if the process has been automated. Click Play to start the process in TIM.
Evaluate Process Performance
Once the process has been deployed and executed, you might want to finish the circle and get some insights into how the process is performing. Ask your ADONIS administrator to configure the connection to TIM process performance dashboards so that the KPIs are shown on the ADONIS side in the Insights dashboard for Processes.
To see your KPIs, navigate to the Process, open its Insights dashboard and scroll to the Process Execution Insights widget. There you will see the state of your process and the the cycle times.

Appendix
Welcome to the appendix for the ADONIS Process Automation user manual! While the main focus of this document is to provide guidance on automating your process portfolio, we have included additional information in the appendix that we believe will be useful to you. The appendix includes the following sections:
Different Types of Workflows
There are many different workflow engines that can execute different types of workflows. The choice of which workflow engine depends on the processes that your organisation wants to automate as well as the tools that you have at your disposal.
We extracted the main types:
- System Workflows
- Data-focused integrative workflows
- Issue Tracking
- Robotic process automation (RPA)
- Human workflows
System Workflows
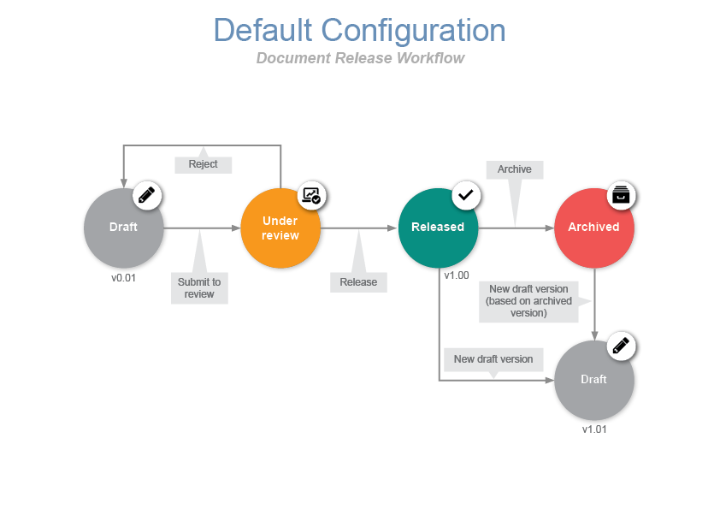
Within a system such as an ERP or a DMS, you may have data oriented, inflexible program procedures. In ADONIS, for example, the document release workflow and the model release workflow fall into this category.
The document release workflow allows submitting documents for review and release. During the release process contributors carry out different tasks depending on their system roles:
- Authors create and submit documents to review. They can also create new versions of already released documents in order to adapt them.
- Reviewers perform business reviews of the submitted documents and release them.
- Administrators can execute all transitions. Only Administrators can archive documents.
The model release workflow allows to formalise model release and versioning. Certain repository objects that are contained in these models also transition through the release process. During the release process contributors carry out different tasks depending on their system roles:
- Modellers create and submit models to review. They can also create new versions of models and contained objects which have already been released in order to adapt them.
- Reviewers perform methodical reviews and business reviews of the submitted models.
- Administrators can execute all transitions. Only Administrators can archive models.
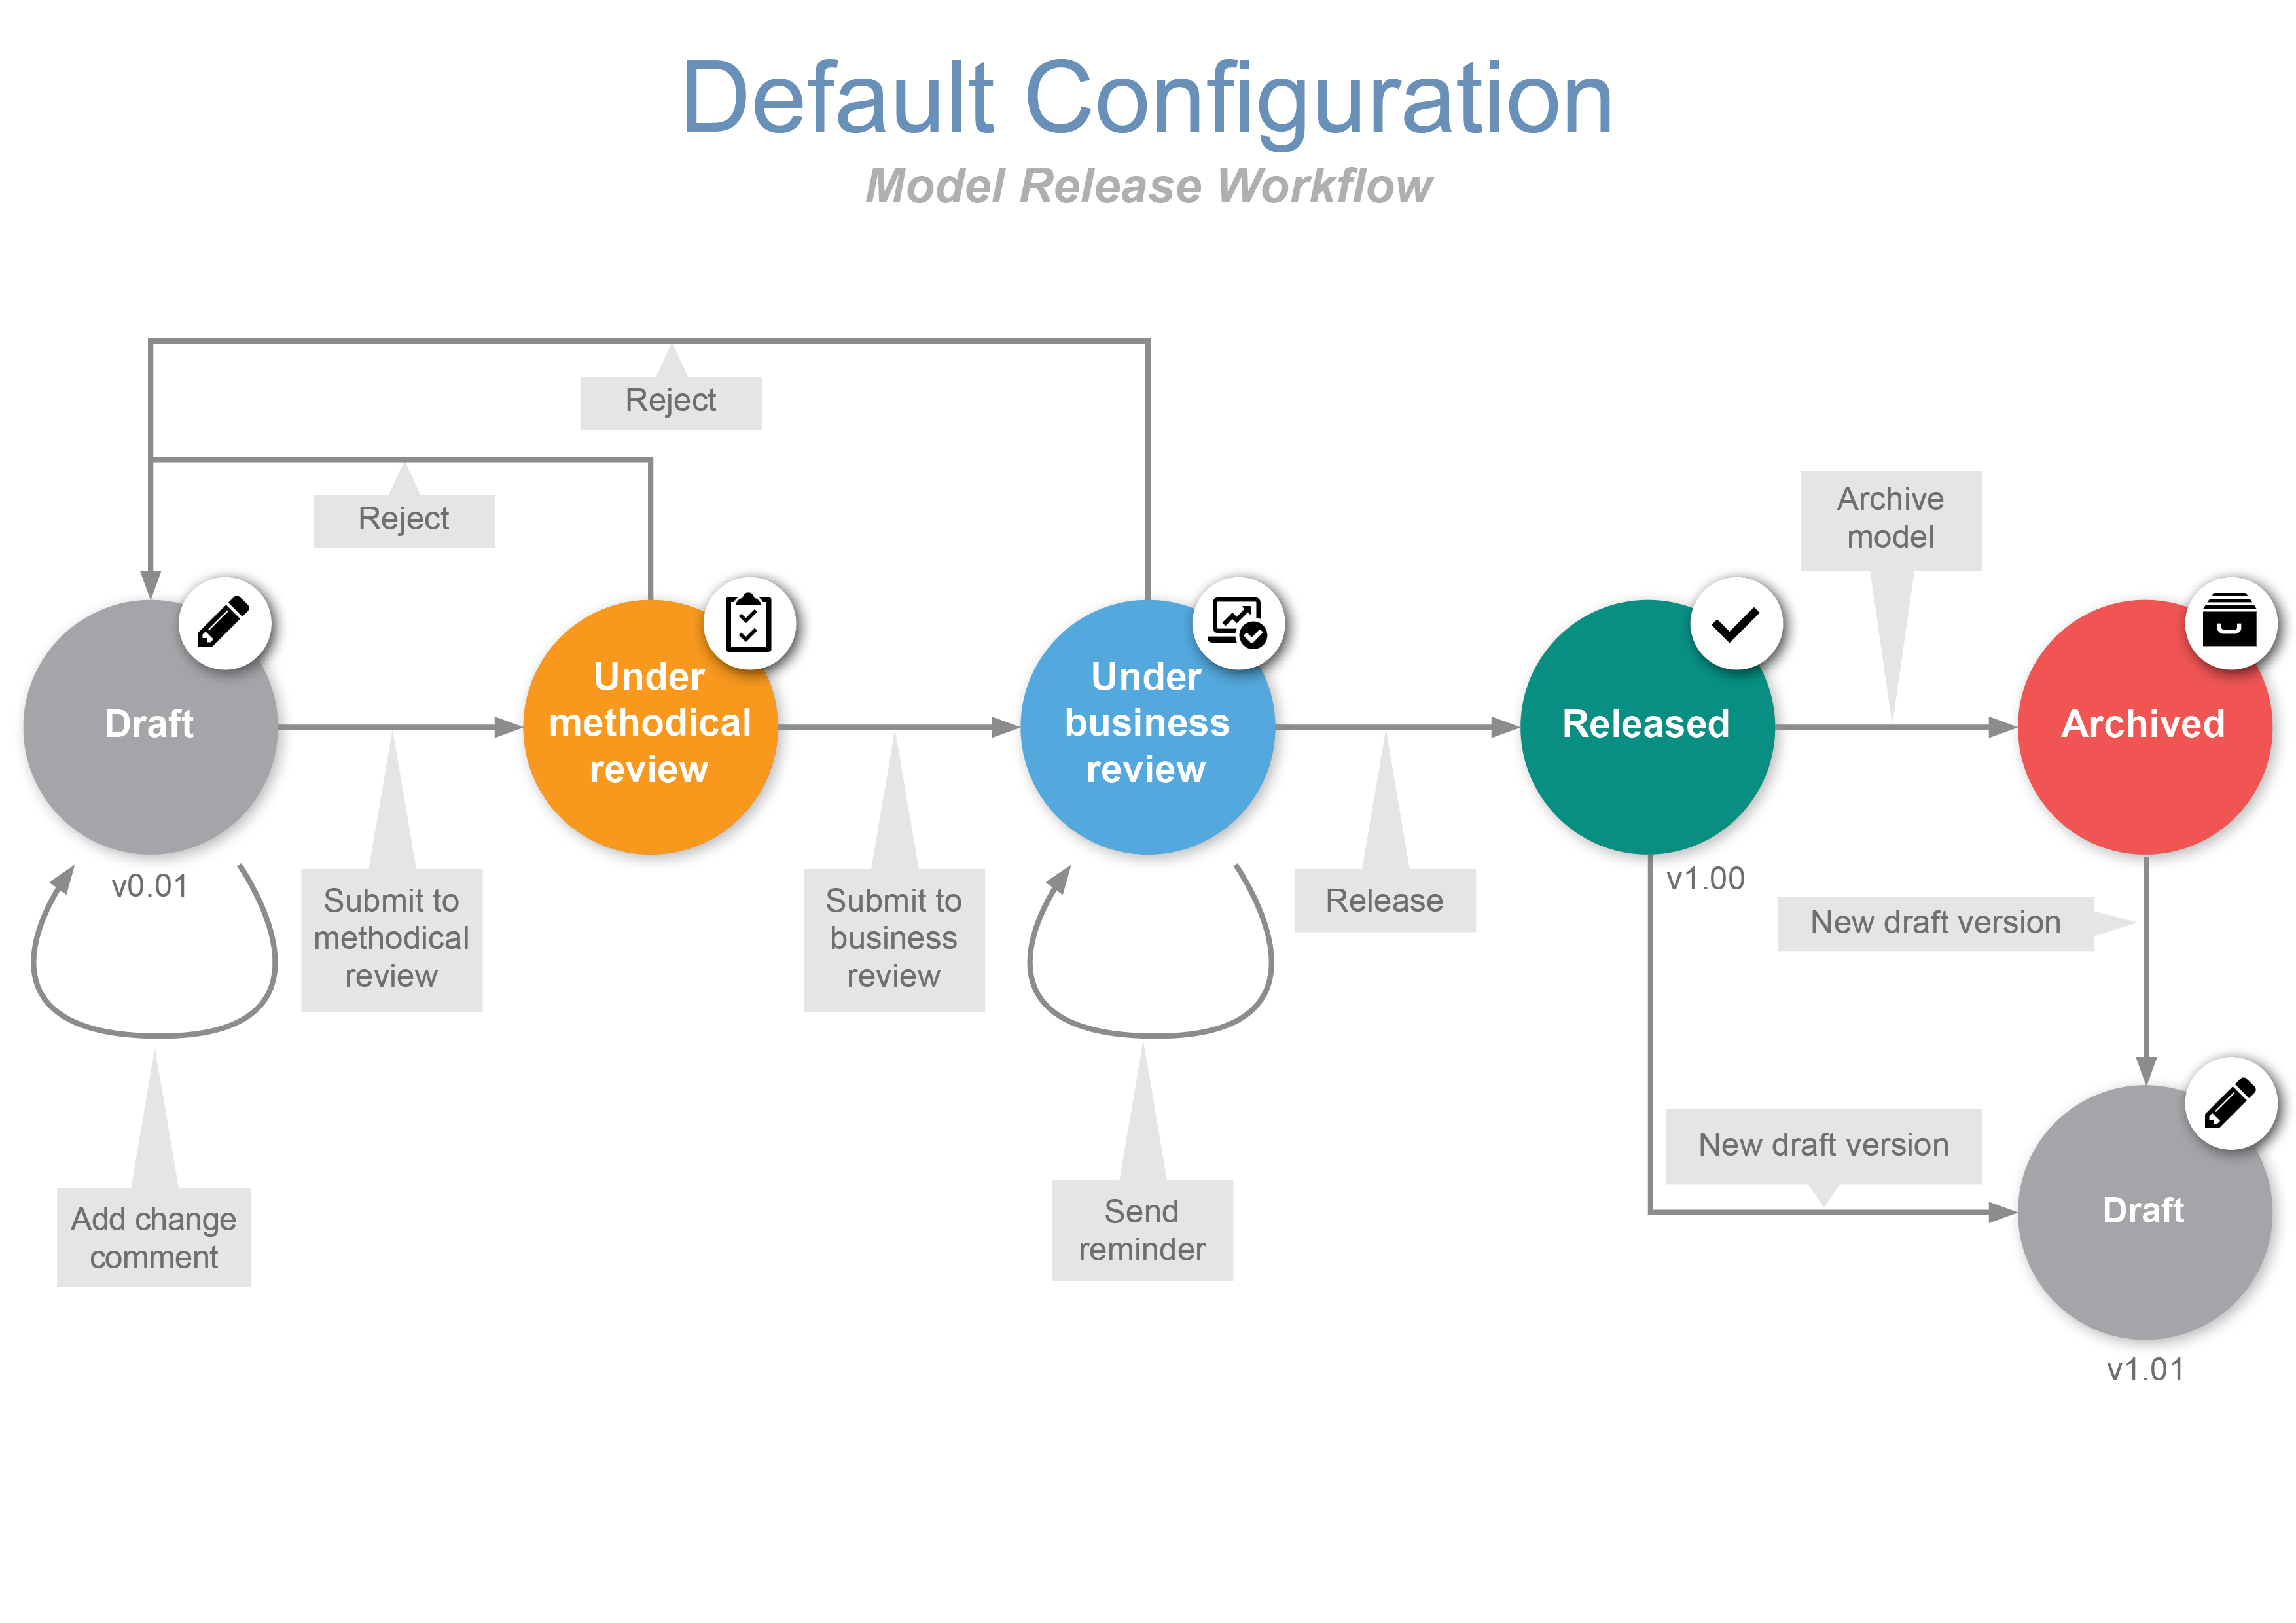
Both of these workflows allow for automatic transitions and notifications to responsible parties in the chain. With each step in the release, ADONIS documents the new status and assigns versions. Everything is fully automated.
Need instructions on how to use document release workflow and the model release workflow* in ADONIS? Check out the Release Workflows section in the ADONIS User Manual.
Once you design and document system workflows, automate them within ERP systems such as SAP, ECM systems such as Sharepoint or CRM systems such as Salesforce.
Data-Focused Integrative Workflows
When most of the tasks are processed automatically, workflows are created to distribute data into various systems. These workflows function essentially as middleware between IT systems. For example, you can create and deploy a workflow to ensure that a change in your project management tool triggers a storage of data in the cloud.
Issue Tracking
Workflows have been established in the IT service domain to manage processes for incidents, requirements, bugs and changes. If you practice SCRUM, QA, ITSM, or similar processes, you will need these processes defined and deployable in tools such as ServiceNow, Jira, Confluence and others. You can easily design and deploy processes like that in ADONIS.
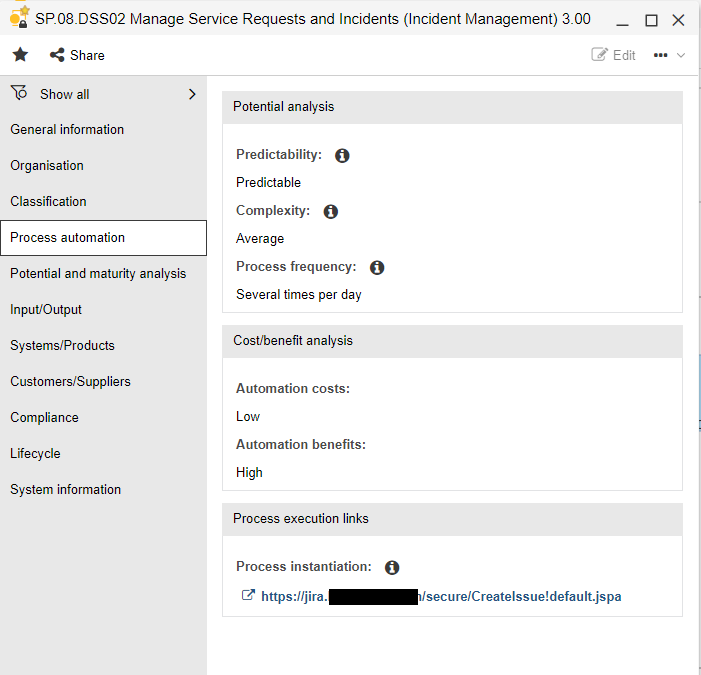
Example: Define a process in ADONIS and set the Process instantiation parameter to trigger the issue creation in e.g. Jira.
Robotic Process Automation (RPA)
If you have highly repetitive workflows with low (no) skills needed, say copy-paste workflows, you might benefit from automating these workflows RPA systems. Define a set of instructions for a software to perform. Typically, tools such as UIpath, BluePrism, or Automation Anywhere are utilized.
Human Workflows
End-to-end business processes, readable and understandable by humans. Processes that are coordinated between multiple participants within multiple departments. These processes are covered by tools such as TIM.
Release History
Let's have a look at the latest release information.
Current Release
| Version | 2.5 |
|---|---|
| Last Update | 03.Sep 2022 |
| Supported Languages | English / German / French |
- Support for ADONIS 14.0 and 14.1 and TIM 7.3 and higher
- Added support for JWT based authentication - retrieving TIM KPIs for ADONIS Insights dashboard
- Removed process instance link in model header and added "Start" toolbar button in model editor for reader scenarios
Version 2.4
- Support for ADONIS 12.0
- Support for BPMN models with escalation events
- Insights moved below standard widgets
- TIM validation checks can be enabled for specific roles in Admin Toolkit
Version 2.3
- Support for ADONIS 11.0
- Improved validation performance
- French translation
- Fast release transition in release workflow for technical changes
- Dropped requirement for technical user
- Stripping standard ActionHandler namespaces during import
Version 2.2.
- Support for ADONIS 10.0
- Support for Smartforms larger than 50.000 characters
- New validation rule for broken references in ActionHandlers
- Improved UI strings
- Support for TIM servers with self-signed HTTPS certificate
Version 2.1
- Check for nested lanes
- Process automation attributes
- Gantt and Portfolio views
Version 2.0
- Pre-deployment validation checks
- Live process KPI Insights
- Improved parameter pair handling within the workflow design for ActionHandlers
- Improved error codes handling for process deployment