Welcome to ADONIS!
This Quick Start Guide helps you start working in a productive ADONIS environment quickly and in a structured way. It keeps explanations brief, focuses on the first day-to-day workflows, and points you to the right Online Help pages if you want to go deeper.
You don’t need to follow the steps in the exact order. Skim once, then focus on the parts you need most.
Before You Start
In a productive environment, the basics are usually already prepared by your organisation, including the URL, authentication, repository structure, and permissions.
Make sure you have:
- Your company’s ADONIS URL and a standardised company login method, often SSO in production.
- Clarity on what you are expected to do:
- Read & Explore = consume released content in read-only mode
- Design & Document = create or update content and therefore requires write access
- An official model folder or group where your organisation stores new or updated processes.
- Confirmation whether Release Workflows are used, because this changes how draft and released versions behave.
Your productive environment may already contain process content, but this is not required. If no content exists yet, users with edit rights can still start in Design & Document by creating the first model.
A Valuable Tip
If you are unsure where to store models, do not guess. Ask your internal ADONIS administrator for the correct model group or folder and your edit permissions. This prevents rework and broken navigation.
Login
If you do not know your credentials or your company’s ADONIS URL, contact your internal ADONIS administrator or the IT department. Otherwise, you are ready to start exploring ADONIS.
Now you are all set and can continue with the orientation below.
Orientation: Explore the UI and Start Your First Task
This is your process workbench. You will mainly use:
- Explorer (left): find models and objects in the repository
- Canvas (center): view or edit the model
- Properties (right): add the information that makes a process usable, such as owners, responsibilities, documents, systems, and related content
Try It Now: Choose the Path That Matches Your Environment
Option A: Your Environment Already Contains Process Content
- Click Find to open the Explorer.
- In Models, use the Filter... field to search for a process area, for example “Order”, “HR”, or “Finance”.
- Open one process model.
- Add it to Favourites so you can return to it quickly next time.
- Add one Comment, for example a question or a small improvement suggestion.
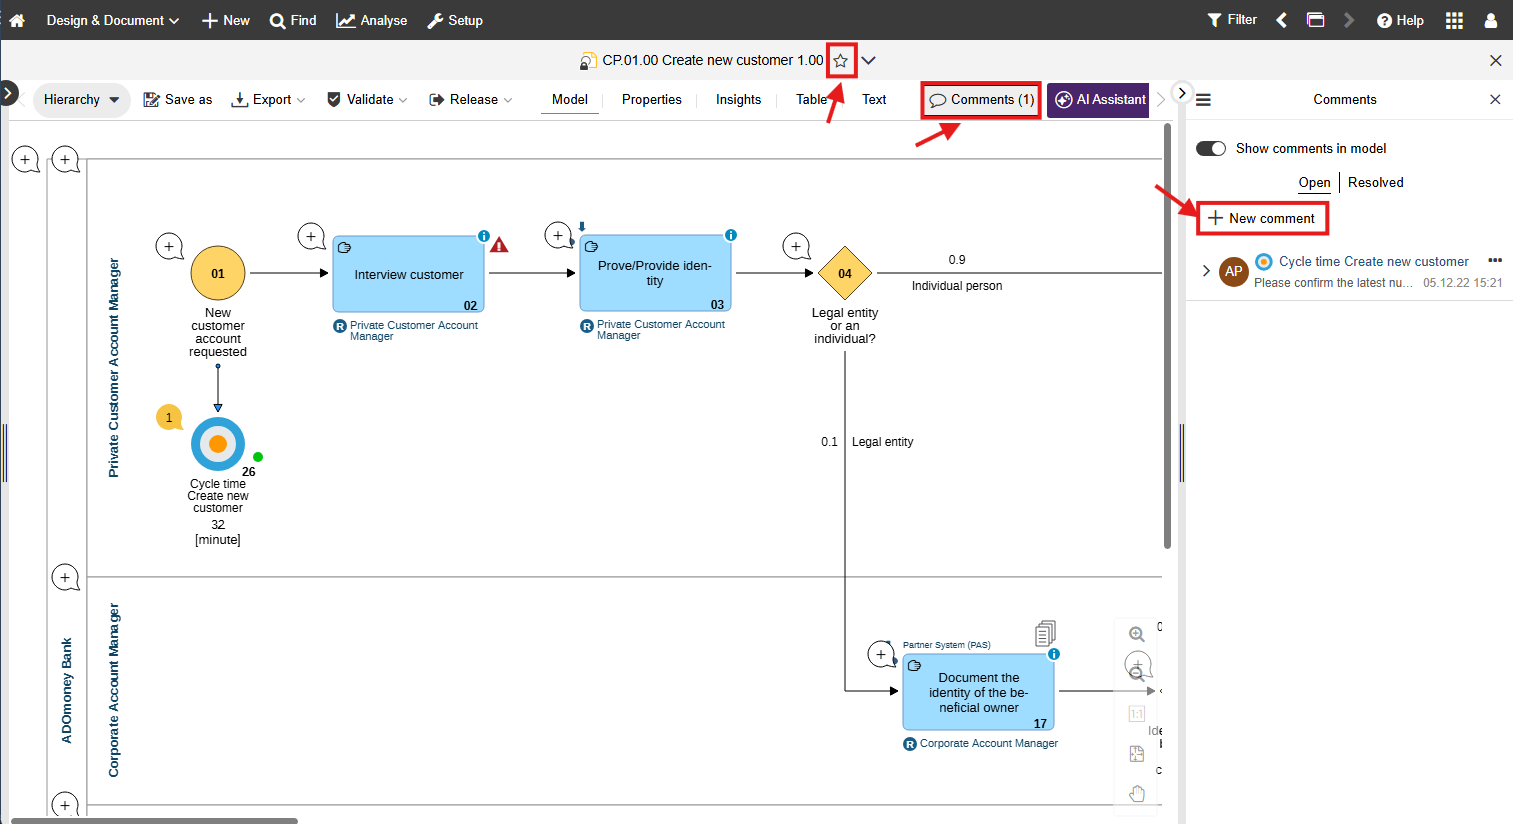
Expected Result
You can reliably find and reopen the same process, and you have created a traceable feedback thread directly on the model.
Option B: Your Environment Does Not Contain Process Content Yet
If you have edit rights:
- Switch to Design & Document.
- Click Find to open the Explorer and review the repository structure.
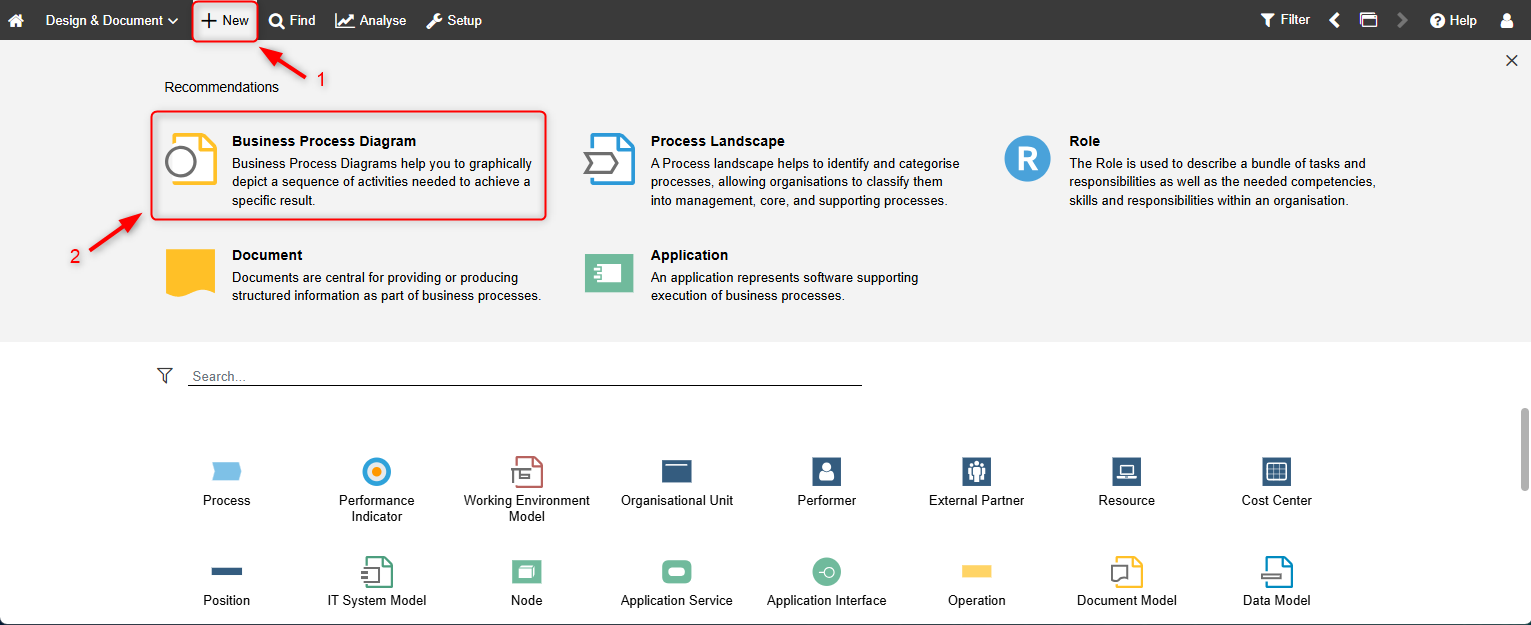
- Click New to create your first model.
- Save it in the correct model group or folder.
Expected Result
You understand the repository structure and have created your first model.
If you have read-only access:
Ask your internal ADONIS administrator which released content or start model should be available to you. In productive environments, work in Read & Explore usually starts from already released content.
Do it in the Course (Recommended)
If you prefer a more guided “learn by doing” path, sign up for the ADONIS Fundamentals 1: Business Process Diagrams e-Learning.The chapter “ADONIS User Interface” will guide you through your first impression of the UI.
Populate Your First Process (Only If You Have Edit Rights)
If you only need to consume processes, meaning read them and give feedback, you can skip this section and go to Turn Properties into an Operational Playbook, Validation, and Releasing Content to understand governance.
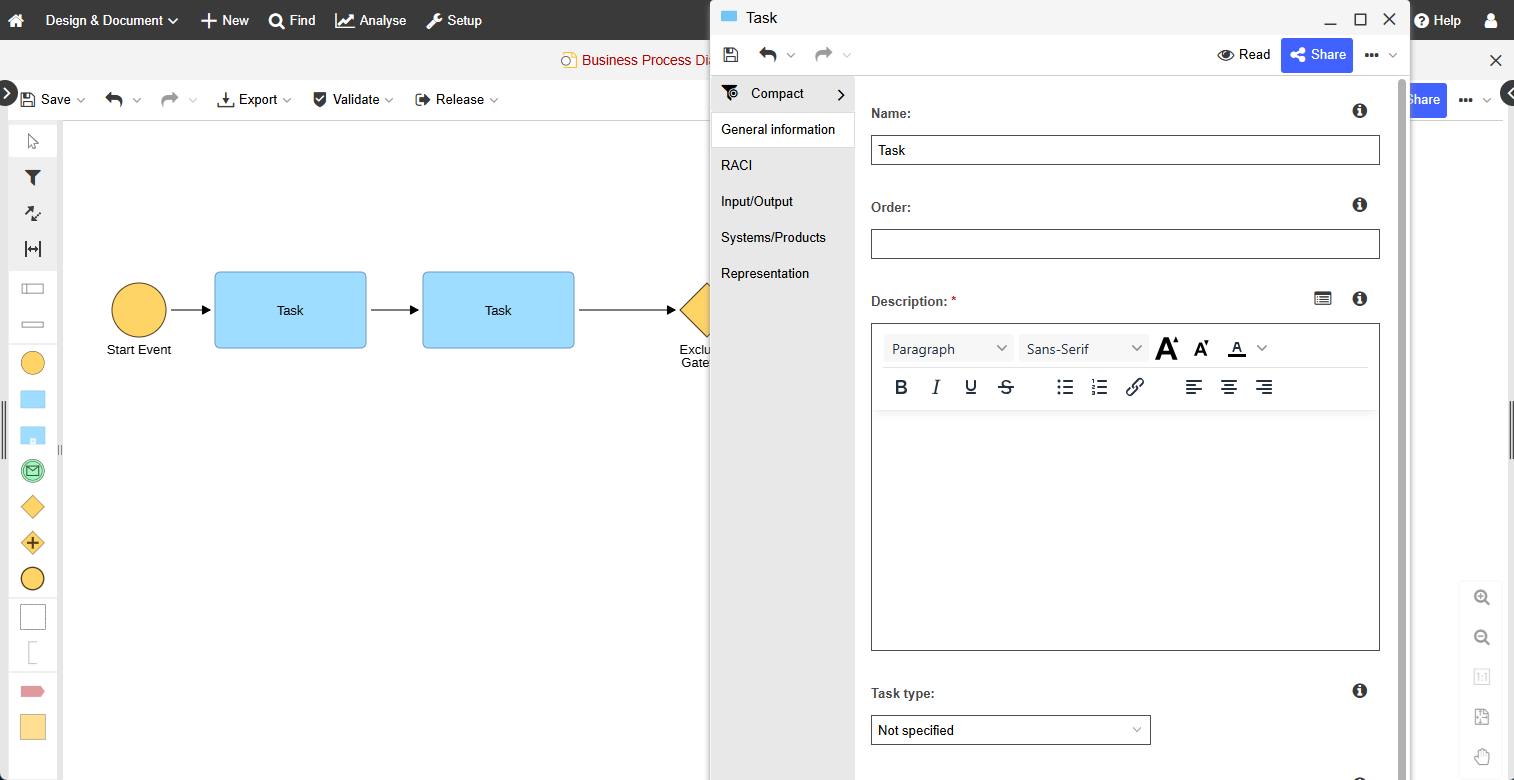
Option A “Classic” (Manual Modelling)
Goal: Model the happy path first. Start with 3–7 tasks and a clear end. Keep the labels clean by using a Verb + Object style.
- Switch to Design & Document.
- Click New and select the model type. In most situations, this will be the Business Process Diagram.
- Place objects using the modelling bar.
- Once you have placed the first object, use the Hover Modelling Assistant to add the next objects faster and connect them directly in the flow. In ADONIS, the Hover Modelling Assistant is a vital and organically integrated part of the graphical modelling workflow, helping users place additional objects and connectors after the first object has been created.
- Connect objects where needed and continue building the flow.
- Save early and choose the correct target folder or group on your first save. On first saves, you enter a name and version and define the target group.
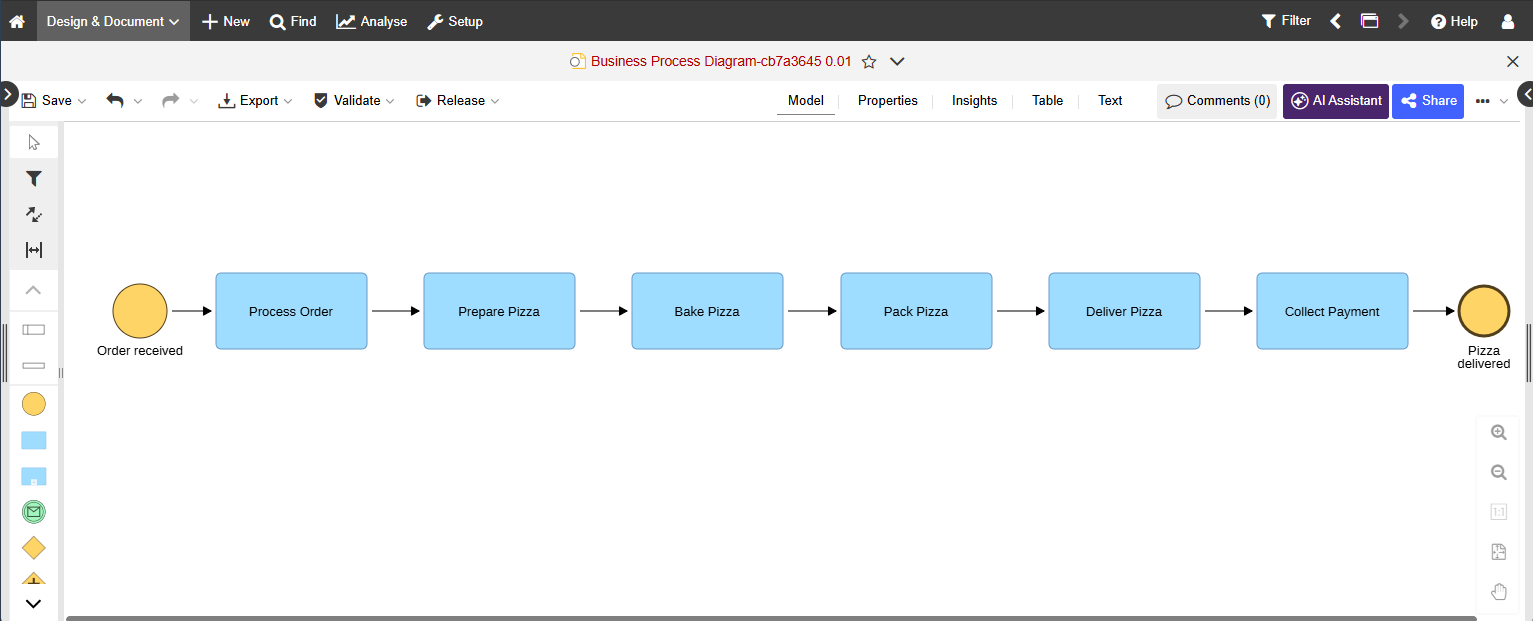
Expected Result
The model is stored in the correct repository location and others can find it based on permissions.
Option B “AI-Assisted” (If Enabled)
If your licence and configuration allow it, the AI Assistant can help you generate a first process draft from a process description. The AI Assistant generates structured process models from ad hoc descriptions, so this fits as a separate, AI-supported option rather than part of classic manual modelling.
Expected Result
You get a first structured process draft on the canvas that you can review, refine, and validate before handover.
For more details, see AI Assistant.
Do it in the Course (Recommended)
“Model Your First Process” is covered in the ADONIS Fundamentals 1: Business Process Diagrams e-learning. The chapters “How to create a Business Process Diagram” and “How to add responsibilities and alternative paths” teach the basics.
Turn Properties Into an Operational Playbook
A diagram becomes operational when it contains the information people need to execute and govern the process: owner and responsibilities, documents, systems, inputs and outputs, and relevant relations.
Add Key Information (Step by Step)
- Open the model and click Properties.
- Click Edit to switch from read mode to edit mode.
- Fill the minimum required fields your organisation expects, commonly owner or responsible role plus a short description.
- Create relations quickly: drag a model or object from the Explorer into the Properties pane and select the relation to create.
Our Recommendation
Properties can have global values and model-specific values depending on where you open them from, for example object catalogue versus graphical editor. This matters when you maintain shared objects.
For more details, see Add Information to Models & Objects.
Do it in the Course (Recommended)
For guidance on your first Notebook or Properties experience, continue with the ADONIS Fundamentals 1: Business Process Diagrams e-Learning. The chapter “How to enrich your Business Process Diagram” teaches the basics of adding information to your notebooks and properties.
Essentials Accomplished!
At this point, you can already do the core basics:
- Navigate the UI
- Create a first BPMN process
- Enrich it with relevant process information in Properties
Before moving into analysis and governance topics, there is one more structural step that matters: connecting your process to the broader process architecture.
Our Recommendation for a Quick Win
Use Favourites to pin the processes you touch weekly. This is the fastest productivity improvement for most users.
Create a Process Landscape and Link Your BPDs
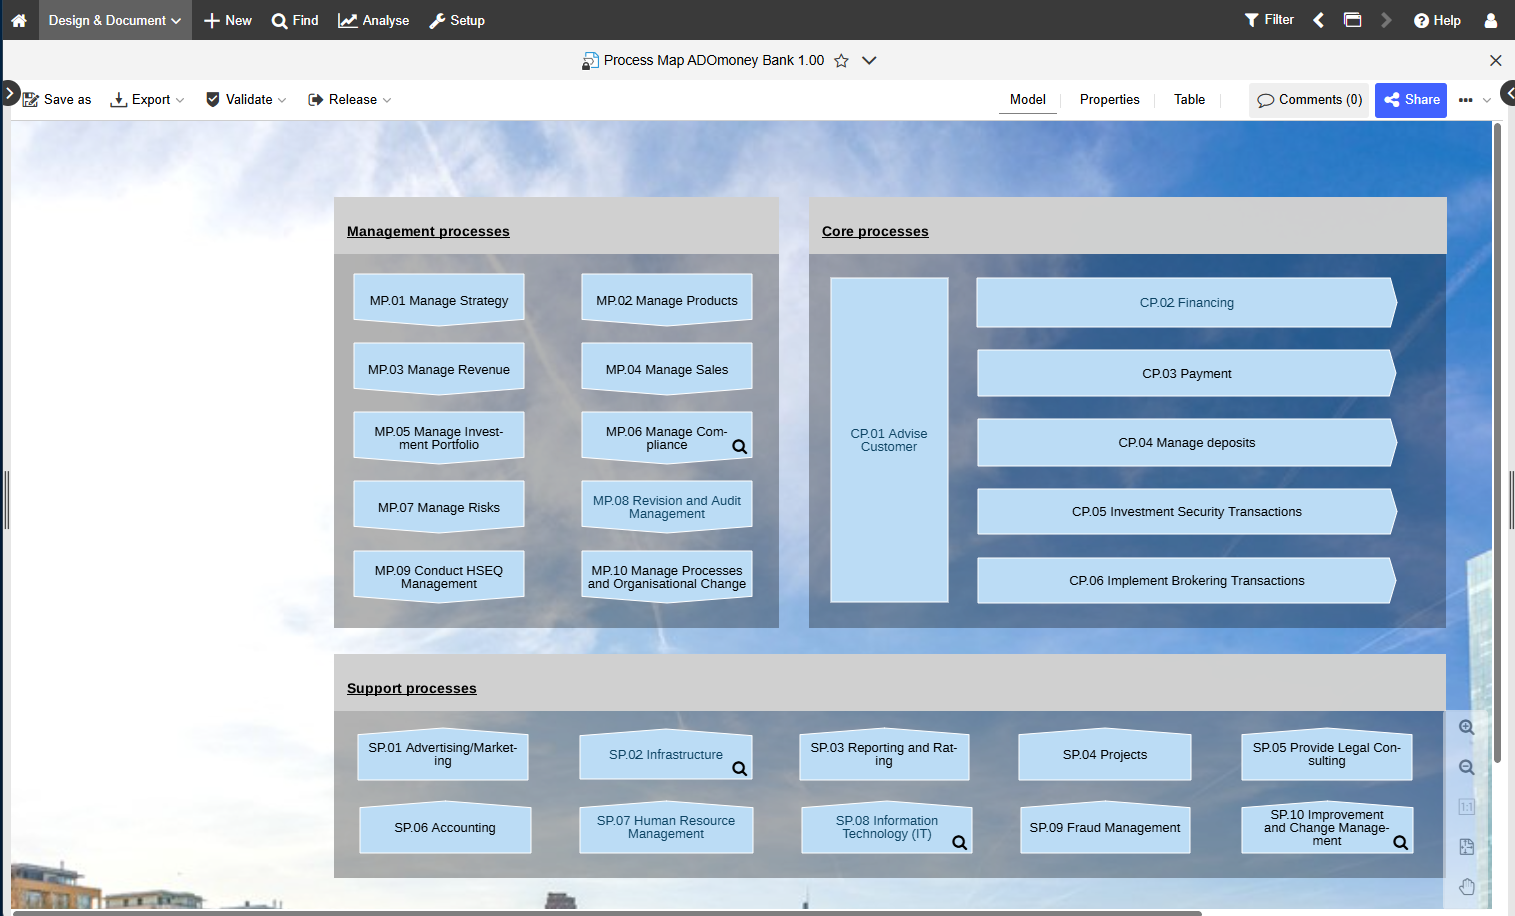
You are able to create and save your Business Process Diagrams. As a next step after learning the basics, it is important to understand how landscapes and diagrams connect for navigation and context. Process Landscapes are the map of your BPM world: they provide an overview and a navigation entry point to detailed diagrams.
Fast Path to Understand Functionalities
- Create or open the relevant Process Landscape in your repository structure.
- Ensure your Business Process Diagram (BPD) is saved in the correct model group or folder, not only in personal work areas.
- Link the landscape and detailed diagram according to your organisation’s modelling conventions, commonly by using the Referenced business process/process landscape property.
Our Recommendation
If your setup uses synchronisation between a Process and its referenced Business Process Diagram, the Synchronise action becomes available only after the reference is set. Enabling synchronisation overwrites common properties on the receiving side during the initial copy.
Why is This Important Before Accessing Insights?
Once your Business Process Diagrams are linked to the right Process Landscape, they are no longer isolated diagrams. They become part of a structured process architecture that gives users context: where a process sits, how it connects to related processes, and which roles, documents, systems, risks, controls, or other objects belong to it.
This structure is important because Insights builds on exactly that maintained information. The more consistently your models, properties, and relations are maintained, the more useful your dashboards and KPI views become.
In practice, the sequence is simple: first create structure and context, then use Insights to analyse and understand that information faster.
Do it in the Course (Recommended)
For your Process Landscape orientation, sign up for the ADONIS Fundamentals 2: Process Landscapes e-earning. It explains why you need Process Landscapes, how to create them, how to link your Process Diagrams to them, and how to add key information to enrich them.
Modelling Tips & Tricks
You now know the essential first steps in ADONIS. The next quick win is to improve modelling speed and quality through better editing habits.

Do it in the Course
For more valuable modelling tips and tricks, sign up for the ADONIS Fundamentals 3: Modelling Tips & Tricks e-Learning. There you will learn how to conveniently edit process flowcharts, align objects for improved readability, and use many other quality-of-life features.
From Process Architecture to Insights
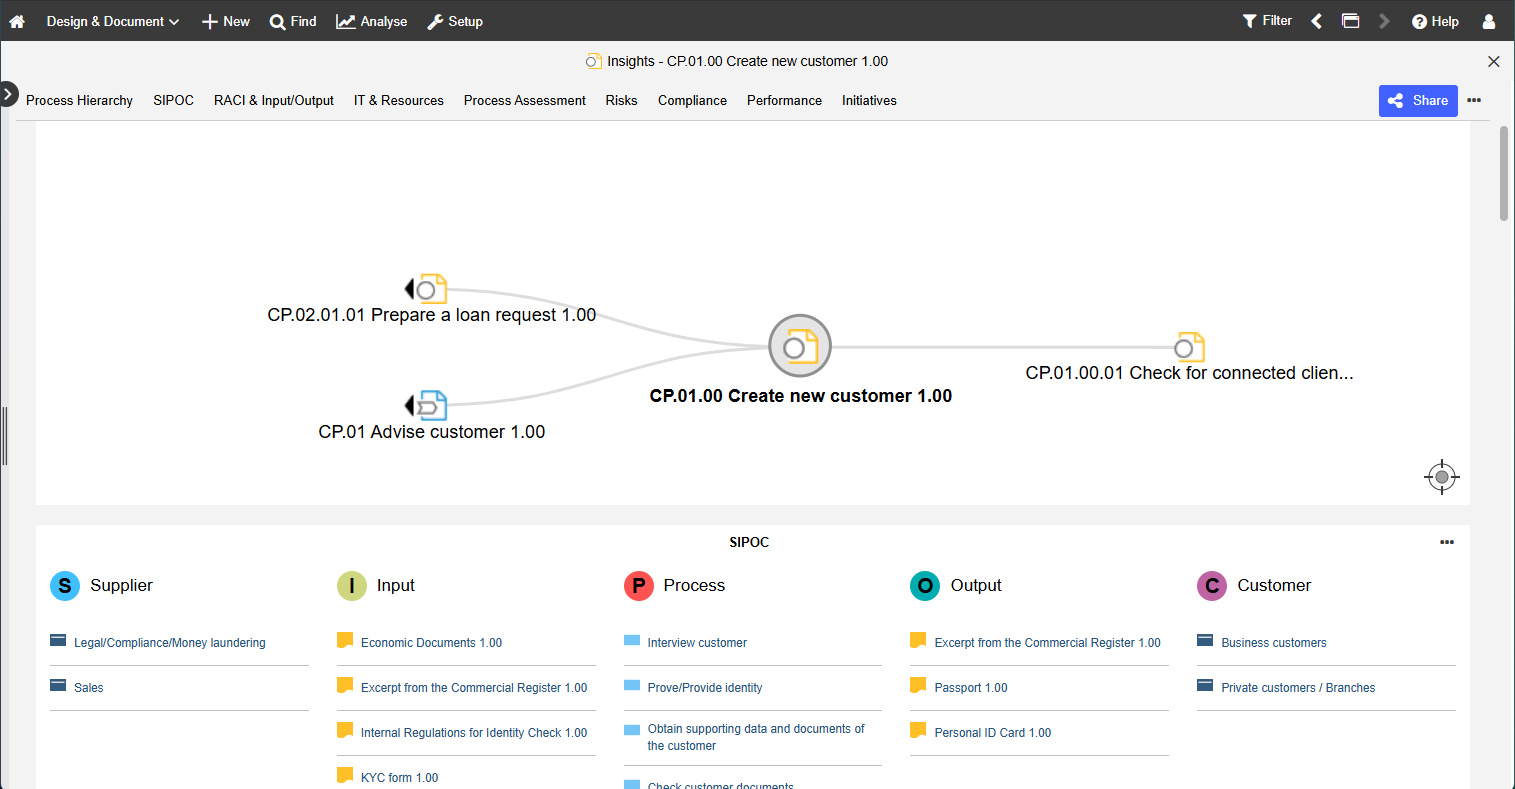
Once your models are properly maintained and linked within your process architecture, Insights Dashboards help you understand the most important information about a process or repository object much faster than reading through all properties manually.
Insights dashboards in ADONIS are best described as a visual, easy-to-understand summary of the most important information about a model or object, such as aggregated data and information about referenced objects. In contrast, Properties are intended for editing and reading master data, while Insights are intended for reading and analysis.
This makes Insights the natural next step after modelling, maintaining properties, and connecting your diagrams within the broader process architecture.
What you Need to do to Actually See Insights
Insights do not become useful just because a diagram exists. They become useful when your processes are documented in a way that ADONIS can analyse across models.
Before using Insights, make sure that:
- The key information is filled in on your process models, for example who is responsible, which objects are linked, and how the model relates to other processes.
- Your processes are linked to the repository objects you want to include in the analysis.
- Your diagrams are connected correctly within the process architecture.
Only then does ADONIS have the information needed to display a meaningful Insights dashboard.
To open Insights, right-click the model or object, go to Open, and click Insights. In many setups, you can also open Insights directly from the graphical editor for the selected model.
How Insights Help you get Productive Faster
Insights are useful when you want to:
- Understand a process in its organisational context.
- Get a quick overview of related information without opening many separate properties.
- Move from static documentation to visual analysis and decision support.
Insights dashboards are available for Business Process Diagrams and for repository object types such as Processes, Documents, Applications, Products, Risks, Controls, Roles, and Organisational Units.
What you can do in Insights
Depending on the dashboard and widget, you can:
- Navigate through the dashboard with quick links.
- Export widget content to PDF or Excel.
- Refresh widgets.
- Filter widget data to focus on what matters most.
For more details, see Insights Dashboards in the Online Help.
Do it in the Course (Recommended)
For a guided self-service learning path, continue with the Insights chapter in the ADONIS Fundamentals 4: Understanding data in ADONIS e-Learning.
Leverage Our AI Assistant for Even More Insights
Use the Analysis Mode for intelligent, AI-powered analysis to detect inefficiencies across workflows. When asked, the AI Assistant scans models, tracks performance metrics, and highlights improvement opportunities, delivering instant, data-driven insights.
Validation
Validation helps you catch structural issues and missing required content before you hand a model over for review or release. The validation functions can be described as checks against modelling guidelines.
- Open the model.
- Click Validate.
- Run the checks you need and address the findings before handover.
For more details, see Validation in the Online Help.
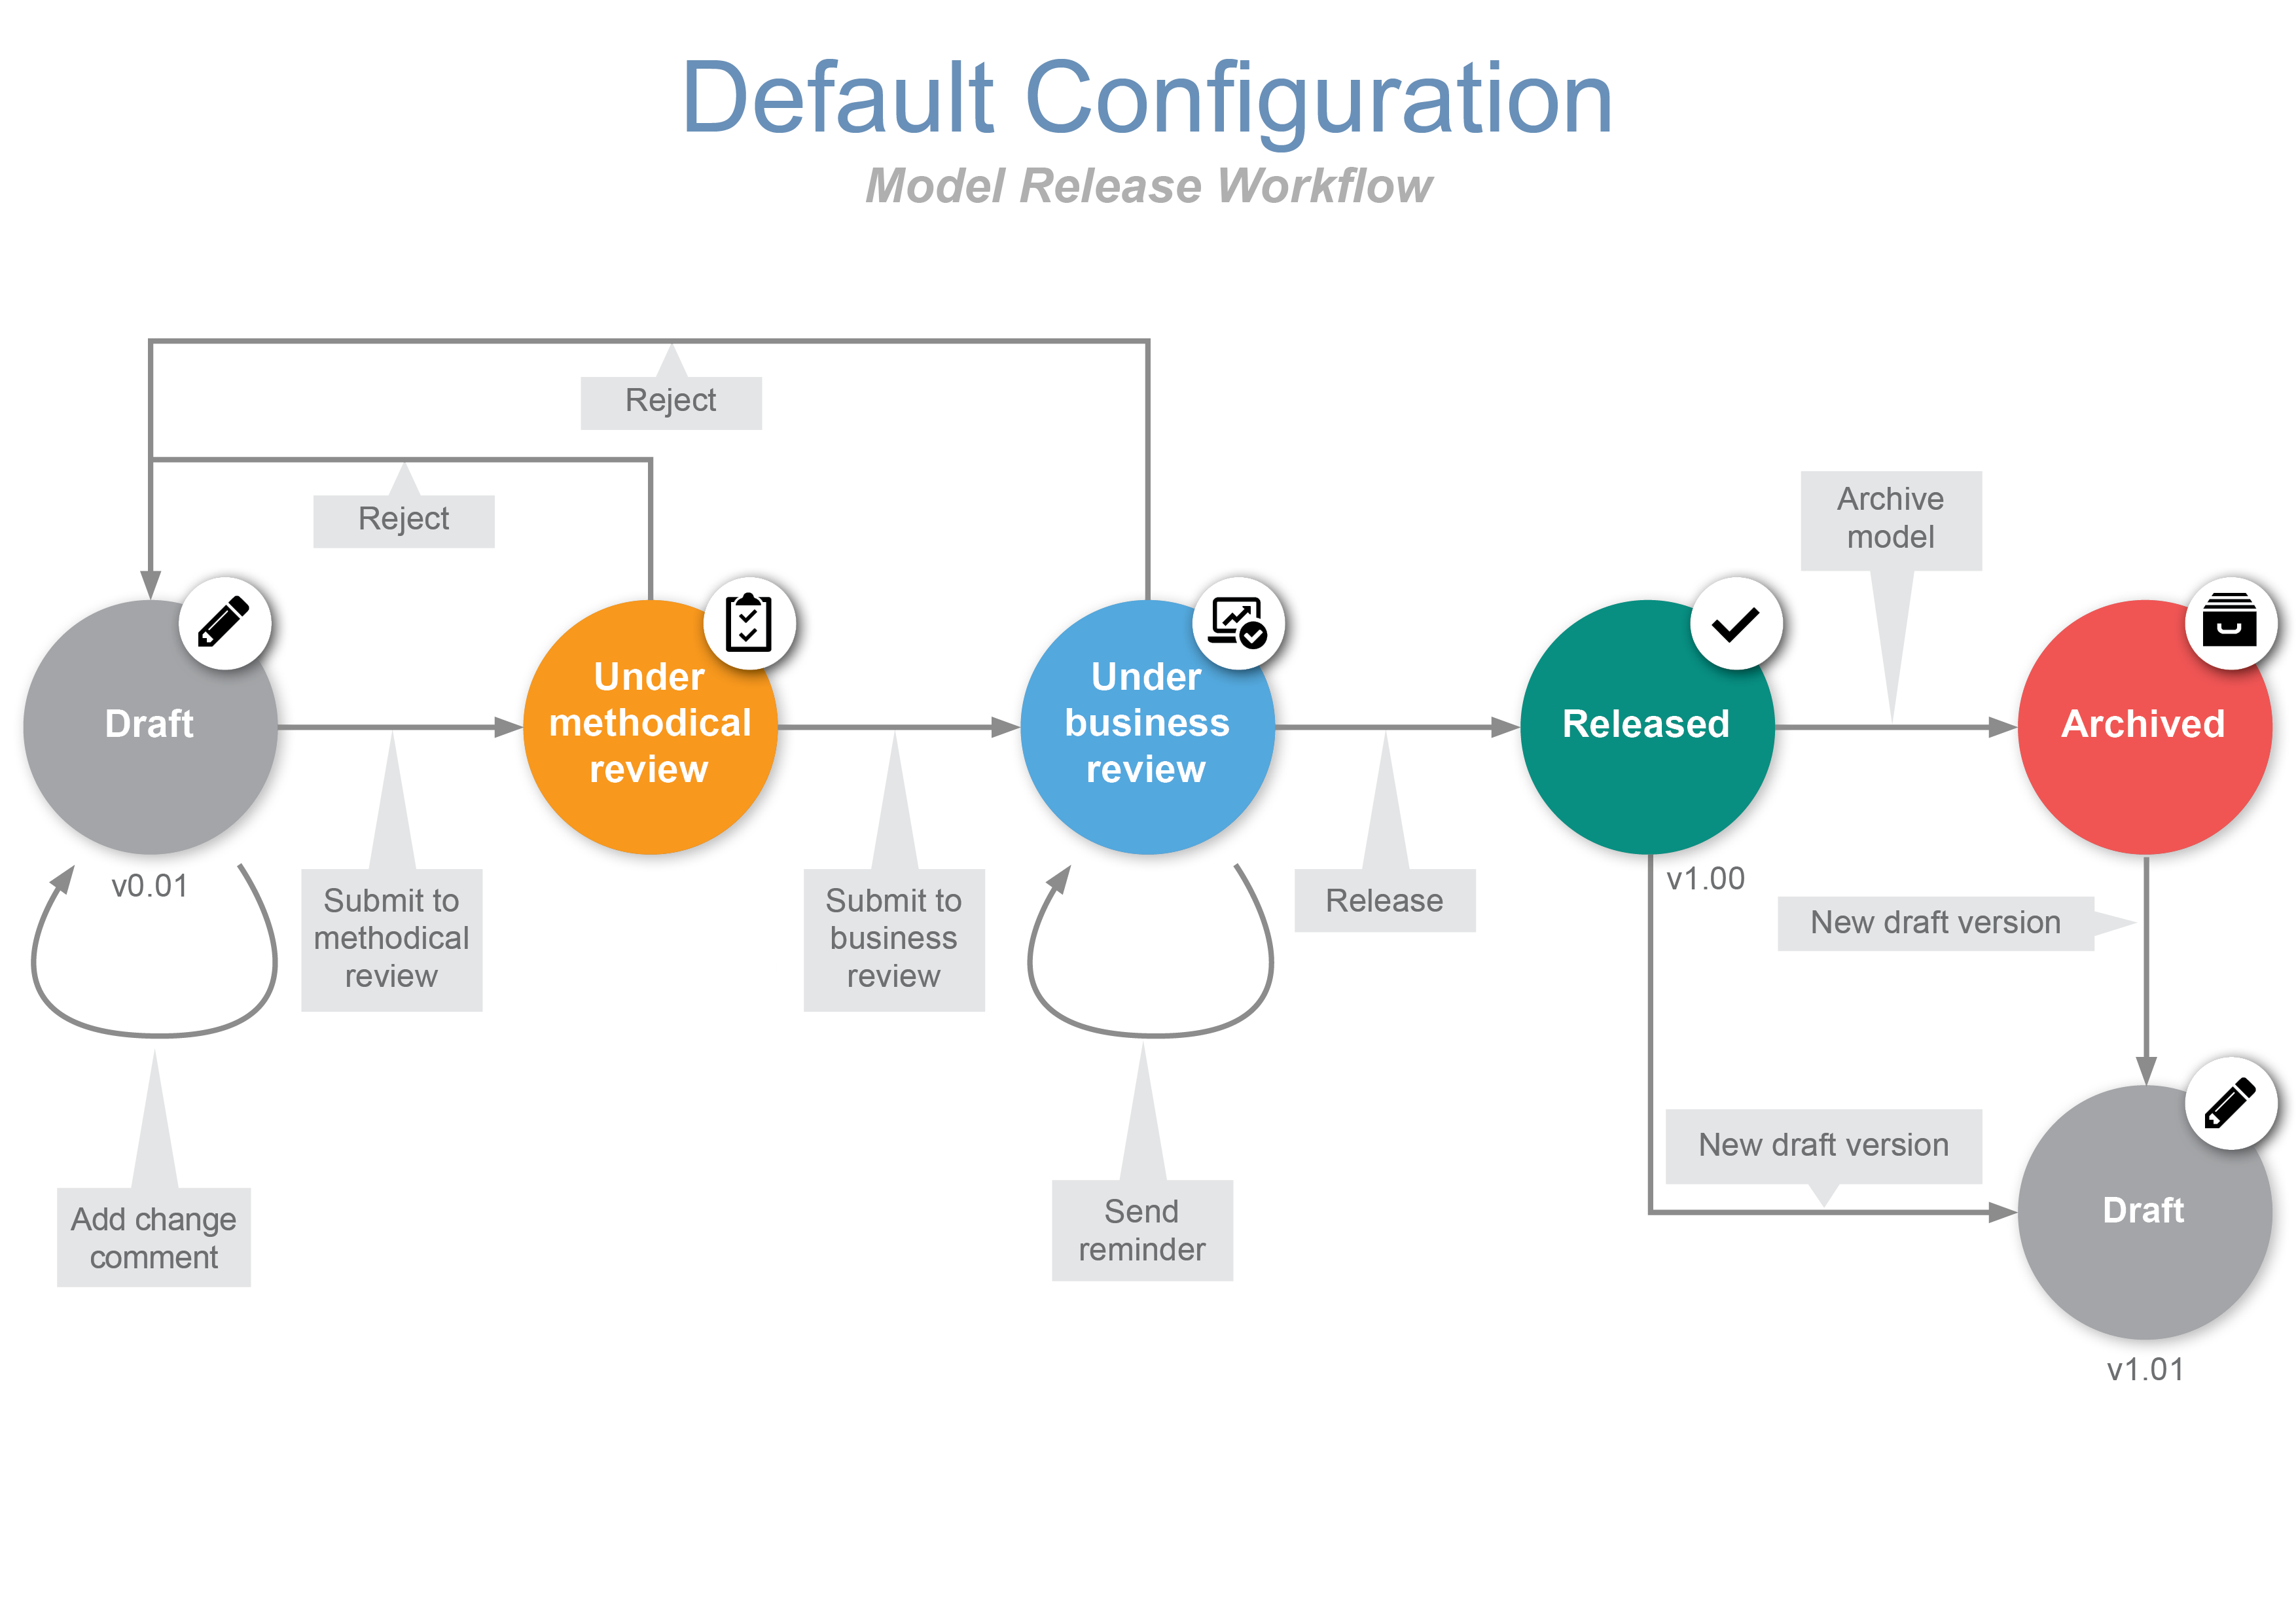
Releasing Content (Only if Your Organisation Uses Release Workflows)
In many productive environments, models move through a draft, review, and released lifecycle. In ADONIS, preconfigured release workflows are grouped together with validation because they are part of the same governance flow.
Typical Modeller Path
- Open the model.
- Click Release and submit it to the next workflow step defined in your organisation.
- After approval, the content becomes Released and is typically consumed in Read & Explore.
Visibility Tip
If a model seems to disappear, check the State Filter before assuming permissions are broken. In ADONIS, the state filter controls which lifecycle states are visible and workflow-governed types are affected by it.
For more details, see Release Workflows and Filter Models & Objects.
Share and Publish Deliverables
When stakeholders need documentation or outputs beyond the live model view, ADONIS provides several self-service options.
Use Publishing when you want to create outputs such as:
- PDF or RTF reports
- HTML publishing for offline or external use
- Print-ready model exports
For more details, see Reporting Board and Publishing in the Online Help.
Share or Embed Models
Use Share or Embed Models when you want to distribute a model via link or embed it in another environment, such as an intranet or portal page.
For more details, see Share or Embed Models.
Continue Learning With Self-Service Resources
Congratulations, you made it to the end of this ADONIS Quick Start Guide for productive users. You have completed the first steps to start working in a structured way in your productive ADONIS environment.
To keep building confidence and solve questions independently, use the following self-service resources:
When you Need Practical Product Help
Use the BOC Support Center and the ADONIS Online Help when you need step-by-step guidance for concrete tasks such as modelling, reporting, release workflows, sharing, settings, or troubleshooting. The Support Center is the central place for help, training, FAQs, and product updates.
When you Want to Learn Visually
Use the ADONIS tutorial videos if you prefer to see workflows in action rather than read through longer documentation.
When BPMN Notation Becomes the Bottleneck
Use the BPMN Guide, the BPMN introductory blog article, and the free BPMN poster to strengthen your understanding of the graphical notation used in ADONIS.
When you Want Broader BPM know-how
Use the BPM Blog for practical BPM topics and expert insights, and the BPM Resource Library for webinars, posters, whitepapers, and other learning materials. Both are key follow-up resources once you have taken your first steps in ADONIS.
When you Want Guided Hands-on Training
Use our free ADONIS e-Learnings. They serve as a hands-on introduction to ADONIS and BPM, covering process diagrams, landscapes, validation, dashboards, exports, and sharing. They are targeted at BPM beginners and practitioners, including process owners, modellers, analysts, quality managers, and team leads.
When you Want Examples of What Good Content Looks Like
Explore the ADONIS sample content if it is available in your environment or has been imported by your administrator. Sample models are a way to understand how process architectures, drill-downs, and process documentation can be structured in ADONIS.
Suggested Self-Service Learning Path
A practical next-step sequence is:
- Use this Quick Start Guide for your first productive tasks.
- Use ADONIS e-learnings when you want a structured, guided learning path.
- Use ADONIS Online Help whenever you get blocked in a specific activity.
- Use the tutorial videos when you want to see the workflow visually.
- Use the BPMN Guide and BPMN poster when notation becomes the main challenge.
- Use the BPM Blog and BPM Resource Library to deepen your BPM knowledge over time.
Need More Help?
If you still have questions after using the self-service resources above, contact your internal ADONIS administrator or your BOC contact person.