Library Management
The Library Management allows the administrator a wide ranging management access to ADOIT libraries and repositories.
Administrator's rights to libraries are limited for security reasons. Only ADOIT customisers and product developers have full access.
Activate the Library Management
In order to use the Library Management:
Click on the component selection on the top left of the application window.
Select Library Management.
On the start screen of the Library Management, links to the most important functions are provided. Depending on the current selection in the Library Catalogue, different functions are active.
General Repository Functions
In order to be able to work with a library, it has to have at least one repository. In this repository, models and objects are created and reused as specified through configuration.
Create New Repository
To assign a new repository to a library:
Select the library in the Library Catalogue.
Select context menu of the library — menu entry Create new repository.... An input dialogue appears.
Enter the desired name into the field Repository name.
Confirm with OK. The repository is created in the database and assigned to the chosen library
A user (administrator), who creates a new repository automatically gains access rights to this new repository.
Lock/Unlock Repository
From time to time, maintenance duties have be carried out on a repository, e.g. deleting old models or conducting a backup. In this case it is advised to lock the repository before starting and release it after the required maintenance has been completed. A locked repository cannot be used by any user – logon to this repository is no longer possible. An inconsistent database state during maintenance can so be avoided.
Lock Repository
In order to lock a repository:
Select the repository in the Library Catalogue.
Select context menu of the repository — menu entry Lock repository. The repository is blocked.
A repository can only be locked while no other user is currently working with this repository. Otherwise an error message appears.
Unlock Repository
In order to release a locked repository:
Select the repository in the Library Catalogue.
Select context menu of the repository — menu entry Unlock repository. The repository is released and can again be accessed by all users with access rights.
Rename Repository
In order to rename an existing repository:
Select the repository in the Library Catalogue.
Press the "F2" key. An input dialogue appears
Enter the new name.
Confirm with OK. The new name is applied and the dialogue window closed.
Delete Repository
Administrators with corresponding rights can delete repositories that are no longer used. In order to do this:
Select the repository in the Library Catalogue.
Select context menu of the repository — menu entry Delete repository. A confirmation box appears.
Confirm with Yes. The repository and its entire content is removed from the database.
A repository can only be deleted while no other user is currently working with this repository.
You cannot delete the active repository. Switch the repository first.
Be careful when deleting repositories, as their entire content (models, objects, other information) cannot be restored.
Repository Properties
Repositories have many different properties. Some of them are important for administrators and therefore can be displayed. In order to display the repository properties:
- Select context menu of the repository — menu entry Properties....
A dialogue with the repository properties appears:

Properties
The following repository properties are shown:
Currently used by
Contains a list of all users currently logged on to the selected repository.
Currently locked by
If the repository is blocked by a user, the user's name is displayed here.
General Library Functions
In the course of ADOIT administration it might be necessary to manipulate existing libraries. The editing rights for administrators are limited; only customisers and product developers have full access. However, a few basic functions are also available in the Library Management.
Rename Library
In order to change the name of a library:
Select the library in the Library Catalogue.
Press the "F2" key. An input dialogue appears
Enter the new name.
Confirm with OK. The new name is applied and the dialogue window closed.
Delete Library
From time to time it might be required to delete old libraries (e.g. outdated versions) from the database. In order to do this:
Select the library in the Library Catalogue.
Select context menu of the library — menu entry Delete library. A confirmation box appears.
Confirm with Yes. The library and all of its contained objects are removed from the database.
Libraries having repositories cannot be deleted. In this case, delete the repositories first.
Export Library Settings
Using the function Export Library Settings, several important ADOIT library settings can be exported from the database and saved into an XML file in the file system.
In order to export the library settings:
Select the tab Settings in the catalogue.
Select context menu of the desired library — menu entry Export library settings.... An export dialogue appears.
Enter the path and name of the future export file into the field File name (either manually or via the support dialogue Search...).
Confirm with Export. The settings are exported and a success message appears.
Which library settings are added to the export file depends on the ADOIT configuration.
Import Library Settings
Using the function Import Library Settings, externally saved settings of ADOIT libraries can be imported and stored in the database.
In order to import stored library settings:
Select the tab Settings in the catalogue.
Select context menu of the desired library — menu entry Import library settings.... An import dialogue appears.
Enter the path and name of the import file into the field File name (either manually or via the support dialogue Search...).
Confirm with Import. The XML file is imported and the library settings are stored in the database. A success message appears.
Optionally you can also:
- Select Import translation settings from a different library, if the XML file originates from a different library or library version than the one in the database (or if you are not sure about this). In this case, an additional comparison of the element names takes place (not only the mandatory internal ID comparison), in order to join matching elements with different IDs.
Check Library
A successful library is often maintained and further extended over many years. With growing size and complexity, problems might arise which are not visible at first glance. With the function Check Library it is possible to locate these problems.
In order to scan a library:
Select the library in the Library Catalogue.
Right-click the library, and then click Check library. The library is checked and the results are displayed as a new tab in the workspace.
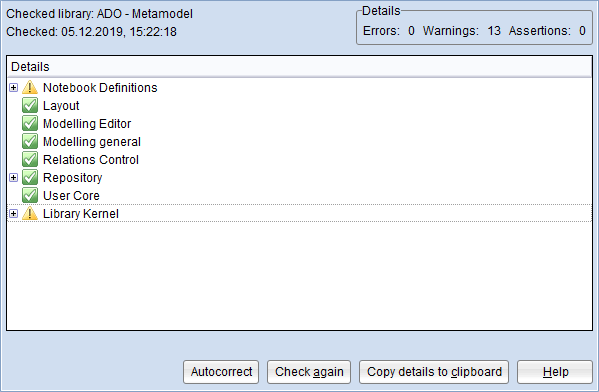
Results
The upper part of the tab contains general information (library name, date and time of the check, summary…). Below that a list shows errors, warnings and informations. The entries are grouped by category.
Click the icon ![]() to
expand a category and read the entries.
to
expand a category and read the entries.
In the above example, you can see that the library does not contain any errors and that 13 warnings occurred during the check. These warnings occurred in the library modules Notebook Definitions and Library Kernel; the other modules are flawless.
Tab Functions
The library check tab offers the following functions:
Autocorrect
To let ADOIT attempt to automatically correct problems:
- Click Autocorrect.
Autocorrect is run and the tab content is updated.
Check Again
To check the same library again (e.g. after changes):
- Click Check Again.
The library check is repeated and the tab content is updated.
Copy Details to Clipboard
To copy the check results to the clipboard:
- Click Copy Details to Clipboard.
The check results are copied directly to the clipboard and can be pasted wherever you need them.
Export Library
For backup purposes and to distribute a library to ADOIT administrators not networked, a library saved in the database can be exported as an AXL format file. To export a library:
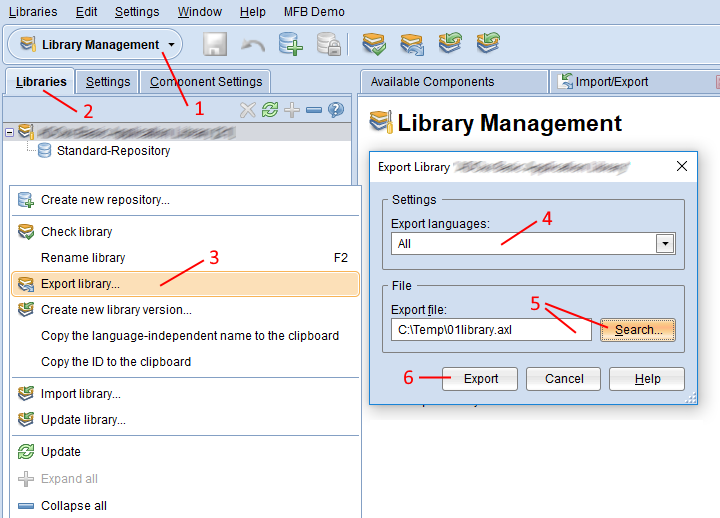
Open the Library Management component via the component selection (1).
Select the library in the Library Catalogue (2).
From the context menu of the library, select Export library … (3). The export dialogue opens.
From the drop-down list Export Languages choose, whether the library shall be exported with all available languages or only with one specific language (4).
Enter the path and name of the future export file into the field Export File (either manually or via the support dialogue Search…) (5).
Confirm with Export (6).
Library Import
This function allows you to import additional libraries to the database. In order to do so:
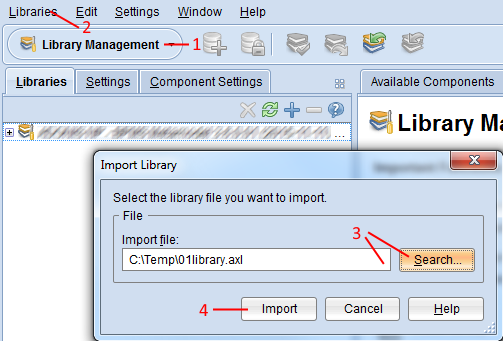
Open the Library Management component via the component selection (1).
Select menu Libraries – menu entry Import library… (2). A dialogue window containing the import settings appears.
Enter the path and name of the backup file into the field Import file (either manually or via the support dialogue Search…) (3).
Confirm with Import (4). The data is imported and a confirmation box appears.
Click Show messages >> to verify if the import was successful.
Update Library
This function allows you to update an existing library to a new version. In order to update a library:
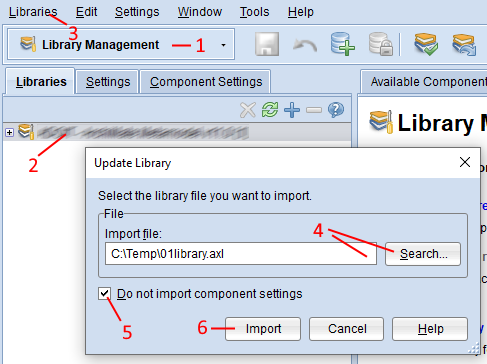
Open the Library Management component via the component selection (1).
Select the library in the Library Catalogue (2).
On the Libraries menu, click Update library… (3). A dialogue window containing the import settings appears.
Enter the path and name of the update file into the field Import file (either manually or via the support dialogue Search…) (4).
Select the Do not import component settings check box (5) to keep your current set of component settings. If this check box is cleared, updating the library will overwrite your component settings in ADOIT with the ones in the import file and you will loose your modifications.
Confirm with Import (6). A dialogue window appears. You will be asked whether you want to overwrite the existing library with the contents of the update file. Click Yes to continue. The data is imported and a confirmation box appears.
Click Show messages >> to verify if the import was successful.
The primary language will not be changed during the library update even if the new version has a different primary language than the library in the database.
Determine Translation Relevance
Every library and its meta model (all model, object and connector types) own different attributes of various types, including text attributes. With the help of the function Determine Translation Relevance you are able to define which text attributes of a meta model or a library shall be translated (= are relevant for translation) and which texts shall remain the same in all languages. Translation-relevant attributes are displayed in the Translation Editor, attributes that are not relevant are hidden there.
This function is only available in multilingual product configurations.
In order to determine the translation relevance of a library:
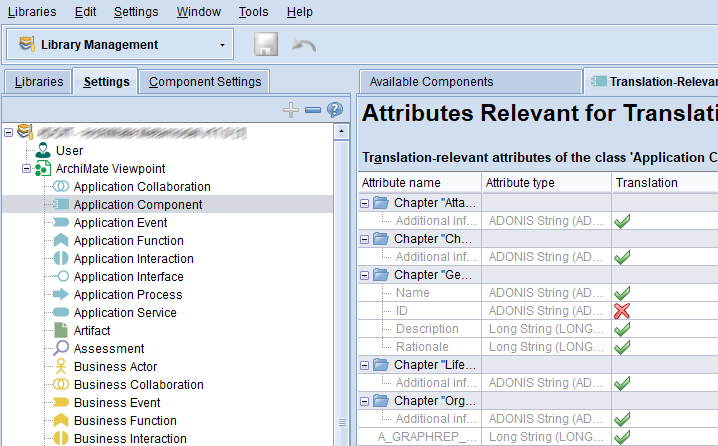
Select the tab Settings in the catalogue.
Select the desired entry in the catalogue. A tab with the text attributes is displayed in the workspace
The column "Translation" shows if an element is relevant for translation (
 )
or not (
)
or not ( ).
Double-click here to change the status.
).
Double-click here to change the status.
Grey rows contain write-protected attributes. Since they are not updated by the users, they are not relevant for translation.
Internal and hidden attributes are never translation-relevant and are thus not displayed here.
Further Actions
The following additional actions are possible:
You can export your translation settings for backup and distribution matters into an XML file using the function Export Library Settings .
You can import externally saved translation settings using the function Import Library Settings .
Import Metamodel Fragment
This function allows you to import a JavaScript file containing information on metamodel elements.
A detailed description of this functionality is beyond the scope of this manual. If you have questions, please contact your ADOIT consultant.
Library-Specific Component Settings
This module allows the administrator to customise a wide range of library-specific component settings.
Activate the Component Settings
In order to use the Component Settings:
In the Library Management Component, switch to the tab Component Settings.
Double-click a library in the Component Settings Catalogue to open the list of components available for configuration.
Depending on the tool configuration, different components can be available for configuration.
The start screen of the Component Settings provides links to the most important configuration functions. Depending on the component selected, the following functions are available:
Create configuration
Create a new configuration for the selected component.
Edit configuration
Edit the selected configuration.
Delete configuration
Remove the selected configuration.
Import component settings
Import settings of components available for configuration. Please refer to the section Migrate Library-Specific Component Settings for details.
Export component settings
Export the settings of the selected component. Please refer to the section Backup Library-Specific Component Settings for details.
Authentication
The settings for authentication in ADOIT are stored here as a library-specific component setting. These settings are read only in the Administration Toolkit. You can edit these settings on the Admin Page.
Chart Templates
In this area you can create and manage chart templates.
Analyse vs. Dependency Analysis
The following templates are used when creating a so-called analysis in the web client and adding charts:
Additionally, you can define templates for dependency analyses:
Box-in-Box Templates
Box-in-box charts in ADOIT visualise hierarchies and relations between objects. They resemble a family tree. In a box-in-box chart with e. g. three layers the top layer represents the grandparents. The second layer contains the children of the grandparents, who are siblings. The third layer contains the grandchildren. The grandchildren are siblings only if they share the same parent.
Templates for box-in-box charts need to be configured in the Administration Toolkit before they become available in the web client.
Create Box-in-Box Template
To create a box-in-box template:
Go to Library Management > Component Settings > Chart Templates.
Right-click Box-in-Box, and then click Create new configuration.
The box-in-box template configuration dialogue opens in the Library Management tab.
Box-in-Box Template Configuration Dialogue
The box-in-box template configuration dialogue offers the following settings:
Name
Enter a name for the new box-in-box template. The name is visualized on the user interface.
Model Type
Select a model type as the basis for the box-in-box chart. Usually this should be the Architecture Diagram or Analysis Model.
Layer Definition
Create a layer definition for the new box-in-box template.
Relation Definition
Create a relation definition for the new box-in-box template.
When you have completed these settings, confirm with OK.
Layer Definition
The layer definition describes the classes that are used and allowed on each level of the data analysis.
A box-in-box chart needs at least two layers.
Each layer must contain at least one class.
Each layer and all layers together are enclosed by parentheses.
A class in a layer is defined by its unique name.
The unique name of a class is highlighted when you open the Edit Class dialogue. In order to do this:
Double-click the class in the Metamodel Catalogue (any view) of the Metamodel Management.
Example: Layer DefinitionThe layer definition of a simple box-in-box chart could look like this:
((C_BUSINESS_PROCESS)(C_APPLICATION_COMPONENT)(C_SYSTEM_SOFTWARE))This box-in-box chart has three layers. The first layer contains the class “Business Process” (unique name
C_BUSINESS_PROCESS). The second layer contains the class “Application Component” (unique nameC_APPLICATION_COMPONENT). The third class contains the class “System Software” (unique nameC_SYSTEM_SOFTWARE).
Relation Definition
The relation definition describes the relation classes that connect the layers in a box-in-box chart.
Neighbouring layers in a box-in-box chart are connected by relation classes.
Each relation class and all relations classes together are enclosed by parentheses.
The start and the end layer of a relation class are denoted by the layer number (0,1,2,…).
The direction in which the relation is allowed is denoted as well (“<” means from end to start, “>” means from start to end, “=” means in both directions).
A relation class is defined by its unique name.
The unique name of a relation class is highlighted when you open the Edit Relation Class dialogue. In order to do this:
- Double-click the relation class in the Metamodel Catalogue (any view) of the Metamodel Management.
If the layer definition of a box-in-box chart looks like this:
((C_BUSINESS_PROCESS)(C_APPLICATION_COMPONENT)(C_SYSTEM_SOFTWARE))
The relation definition could look like this:
((0 1 < RC_SERVING)(1 2 < RC_SERVING))
This relation definition contains two relations. Both times “Serving”
(unique name RC_SERVING) is defined as the relation class. The first
relation connects the first layer and the second layer of the box-in-box
chart. The direction is from the second layer to the first. The second
relation connects the second layer and the third layer of the box-in-box
chart. The direction is from the third layer to the second.
Bubble Templates
A bubble chart displays objects as bubbles on an area. The area is defined by two axes (x-axis and y-axis).
Templates for bubble charts define the class of the visualised objects and the attributes for x-axis, y-axis and bubble size. The attribute for bubble size is optional; all bubbles have the same size when the attribute is not set.
Dependencies
The configuration depends on the used metamodel. Only modelling classes which contain at least two attributes of type INTEGER, DOUBLE, ENUM, BOOL or DATE are shown in the configuration panel. Model context specific attributes cannot be used for a bubble template.
Create Bubble Template
To create a bubble template:
Go to Library Management > Component Settings > Chart Templates.
Right-click Bubble, and then click Create new configuration.
The bubble template configuration wizard opens in the Library Management tab.
Bubble Template Configuration Wizard
The bubble template configuration wizard offers the following settings:
Name of the Template
The name of the new bubble template. The name is visualized on the user interface.
Description of the Template
A description which characterises the bubble template. This setting is optional.
Attribute for X-axis
Attributes of type INTEGER, DOUBLE, ENUM, BOOL and DATE are shown.
Attribute for Y-axis
Attributes of type INTEGER, DOUBLE, ENUM, BOOL and DATE are shown.
Attribute for Object Size
Attributes of type INTEGER, DOUBLE and ENUM are supported.
Modelling Class
A modelling class is shown here if it contains at least two attributes which can be represented on the bubble axes.
When you have completed these settings, confirm with OK.
Gantt Templates
A Gantt chart shows objects as bars on a timeline. Templates for Gantt charts define the class of the visualised objects and the attributes to use for the start and end dates.
Create Gantt Template
To create a Gantt template:
Go to Library Management > Component Settings > Chart Templates.
Right-click Gantt, and then click Create new configuration.
The first page of the Gantt template configuration wizard opens in the Library Management tab.
Gantt Template Configuration Wizard - Page 1
The first page of the Gantt template configuration wizard offers the following settings:
Name of the Template
The name of the new Gantt template. The name is visualized on the user interface.
Description of the Template
A description which characterises the Gantt template. This setting is optional.
Start Class for the Template
The start class of the new Gantt template. The start class is the class upon which all relations to other classes of configuration items are based.
When you have completed these settings, click Next >. The second page of the Gantt template configuration wizard opens.
Gantt Template Configuration Wizard - Page 2
The second page of the Gantt template configuration wizard offers the following settings:
List of relation classes
The content of the left panel depends on the selected starting class. In this panel, a list of all existing relation classes of the selected element is shown, divided into incoming and outgoing relation classes.
By marking a class and clicking on the ">" button between the two panels, a class is added to the configuration and can now be selected in the right panel to further specify the hierarchy of the Gantt configuration.
Preview
In the right panel, elements that have already been added to the configuration are shown as layers. An Icon for removing a layer is activated by mouseover.
When you have completed these settings, confirm with Next >. The third page of the Gantt template configuration wizard opens.
Gantt Template Configuration Wizard - Page 3
The third page of the Gantt template configuration wizard offers the following settings:
Attribute
The start date attribute.
Attribute (To Date)
The end date attribute.
When you have completed these settings, confirm with OK.
Matrix Templates
A matrix chart in ADOIT displays connections (matrix cells) between objects of the x-axis and objects of the y-axis. A connection can be
a relation between x-axis object and y-axis object or
an object which is connected with the x-axis and y-axis objects by relations.
A matrix template defines the modelling class of the visualized x-axis objects, the modelling class of the visualized y-axis objects and the class for the matrix cells. It is possible to define a relation class or a modelling class for the matrix cells. In case of a modelling class the user has to define how the class is connected to the x-axis class and the y-axis class. Thus a class with two relation classes must be defined.
Dependencies
The configuration depends on the used metamodel. At least one modelling class (for x-axis and y-axis) and one relation class (for cell relation class) must be defined in the used metamodel.
Create Matrix Template
To create a matrix template:
Go to Library Management > Component Settings > Chart Templates.
Right-click Matrix, and then click Create new configuration.
The matrix template configuration wizard opens in the Library Management tab.
Matrix Template Configuration Wizard - Page 1
The first page of the matrix template configuration wizard offers the following settings:
Name of the Template
The name of the new matrix template. The name is visualized on the user interface.
Description of the Template
A description which characterises the matrix template. This setting is optional.
X-axis
This setting defines the modelling class of the visualized x-axis objects.
When you have completed these settings, click Next >. The second page of the matrix template configuration wizard opens.
Matrix Template Configuration Wizard - Page 2
The second page of the matrix template configuration wizard offers the following settings:
Cell
This setting defines the class for the matrix cells.
When you have completed these settings, click Next >. The third page of the matrix template configuration wizard opens.
Matrix Template Configuration Wizard - Page 3
The third page of the matrix template configuration wizard offers the following settings:
Y-axis
This setting defines the modelling class of the visualized y-axis objects.
When you have completed these settings, confirm with OK.
Dependency Analysis (Dependency Modeller) Templates
The dependency analysis is a graphical means to discover and analyse dependencies between architectural objects across several architectural layers. For example, it can show which architecture objects have a direct or indirect influence on on business-critical processes.
A template defines the complete structure of the dependency analysis hierarchy. The hierarchy is based on a start modelling class and several other classes connected with relation classes. For each modelling class a layer is built, which is represented as a swimlane in the dependency analysis. The layer can be bridged, i.e. made invisible in the dependency analysis. The configuration also stores the colour selected for each layer.
Create Dependency Analysis Template
To create a dependency analysis template:
Go to Library Management > Component Settings > Chart Templates.
Right-click Dependency Modeller, and then click Create new configuration.
The first page of the dependency analysis template configuration wizard opens in the Library Management tab.
Dependency Analysis Template Configuration Wizard - Page 1
The first page of the dependency analysis template configuration wizard offers the following settings:
Name of the Template
The name of the new dependency analysis template. The name is visualized on the user interface.
Description of the Template
A description which characterises the dependency analysis template. This setting is optional.
Start Class for the Configuration
The start class of the new dependency analysis template. The start class is the class upon which all relations to other classes of configuration items are based.
When you have completed these settings, click Next >. The second page of the dependency analysis template configuration wizard opens.
Dependency Analysis Template Configuration Wizard - Page 2
The second page of the dependency analysis template configuration wizard offers the following settings:
List of relation classes
The content of the left panel depends on the selected starting class. In this panel, a list of all existing relation classes of the selected element is shown, divided into incoming and outgoing relation classes.
By marking a class and clicking on the ">" button between the two panels, a class is added to the configuration and can now be selected in the right panel to further specify the hierarchy of the dependency analysis template.
Preview
In the right panel, elements that have already been added to the configuration are shown as layers. Icons for removing a layer, setting the background of a layer and bridging a layer are activated by mouseover.
The layer containing the start class cannot be deleted or bridged. All other layers can be moved with the buttons between the two panels (up, down, to the top and to the bottom).
When you have completed these settings, confirm with OK.
ClamAV Virus Scanner
By integrating the ClamAV virus scanner into ADOIT, files being uploaded to the ADOIT database (documents, media files, files attached to comments, etc.) or downloaded to your device may be checked for virus infections.
For detailed instructions on how to integrate ClamAV into ADOIT, please refer to the chapter Enable Virus Scan for File Uploads in the Installation Manual.
Common
Here you can manage configuration options for various general settings.
Change History
Changes to repository objects can be tracked in the change history. Web client users can access the change history through the Notebook of an object.
Select Edit configuration to open the settings for the Change history. The following settings are available:
Activate change history
Activate or deactivate the change history by ticking the check box.
Table attribute for the change history
Select the table attribute for the change history from the drop-down list.
Maximum entries in the change history
Select the maximum number of entries in the change history.
Activate the change history in the web client
Activate or deactivate the change history in the web client by ticking the check box. If this option is activated, you can specify which columns of the change history are shown in the web client.
Show all entries regardless of metamodel rights
By default, the complete change history of a repository object is hidden if a user has no access to one or more object attributes due to metamodel rights. Select this check box to always show the complete change history, regardless of metamodel rights restrictions.
Document Management
Here you can configure an object type which allows web client users to upload external files into the database. By default, the imported files are maintained as Documents in the Object Catalogue. If a repository is exported for backup or migration purposes, the external files in the database are exported as well.
Select Edit configuration to open the settings for Document management. The following settings are available:
Activate Document Management
Activate or deactivate the document management by ticking the check box.
Class for Document Management
Select a class for the document management from the drop-down list.
Attribute for Document Management
Select an attribute for the document management from the drop-down list.
Max file size (MB)
Select the allowed maximum size for files in the database (up to 50 MB).
Allowed file types (space-separated extensions)
Select the allowed file types for files in the database. Separate the file extensions with a blank.
Allowed file types include: doc, docx, ppt, pptx, xls, xlsx, csv, txt, pdf, rtf, png, jpg, gif, jpeg, bmp, zip, rar, 7z, axr, xml, bpmn
All other file types are blocked by default. To allow additional file types to be added to this list, you need to customize a configuration file.
The ADOIT application server has to be restarted if these settings are changed. Otherwise the changes will not become effective.
Media Management
Here you can configure an object attribute which allows web client users to upload external media files to the database.
If an image file is uploaded (PNG, JPG, etc.) and the object type is configured correctly, the content of the image file is displayed instead of the standard representation of the object in the graphical editor. By default, this applies to Notes.
If a repository is exported for backup or migration purposes, the external media files in the database are exported as well.
Select Edit configuration to open the Media Management Settings. The following settings are available:
Activate Media Management
Activate or deactivate the media management by ticking the check box.
Attribute for Media Management
Select an attribute for the media management from the drop-down list.
Max file size (MB)
Select the allowed maximum size for files in the database.
Allowed file types (space-separated extensions)
Select the allowed file types for files in the database. Separate the file extensions with a blank.
The ADOIT application server has to be restarted if these settings are changed. Otherwise the changes will not become effective.
Object Owners
In ADOIT a user can be assigned ownership of a repository object . In order to do so:
ArchiMate Application Library: The user has to be assigned as Responsible business actor (object attribute in the Notebook chapter "Organisation").
ADOIT Standard Application Library: The user has to be assigned as Responsible Person (object attribute in the Notebook chapter "Organisation").
Alternatively, you can select a different relation to define ownership.
The object owner is responsible for the content of the object. The following settings are available:
Set the user automatically as object responsible after creation of objects
Select whether a user who creates an object is automatically assigned as its owner by ticking the check box.
Relation class that should be used to define an ownership
Select a relation class as default ownership relation from a drop-down list of all ownership relations in use in the current library. This relation is then used e.g. to create ownership between an object and a user when the user creates a new object and the first option is checked.
[OOO] When you select a relation class with the suffix [OOO], the object owner will ALWAYS get granted write access to the object no matter what type of access they had previously.
After the assignment, ADOIT Administrators can adjust the rights of object owners as they see fit. When the reference to the user is deleted, rights to the object are inherited as set in a superior hierarchy level (group).
Corporate Identity
The corporate identity scheme (CI scheme) of an organisation can be embedded in various publications in ADOIT (e.g. when printing models to PDF and creating reports). The following settings are available:
Name of the corporate identity
Enter a name for the CI scheme you want to create.
Upload a logo that should be shown in the headline of reports
Click Search... to upload a logo that will appear in publications.
Upload an image that can be shown as banner on scenario startpages and dashboards
Click Search... to upload a banner image that will appear near the top of the "Design & Document" start page.
In the ADOIT Standard Application Library, the functionality Upload an image that can be shown as banner on scenario startpages and dashboards is not available.
Corporate Data
Enter the name of the company, the postal address and other corporate data in the respective fields.
Use as standard
Select whether this CI scheme will be set as the default when creating publications. This setting can be overridden by individual users of the ADOIT web client according to their preferences.
Sizing Images
Images should follow these guidelines:
| Type | Width & Height | File Size | Format |
|---|---|---|---|
| Banner | Recommended 2000 x 1000 pixels (see below table for more information). | Less than 5MB | JPG, PNG, BMP, GIF or SVG |
| Logo | Minimum 260 x 260 pixels. Aspect ratio approximately 1:1 for best results. | Less than 5MB | JPG, PNG, BMP or GIF |
Banner images are cropped automatically due to varying screen sizes. This occurs mostly on wide screens, where the top and bottom are cropped. Therefore, keep the most important part of the image (e.g. logo and text) in the center. The recommended, safe content area is approximately 2000 x 150 pixels.

Data Actuality
In this area you can configure data actuality settings for objects.
Attribute for Data Actuality
Select the attribute on which the data actuality assessment should be based.
Global threshold (default value if no class-specific value is defined)
Here you can set global thresholds for assessment of data actuality. These settings apply to all object types if no class-specific values have been defined.
Number of days after which an object is marked 'yellow'
Select after how many days an object is marked as 'yellow' if its actuality was not confirmed by the user responsible for this application. At the same time, the user receives an alert.
Number of days after which object is marked 'red'
Select after how many days an object is marked as 'red' if its actuality was not confirmed by the user responsible for this application.
Threshold (per class)
Here you can override the global thresholds by setting individual thresholds on specific classes.
- Click where a row (= class) and a column (= yellow or red status) meet to edit the threshold values.
Element Creation Configuration
The settings in this area allow you to provide guidance to web client users when they create new models and objects. You can define a set of model and object types that will be placed in the Recommendations pane of the New page.
If no recommended elements have been configured, the Recommendations pane is not shown.
The following settings are available:
Element creation recommendations
Select the model and object types that should be placed in the Recommendations pane, and then click Add. The order in which these elements are visualised can be adapted in the right panel.
Recommendations
For all elements selected in the left panel, you can change the order in which they are visualised with the buttons between the two panels (up, down, to the top and to the bottom).
When you have completed these settings, confirm with OK. The element creation configuration is saved in the database and immediately available in the web client.
In the ADOIT Standard Application Library, this functionality is not available.
Enterprise Architecture Management
In this area you can configure special functionality related to Applications or architecure elements.
ArchiMate Application Library
If you are using the ArchiMate Application Library, the following settings are available:
Grant the owner write access to the object group containing the architecure element
In ADOIT a user can be assigned ownership of a repository object (see section Object Owners). Define whether they will be granted write access to the object group containing the repository object, even if they usually only have read access. When the user is removed, the rights to the object group are set back to inherited.
ADOIT Standard Application Library
If you are using the ADOIT Standard Application Library, the following settings are available:
Grant the application owner write access to the object group containing the application
In ADOIT a user can be assigned ownership of an Application (see section Object Owners). Define whether they will be granted write access to the object group containing the Application, even if they usually only have read access. When the user is removed, the rights to the object group are set back to inherited.
Propagate the ownership of the application to all of its provided interfaces
Define whether the owner of an Application is automatically assigned as owner of all provided Interfaces. When the application owner is removed, they are also removed from the provided Interfaces.
Inform application responsibles when used interfaces are deleted
Define whether ADOIT automatically sends out emails to the owner of an Application when used Interfaces are deleted.
Excel Import
ADOIT provides a configurable Excel interface for quick data acquisition. Via the Excel interface, you can import repository objects with their attributes and relations from an Excel file (XLS or XLSX format). For this process, the structure of the Excel file is described in an XML configuration file.
Create Configuration
An XML configuration file contains the mapping of objects from the Excel file to the ADOIT metamodel:
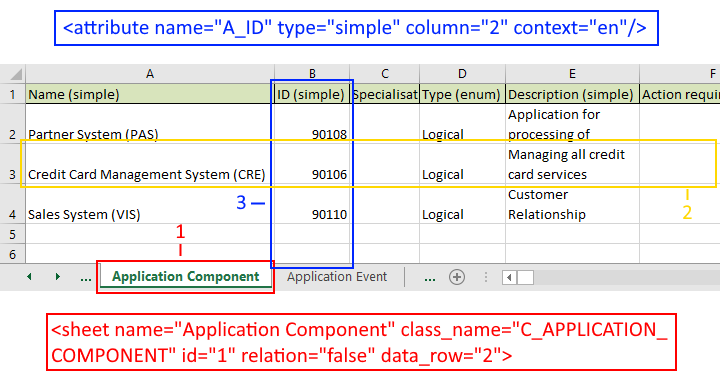
The Excel file can contain any number of sheets
Each sheet contains only objects of one type (1)
Example - XML configuration fileA configuration for a sheet could look like this:
<sheet name="Applications" class_name="C_APPLICATION" id="2" data_row="4"><sheet name>is the name of the sheet in Excel.<class_name>is the language independent name of the object type.<id>is the number of the column which uniquely identifies an object.<data_row>is the first row containing an object.Each row in the sheet contains one object (2)
Each column holds an attribute or a relation to another object (3)
Example - XML configuration fileA configuration for an attribute could look like this:
<attribute name="A_DESCRIPTION" type="simple" context="en" column="5"/><attribute name>is the language independent name of the attribute.<type>is the attribute type.<context>defines the language of the objects that are imported.<column>is the column number.A unique identifier (name, ID etc.) is needed for each object
The following attribute types can be imported: simple, date, enum, treeenumlist, enum_list, bool, relation and file_pointer
If you are using the ArchiMate Application Library or the ADOIT Standard Application Library, one or more sample configurations will already be provided for you in the Administration Toolkit. For every configuration, a suitable Excel file is included.
The details of how to create an Excel import configuration are not covered here. If you want to create your own configurations, please contact your ADOIT consultant.
To successfully create a configuration, you need access to the Metamodel Management. The language independent name of object types, attributes etc. can be found there and you need those for the configuration.
Import Configuration
In order to use a specific configuration in ADOIT you have to import the XML configuration file first:
In the Component Settings Catalogue, right-click Excel Import, and then click Create new configuration.
In the Configuration name box, type a name for the configuration.
Click the Import button and double-click the XML configuration file. The configuration is imported and displayed in the Preview box.
Click OK.
The configuration is saved. You can now import objects from any Excel file that corresponds to the configuration.
Import Excel File Template
For each configuration you can import a suitable Excel file as a template.
Double-click the configuration for which you want to import a template.
Click the Import template button and double-click the Excel file. The configuration is imported.
Click OK.
The configuration is saved. The template is now available for download in the Excel import dialog in the web client. Users can download the template, capture objects in it, and then import the objects.
HTML Publishing
By default, the search page will be displayed as the start page of an HTML publication, including embedded corporate identity elements. You can configure a custom start page instead. To do so, upload a single HTML page.
The uploaded file must contain all images, scripts, style information etc. inline, or download it from a place in the web. To include images inline within the HTML page, they have to be embedded base64-encoded.
The following settings are available:
Disable Custom Start Page
Choose whether to show the uploaded file in HTML publications. This option is useful if you want to temporarily disable a custom start page.
Custom Start Page - File Name
Upload an HTML page. Click the Browse button, click the HTML page that you want to use, and then click OK.
Custom Start Page - File Content
The content of the uploaded HTML file is displayed here.
Integration - Configuration & Data Connectors
The ADOIT integration framework is a generic ADOIT extension that can be used to create and configure adapters connecting to any kind of third party tool that exposes an HTTP interface which allows fetching of data.
A detailed description of this functionality is beyond the scope of this manual. If you have questions, please contact your ADOIT consultant.
Layout
Here you can manage configuration options for various layout settings.
Analysis
The Analysis settings define the layout for a query result model. Query result models are used to save the results of a graphical or tabular analysis as a model. The following settings are available:
Model type
Select a model type as the basis for a query result model. Usually this should be the Architecture Diagram or Analysis Model.
Swimlane class
Define a swimlane class for structuring all objects of a class.
Order of swimlanes
Define the order in which the swimlanes should be listed in the query result model.
Swimlane layout
Define whether swimlanes should be arranged horizontally or vertically.
Management Office Integration
ADOIT offers synchronisation of objects with other BOC Management Office products. The synchronisation takes place between the ADOIT web client and the web client of another BOC Management Office product. Objects are exported from the source product and imported into the target product. A REST API is used for the communication between the products.
ADOIT administrators can configure in the Administration Toolkit which object types are synchronized and in which target group synchronized objects are placed. Synchronisation can either be triggered manually in the web client or run automatically on a scheduled basis.
The availability of this feature depends on the licence.
For more detailed instructions on this topic, please refer to the document "Management Office Integration" on the ADOIT installation medium in the folder “02 Rich Client\BOC\ADOIT 14.0\books\english”.
Metamodel Profile Configurator
The Metamodel Profile Configurator allows power users to choose between various predefined metamodel profiles in the web client:
Metamodel profiles reduce the number of available metamodel elements.
They are applied to all users on login.
They consist of a set of metamodel rights which are resolved in a special system role.
This system role is automatically created when the power user selects a profile and then assigned to all users.
The system role has the same name as the profile (e.g. ADOIT for Fans of a Lean Architecture).
Conflict with Other System Roles
Metamodel profiles may be affected by other system roles which are relevant for metamodel rights.
The metamodel profiles are predefined and cannot be changed by the ADOIT administrator. If you want to modify the configuration, please contact your ADOIT consultant.
Set up Access to Metamodel Profile Configurator
As an ADOIT administrator, you can grant trusted users in your organisation the permission to choose metamodel profiles. Assign the following system role to user grups or individual users:
- MMProfileConfigurator
If the MMProfileConfigurator system role is not available in your environment, you can create your own system role with access to the Metamodel Profile Configurator:
Create the following system role:
- MMProfileConfigurator (or another meaningful name)
Assign the following web module to this system role:
- Metamodel profile configurator
Done! This system role now provides access to the Metamodel Profile Configurator for your users.
Model Time Filter
The model time filter allows to filter objects in the currently opened model / view according to their validity period. The following settings are available:
Classes that are considered by the model time filter
Select the classes which should be considered by the model time filter from a list of all classes.
Organisation Portal
The Organisation Portal allows employees of your organisation easy and intuitive access to the models in the ADOIT database. Personalized dashboards and other complex functions are not included in the Organisation Portal. Access to the Organisation Portal does not require a user account.
The Organisation Portal is read-only. Users have no write access to repository content (including all models and objects and their relations).
The availability of the Organisation Portal depends on the licence.
Set Up Access to the Organisation Portal
In order to set up access to the Organisation Portal you need to prepare at least one user account with the appropriate system role. The following steps are necessary to set up the default configuration:
Create the following top level user group:
- Reader
Edit the access rights of the user group "Reader" so that it has the following rights:
Read access to the model group "(Standard group)"
Read access to the object group "(Standard group)"
Create the following user account and add it to the newly created user group:
- User name: Reader, Password: Password123++. Activate Trusted Login and assign the current standard repository to the user.
Assign the following preconfigured system role to the newly created user group:
- Organisation Portal
By default, the system role 'Organisation Portal' has access to the following web modules only:
- Standard Organisation Portal
The above settings represent the minimum configuration. You can assign additional web modules to the system role "Organisation Portal". Bear in mind though that if a user has access to more functionality via additional web modules, the complexity of the Organisation Portal as a whole increases.
The ADOIT application server has to be restarted if these settings are changed. Otherwise the changes will not become effective.
Configure Organisation Portal
In order to configure the Organisation Portal:
- Go to Library Management > Component Settings >Organisation Portal > General.
The first page of the Organisation Portal configuration wizard opens in the Library Management tab.
Organisation Portal Configuration Wizard - Page 1
The first page of the Organisation Portal configuration wizard allows you to define the following settings:
Allow anonymous access to the Organisation Portal
Select whether access to the Organisation Portal does require a user account. Deactivating this option is useful in case of publicly accessible deployments when allowing access to the Organisation Portal without authentication is not desirable.
Deactivating this option has the following effects:
Only authenticated users with the system role 'Organisation Portal' may log in to the Organisation Portal.
The link to access the Organisation Portal on the web client login page is not displayed.
Access to the Organisation Portal via user-specific URLs is disabled.
The menu entry Organisation Portal from the dropdown menu for scenario selection in the web client is disabled.
The Organisation Portal configuration options Access the Organisation Portal via the link on the web client login page, Activate user-specific URL and Standard user become inactive.
Access the Organisation Portal via the link on the web client login page
- Select whether a link is displayed on the web client login page that allows users to enter the Organisation Portal. The Standard user (see below) is utilized in this case.
Activate repository fallback
Select this check box to enable a fallback mechanism for authenticated users with the system role 'Organisation Portal' that do NOT have a user-specific Organisation Portal configuration. When such users log on to the web client, a fallback configuration is used. This is useful in case of deployments where large numbers of users with the system role 'Organisation Portal' are automatically created but configuring them individually is not feasible.
noteFallback configurations can be configured for each repository in the Repositories tab.
Users
This tab lists all user accounts with the system role "Organisation Portal".
You can configure different users (different settings for the Organisation Portal and different user rights). This allows you to provide multiple entry points to the Organisation Portal and to restrict access to the available repository content for employees of your organisation.
Trusted Login is a prerequisite for user accounts which are used to access the Organisation Portal anonymously.
Filter
Choose whether to show All user accounts in the table below, or just Configured or Not configured user accounts.
Name
The first column contains the name of the user account.
User-specific URL
This column contains the URL which can be used to skip the login and go directly to the Organisation Portal. Access rights to the models in the database are based on the user account that is used and on the settings for the Organisation Portal.
The URL is composed of the Base URL and the suffix ?reader=<user account>, e.g. http://server:8000/ADOIT14_0?reader=Reader2.
Double-click the cell to view the complete URL. Copy the URL to the clipboard, and then paste the URL where you need it.
Selected repository
If the user has access to more than one repository, you must choose one repository for the Organisation Portal. To select a repository, double-click the cell, and then select a repository from the Available repositories list.
Configured
When a user-specific Organisation Portal configuration exists for a user, the entry Configured is displayed in this column.
To create a user-specific configuration, choose a repository (Selected repository column) and then, with the user selected, complete the settings on the following pages of the Organisation Portal configuration wizard.
noteUser accounts that do NOT have a user-specific Organisation Portal configuration cannot access the Organisation Portal, unless the option Activate repository fallback is activated AND a fallback configuration is configured in the Repositories tab.
Activate user-specific URL
Select whether anonymous access to the Organisation Portal with this user is possible. This option is useful if you want to temporarily disable an entry point to the Organisation Portal instead of permanently removing it.
When you deactivate this option, the user-specific URL to access the Organisation Portal with this user is disabled. Additionally, in case of the Standard User (see below), the link to access the Organisation Portal on the web client login page is not displayed and the menu entry Organisation Portal from the dropdown menu for scenario selection in the web client is disabled.
Standard user
Select which user account is utilized when users enter the Organisation Portal via the link on the web client login page.
Repositories
This tab lists all repositories. You can define a fallback configuration for each of these repositories. These fallback configurations are used when the option Activate repository fallback is activated.
Filter
Choose whether to show All repositories in the table below, or just Configured or Not configured repositories.
Configured
When a fallback configuration exists for a repository, the entry Configured is displayed in this column.
To create a fallback configuration, with the repository selected, complete the settings on the following pages of the Organisation Portal configuration wizard.
Active
Select whether access to the Organisation Portal with this fallback configuration is possible. This option is useful if you want to temporarily disable an entry point to the Organisation Portal instead of permanently removing it.
When you have made your selection, click Next >. The second page of the Organisation Portal configuration wizard opens.
The settings on the following pages of the Organisation Portal configuration wizard are user-specific. To proceed, a user or repository has to be selected.
Organisation Portal Configuration Wizard - Page 2
The second page of the Organisation Portal configuration wizard allows you to define a start model. The start model will be displayed on the Organisation Portal start page.
Additionally, in case of the Standard User (see above), the start model configured here will also be displayed on the "Explore & Contribute" scenario start page (ArchiMate Application Library only).
The following settings are available:
Enable start model
Select whether a start model will be displayed.
Models
If Enable start model is activated, you can select the start model here.
When no start model has been configured, the following applies:
In the Organisation Portal, the appearance of the start page changes. The "Home" section with the start model is not displayed. Instead, the "Architecture Diagrams" section will appear as the start page.
In the "Explore & Contribute" scenario, the "Home" section will still be the start page. Only the Recently opened, Favourites and My Objects lists are shown on the start page.
When you have completed these settings, confirm with Finish. The Organisation Portal configuration is saved in the database.
The ADOIT application server has to be restarted if these settings are changed. Otherwise the changes will not become effective.
Property Filter
Property filters control the visibility of attributes in (the):
Tabular Editor
Notebooks
Reports
Model Comparison
You can define different property filters for different system roles and scenarios.
Add Property Filter
In order to add a new property filter:
Click the Add filter button.
In the Language independent name box, type a name for the property filter. This language-independent name uniquely identifies the filter.
In the Display name area, type a name for every language ADOIT supports. These names are visible on the user interface.
In the Order area, select the order of the entries when a user selects a property filter in the web client.
In the System role assignment area, select the system roles to which you want to assign this filter.
In the Scenario assignment area, select the scenarios to which you want to assign this filter.
Click OK. The new property filter is added as a new column in the Property Filter Settings editor.
Optionally you can also:
- In the Copy filter from box, select an existing configuration as a template for your new property filter.
You can combine system role assignments and scenario assignments. A property filter is only visible if all conditions are met (logical AND operator).
Configure Property Filter
In order to specify the attributes which should not be visible when a property filter is active:
Click the “+” and “-“ icons next to the elements in the editor to expand and collapse content. You can show or hide the individual model/object/relation types and their attributes.
Clear the check box where a row (= attribute) and a column (= filter) meet to specify an attribute which should not be visible when a specific property filter is active. You can also deactivate entire Notebook chapters or even all attributes in a specific Notebook at once.
Edit Property Filter
In order to edit a property filter:
- Click the column header of the column that represents the property filter.
Filter Settings
In this area are you can configure settings that affect the availability of property filters.
Standard Filter
Select which property filter is activated by default in the ADOIT web client. If a user does not have access to the selected filter, the first filter on the list is activated, then the second filter and so on.
Enable 'Show All' Filter
Select this check box to make the Show all filter available to all users. When the Show all filter is active, all attributes are visible.
Enable 'Hide empty attributes' filter in notebooks in read mode
Select this check box to make the Hide Empty Attributes filter available to all users. When the Hide Empty Attributes filter is active, no empty attributes are visible in Notebooks in read mode.
Scenario Specific Filter Settings
Click this button to adjust the filter settings for specific scenarios:
Clear the Use default settings check box to enable scenario specific options.
From the Default filter list, select which property filter is activated by default in this scenario.
noteWhen a filter is defined as default for a scenario, switching to this scenario will always set this default filter, no matter which filter was active before.
Select the Enable 'Show All' Filter to make the Show all filter available to all users in this scenario.
EA Workflow
The EA workflow allows submitting repository objects for review and release. During the release process contributors carry out different tasks depending on their system roles.
The availability of the EA workflow depends on the licence.
The EA workflow configuration is predefined and cannot be changed by the ADOIT administrator. If you want to modify the configuration, please contact your ADOIT consultant.
Set up Access to EA Workflow
To use the EA workflow, add users to the following system roles depending on their task in the release process. These are sub roles of the system role "EA Workflow":
Contributors submit objects to review. They can also create new versions of already released objects in order to adapt them.
Architects can execute all transitions. Unlike Contributors, they can also release or reject objects.
Administrators can also execute all transitions, but they do not receive automatic notifications.
Afterwards the EA workflow is ready for use.
Please refer to the section Create System Roles and Assign Users for details on how to assign system roles to users.
Access to Objects for Readers
Access rights to objects in the EA workflow are defined depending on release workflow role (e.g. "Architect") and status (e.g. "Draft"). Users without a release workflow role (= Readers) have read access to all objects in all states. This ensures that Readers cannot override the mechanisms of the EA workflow.
Reporting Board
The Reporting Board allows web client users to create different reports from one central dashboard. Several report categories may be defined, which in turn consist of one or more groups of individual reports.
Configure Reporting Board
In order to edit the Reporting Board settings:
Select Reporting Board - General.
Select context menu — menu entry Edit configuration.
The first page of the Reporting Board configuration wizard opens in the Library Management tab.
Configuration of Categories
The first page of the configuration wizard presents its content as a table structure containing all categories at the same time.
Every row represents a different category.
The first table column contains the name of the category.
The second table column contains the name of the system roles which are allowed to create reports of this category.
You can edit, remove or add new categories by clicking the relevant buttons.
Edit/Add Category
When you edit an existing category or add a new category, a dialogue window opens.
Name
Edit the language-specific names of the category via the support dialogue Edit….
System Roles
Select the system roles which are allowed to create reports of this category by ticking the appropriate check boxes.
When you have completed these settings, click Next >. The second page of the Report Board configuration wizard opens.
Configuration of Groups
The second page of the configuration wizard presents its content as a table structure containing all groups at the same time.
Within the editor, the report groups are grouped by category (e.g. Reports by Type).
The category All groups contains all available groups.
Individual groups can be presented as table rows or hidden by clicking the “+” and “-“ icons next to the categories.
Edit/Add Group
When you edit an existing group or add a new group, a dialogue window containing two tabs opens.
General
Edit the language-specific names of the group via the support dialogue Edit….
Select the categories to which a group belongs by ticking the relevant check boxes.
Reports
- Select the reports which will be part of the group by ticking the relevant check boxes.
When you have completed these settings, confirm with OK. The Reporting Board settings are saved in the database and immediately available in the web client.
REST API
ADOIT offers a generic, extensible REST API that allows authenticated access to exposed functionality. The REST API can be used to e.g. send GET requests to query ADOIT for data.
The availability of this feature depends on the licence. Access to the application programming interface (API) is limited to 500 requests per hour.
Activate Access to the REST API
Instructions on how to activate access to the REST API are covered here in the Administration Manual.
You must first perform the following steps:
Create Technical User (token based authentication only)
Then you can configure the authentication method you want to use to communicate with the REST API:
These steps are explained in the following sections.
Use the REST API
For information on how to use the REST API, please refer to the ADOxx Developer Portal.
Create Technical User
Do you want to use token based authentication for authenticating requests to the REST API? If yes, you need to create a technical user now.
A technical user is NOT necessary for basic authentication or OAuth 2.0 authentication.
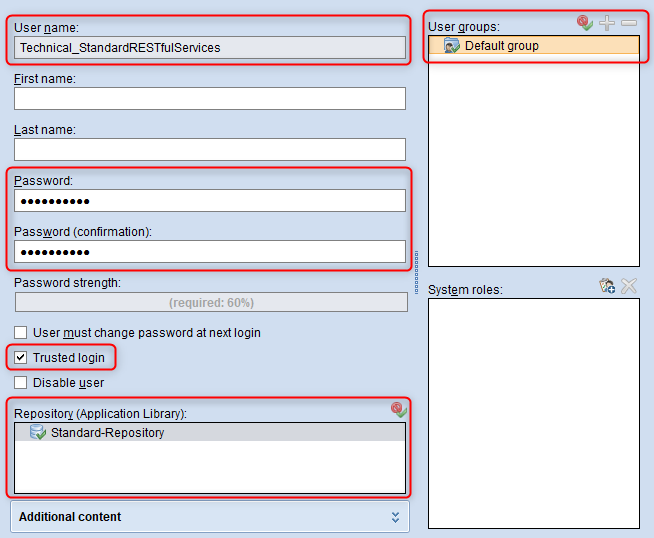
To create the technical user in the Administration Toolkit:
Open the User Management, and then click Create user
 .
.Enter the following data:
User name: "Technical_StandardRESTfulServices" (and a password of your choice)
Repository: Only (!) assign the repository to the user which holds the data to be queried.
User groups: This user belongs to the default group.
Trusted Login: Yes
You cannot activate "Trusted Login" during user creation. Only rights of already created users can be modified. Use the button "Create" in the "Create New User" tab to create the user before you activate "Trusted Login".
Assign Access Rights to the Administration Toolkit
If you want to use user write APIs, you must assign access rights to the Administration Toolkit to the user in whose context requests should be executed.
This can either be the technical user (for token based authentication) or a standard product user (for basic authentication and OAuth 2.0).
To assign access rights to the Administration Toolkit:
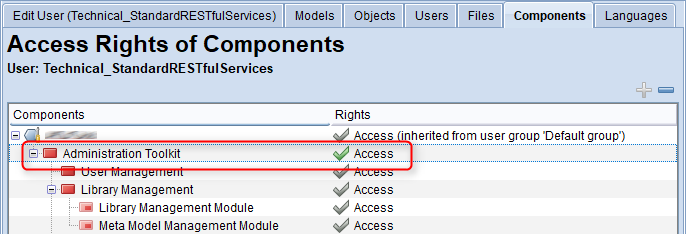
Open the User Management.
In the User Catalogue, right-click the user you want to grant access rights to the Administration Toolkit, and then click Change access rights.
Switch to the Components tab.
The momentary rights status for the Administration Toolkit is shown in the column Rights. Double-click here until you reach the status Access.
When prompted whether the user shall also receive global administration rights, click No.
Edit System Settings
Now you have to define a few technical settings controlling the base functionality of the web client. To edit the System settings:
Go to Library Management > Component Settings > Web Client > System.
In the Base URL field, enter the URL where the web client can be reached from other machines.
Do you want to use token based authentication? If yes, in the Technical Users field, select the technical user you created from the Available Users list, i.e. "Technical_StandardRESTfulServices" (see Create Technical User).
Click OK.
You are configuring ADOIT 14.0. You are running the ADOIT web client on a machine with the IP 10.2.100.68 on port 8000. The URL should look like this
"http://10.2.100.68:8000/ADOIT14_0"
Configure General Settings
Now the general settings for the REST API settings have to be adapted:
- Go to Library Management > Component Settings > Standard RESTful Services > General.
These settings apply to all authentication methods:
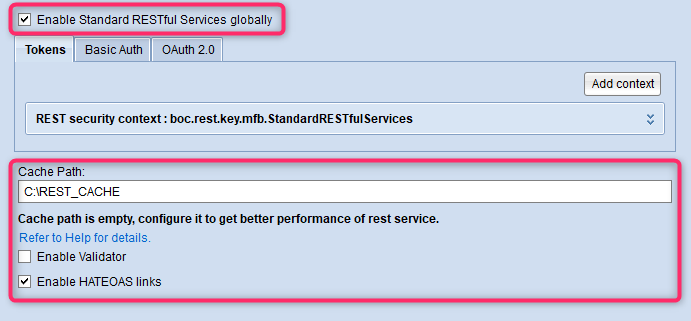
Enable Standard RESTful Services globally
Select this check box to enable the REST API. All other options in this area are inactive unless you select this check box.
Cache Path
This parameter is optional. Enter the absolute path to the directory in which cache files must be stored. The user under which the Apache Tomcat web server service is running must have write access to this directory. If the directory does not exist, it will be created by ADOIT.
Advantages of using the Cache Path parameter:
Model images and model image maps are generated only once and then cached. Every time the model image or image map is requested, a check is performed if the model has changed. If there are no changes, the information is loaded from the file system. Otherwise, the cache is updated first. As a result, responses to these types of requests are faster and use fewer server resources.
For search jobs the advantage is that created queries are saved in cache files and can be reused after a server restart. Without the cache path, queries are saved only in memory and are lost during restart.
Enable Validator
This parameter is optional. Select this check box to turn on syntax and semantic validation of XML and JSON responses. Enabling this parameter may slow down the execution of requests and cause high memory consumption and CPU usage on the web server.
Enable HATEOAS links
This parameter is enabled by default. When you clear this check box, responses to requests will not include HATEOAS links that help you find related resources.
Configure Token Based Authentication
To configure token based authentication for the REST API:
Go to Library Management > Component Settings > Standard RESTful Services > General.
Edit the settings on the Tokens tab.
The following settings are available:
REST Security Context
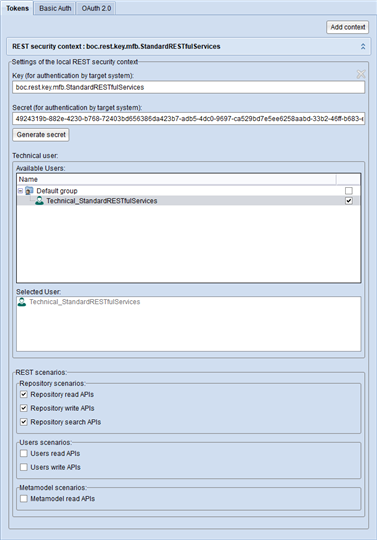
You can edit the default REST security context, or click the Add context button to generate a new REST security context. A security context consists of the following parts:
key
secret
technical user
REST scenarios
ADOIT RESTful services support multiple security contexts. At least one security context is required.
When would you want to use multiple security contexts? For example, you can configure one security context that allows for modification of users, and another one with access to the repository. You can execute requests with access rights of different technical users. During execution, you can choose which of the predefined security contexts should be used.
Let's take a detailed look at the settings:
Key (for authentication by target system)
This parameter represents the name of the key which is used for communication with the web application using authenticated REST APIs. Enter a descriptive name, e.g. "boc.rest.key.mfb.StandardRESTfulServices".
Secret (for authentication by target system)
This parameter represents the secret value of the key which is used for communication with the web application using authenticated REST APIs. Click the Generate secret button to generate the value of the key.
Technical user
From the Available users list, select the technical user you created, i.e. "Technical_StandardRESTfulServices" (see Create Technical User).
REST Scenarios
In this area, you can enable specific REST scenarios. If a scenario is not enabled, all requests to its endpoints will return a 403 FORBIDDEN status. HATEOAS links that help you find related resources are also affected. For example, the response to a request to get user information may contain a HATEOAS link to delete the user. If the user write APIs scenario is disabled, a request to this link will return the status code 403 FORBIDDEN.
To find out which endpoints are assigned to the REST scenarios, see the API Reference in the ADOxx Developer Portal where they are grouped according to the scenarios.
Configure Basic Authentication
You need to enable basic authentication in the component settings (see Configure Settings for Basic Authentication) and in a configuration file (see Enable Basic Authentication for ADOIT).
Configure Settings for Basic Authentication
To configure basic authentication for the REST API:
Go to Library Management > Component Settings > Standard RESTful Services > General.
Edit the settings on the Basic Auth tab.
The following settings are available:
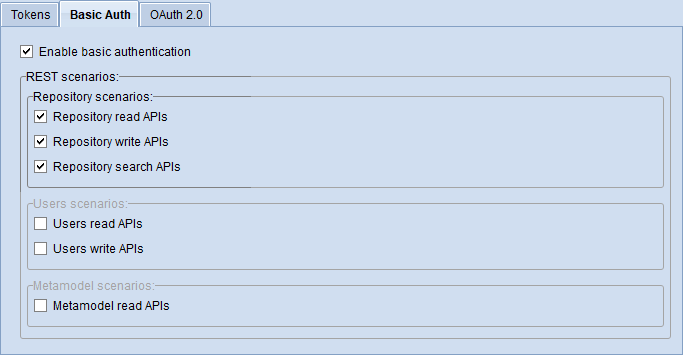
Enable Basic Authentication
Select this check box to enable basic authentication. All other options in this tab are inactive unless you select this check box.
REST Scenarios
In this area, you can enable specific REST scenarios. If a scenario is not enabled, all requests to its endpoints will return a 403 FORBIDDEN status. HATEOAS links that help you find related resources are also affected. For example, the response to a request to get user information may contain a HATEOAS link to delete the user. If the user write APIs scenario is disabled, a request to this link will return the status code 403 FORBIDDEN.
To find out which endpoints are assigned to the REST scenarios, see the API Reference in the ADOxx Developer Portal where they are grouped according to the scenarios.
Enable Basic Authentication for ADOIT
For security reasons, basic authentication is turned off by default in ADOIT. If you want to use the REST API with basic authentication, you need to customize a configuration file:
Shut down Apache Tomcat (if it is running).
Open the folder <Tomcat installation>\webapps\ADOIT14_0\WEB-INF\registry\rest and edit the file
RESTAuthorization.xml.Look for a section similar to:
<!--<entry key="REST_BASIC_AUTHENTICATION">true</entry>-->Remove the comment characters (
<!--and-->).Save the file and restart Apache Tomcat.
Configure OAuth 2.0 Authentication
You need to enable OAuth 2.0 authentication in the component settings (see Configure Settings for OAuth 2.0) and on the Admin Page (see Enable OAuth 2.0 for ADOIT).
Configure Settings for OAuth 2.0
To configure OAuth 2.0 authentication for the REST API:
Go to Library Management > Component Settings > Standard RESTful Services > General.
Edit the settings on the OAuth 2.0 tab.
The following settings are available:
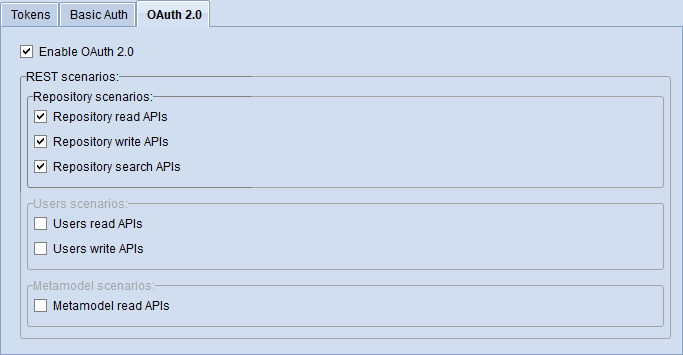
Enable OAuth 2.0
Select this check box to enable OAuth 2.0 authentication. All other options in this tab are inactive unless you select this check box.
REST Scenarios
In this area, you can enable specific REST scenarios. If a scenario is not enabled, all requests to its endpoints will return a 403 FORBIDDEN status. HATEOAS links that help you find related resources are also affected. For example, the response to a request to get user information may contain a HATEOAS link to delete the user. If the user write APIs scenario is disabled, a request to this link will return the status code 403 FORBIDDEN.
To find out which endpoints are assigned to the REST scenarios, see the API Reference in the ADOxx Developer Portal where they are grouped according to the scenarios.
Enable OAuth 2.0 for ADOIT
If you want to use the REST API with OAuth 2.0, you need to enable OAuth 2.0 and configure a client:
Open a web browser and navigate to http://<SERVER_NAME>:<TOMCAT_PORT>/ADOIT14_0/admin.view.
Enter your credentials (if needed) and log in. The user must have access rights to the Administration Toolkit.
On the toolbar at the top of the screen, click More
 , point to
Authentication, and then click OAuth 2.0.
, point to
Authentication, and then click OAuth 2.0.Select the OAuth 2.0 enabled check box to enable OAuth 2.0.
Click the Upload Logos button to upload a logo to represent the client application.
Click the Add button
 to add a new
client.
to add a new
client.Complete the Client Data form that appears. You can enter and edit the following data:
Type: Select the client type. Confidential clients are e.g. centralized, server based applications, which are capable of securely storing client secrets. Public clients are e.g. purely client based applications and native apps which are not capable of securely storing client secrets.
ID: The ID of the client system. Must be unique among the clients, should be kept simple as special characters need to be URL encoded.
Name: The name of the client application. Will be shown on the user interface.
Redirect URI: The URL of a redirect endpoint inside the client application which will be called by the authorization server when issuing an authorization code.
Logo: Select a logo to represent the client application (must be uploaded first on the OAuth 2.0 page). Will be shown on the user interface.
Access Token Validity (Seconds): The time in seconds how long an access token is valid until it expires. Default: 1800s = 30 minutes.
Refresh Token Validity (Seconds): The time in seconds how long an refresh token is valid until it expires. Default: 1209600s = 14 days.
Secret: The secret to use for client authentication. You can click Generate to generate a new secret or manually specify one.
Back on the OAuth 2.0 page, click Save changes to save all changes made on this page.
Time Filter
Here you can select for which system roles the time filter is activated by default. When a user with that system role logs in to the web client, the time filter is set to the current date. Only objects which are currently valid are visible.
Users can then set the time filter to a different date or disable it completely. When they log in the next time, the time filter will be enabled again.
When a user has multiple system roles, the time filter will be active if this setting is enabled for at least one system role.
Validation
The validation functions in ADOIT allow web client users to check whether models and objects comply to the modelling guidelines. If the modelling guidelines are violated, ADOIT shows corresponding notifications.
Configure Validation
In order to edit the validation settings:
Select Validation - General.
Select context menu — menu entry Edit configuration.
The first page of the validation configuration wizard opens in the Library Management tab.
Configuration of Categories
The first page of the configuration wizard presents its content as a table structure containing all categories at the same time.
Every row represents a different category.
The first table column contains the name of the category.
The second table column lists the extension module which contains the logic for running checks of this category.
The third table column contains the name of the system roles who are allowed to run checks of this category.
You can edit, remove or add new categories by clicking the relevant buttons.
Edit/Add Category
When you edit an existing category or add a new category, a dialogue window opens.
Name
Edit the language-specific names of the category via the support dialogue Edit….
System Roles
Select the system roles which are allowed to run checks of this category by ticking the appropriate check boxes.
Reset values
Click Reset values to restore the default settings for a category.
When you have completed these settings, click Next >. The second page of the validation configuration wizard opens.
Configuration of Checks
The second page of the configuration wizard presents its content as a table structure containing all checks at the same time.
Within the editor, the checks are grouped by category (e.g. Methodical).
Individual checks can be presented as table rows or hidden by clicking the “+” and “-“ icons next to the categories.
The first table column contains the name of the check.
The second table column lists the type of the check (ToDo, Information, Warning, Error).
The third and fourth table columns list the text and according hint which are displayed in the notification.
The fifth table column lists the extension module which contains the logic for running the check.
Edit/Add Check
When you edit an existing check or add a new check, a dialogue window containing three tabs opens.
General
Edit the language-specific names of the check via the support dialogue Edit….
Edit the language-specific texts which are displayed in the notification via the support dialogue Edit….
Edit the language-specific hints which are displayed in the notification via the support dialogue Edit….
Click Reset values to restore the default settings for a check.
Categories
- Select the categories to which a check belongs by ticking the relevant check boxes.
Model and object types
- Select the model and object types which will be checked by ticking the relevant check boxes.
When you have completed these settings, confirm with OK. The validation settings are saved in the database and immediately available in the web client.
Web Client
Here you can manage configuration options for the web client.
Attributes for the Fulltext Search
When performing a search in the web client, certain attributes are considered to find matching objects or models. By default, these are the attributes Name, Description, First name and Last name. Further attributes of the types Short String, ADOstring and Long String can be defined using this function. The following settings are available:
Select attributes that should always be part of the search results
The attributes defined here are always considered:
- when using the general search function in the ADOIT web client (Search & Analysis)
The search result table displays a separate column for each of these attributes. Found search terms are highlighted in yellow in the search result.
Apply global attributes for the search in explorer
Select this check box so that the attributes selected above are additionally considered:
when using the search function in the Explorer
while managing relations in the Notebook, when using the search field
When this check box is cleared, only the Name will be considered when using the search function in Explorer and when managing relations.
Use name visualisation pattern for the search in Explorer
During the customising process of ADOIT, a name pattern may be defined by a BOC Solution Engineer for a model type or class. The name pattern determines which components make up the visualized name on the user interface.
Select this check box so that relations that are part of the defined name pattern are considered:
when using the search function in the Explorer
while managing relations in the Notebook, when using the search field
When this check box is cleared, only the Name will be considered when using the search function in Explorer and when managing relations.
Loading this function may take a few minutes when an extensive library is in use.
The ADOIT application server has to be restarted if these settings are changed. Otherwise the changes will not become effective.
General
The General settings allow configuring the basic behaviour of the ADOIT web client. The following settings are available:
Allow renaming of catalogue elements
Select to allow renaming of catalogue elements displayed in the web client by ticking the check box.
Allow creation of new objects
Select to allow creating new objects in the web client via the catalogue or via relations controls by ticking the check box.
Hide model types when creating new objects
Select this check box to display all object types in a flat list when creating an object in the Explorer. When you clear this check box, object types are grouped by model type.
Allow creation of model groups
Select to allow creating new models in the web client via the catalogue by ticking the check box.
Allow creation of object groups
Select to allow creating new object groups in the web client via the catalogue by ticking the check box.
Allow moving elements in the catalogue
Select to allow web client users to move elements (models, objects, groups) to other parent folders using drag and drop by ticking the check box.
Allow deletion of models and objects
Select to allow deleting objects in the web client via the catalogue or via relations controls by ticking the check box.
Allow models of same type and with same name
Select to allow web client users to create multiple models of the same type with the same name.
Allow repository objects of same class and with same name
Select to allow web client users to create multiple repository objects of the same type with the same name.
Show models in the catalogue
Select to show models in the catalogue of the web client by ticking this check box.
Show objects in the catalogue
Select to show objects in the catalogue of the web client by ticking this check box.
Enable collaboration component
Select to allow using the collaboration component in the web client by ticking this check box.
Enable dependency analyser component
Select to allow using the dependency analyser component in the web client by ticking this check box. Additional configuration steps may be needed.
Enable favourites component
Select to allow using favourites in the web client by ticking this check box.
Enable translation component
Select to allow using the translation component in the web client by ticking this check box.
Enable file upload to DMS
Select to allow importing external files into the database in the web client by ticking this check box.
Enable graphical model comparison
Select to allow using the graphical model comparison in the web client by ticking this check box.
Enable change password
Select to allow changing the password in the web client by ticking this check box.
Enable recently opened models
Select this check box to display recently opened models in the Quick Access component in the Explorer. When you clear this check box, models are not displayed in Quick Access.
Enable recently opened objects
Select this check box to display recently opened objects in the Quick Access component in the Explorer. When you clear this check box, objects are not displayed in Quick Access.
Search automatically activated
Select to activate the option Search automatically in the web client by default, i.e. the search results are automatically adjusted whenever the user edits a search filter.
Deactivate "Save As"
Select this check box to disallow creating copies of models in the web client.
Activate highlighting for relations
Select this check box to highlight the relation with the highest priority when creating relations in the web client. When you clear this check box, no relation is highlighted.
Mail
The ADOIT web client includes a mail component, which can be used to send messages automatically on several events. Before it is possible to use this component, it has to be configured correctly. The following settings are available:
Activate mail service
If this check box is selected, the mail service is activated. When the web server is started, it will regularly poll the application server for new mails.
IP address or name of the mail server
Enter the IP address or the host name of the client, where the mail server is installed.
Port of the mail server
Enter the port number which is used to access the mail server. Normally this is port 25.
System sender address
Enter the email address, which should be used as sender address for system notifications (e.g. users receive a notification when their attention is required for a step in a release workflow, and the sender address is the system address entered in this field).
System replyTo
Enter the email address to which replies for system notifications should be sent (if replies should not be sent to the system sender address).
Encryption
Select an encryption option if the mail server requires it. The following settings are available:
None: No encryption is used.
StartTLS (optional): Use StartTLS to upgrade to a secure connection. If the mail server does not support StartTLS, an unencrypted connection is used.
StartTLS (required): Use StartTLS to upgrade to a secure connection. If the mail server does not support StartTLS, the operation will fail (= emails are not sent).
SSL/TLS: Use SSL or TLS to enrypt communication. If the mail server does not support SSL/TLS, the operation will fail (= emails are not sent).
Mailserver requires authentication
Select this check box if the mail server requests authentication. Normally this is the case.
Username
If the mail server requires authentication, the username of the mail server user has to be entered here.
Password
If the mail server requires authentication, the password of the mail server user has to be entered here.
Interval in seconds for processing mails
This setting defines the interval that is used by the web server to poll the application server for new mails. A value of 300 means that the web server will wait for 300 seconds (= 5 minutes) between requests for new mails.
Maximum number of failed send attempts (0=unlimited)
Specifies the number of send attempts after which emails that fail to send (e.g. because the email address does not exist anymore) are skipped.
Before it is possible to send email notifications, the Base URL has to be configured correctly.
The ADOIT web application running on the web server has to be restarted if these settings are changed. Otherwise the changes will not become effective.
Model Comparison
The graphical comparison of models in the ADOIT web client makes the differences between two models visible. This includes deleted objects and connectors, new objects and connectors as well as changes in the attribute values.
The graphical model comparison can be configured in the Administration Toolkit. The following settings are available:
Settings for the Model Comparison
Select which attributes should be considered when comparing models.
Modelling
Configure settings for automatic saving, visualisation options for the ADOIT web client and other settings. Most of these settings can be overridden by individual users of the ADOIT web client according to their preferences.
General
The following settings are available:
Autosave
Enable automatic saving of changes in models and objects. Determine the number of changes before the next autosave.
Modelling
The following settings are available:
Rectangular Connectors
Make ADOIT draw right-angled connectors
 automatically.
Clear this check box to make ADOIT draw straight connectors
automatically.
Clear this check box to make ADOIT draw straight connectors
 instead.
Bridges
Draw bridges if connectors cross.
Crosshair
Show a crosshair when modelling.
Move Along Objects
Resizable objects and aggregations can act as container objects for other objects. When you drag such a container around the drawing area, objects placed inside are moved along if you press and hold the <Shift> key at the same time.
Clear this check box if you want contained objects to move along at all times (without simultaneously pressing the <Shift> key).
If you are using the ADOIT Standard Application Library, the following object type is an aggregation: Block. The ArchiMate Application Library does not contain any aggregations.
Page Breaks and Page Numbers
Page breaks divide models into separate pages when you print. They are displayed as dashed lines in the graphical editor. Select whether page breaks and page numbers are visible, if a user has write access or read-only access to a model.
Web Worker Rendering
Web worker rendering means that model graphics are rendered in a separate process, which is more performant. When web worker rendering is disabled, the model is rendered in the same process as the rest of the client-side application, and graphics on the drawing area will load more slowly. Clear this check box only if requested by a BOC employee.
Modelling Direction
The modelling direction can be set to horizontal (modelling is done from left to right) or vertical (modelling is done from top to bottom). You can define the modelling direction for each model type.
Select the Changeable check box to allow web client users to change the modelling direction for a specific model in the graphical editor. The objects on the drawing area are automatically rearranged.
When using the Hover Modelling Assistant in the web client, the modelling direction determines where the next object is placed:
Horizontal: To the right of the selected object
Vertical: Below the selected object
Object Mouseovers
The Object Mouseovers settings allow configuring object tooltips in the ADOIT web client. Object tooltips are displayed when a model is opened with read access in the graphical editor or in the Organisation Portal. The following settings are available:
Settings for the Object Mouseovers
Select which attributes should be considered when object tooltips are displayed.
Printing and Reporting
The Printing and Reporting settings allow configuring settings for printing models to PDF, creating PDF and RTF reports, and generating images in the ADOIT web client.
Print Templates Available in Print Dialogue
Define which print templates can be used when printing models to PDF. Depending on the Application Library, various reports and the print template Standard are available. Reports which are not intended for use as a print template are not displayed.
Default Print Template
Set a default print template for printing models to PDF.
Default Page Layout
Select a default page layout for printing models to PDF and creating PDF and RTF reports. Page layouts determine the appearance of the header and footer.
noteIf you are using the ArchiMate Application Library or the ADOIT Standard Application Library, the default page layout for printing models to PDF is defined directly in the metamodel for all model types and this setting is not evaluated. This setting is however still evaluated as a default setting for creating reports.
ADOIT web client users can choose their own preferred page layout for printing models to PDF and creating reports (under
 >
Preferences > Printing).
>
Preferences > Printing).PDF Version
Select a PDF version for printing models to PDF and creating PDF reports. PDF is the default format for quality printing. PDF/A is used for archiving and long-term preservation of electronic documents. The availability of PDF versions depends on the configuration of the print templates.
For more information about PDF/A, please visit https://www.pdfa.org/pdfa-faq/. PDF/A documents generated in ADOIT are PDF/a-1b compliant.
Image Format for Printing Models to PDF
Set the image format for contained images when printing models to PDF. You can choose between PNG (pixel-based image format) and SVG (vector-based image format).
Image Format for Image Generation
Set the image format for generating images (= exporting models in the graphical editor as graphic files). You can choose between PNG (pixel-based image format) and SVG (vector-based image format).
Page Limit for Printing Models
Set the maximum number of pages that can be selected in the preview window when printing models to PDF.
Page Size Settings
Define which paper sizes can be used when printing models to PDF.
To add a new paper size, click the New page size button. Then define the format name and the width and height in millimetres (e.g. Letter, 216, 279).
Double-click a paper size to change it.
To remove a paper size, select the paper size you want, and then click the Remove selected button.
System
The System settings allow an ADOIT administrator to define technical settings controlling the base functionality of the web client. The following settings are available:
Base URL
Enter the URL where the web client can be reached from other machines: "http://<SERVER_NAME>:<TOMCAT_PORT>/ADOIT14_0/".
<SERVER_NAME> is the name of the server machine, <TOMCAT_PORT> is the HTTP/1.1 Connector Port defined during setup at which Apache Tomcat (and therefore the web client) is accessible. The default value is “8000”.
Session Timeout (Minutes)
Specify the number of minutes that a session can remain idle before the server terminates it automatically. The default is 20 minutes.
AJAX-Timeout for the requests from the Web Client to the Web Server in seconds
Enter the timeout for the requests from the web client to the web server in seconds.
Technical Users
Here all users with the option trusted login enabled are listed. Select one or more users from the Available Users list to make them available as technical users. These users are displayed in the Selected Users box.
Technical users are used by various components of ADOIT, for example for the synchronisation of objects with other BOC Management Office products.
Web Modules
You can assign web modules (plug-ins) to system roles to grant permissions for functionalities in the web client. This allows you to define different scenarios for different user groups or users.
Business Modules
This tab contains all web modules that can be assigned to users. You can either select to activate a web module for all system roles or for specific system roles by ticking the relevant check boxes.
For a step-by-step walkthrough on how to assign web modules, please refer to the section Assign Web Modules to System Roles.
The ADOIT application server has to be restarted if these settings are changed. Otherwise the changes will not become effective.
Error Message: Configured System Roles Could Not Be Found
The following situation can arise when importing component settings: In the import file, web modules are assigned to system roles that do not exist in your database. Such system roles will be highlighted in red in the settings for web modules. You can either recreate the missing system roles and make the assignment work again. Or you can remove the assignment (clear check box) and save the settings, and the system roles that do not exist in your database are removed from the configuration.
Assign Saved Queries Administrator
As an ADOIT administrator, you can grant trusted users in your organisation the permission to unpublish saved queries from other users. Assign the following web module to the appropriate system roles:
- Saved queries (advanced options)