Restore a Manual Backup
This scenario will teach you how to import a manual backup of all relevant ADOIT data to another ADOIT instance, e. g. for upgrading purposes. You will learn how to:
As the ADOIT administrator of the ADO Money Bank you have to migrate all ADOIT data to a new version. You have already exported all relevant data and can immediately start the update process.
This scenario is split into two parts. This chapter represents the second part. Here you will learn all steps necessary to migrate a manual backup to a new ADOIT instance. Read the previous chapter to find out how to backup all relevant files before.
Install ADOIT and Create Database
Install the new ADOIT version as described in the Installation Manual and create a new ADOIT database.
Selecting the Library when Creating the Database
A library is a basic part of every ADOIT product configuration. In the library, model types, object types, types of connectors, attributes and much more are defined by customisation. Libraries have repositories, which are allocated to the users. In these, database models and objects are organised and managed.
In general, newer ADOIT versions are NOT compatible with libraries from earlier ADOIT versions. Therefore proceed as follows:
If you are using the ArchiMate Application Library or the ADOIT Standard Application Library: A new version of your library can be found in the folder “04 Sample Data“ on the installation medium. Initialize the new ADOIT database with this library file.
If you are using another library, or a ArchiMate Application Library or ADOIT Standard Application Library with changes in the metamodel or functional extensions: Contact your ADOIT consultant to find out whether you need a new version of your specific library.
To simulate migration to another ADOIT instance, start ADOIT with a newly created database. Refer to the Installation Manual for detailed instructions on how to create and initialize a database.
Migrate a Migration Package
This procedure allows importing a migration package that has been saved in an external AXR format file to the ADOIT database.
Import the migration package file to your database. Select the following file you exported in the previous example scenario:
- 02migrationpackage.axr
Import the file as a new repository and update the database catalogue statistics. Switch to the imported repository. Delete the old Standard-Repository and rename the newly imported repository to “Standard-Repository”.
Import Migration Package
In order to import a migration package:
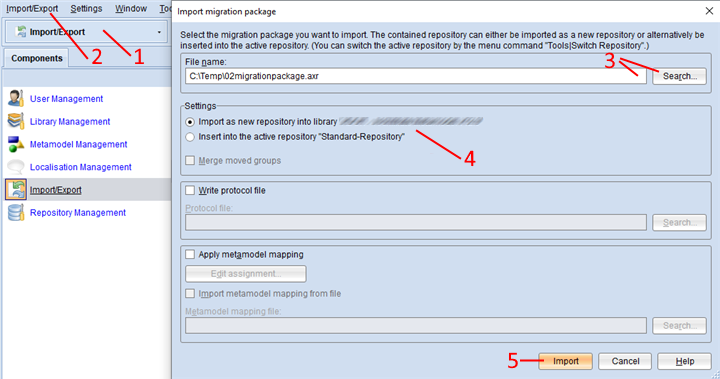
Open the Import/Export component via the component selection (1).
Select menu Import/Export – menu entry Import migration package… (2). A dialogue window containing the import settings appears..
Enter the path and name of the import file into the field File name (either manually or via the support dialogue Search…) (3).
Select whether to import the file as a new repository or insert it into the active repository (4).
Confirm with Import (5). If the import file is encrypted, enter the password and click OK. The data is imported and a confirmation box appears.
Click Show messages >> to verify if the import was successful.
Click Close. Another dialogue box appears. You will be asked whether you want to update the database catalogue statistics or not. Click Yes and update the statistics.
Optionally you can also:
Select Resolve release workflow conflicts if an element already exists so that ADOIT checks whether the content from the import file violates the integrity of a release workflow. This feature is only available if a release workflow is enabled and if the option Insert into the active repository is selected. Clear this check box only if requested by a BOC employee.
Select Merge moved groups when you import a backup and some groups have been moved to another location in the meantime. The groups and all contained artifacts will be merged at the new location (artefacts according to the selected conflict strategy). When this option is disabled, the imported groups are created at the old location. Contained artifacts will be merged at the new location if they exist in both groups, or created in the old location if they only exist in the import groups. This feature is only available if the option Insert into the active repository is selected.
Select Write Protocol File to create a log file during the process of the import. It is saved as a plain text file in the file system.
Select Apply metamodel mapping if the meta model elements in the file (model, object, relation and endpoint types plus their attributes) do not perfectly match the metamodel elements in the library used.
Select Edit assignment.... This button becomes available, when Apply metamodel mapping is active. This enables manual assignment of import elements to the library elements. Please refer to the section Apply Metamodel Mapping for details.
Select Import metamodel mapping from file. This button becomes available, when Apply metamodel mapping is active. This allows you to import a metamodel mapping file you have received from your ADOIT consultant.
Migrate Library-Specific Component Settings
Library-specific component settings previously exported can be imported and stored in the ADOIT database.
Import the component settings to your database. Select the following file you exported in the previous example scenario:
- 01componentsettings.axs
With this step you have accomplished restoring a manual backup. Check if the access rights of the user group "Reviewer" you edited earlier during the first training scenario were imported correctly. Next, check if the component settings were imported correctly. If not, verify that you performed all steps of the migration procedure correctly.
Import Component Settings
In order to import component settings:

Open the Library Management component (1) and switch to the tab Component Settings (2).
Select the appropriate library in the Component Settings Catalogue (3).
From the context menu of the library, select Import component settings (4). The import dialogue opens.
Enter the path and name of the import file into the field File name (either manually or via the support dialogue Search…) (5).
Click Import (6). A dialogue window showing the migratable component settings appears.
Either select specific component settings (7) or click the All button to import all component settings contained in the import file (8).
Confirm with OK (9). Another dialogue box appears. You will be asked whether you want to import the component settings even if it means that the existing configuration data will be overwritten. Click Yes to continue. The data is imported and a confirmation box appears.
Behaviour if a configuration
(![]() ) already exists
in the database:
) already exists
in the database:
If a configuration already exists in the target library, it is overwritten with the contents of the import file.
Configurations that do not already exist in the target library are added.
Configurations that exist in the target library, but not in the import file, are not changed.
Configurations for web modules are an exception. The information from both sources is combined:
If a web module exists both in the source library and the target library, it is overwritten with the contents of the import file.
Web modules that exist in the target library, but not in the import file, are not changed.
Migrate Comments
Comments previously saved can be restored to another ADOIT instance.
Saving and restoring comments is an important step in the migration process, and therefore part of this chapter. However, this topic is too complex for an entry-level tutorial. Therefore skip this section now and return to it when you need to later.
Restore Comments
In order to restore comments:
Stop the Apache Tomcat web server.
ONLY when when you import from ADOIT 9.1 or lower: Delete the file “<Tomcat installation>/webapps/ADOIT14_0/WEB-INF/registry/core/migrations.xml“ (if it exists).
Copy the backup files to the folder “<Tomcat installation>/webapps/ADOIT14_0/WEB-INF/registry/“. Overwrite the destination files if they already exist.
Restart the Apache Tomcat web server.
When you import a manual backup of all relevant data from ADOIT 9.1 or lower, the favourites will also be part of the backup files. They will be migrated together with the comments.
Starting with ADOIT 10.0, the favourites are stored in the database and will be imported as part of the migration package.
Migrate Deployment-Specific Configuration Settings
Deployment-specific configuration settings previously saved can be restored to another ADOIT instance.
Saving and restoring deployment-specific configuration settings is an important step in the migration process, and therefore part of this chapter. However, this topic is too complex for an entry-level tutorial. Therefore skip this section now and return to it when you need to later.
Restore Deplyoment-Specific Configuration Settings
In order to restore deployment-specific configuration settings:
Stop the ADOIT application server and the Apache Tomcat web server.
Merge the backup configuration with the new ADOIT application server configuration and with the new Apache Tomcat web server configuration. For example, if you previously customized the file "<ADOIT installation>/conf/adoxx_web_conf.js" to set the standard language the web client should be started with, then copy the value of the parameter
ADOXX_WEB_CLIENT_LANGUAGEto the new "<ADOIT installation>/conf/adoxx_web_conf.js" file.cautionAlways merge your changes into the new configuration files - never overwrite them!
Restart the ADOIT application server and the Apache Tomcat web server.