Working with the Explorer
The following sections provide an overview of functions for managing models and objects in the Explorer.
The Explorer
Via the Explorer you can access the models and objects saved in the database. The Explorer can be found on the left side of the program window.
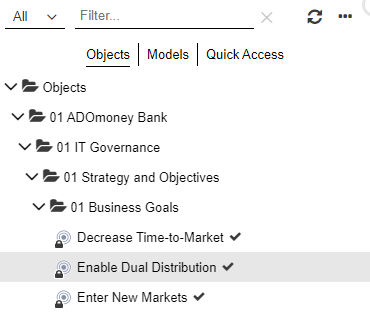
The Explorer contains the following catalogues:
Models
The Model Catalogue. Here, you can view and manage all model groups and models to which you have access.
Objects
The Object Catalogue. Here, you can view and manage all object groups and objects to which you have access.
Quick Access
Quick Access offers a way to view and use content you have worked on recently. The following folders are displayed in Quick Access:
Favourites: The Favourites folder contains your favourite models and objects. It is collapsed by default. Within the Favourites folder, favourites are sorted by type and alphabetically.
Recently Opened: The Recently Opened folder contains your most recently opened models and objects, up to a maximum of thirty. The list is sorted by date, with the most recent artefact placed at the top.
Open Explorer
To open the Explorer:
- On the toolbar at the top of the screen, click Find
 .
.
The Explorer opens at the left side of the program window.
Switch between Catalogues in Explorer
To switch between the Model Catalogue, Object Catalogue and Quick Access in the Explorer:
![]()
- Click the Models or Objects or Quick Access button at the top of the Explorer.
Update Content
To update the Explorer:
- Click the icon
 .
.
Expand/Collapse Folders
The following options are available:
Expand Folder: Click the icon
 next to a
folder.
next to a
folder.Shortcut: <+>
Collapse Folder: Click the icon
 next to a
folder.
next to a
folder.Shortcut: <->
Search and Filter in Explorer
The search and filtering options are located in the menu bar of the Explorer. Each catalogue in the Explorer (Model Catalogue, Object Catalogue and Quick Access) can be searched separately.
![]()
To help you quickly find a model or object in the Explorer, the following options are available:
Search for a Model or Object: In the Filter... box, type the text you want to search for. All models and/or objects that contain the search string in their name are shown.
Filter by Type: Click All
 , and then
select the object or model type you want (multiple selection is possible). Additionally, you can
display All elements.
, and then
select the object or model type you want (multiple selection is possible). Additionally, you can
display All elements.Show/Hide Folders: Click All
, and then
click the Show folders button
 .
.Remove all Filters: Click the icon
 .
.
Sort in Explorer
You can sort elements in both the Model Catalogue and in the Object Catalogue. Here's how:
- At the top right of the Explorer, click
 More, point to Sort, and
then select the sorting option you want.
More, point to Sort, and
then select the sorting option you want.
You can sort items in ascending or descending order based on their name.
Show or Hide Explorer
You can hide the Explorer to increase your workspace, and show it again at any time:
To hide the Explorer, click the icon
 at the top right corner of the
Explorer
at the top right corner of the
ExplorerTo show the Explorer again, click the icon
 .
.
Design Folder Structure
Design any folder structure in the Model Catalogue or Object Catalogue by creating groups hierarchically.
Create Group
To create a model group or object group:
- Right-click the group in which you want to create the new group, and then click Create group.
The usage of the following functionalities helps design a folder structure: Copy, Paste, Delete and Rename. These functions are available in the context menu of groups. Groups can be also moved by using drag and drop.
The context menu entry Translate is very useful in multilingual scenarios and in designing different folder structures for all languages.
Automatically Generated Folders
ADOIT automatically creates the following folders (and recreates them if they are deleted):
Personal Models
Temporary model group in the Model Catalogue. New models and analyses are stored in this group until a different storage location is specified. They are organised into subgroups based on their type (Personal Models\<user name>\<object type>). When saving the model or analysis for the first time, you can choose a different model group as the storage location.
Personal Objects
Group for unassigned objects. New repository objects are stored in this group until a different storage location is specified. They are organised into subgroups based on their type (Personal Objects\<username>\<object type>). When saving the object for the first time, you can choose a different object group as the storage location.
Obsolete Objects
This object group only exists if synchronisation of objects between ADOIT and ADONIS is enabled. This group contains imported objects from ADONIS that have been deleted there, but cannot be deleted in ADOIT due to added relations.
Create Reusable Objects
Repository objects can be reused in different models. They are stored in the Object Catalogue.
To create a reusable object:
On the toolbar at the top of the screen, click New
 .
.Select an object type. The object is created and the Notebook of the object opens.
Now you can start editing the attributes of the object and reusing the object in models.
Recommendations
Your ADOIT administrator may define a set of recommended model and object types. They will be displayed in the Recommendations pane.
If no recommended elements have been configured, the Recommendations pane is not shown.
Find What You Need
To help you quickly find the artefact you want to create, the following options are available:
Search for a Model or Object Type: In the Search box, type the text you want to search for. All model and object types that contain the search string in their name are displayed. To clear the search filter, click the icon
 .
.Filter by Topic: Click the button
 , select the
topic you want, and then click Apply. You can display a topic-specific selection of model and
object types. Additionally, you can display all models or all objects.
, select the
topic you want, and then click Apply. You can display a topic-specific selection of model and
object types. Additionally, you can display all models or all objects.
Other Ways to Create Objects
You can also create objects directly in the Object Catalogue or in the graphical editor:
Create Objects Directly in the Object Catalogue: Choose an object group as a starting point when creating objects. Right-click the object group, and then click Create object.
Create Objects in the Graphical Editor: Graphical modelling. Place objects directly on the drawing area.
Save Reusable Objects
Saving a reusable object (= repository object) is necessary if you edit its attributes. To save a reusable object:
Click the Save button
 in the
menu bar of the Notebook.
in the
menu bar of the Notebook.Enter a name for the object and define a target group if you are saving it for the first time.
Create Relations Using Drag-and-Drop Operations in the Explorer
In the Explorer, you can create relations by drag and drop:
between repository objects
between repository objects and models
The following functions are available:
Create Relation within the Object Catalogue: Drag an object onto another object. When you release the mouse button, ADOIT will show you which relations can be created in this way. Simply choose the desired relation and it will be created.
Drag Multiple Models/Objects onto an Object: Similar to above, you can also drag multiple objects or models onto another object. This will be successful if the target attribute allows multiple connections. If the target attribute only allows a single connection, only the first of the objects or models will be added.
Copy & Paste Objects in the Explorer
In order to create a copy of an object in the Object Catalogue:
Press <Ctrl> + <C> to copy an object.
Select the target group and press <Ctrl> + <V> to paste an object.
Inheriting Relations When Copying Objects
When an object is copied, the relations are inherited as follows:
Incoming relations (icon
 ): NOT
inherited.
): NOT
inherited.Outgoing relations (icon
 ):
inherited.
):
inherited.
Example
The object "Partner System (PAS)" has one incoming relation ("Host") and one outgoing relation ("Demo Interface"). When a copy of this object is created, the new object "Copy of Partner System (PAS)" has NO incoming relation and one outgoing relation ("Demo Interface").

Create a Copy of a Model
To create a copy of a model, use the Save as command.
Move Models/Objects in the Explorer
In order to move models or objects to another group in the Model Catalogue or Object Catalogue:
- Drag the models or objects to the destination folder.
Replace Object
ADOIT offers the possibility to merge two objects of the same type. In order to do so:
Select the two objects you want to merge in the Object Catalogue.
Right-click the objects, and then click Replace object. A dialogue box opens.
Select the object that should replace the other one.
If you want to transfer attributes from the object to be replaced, perform the following additional steps:
Open the Notebooks of both objects by using the provided links.
Compare the attributes of both objects and transfer them from one object to the other.
Click Replace.
If the replaced object is marked as a favourite, the new object is automatically added to your favourites.
Replace Objects Using Drag-and-Drop Operations
Alternatively, you can replace objects by drag and drop:
- Drag an object onto another object, release the mouse button, and then click Replace <object type>.
Relations Behaviour when Using „Replace object...“
The relations of the replaced object are inherited as follows:
Incoming relations (icon
):
inherited.Outgoing relations (icon
): NOT
inherited.
Example
The following example shows the behaviour of incoming and outgoing relations of the replaced object. The business object “Partner” has two incoming relations (“Business Intelligence System (BIS)” and “Partner System (PAS)”) and two outgoing relations (referenced business objects “Business customer” and “Private customer”). The business object “Partner data” has one incoming relation (“Credit Card Management System (CRE)”) and one outgoing relation (“Partner address”) If “Partner” is replaced by “Partner data”, the following happens:
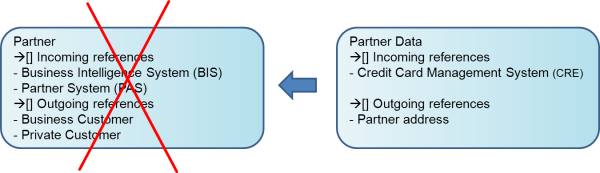
Result: “Partner data” has now three incoming relations ("Business Intelligence System (BIS)”, "Partner System (PAS)” and “Creditcard management system (CRE)”) and one outgoing relation (“Partner address”).

Delete Model or Object in the Explorer
To delete a model in the Model Catalogue or an object in the Object Catalogue:
Right-click the model or object, and then click Delete or:
Select the model or object you want to delete, and then press <Del>.
Object is Used in a Model
In order to delete an object, it must not be used in any model. When trying to delete an object which is still used in models, a notification appears.
Press <Shift> + <Del> to delete the object anyway.
Single Model or Object with Incoming References
When you delete a model or object with incoming references (icon
![]() ), a warning message appears. You
can continue anyway, or cancel the action and check the references.
), a warning message appears. You
can continue anyway, or cancel the action and check the references.
Press <Shift> + <Del> to remove a model or object with incoming references without a warning message.
Multiple Objects with Incoming References
When you delete a group of objects, all contained objects with incoming references will not be deleted. After the deletion process a notification appears. You can click the “Details” button to view a list of the objects that were not deleted.
Rename Model or Object
In order to rename a model or object:
Right-click the model/object, and then click Rename or:
Select the model/object you want to rename, and then press <F2>.
Switching the language of ADOIT and renaming an element counts as a translation: The value is set for this particular language.
When you rename a repository object and the object already exists (same name, same type), you have two options:
Click Cancel and choose a different name or:
Click Replace object and merge the two objects.
The Organiser
You can open multiple Object Catalogues or Model Catalogues at the same time, side-by-side, to help you organise your objects or models. This feature is called Organiser.
Open Organiser
To open the Organiser:
- Click the More button in the
menu bar of the Explorer, and then click Organiser
 .
.
When the Model Catalogue is selected in the Explorer, two Model Catalogues will open side-by-side. When the Object Catalogue is open in the Explorer, two Object Catalogues will open.
Switch between Catalogues in Organiser
It is possible to switch between the Model Catalogue and Object Catalogue in the Organiser:
![]()
- Click the Models or Objects button in the menu bar of the Organiser.
Open Additional Catalogue
To open an additional catalogue:
- Click the large button
 on the
right side of the program window.
on the
right side of the program window.
Organise Models/Objects
The Organiser offers the same features as the Explorer. The following commands are especially useful for organising your objects or models:
Copy, Paste, Delete and Rename.
You can drag models, objects or even entire groups from one catalogue to another.
The Copy and Paste commands are only available for objects. If you want to create a copy of a model, use Save as.