Welcome to ADOIT!
Thank you for choosing ADOIT! The admin section of this Quick Start Guide helps you quickly explore the most important settings. It walks you through the initial steps so you can get started with your colleagues in ADOIT right away!
You don’t need to follow the steps in the exact order described here. Simply review them - you might decide to prioritize or skip certain steps.
The first E-mail & Login
You’ve received an email with an access credentials sheet. This sheet contains your login details as well as a link to your account. The email also includes your BOC contact person, who is available to support you every step of the way - whether it’s about steps in this Quick Start Guide or any future questions you may have!
- Click on the link in the credentials sheet to access your account.
- Click the gear icon
 in the top right corner next to your username to log into the administration area.
 - Use the login credentials provided in the credentials sheet.
- Change your password the first time you log in - and be sure to remember it!

Get to know the ADOIT administration and settings
To help you quickly find your way around the ADOIT administration and set up a configuration that fits your team’s needs, we’ve compiled the most important information for you. Further down, you’ll find a list of videos and links to helpful resources.
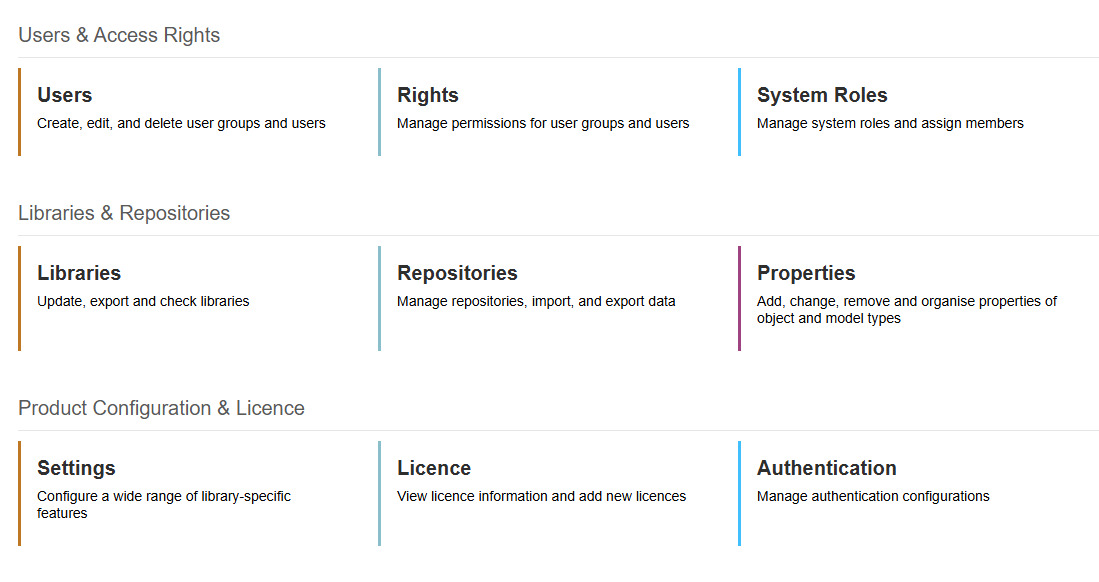
Important Settings:
- Users: Management of users and user groups
- Permissions: Assignment and management of permissions
- System Roles: Management of system roles
- Repositories: Management of repositories, import/export of migration packages and models
- Properties: Customization of fields for ArchiMate elements
- Settings: Various options, mostly preset
Helpful Videos to Get Started
To make getting started easier for you, we’ve selected a video from our tutorial series that walks you through some helpful first steps in the administration:
![]() Get an overview of the key components of administration.
Get an overview of the key components of administration.
Our playlist offers more exciting videos – featuring the key functions and clever tips for ADOIT!
Our Admin-Help
Prefer reading over watching? In our Admin-Help, you’ll find all the settings described in detail.
Initial Administrative Tasks
Just a few more steps and you’re ready to go! To get started, you’ll need to define an initial folder structure, create a few user groups, and assign permissions. No worries – we’ve already prepared everything for you in what we call the Quick Start Migration Package. All you need to do is import a file, and the most important settings will be pre-configured.
You can download the Quick Start Migration Package here.
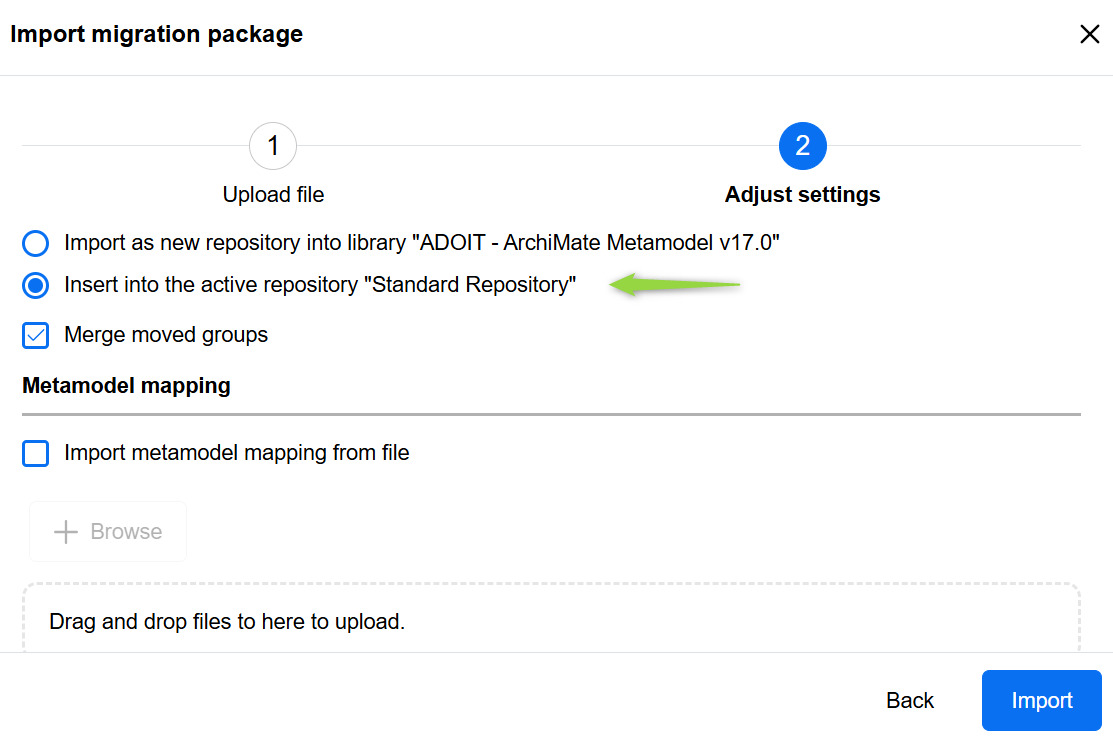
To import the Quick Start Migration Package:
- In the Administration section, go to Repositories.
- Click on “More Options” in the top right corner → “Import Migration Package”.
- Upload the downloaded Quick Start Migration Package – either by drag & drop or using the file selector.
- Import the migration package directly into the active standard repository.
You can find more information in our online help. There, you can also get familiar with our terminology around repositories and migration packages. Check out the following articles in the online help: What are repositories?, What is a migration package?.
You’ve successfully setup:
- A folder structure for objects
- A folder structure for models
- Initial user groups
- First permission settings
Of course, you can adjust structures, permissions, etc. later on - we’ll take care of that further down in the guide. You’ll also find a dummy user called “arch” in your user groups. This account is needed for a few example models you’ll import later - feel free to ignore it for now.
Create a super-user for yourself
The user account you’ve been using so far probably doesn’t align with your company’s guidelines. We’ll cover how to set up Single Sign-On (SSO) and SAML later - but for now, let’s get you ready by creating a user account that meets your organization’s policies.
Ideally, use your company’s standard format for usernames, such as your Windows login or email address. This will make integrating with your Directory Service much easier. If you're unsure, it’s best to check with your IT Service Desk.
Here’s how to proceed:
- Log in to the Administration
- Go to Users
- Create a new user
- Under “General”: define the username, password, email address, etc.
- Under “Groups and Roles”: assign the user to the “Administrator” group
- Under “Repository”: select the “Standard Repository”
- Under ”Named user”: select scenarios if you want to login with the super-user in ADOIT
You can find more detailed information on how to create new users and what each setting means here.
It’s also important to enter your email address under “General”, so you can reset your password in case you forget it.
If you’d like your BOC contact to have access to your ADOIT environment — to better assist you with any questions or issues — we’ve already created a user account for them. You just need to activate it in the Administration panel. You’ll find more about editing users in our online help.
Great, the first steps are done! Now let's move on to your colleagues

To make sure your colleagues also have access to ADOIT, we’ll now create user accounts for them. Before doing so, let’s take a quick look at the existing user groups. You can find them in the administration under “Users”. User groups allow you to manage your users’ permissions. The following groups have already been prepared for you during the installation:
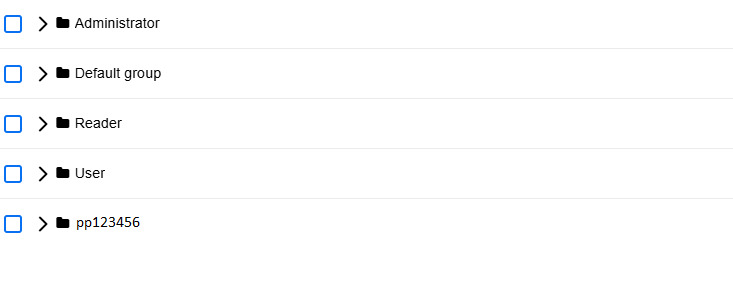
- Reader: Users assigned to this group have read-only access.
- User: Users assigned to this group have full write access.
- Administrator: Users in this group have full write access, as well as access to the administration features.
The "Standard Group" and "ppXXXXXX" groups are not needed for now.
Create users for the members of your core team
Normally you will manage your ADOIT accounts via SAML. This usually takes a little longer, as some clarifications have to be made.
We therefore recommend that you create your first users manually. So that you don't have to do this individually, we have prepared an Excel template that you can download and enter all your users. Then all you have to do is import them and the user accounts for your colleagues are created in ADOIT!
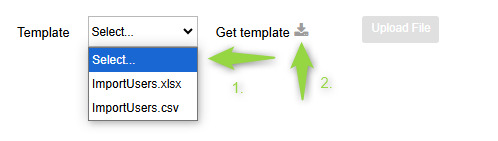
- Go to the administration section → "Users" → "More options" → "Import users from Excel."
- Download the template "UserImport.xlsx."
- Enter all the users' details. IMPORTANT: An email address must be provided for each user. This is required to reset the password later!
Enter all users who are to work with ADOIT in the start phase. All other users will be created automatically via SAML in the future. You typically give the core team members write permissions. You can of course restrict this later.
Now you have to upload the file with the registered users again. Use the following import options:
- Select the “Trusted login” checkbox. (You can read why and why this is important here)
- For user groups: User (this gives your core team write access to models and objects)
- Under “Repositories and object groups”: Standard repository and objects
- Then click on “Upload file”

Assign scenarios to your users
There are named-use scenario licenses in ADOIT. Named-use scenario licenses define the users who can use a scenario. Scenarios are the main components of ADOIT. There are:
- Design & Document
- Read & Explore
- Workspaces
This is how you assign scenarios to users:
- Go to Administration > Users > Select a user > Edit (⋮) > Named-Use user
- Select the desired scenario in the “Select scenarios” field
- Click on “Select”
The users are now configured. Now distribute the ADOIT URL to your users by email and inform them of their user name. The users can reset their password via “Forgot password”.
Import examples for your colleagues
We have prepared 5 industry-specific example models for getting started in ADOIT. These consist of:
- 3 models
- 1 analysis model
- 1 workspace
Simply import the file, and your colleagues can explore the models at their own pace.
Download the desired example model directly:
- Model of an Airport
- Model of a Bank
- Model of an Insurance
- Model of a Retailer
- Model of a Toymanufacturer
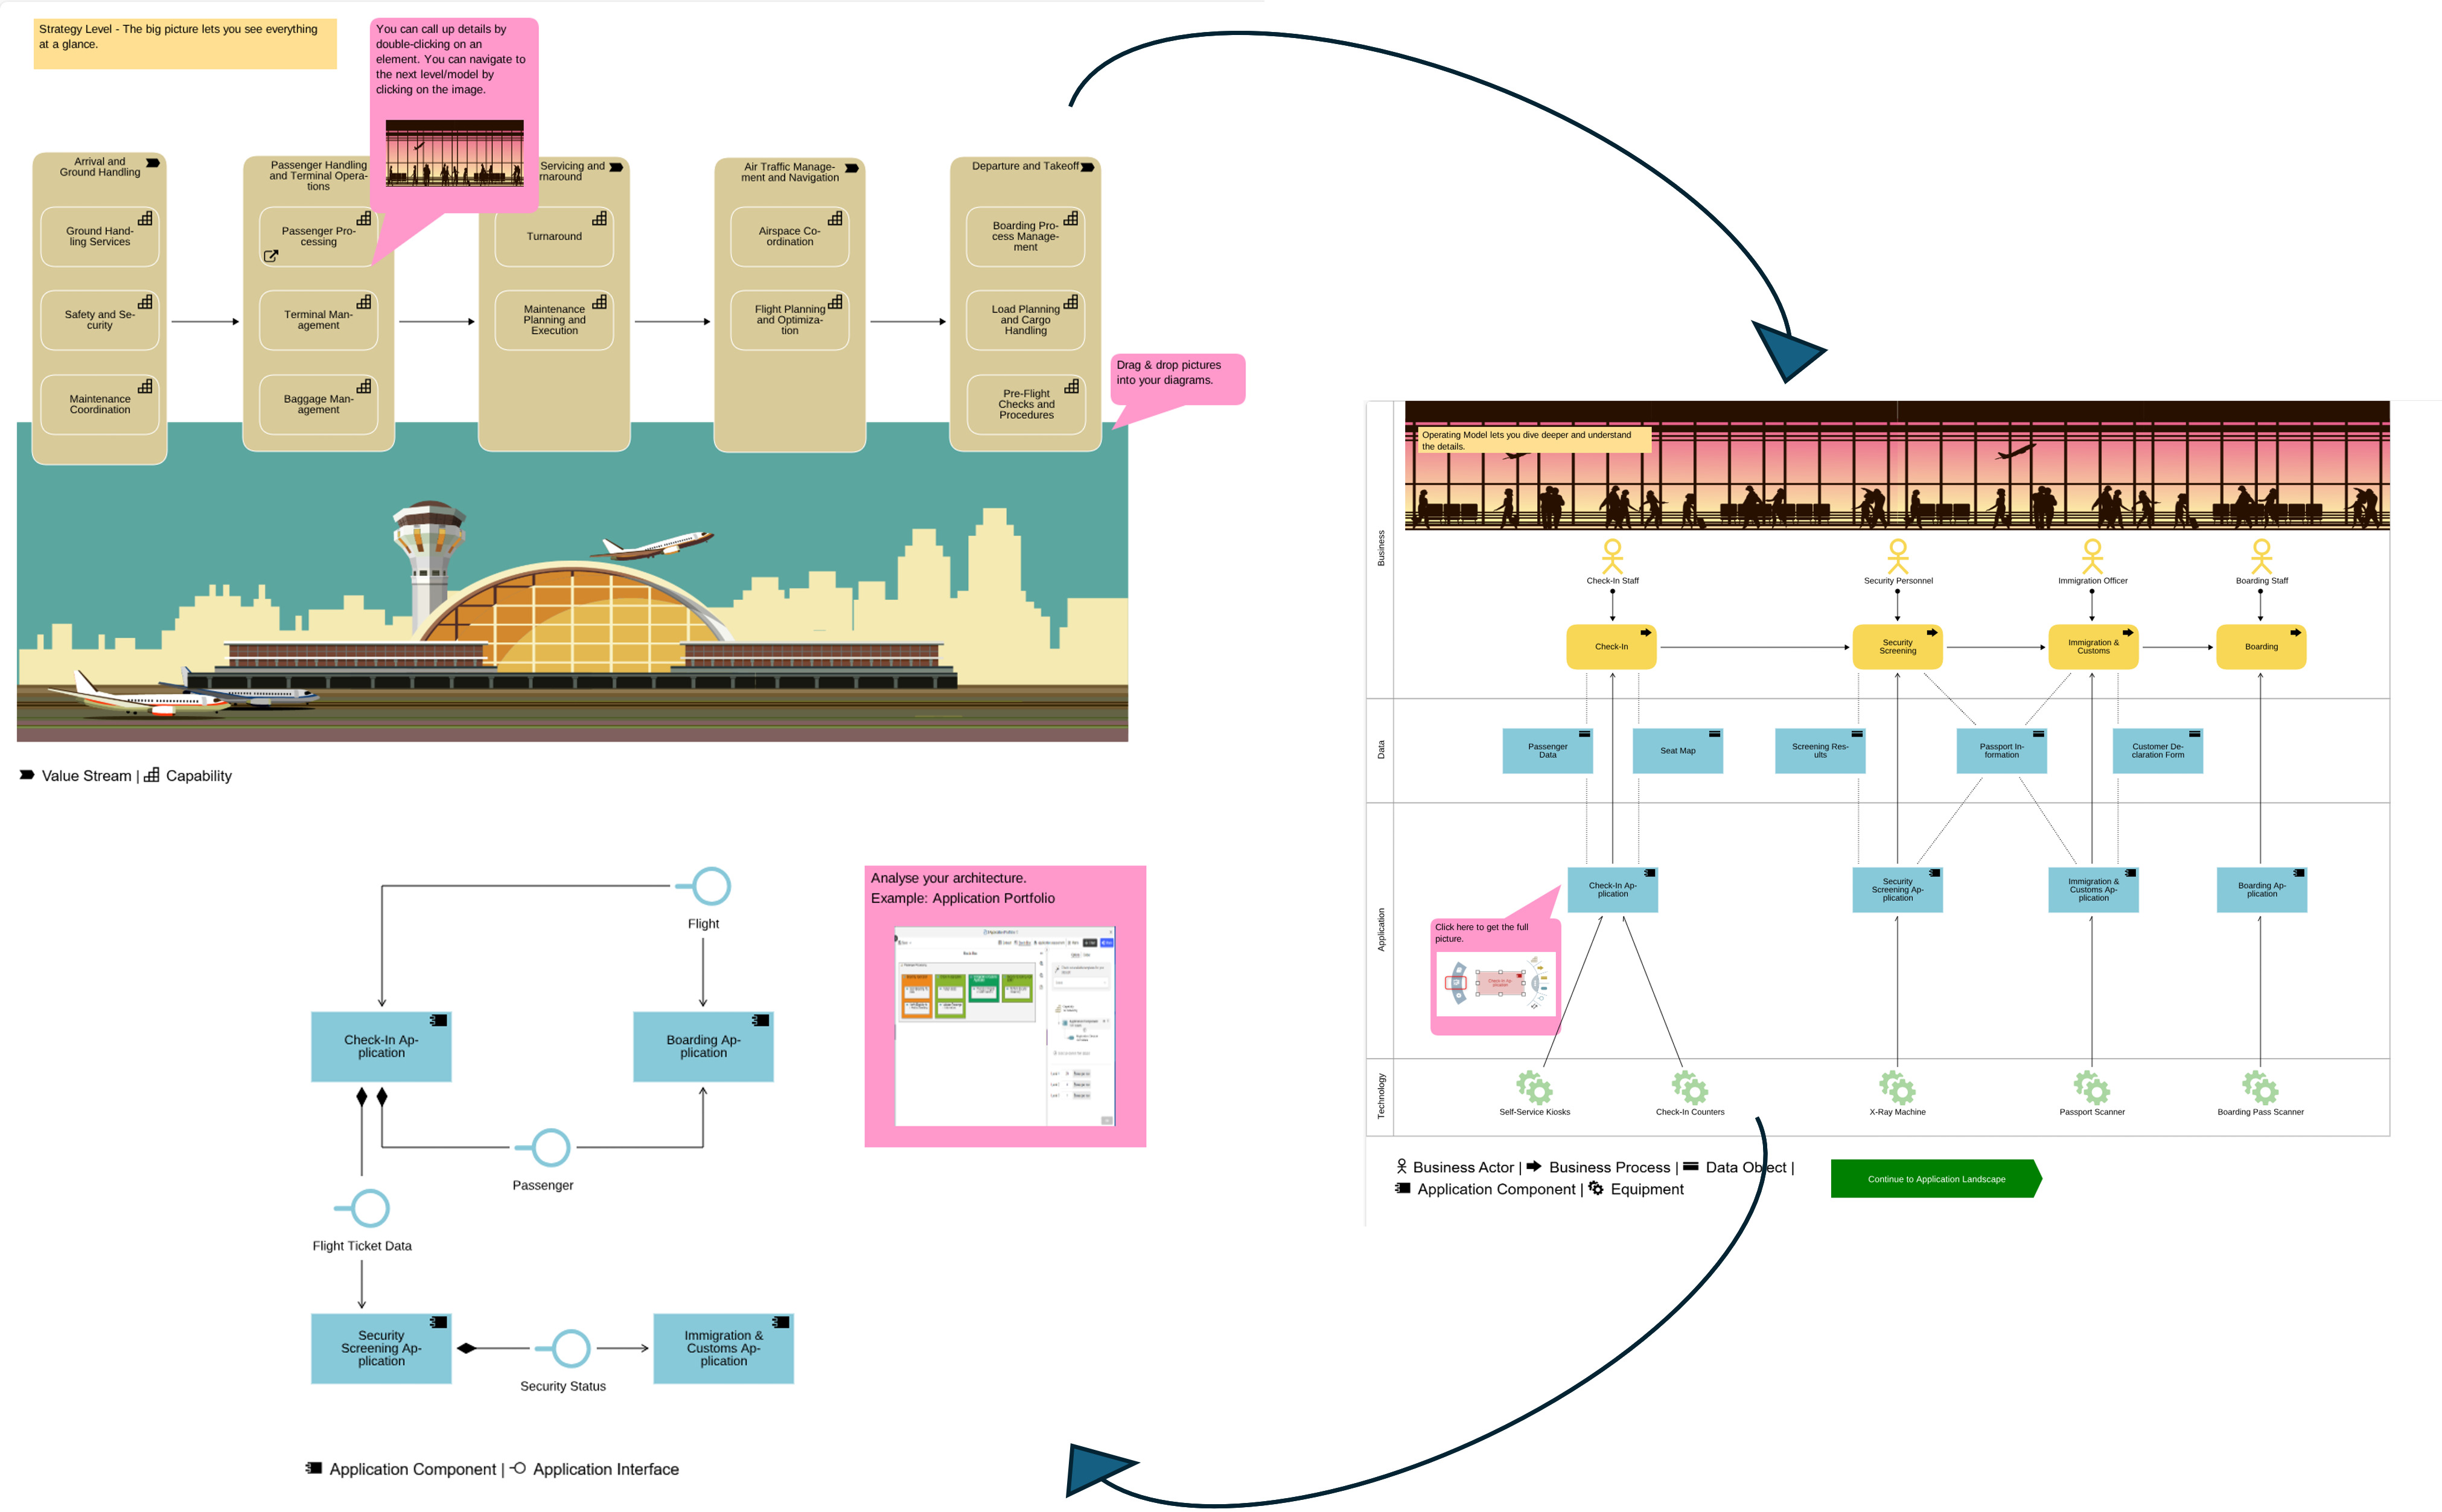
Structure of the example models:
- Capability Map
- Operating Model
- Application Landscape
- An analysis with a portfolio view of the application components
Additionally, you will find a pre-configured workspace in the Workspaces scenario.
Importing the example models:
- Download one of the example models above.
- Go to Repositories in the administration and click on More Options in the top right corner. Then click Import Repository.
- It is important to import it as an INDEPENDENT Repository (select the first option in the import settings).
- After importing the example model, you will need to assign access rights to yourself or the responsible colleagues who should see the example. You can do this under Users in the administration. Select your user and those of your colleagues who should be able to see the example and click Edit. Under Repository, you now need to select the corresponding repository. For more information, please refer to our Online-Help.
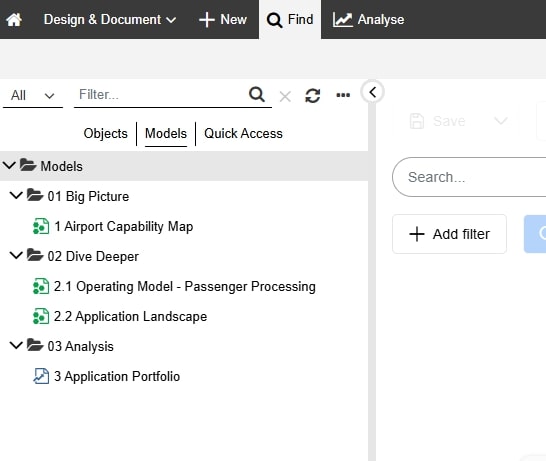
- Log out of the administration and log into ADOIT to check if the import was successful. When logging in, select the new repository. You should now see the following in the explorer:
Great, your colleagues are now on board! Share the User Guide with them and inform them about their login credentials.

Further useful information for you as an Administrator
Import existing data via the Excel Interface
Do you already have architecture information in Excel format? Use our Excel templates to import the data:
You can find our template directly in the Object Explorer:
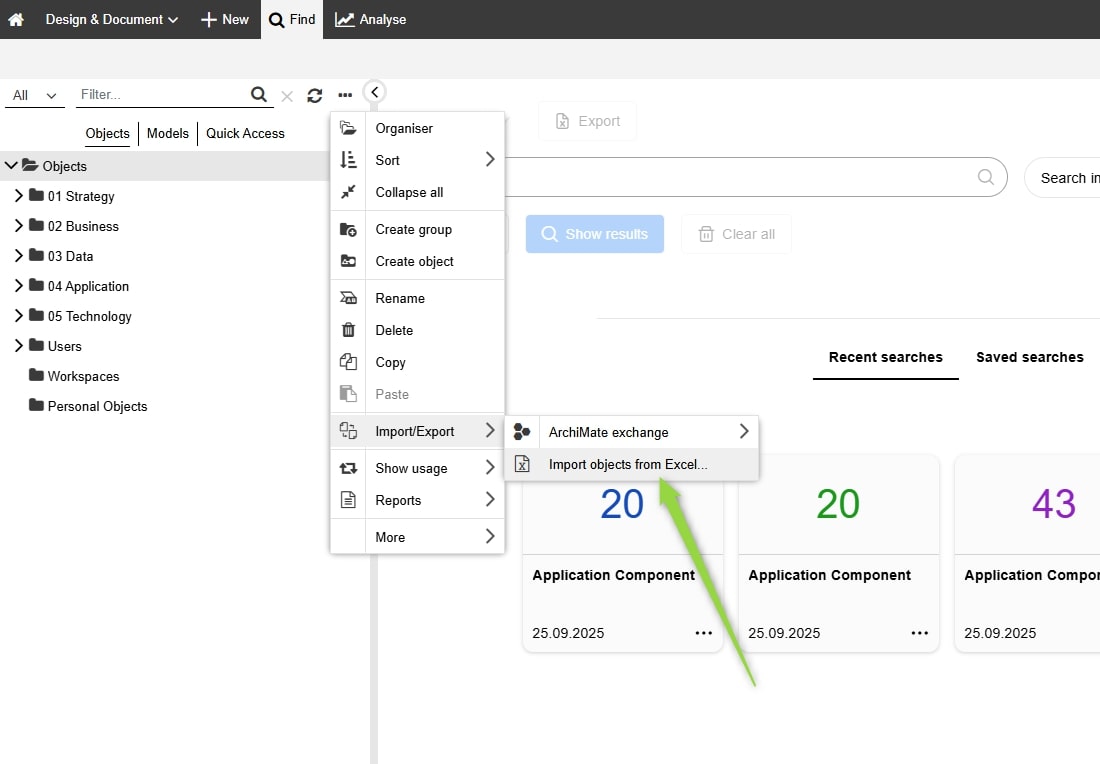
- Select the folder where you want to import the data.
- Open the context menu (the three dots in the top right corner of the Explorer).
- Choose "Import/Export" → "Import objects from Excel...".
- Download the template using the download icon.
- Fill in the template with your architecture information and upload it again.
For more information, please refer to our Online-Help!
Of course, you can also customize the template to fit your needs. You can find more information about this here.
Reduce modeling complexity with metamodel profiles
In ArchiMate, there are many elements and relationships. Initially, your team will only use a few of them. Therefore, we offer so-called metamodel profiles. These act as a filter for elements and relationships. All our predefined views, analyses, examples, and templates are based on this filter.
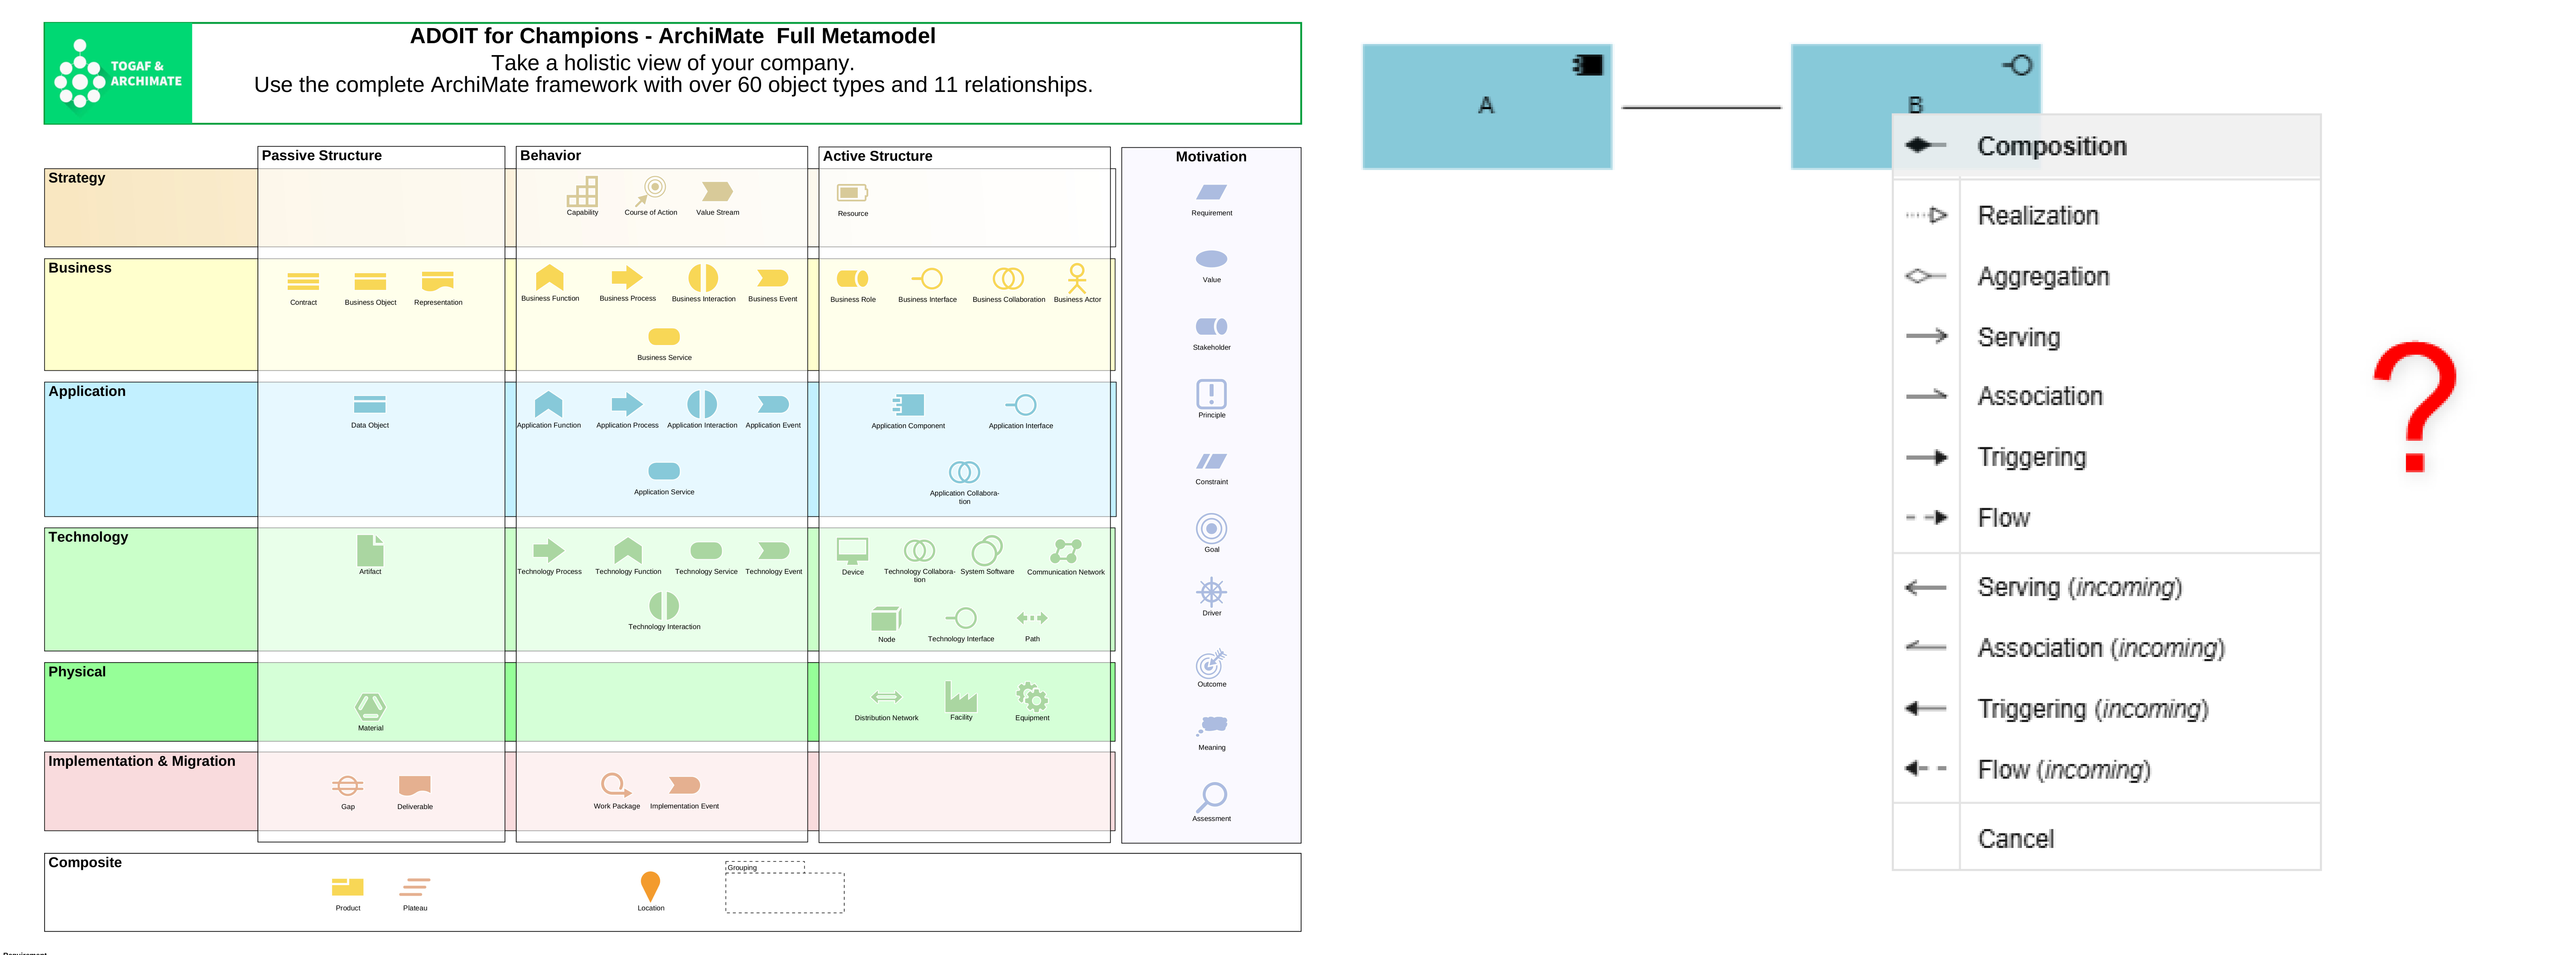
Switch the metamodel profile via Setup ![]() in the toolbar. Please note that the selected profile will also be activated for your colleagues.
More information about metamodel profiles can be found here.
in the toolbar. Please note that the selected profile will also be activated for your colleagues.
More information about metamodel profiles can be found here.
In most cases, the profile "ADOIT for Fans of Lean Architecture" is used. In this profile, we have reduced the possible relationships between two classes to just one relationship. We recommend using this profile as a starting point. You can expand or further restrict it later based on your specific use case. More information, can be found here.
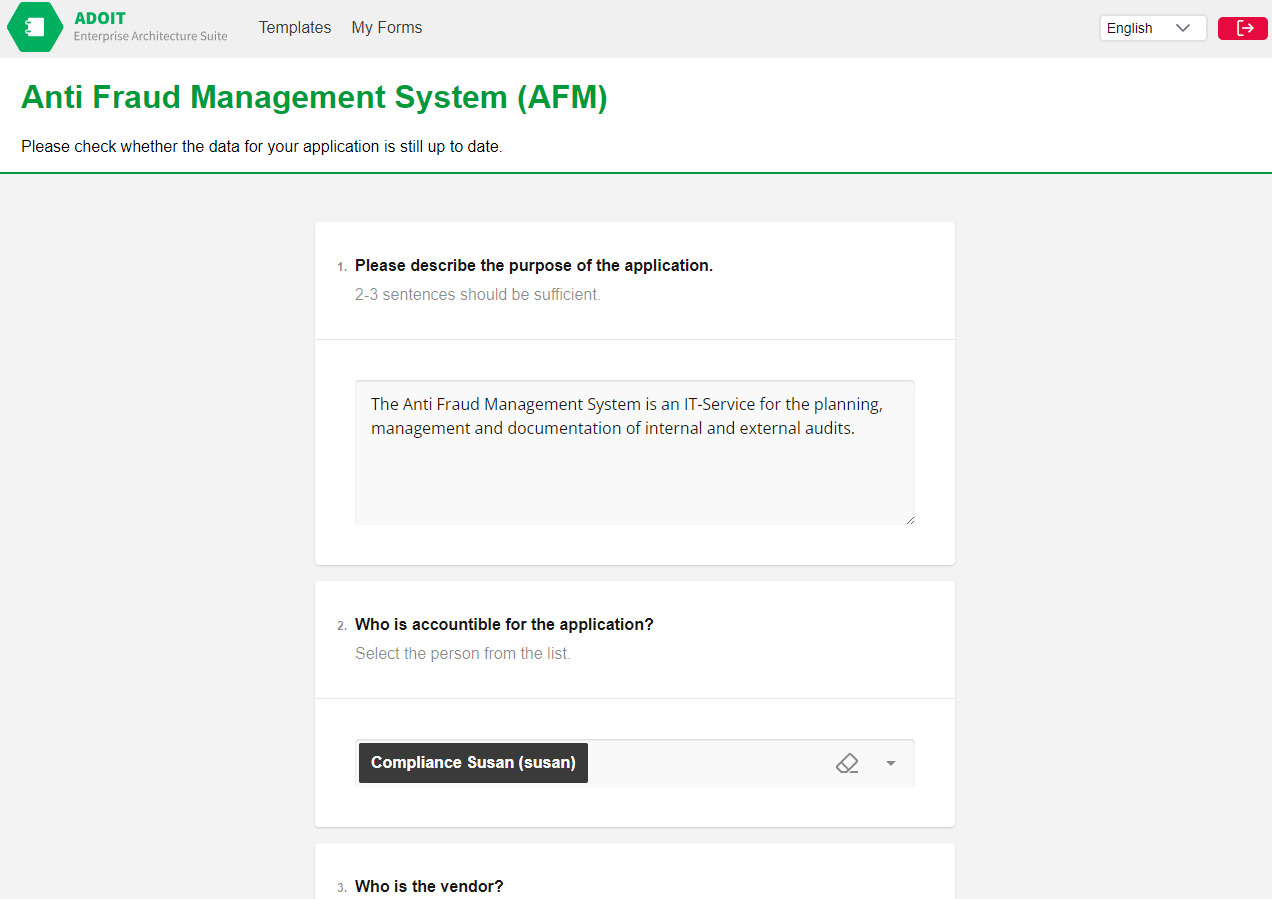
Activate ADOIT Forms
With ADOIT Forms, you can simplify data maintenance. It is a user-friendly, form-based interface that allows for easy data entry and updates – even for users who are less familiar with ADOIT or enterprise architecture.
There are 3 use cases in ADOIT Forms:
- Create forms
- Distribute forms
- Fill out forms
For more information about ADOIT Forms, please refer to our Online-Help.
How to activate ADOIT Forms:
- ADOIT Forms runs in SaaS mode, so no additional installation is required.
- To activate Forms, log in to the administration.
- Navigate to “Settings” and click on “ADOIT Forms” in the list on the left.
- You can now activate Forms with the click of a button. All necessary settings for OAuth, REST, and CORS will be automatically configured in the background.
Prepare the SAML integration
To set up Single-Sign-On (SSO) on your BOC SaaS account (SP) and your SAML Identity Provider (IdP), some preliminary work is required. Please prepare the following and send us the details up to 24 hours before the first scheduled customer meeting.
We need the following from your SSO technical team:
The following claims should be configured in your SAML Identity Provider (IdP):
- Username = E-mail address
- First name
- Last name
- E-mail address
- Groups
After configuring the Identity Provider (IdP), you need to think about the AD groups to be configured: In ADOIT we have the following user groups by default:
- Administrators
- Readers
- Users
Please talk to your administrator about possible AD groups. You will probably add a few more in the course of further configuration. For more information, please ask your BOC contact person.
We also require the necessary information from the customer IdP:
- IdPURL
- Token signing certificate
- The “metadata.xml” file or the metadata URL
- The names of the configured claim attributes
If your IdP endpoint is not accessible via the internet, we need someone on your side to test it. Please provide us with the contact information of a possible test assistant.
Once you have collected all the important information, we would ask you to contact your BOC contact person. They will provide you with a secure file exchange service through which you can upload all the necessary files and information. For this we also need a telephone number from your side. Please also provide this to your BOC contact person.
Once we have received the required data, we configure SAML. First, it is set up as a secondary authentication method to avoid any impact on the productive use of your instance. After successful testing during the session, SAML will be enabled as the default authentication method. If you have any further questions on this topic, you can always contact your BOC contact person!
The most important steps are done!
Great job! You've successfully completed the first steps in ADOIT! Now you and your colleagues can continue exploring the software at your own pace. The next steps can now be discussed with your BOC contact person. Here is a small list of useful features and settings that we would recommend at the beginning:
- Already using ADONIS? Discover the possibilities of integration with ADO Connect:
- Explore all extensions for ADOIT in our EA Marketplace:
- For more insights, know-how, and useful tips, check out our blogs or EA resources:
- Got more questions? Browse our FAQ section for many interesting topics:
For any further questions or concerns, please reach out to your BOC contact person!