Publishing
This chapter provides an overview of the most important publication functions of ADONIS NP.
Create Report
You can create various PDF and RTF reports based on models or objects. These reports e.g. provide an overview of the values of certain attributes across all the selected elements.
In order to create a report:
Select the models/objects you want to create a report on.
Right-click the selection, point to Reports, and then choose the desired report from the submenu. The settings dialogue opens.
Select the desired report options.
Confirm with OK.
You can create reports this way using e.g. the Explorer, the textual view or the graphical editor as a starting point. Additionally, it is possible to create reports from various widgets and dashboards by clicking the appropriate icon.
Different kinds of reports are available depending on your Application Library and product configuration.
Report Options
The following report options are available:
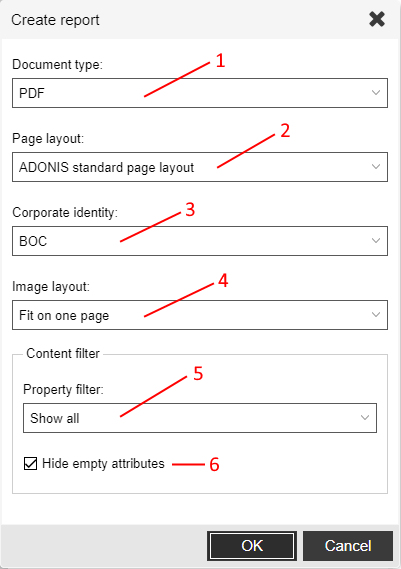
Document type (1)
Select the file format for generating the report. You can choose between PDF (default format for quality printing) and RTF (cross-platform document interchange format).
Page layout (2)
Page layouts determine the appearance of the header and footer in the report. These layouts can contain logos, text, meta information like the username and printing timestamp and much more.
Corporate identity (3)
If several corporate identity schemes (CI schemes) are available, you can select one of them for creating the report. A CI scheme consists of a company logo and company data. Depending on the page layout, the CI scheme will be displayed on the title page and in the header and footer.
In the user settings, you can specify which CI scheme is set as the default. CI schemes can be configured in the Administration Toolkit.
Image layout (4)
Modify the size and orientation (portrait or landscape) of model graphics in the report:
Fit on one page
The model is enlarged or reduced to fit exactly on one page.
Apply settings from model
Apply print settings from the model to determine the size and orientation of model graphics. For this purpose, the settings have to be saved for specific models.
This option is only available when creating a Standard Report or QM Report.
Content filter
The options in this area affect the content of the report. These options are only available when creating a Standard Report, QM Report or Object Report.
Property filter (5)
Here you can change the active property filter. The property filter influences which attributes are visible in the report.
Hide empty attributes (6)
Activate Hide empty attributes to hide all attributes with no value in the report. You can combine this filter with any property filter.
For information on which attributes are considered "empty", please refer to the section Display or Hide Empty Attributes.
Available Reports
The following reports are available:
Standard Report
This report provides an overview of the selected models. It lists the model attributes and contains the model graphics. Additionally, the objects in the models are listed. In the case of Business Process Diagrams, Process Landscapes and Working Environment Models the objects are sorted by their order, else according to their type.
Open Questions Report
The main objective of this report is to provide an overview of the objects contained in the selected models which contain open questions. Models are sorted according to their type, and for every model all objects with open questions are listed.
Project Summary Report
This report provides a management summary for the selected project, considering the current state of models. The current state of the models in scope of the project is shown graphically and further details giving an overview of the current progress are provided.
QM Report
For the generation of a QM Report one or more Business Process Diagrams must be selected. The model graphic is shown and a selection of model attributes is listed. Additionally, the objects in the model including their attributes are listed.
Object Report
This report provides an overview of the selected objects. The objects are sorted according to type. All attributes that have been populated with data are listed (alternatively, you can also display empty attributes in the report).
The configuration described here applies to the ADONIS BPMS Application Library and can differ from your configuration.
HTML Publication
HTML publishing allows you to distribute modelling content to users with no access to ADONIS NP. Models and objects are provided as static HTML files which can be opened in a web browser. The user interface of the HTML publication is a simplified version of the web client complete with Model and Object Catalogues, a graphical model viewer, Notebooks and a search function.
You can e.g. send a generated HTML publication to your colleagues via email or make it available on a web server for people to view.
Create HTML Publication
In order to create an HTML publication:
Right-click a model or object, point to Reports, and then click HTML Publishing.
In the Models and Object areas, select individual models, objects or entire groups that should to be included in the HTML publication.
Select the scope of the HTML publication:
Select the Including referenced models check box to include all models referenced by the selected models and objects.
Select the Include subordinated model groups check box to include the entire hierarchy below a selected group into the export – not only the selected hierarchy level.
Select the Including referenced objects check box to include all objects referenced by the selected models and objects.
Select the Include subordinated object groups check box to include the entire hierarchy below a selected group into the export – not only the selected hierarchy level.
Select the languages in which the modelling content should be available.
Click OK.
The HTML publication is being generated. The download will start automatically.
View HTML Publication
In order to view an HTML publication:
Extract the downloaded .zip file into a folder of your choice.
Navigate to the folder where you extracted the HTML publication, and then open the file
index.htmlin a web browser.
The HTML publication is displayed.
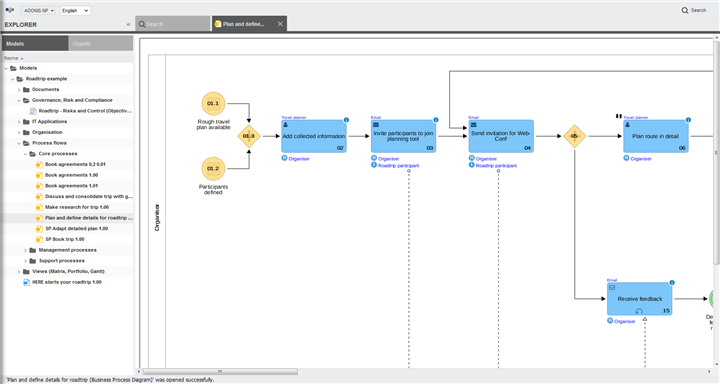
Open Model
In order to open a model included in the HTML publication:
- Double-click the model in the Model Catalogue.
The model opens in the graphical model viewer.
Open Notebook
You can open the Notebooks of models and objects included in the HTML publication.
Open Model Notebook
In order to open the Notebook of a model included in the HTML publication:
- Right-click the model, and then click Open Properties.
Open Object Notebook
In order to open the Notebook of an object included in the HTML publication:
- Double-click the object.
Open Referenced Document
In order to open a referenced document in the HTML publication:
Open the Notebook of the Document object which contains the referenced document.
In the Notebook chapter General information, click the link to the document in the attribute Referenced document. The web client opens in a new tab.
Log in to the web client. The Notebook of the Document object opens.
Click the link to the document in the attribute Referenced document.
The document is downloaded.
This feature is only available if the Base URL is configured in the ADONIS NP Administration Toolkit.
Search
In order to search for models or objects in the HTML publication:
Click the Search tab to start the search.
In the Search box, type your search text, and then press <Enter>.
All models and objects containing the search term in their Name or Description are displayed.
Extended Search
In order to refine your search:
Select the Extended Search check box.
Now do one of the following:
From the Search In list, select to display either Models or Objects only.
From the Restrict Search to list, select either All Model/Object Types or restrict the search to certain types.
Press <Enter> to refresh the search results.
Save Image
Models opened in the graphical model viewer can be exported as graphic files (in PNG format). In order to save an image:
- Right-click the model, and then click Save Image.
Generate URL
You can generate a URL based on models opened in the graphical model viewer. In order to do so:
- Right-click the model, and then click Generate URL.
Pending Actions
The pending actions overview allows you to track the state of the reports you are currently generating (including HTML publications). It lists all reports that are queued (Pending...) or being generated (Processing...). When a report is completed, it will be downloaded automatically.
Open Pending Actions
In order to open the pending actions overview:
- Click the Pending actions button
 at the top right corner of the
program window.
at the top right corner of the
program window.
Cancel Report
In order to cancel a report:
- Click the Cancel button
 .
.
The total number of reports currently being generated is displayed within the Pending actions button.
Print Model to PDF
Models in the graphical editor can be printed as a PDF document. You can save this document on your computer, share it with colleagues or print it on paper.
In order to print a model to PDF:
Click the Share button
 in
the menu bar of the open model, and then click Print PDF. The print dialogue opens.
in
the menu bar of the open model, and then click Print PDF. The print dialogue opens.Select the desired print settings.
Confirm with Print.
Print Settings
The following print settings are available:
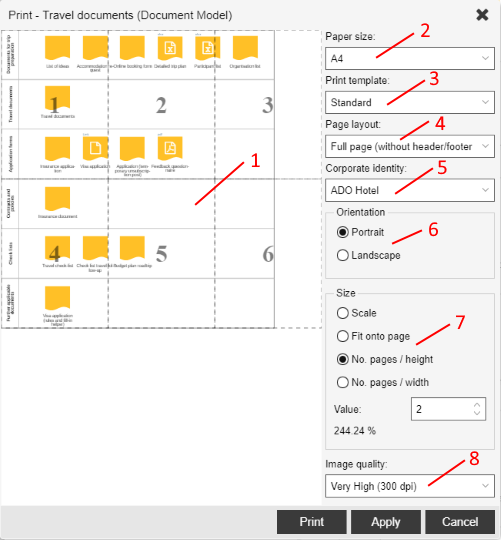
Preview (1)
The left part of the dialogue box contains a print preview. This preview corresponds to the settings on the right part of the dialogue box.
Page selection
To omit particular pages during printing, click them in the preview window. They will be highlighted and omitted during printing. You can un-mark pages by clicking them again.
In the user settings, you can specify whether the page breaks and page numbers displayed here in the preview are also visible in the graphical editor.
Paper size (2)
The setting Paper size determines whether the document shall be printed in A0, A1, A2, A3, A4, A5, B4, B5 or C5 format.
Additional paper sizes can be configured in the Administration Toolkit.
Print template (3)
Print templates enable you to control the layout and content of the PDF document when you print a model. Depending on the configuration, various reports and the print template Standard are available. When you select a print template, you can set the page layout (4) separately.
Page layout (4)
Page layouts supplement the selected print template (3) and determine the appearance of the header and footer. These layouts can contain logos, text, meta information like the username and printing timestamp and much more.
Corporate identity (5)
Select a corporate identity scheme (CI scheme) to display in the PDF document. This makes it possible to embed company logos and display corporate data. If you are using a page layout without header and footer, the CI scheme will not be visible.
In the user settings, you can specify which CI scheme is set as the default. CI schemes can be configured in the Administration Toolkit.
Orientation (6)
The setting Orientation determines whether the document shall be printed in Portrait or Landscape orientation.
Size (7)
Models need not always be printed in a standard size, but can be scaled to meet your needs when printed. The following sizing options are available:
Factor
The model is printed with a defined zoom factor, ranging from 1% to 400%. Default: 100% (the original size).
Fit onto page
The model is scaled to exactly fill one printing page. The necessary zoom factor is calculated automatically.
No. pages / height
The model is scaled to fill the printing pages determined in height. Factor and width in pages are calculated automatically.
No. pages / width
The model is scaled to fill the printing pages determined in width. Factor and height in pages are calculated automatically.
Image quality (8)
The setting Image quality determines whether the document shall be printed at 72, 150 or 300 dpi.
Save Model-Specific Print Settings
You can save the print settings that you defined for a specific model. In order to do so:
In the print settings dialog box, click the Apply button.
Click either the Print or Cancel button.
Click the Save button
 in the
menu bar of the model.
in the
menu bar of the model.
Generate Image
Models in the graphical editor can be exported as graphic files. You can use these graphical model views in other applications than ADONIS NP (e.g. in a word processor).
In order to generate a graphic:
Click the Share button
in
the menu bar of the open model, and then click Export image. The settings dialogue opens.Select the desired graphic options.
Confirm with Export image.
Optionally you can also:
- Crop the image. Press and hold <Ctrl>, <Shift> and the left mouse button and drag a frame around the part of the model which shall appear in the graphic file.
Graphic Options
The following graphic options are available:
Preview
The left part of the dialogue contains a preview.
Display Detail
The part of the model which shall appear in the graphic file is visualised by a coloured border (by default the whole model).
Image format
Select the image format for generating images. You can choose between PNG (pixel-based image format) and SVG (vector-based image format).
Scale
The graphic is generated with a defined zoom factor, ranging from 1% to 400%. Default: 100% (the original size). After selecting a factor, the expected graphic size (in mm) is calculated and displayed.
Image quality
The setting Image quality determines whether the graphic shall be generated at 72, 150 or 300 dpi.