Tabular Editor: Large-Scale Attribute Editing
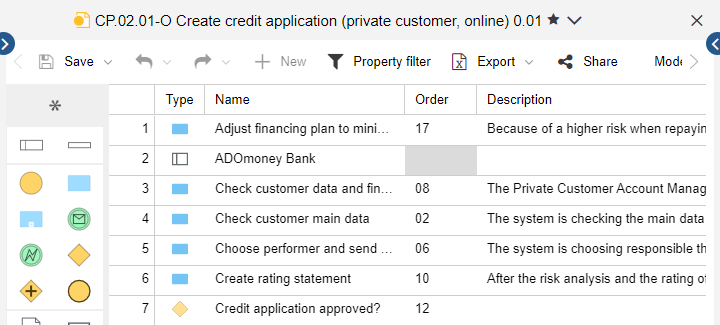
The tabular model editor is a model viewing and editing tool. It presents objects as table rows, while the table columns hold their attributes. The model header above the open model contains basic information such as the name and description of the selected model.
Compared to the graphical editor, the tabular editor offers the opportunity to show the modelling content clear and well laid-out, even in large models. Attribute values can be edited quickly and extensively.
If an attribute cannot be found in the Notebook of an object, the corresponding cell is greyed out.
Open Model/Objects in the Tabular Editor
You can open both models and objects in the tabular editor:
Open Model in Tabular Editor
In order to open a model in the tabular editor, proceed as follows:
Select the model you want to open in the Model Catalogue.
Right-click the model, point to Open, and then click Table.
Open Objects in Tabular Editor
Alternatively, you can also open a selection of objects in the tabular editor:
Select the objects you want to open in the Object Catalogue.
Right-click the objects, point to Open, and then click Table.
Edit Attribute Values
One of the advantages of the tabular editor is the possibility to change attribute values easily and straightforward.
Manually Edit Attribute Values
- Double-click a table cell to manually edit attribute values.
Delete Attribute Values
- Select one or more cells and press <Del>.
The existing values are replaced by the default values of the attributes.
Copy & Paste Attribute Values
Transfer attribute values between cells by Copy & Paste.
Press <Ctrl> + <C> to copy an attribute value.
Press <Ctrl> + <V> to paste an attribute value.
The selected value may be pasted to one cell or multiple cells at once.
Pasting is only possible if the data in the clipboard match the data structure of the target attribute. For instance, numbers can be pasted into text attributes, but not text into numeric attributes.
Copy & Paste Multiple Values
- Use Copy & Paste to transfer multiple cells or whole rows within the tabular editor.
Pasting is executed via “best effort” approach i.e. pasting what is possible, ignoring what does not fit.
Copy & Paste From One Tabular Editor to the Other
- Use Copy & Paste to transfer attribute values to another tabular editor which is simultaneously open.
Copy & Paste From and to Other Applications
- Use Copy & Paste to import and export attribute values from and to other applications (e.g. Microsoft Excel).
Select Cells/Rows
There are various methods via which you can select cells/rows for editing:
Select Cell
- Click a cell to select it.
Select Multiple Cells
Click and hold the left mouse button and drag a frame around the cells or:
Press and hold <Shift> and use the arrow keys to select multiple cells.
Select Row
- Click the row header.
Select Range of Rows
- Click the first row header, press and hold the <Shift> key and click the last row header.
Select Different Rows
- Click the first row header, press and hold the <Ctrl> key and click additional row headers.
Select Whole Table
Click the top left cell.
As an alternative, click a cell, and then press <Ctrl> + <A>.
Sort Cells
By default, the objects are sorted alphabetically. To change this sorting, proceed as follows:
Click the header of a column to sort the table by its content (ascending).
Click on the column header again to reverse the sorting order from ascending to descending (and vice versa).
Adjust Column Width
Many cells contain information too large to be visualised in a standard table view (e.g. long text). This will be indicated on the user interface:
- If the information is too long for the current cell width, the content ends in ellipsis (…).
There are two alternatives to optimize the column width:
Manually Adjust Column Width
- Drag the separator between the column headers to the left or right.
Automatically Adjust Column Width
- Double-click the column separator.
Select Attributes
By default, various object attributes which are specified in the configuration are displayed. As this is in many cases too much information (and therefore not always significant), attribute columns can be hidden and shown as needed:
The button
 is activated in the
header of any column by mouseover. Click this button to open a drop-down menu.
is activated in the
header of any column by mouseover. Click this button to open a drop-down menu.Point to Columns or Select columns, and then choose the attributes you want.
The attributes are arranged according to object type. Within the object type, the attributes are arranged according to the chapters of the Notebook of the object.
Add and Remove Objects
In the tabular editor it is possible to create new objects or add existing objects from the Object Catalogue. It is further possible to delete superfluous objects.
Create Object
In order to create a new object:
Click the corresponding object icon in the modelling bar to select the object type. The view is filtered.
Click the New button
 in the
menu bar of the tabular editor.
in the
menu bar of the tabular editor.
The object is created with a random name and the default attribute values and is added to the table as a new row.
When you create new objects in a model, they appear in the top left corner of the drawing area in the graphical editor.
Add Existing Objects
In order to add existing objects:
- Drag objects from the Object Catalogue into the tabular editor.
If you have opened a model in the tabular editor, the model type determines which object types you can add. In case of a selection of objects, you can add objects of any type.
Delete Object
In order to delete an object:
Click the row header to select the object.
Right-click the row header, and then click Remove.
Open Object Notebook
You can open the Notebook of an object in the tabular editor:
Right-click the object, and then click Open or:
Double-click the object icon in the column Type.
Filter View by Object Type
In order to only display objects of a certain type in the tabular editor:
- Click the corresponding object icon in the modelling bar.
In order to switch back to the overview of all object types:
- Click the Show all icon
 in
the modelling bar.
in
the modelling bar.
Export Table Content
The tabular model editor offers the possibility to save the visualised attributes from ADONIS NP to the file system as an Excel file (XLSX format).
In order to export the table content, proceed as follows:
Click the Export button
 in
the menu bar of the tabular editor, and then select the desired export configuration:
in
the menu bar of the tabular editor, and then select the desired export configuration:Excel (grouped): A separate Excel sheet is created for each object type. Table attributes are shown only to a limited extent: Brackets indicate how many rows the attribute contains.
Excel (grouped with table attributes): A separate Excel sheet is created for each object type. All columns and rows of table attributes are displayed.
Excel (current view): The appearance of the Excel spreadsheet corresponds to the display in the tabular editor. Table attributes are shown only to a limited extent: Brackets indicate how many rows the attribute contains.
Excel (current view with table attributes): The appearance of the Excel spreadsheet corresponds to the display in the tabular editor. All columns and rows of table attributes are displayed.