Metamodel Management
The Metamodel Management is a component that allows configuration of the ADOIT metamodel. For this, a multitude of different functions and various views on the meta model are available.
Whether the Metamodel Management is available in the current configuration is determined by the licence.
The Administration Manual only provides an overview of a few basic functions to change the metamodel. If you want to use the advanced functions of the Metamodel Management, please do not hesitate to contact your ADOIT consultant.
Activate the Metamodel Management
In order to use the Metamodel Management:
Click on the component selection on the top left of the application window.
Select Metamodel Management.
The Metamodel Catalogue
The catalogue of the Metamodel Management provides three different views on the metamodel:
Library View: The Library View offers a structural view of the library. For every library, its model types, their classes and relation classes plus the end points of the relation classes are shown.
Class Hierarchy View: The list contains a view of all available classes in the database, in their hierarchical order of inheritance.
Global View: The list contains a collection of all metamodel elements. The topmost hierarchy level is a list of all element types, each in turn containing a list of all elements of the appropriate type. There is no further diversification.
The workspace shows the available attributes depending on the selection in the catalogue.
Manage Attributes
Almost all elements of a metamodel definition and all modelling elements need so-called attributes. In these, specific variable properties of the elements and various values are stored. Attributes are stored independently in the database and can be re-used as often as needed.
Create Attribute
In order to create a new attribute, either:
Activate the Library View or the Class Hierarchy View and select an element you want to assign the new attribute to or:
Activate the Global View of the Metamodel Catalogue and select the entry Attributes.
When you have made your selection:
Select context menu - Create attribute.... A dialogue window (divided into the two tabs Properties and Name and Default Values) opens.
Set the Properties of the new attribute.
Fill in the Interface Texts.
Set the Default Values.
Confirm with OK.
The new attribute is created and ready for use.
Example: Create Long String Attribute
In order to create a new long string attribute, e. g. a comment:
Activate the Library View and select an element you want to assign the new attribute to.
Select context menu - Create attribute.... A dialogue window opens.
Switch to the tab Properties and Name (default selection).
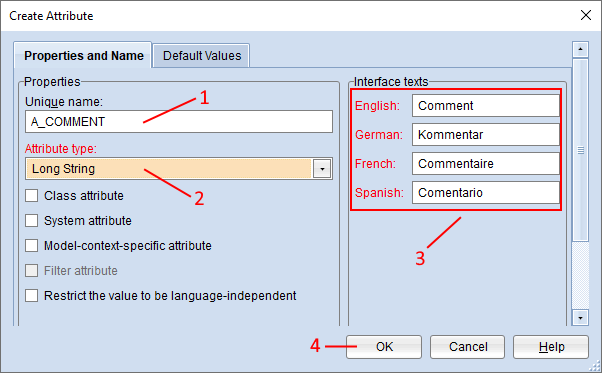
Enter a unique name for the new attribute, e. g. "A_COMMENT" (1).
Select "Long String" as attribute type (2).
Enter the interface texts for the new attribute (3).
Confirm with OK (4).
The new attribute is created and ready for use.
Attribute Properties
At the beginning of the attribute definition, the basic attribute parameters have to be set:
Select a Unique name.
Select an Attribute type.
Select whether the attribute should be a Class attribute.
Select whether the attribute should be a System attribute.
Select whether the attribute should be a Model context specific attribute.
Select whether the attribute should be a Time filter attribute.
Select whether to restrict the attribute value to language independent.
Determine the evaluation of the value not set.
Unique Name
The global name for the new attribute. When determining the name, stick to the following conventions:
Use only upper-case letters (A–Z), cyphers (0–9), underscores (_), and hyphens (-). Avoid blanks in any case.
By naming convention, in case of attributes this name should start with "A_", e. g. "A_DESCRIPTION".
The language-independent name uniquely identifies the attribute within an element (class, model type, ...). It also appears on the user interface in all languages where the Interface Text is undefined.
Attribute Type
The drop-down list Attribute Type contains an alphabetical list of all attribute types ADOIT currently provides. Selecting an attribute type from the list causes the tab Default Values to provide the appropriate input support.
Class Attribute
If the check box Class Attribute is checked, the new attribute will be a class attribute. Class attributes are attributes defined for metamodelling elements (e.g. the graphical representation of a class or the info text of a model type) and cannot be edited in the instances derived from these elements. If it is unchecked (default), then the attribute will become an instance attribute and can be edited in the instances (models, objects…).
System Attribute
System attributes are needed for various platform components and are never considered by the Change History mechanism.
Model Context Specific Attribute
This is an option for attributes used as instance attributes and consequently is not available if Class Attribute is checked. If this property is checked, the attribute can hold different attribute values for each distinct model context. If it is unchecked, the attribute will have one global attribute value for all model contexts.
Filter Attribute
This property indicates if the attribute is relevant for global filter mechanisms. This property is currently available only for Coordinated Universal Time (UTC) and ENUMLIST_TREE attributes.
Restrict the Value to Be Language Independent
If this property is checked, the value of the attribute is the same for all languages enabled in the library. If it is unchecked (default), then every language variant of the instance can have its own, distinctive value.
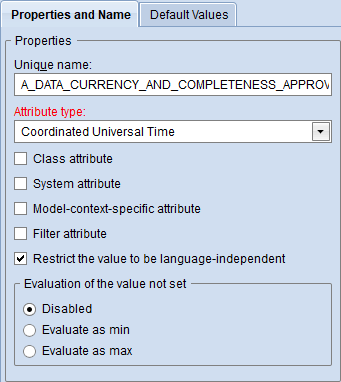
Evaluation of the Value Not Set
This property is only available for numeric attributes (integer, double,...) and attributes of type Coordinated Universal Time (UTC). The customizing option for the evaluation specifies whether an attribute value that has no value set should be evaluated as an absolute minimum / maximum value. This can e.g. be the case when comparing two numbers in the analysis component. If Disabled is checked, a fallback to the library default value is done.
Interface Texts
Interface Texts are texts that are visible on the user interface. These are names of attributes which are displayed e. g. in a notebook in the appropriate language.

When entering interface texts, bear the following denomination guidelines in mind:
A maximum of 50.000 characters per language is allowed
No restrictions apply for the characters.
Default Values
Apart from its properties, an attribute can have default values. These default values can be set when the attribute is created or edited. There are two hierarchy levels of default values: a language-independent default attribute value and one language-specific default value for every language ADOIT supports. If a language-specific default value is undefined, the language-independent default value applies in that language. If both are undefined, the default value of the attribute type applies.
Numeric attributes (integer, double,...) and attributes of type Coordinated Universal Time (UTC) are an exception. If in Properties the parameter Evaluation of the Value Not Set is set to Evaluate as min/max, no value is set for the default value in the library.
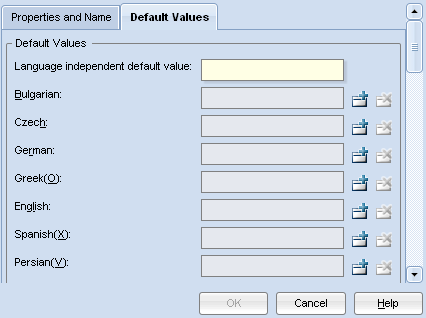
Depending on the type of the attribute, the tab Default Values can look quite different. If the attribute is e. g. of the type Short String (SHORTSTRING), the user interface simply shows a list of input fields for the language-independent and language-specific attribute values.
Edit Attribute
From time to time it may become necessary to modify the interface texts of an attribute or to change the default values. For requirements like these, attributes can be edited.
In order to edit an attribute:
Select the attribute in the Metamodel Catalogue (any view).
Select context menu of the attribute - Edit attribute.... A dialogue window (divided into the two tabs Properties and Name and Default Values) opens.
Adjust the Properties of the attribute.
Adjust the Interface Texts.
Set the Default Values.
Confirm with OK.
The changes are applied and the dialogue closes.
Attribute modifications are applied globally. Editing an attribute therefore has immediate effects on all elements that use this attribute. However, there is an exception to this rule: In the context of a specific metamodel element (class, endpoint, ...), attributes can have a special default value that can be different from the default for the same attribute in the context of another metamodel element.
The unique name and the attribute type of an attribute cannot be changed.
Example: Edit Enumeration Attribute
In order to change the value range of an enumeration attribute in the Metamodel Management:
Select the element that contains the enumeration attribute you want to extend in the Global View of the Metamodel Catalogue. All attributes of the selected element are shown in a tabular view in the workspace.
An enumeration attribute has the attribute type Enumeration (ENUM). Double-click the enumeration attribute you want to edit in the tabular view. A dialogue window opens.
Switch to the tab Default Values.
Default Values
To extend the value range of the enumeration attribute:
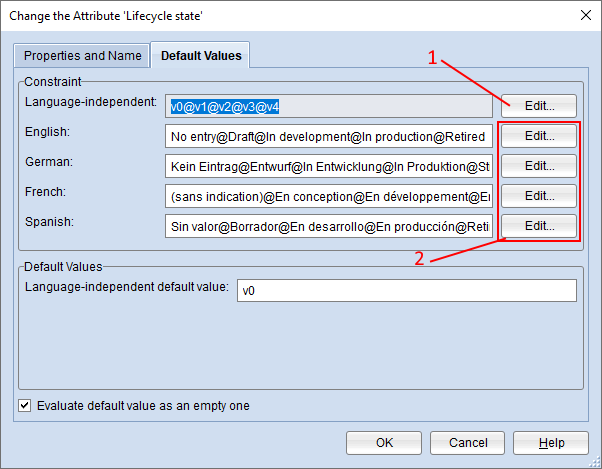
First increase the number of possible values in the language independent value range (1).
Afterwards enter the language-specific values (2).
Edit Language Independent Values
In order to extend the number of possible values in the language independent range:

Increase the Number of values (1).
Confirm with OK (2). The dialogue window closes.
Another dialogue box appears. You will be asked whether you want to update the number of constraints (that define the possible range of values) in other languages as well. Click Yes and update the values.
Edit Language-Specific Values
In order to enter the language-specific values:

Select the attribute you want to edit from the field Domain (1).
Enter the correct language-specific value (2).
Click Change to commit the changes (3).
Confirm with OK (4).
Assign Attribute
To assign an attribute to a metamodel element:
Select the element in the Metamodel Catalogue (any view).
Select context menu of the element - Assign attribute.... A dialogue window opens.
Select one or more attributes from the list of available attributes.
Click Add.
Confirm with OK.
The changes are applied and the dialogue closes.
Additional Metamodel Functions
The following sections provide an overview of some additional features useful for carrying out various tasks within the Metamodel Management.
Edit Notebook
Most model types, classes and end points have Notebooks. The Notebook definition is stored in the
attribute Notebook (language-independent name NOTEBOOK).
It is not necessary to assign the NOTEBOOK attribute manually to the metamodel element. As soon as
the function Edit Notebook Definition is used, the proper attribute is assigned automatically (if
not already present).
In order to edit the Notebook definition of an element:
Select the element in the Metamodel Catalogue (any view).
Select context menu of the element - Edit notebook definition.... A support dialogue opens.
Add Attribute
In order to add an attribute to a notebook chapter:
- Select one or more attributes from the list of available attributes and drag them into the notebook chapter.
The attributes are inserted into the chapter and at the same time deactivated in the list Available Attributes.
Add New Chapter
In order to add a new chapter to a notebook:
- Click the icon
 .
.
A new Notebook chapter is created and appended to the end of the existing chapter structure. A provisional name is assigned to the chapter.
Edit Chapter Names
As the first name of a Notebook chapter is an automatically created one, the chapter names must be edited during the Notebook definition procedure. In order to do this:
Activate the Notebook chapter you want to rename by clicking on the chapter flap.
Click the icon
 . An input dialogue showing
the chapter's name in all available languages appears.
. An input dialogue showing
the chapter's name in all available languages appears.Edit the names as needed.
Confirm with OK.
The Notebook chapter is renamed and the dialogue closes.
Rearrange Chapters
As new Notebook chapters are appended to the end of the Notebook definition, it will often become necessary to change the order of the Notebook chapters. In order to do this:
- Grab a chapter's flap and insert it into its new place by drag and drop.
The Notebook definition is adjusted accordingly.
Remove Chapter
Notebook chapters that are no longer necessary can be removed:
Select the chapter in question.
Click the icon
 .
.
After a security query the chapter is deleted. The attributes already assigned to this chapter are now marked as available again in the list Available Attributes.
Add Custom Element
It is possible to customise special additional elements and add them the Notebook. As these elements are not part of the platform, there is no ready-to-use UI representation available. In order to add a custom element:
- Click the icon
 . A support dialogue opens.
A detailed description how to customise such elements is not part of this manual. If you want to use this functionality, please do not hesitate to contact your ADOIT consultant.
Move Element
Existing Notebook elements (attributes and custom elements) can be shifted within the Notebook as needed – both within the same Notebook chapter and between different chapters.
Move Notebook element within the same chapter
To move a Notebook element within the same Notebook chapter:
- Drag the element it into its new place.
Move Notebook element to another chapter
To shift a Notebook element to another chapter of the same Notebook:
Drag the element onto the new chapter's flap. The preview switches to the new chapter's panel.
Drag the element into its new place.
The Notebook definition is adjusted accordingly.
Edit Element Properties
When adding an attribute to a Notebook definition it is inserted as designed. However, it is possible to change the settings from default to a better suitable configuration:
Select the attribute you want to edit.
Click the icon
 . A support dialogue
appears.
. A support dialogue
appears.Choose the desired control type.
Set the standard properties.
Define new properties.
Confirm with OK.
The element's properties are adjusted accordingly.
Control Type
The control type defines the visual representation of the selected attribute in the notebook. In most cases, the control type should correspond to the attribute type (default selection).
Standard Properties
The following properties are available for all attribute types:
Read-only: Activate this setting if you want the custom element to appear as read-only in the Notebook.
Mandatory: When you activate this setting, the selected attribute is coloured red and marked with an asterisk in the element's notebook in the web client as long as it is empty.
What other properties are displayed depends on the selected control type.
Properties
This option allows defining new attribute properties that are relevant e. g. for the active notebook concept. If you want to use this functionality, please do not hesitate to contact your ADOIT consultant.
Remove Element
Notebook entries that are no longer necessary can be removed:
Select the element in question.
Click the icon
 .
.
The element is removed from the Notebook definition. If an attribute is removed, it is marked as available again in the list Available Attributes.
Edit Graphical Representation
Classes and end points used for modelling purposes need a graphical representation in order to be visible. The script language JavaScript is used to change the representation of an element.
In order to edit the graphical representation of an element:
Select the element in the Metamodel Catalogue (any view).
Select context menu of the element - Edit graphical representation.... A support dialogue opens.
A detailed description how to edit graphical representations is not part of this manual. If you want to use this functionality, please do not hesitate to contact your ADOIT consultant.
Edit Info Texts
Model types and classes can be equipped with a text explaining the purpose of this metamodel element
to the end user. The info text definition (if available) is stored in an attribute with the
language-independent name INFO_TEXT. This text is then available via an "Info" icon
(![]() ) near the attribute in the Notebook.
) near the attribute in the Notebook.
It is not necessary to assign the appropriate info text attribute manually to the metamodel element. As soon as the function Edit Info Texts is activated, the proper attribute is assigned automatically (if not already present).
In order to edit the info texts of an element:
Select the element in the Metamodel Catalogue (any view).
Select context menu of the element - Edit info texts.... A support dialogue opens.
From the drop-down list Language, select the language you want to write the text in.
If you need a template, expand one or more language fields from the lower part of the dialogue.
Enter the text in the large input box Info text.
Apply the changes with OK.
The default text (only available in the drop-down list) is the fallback text that appears if no language-specific text is defined.
Change Primary Language
The primary language serves both as default and as fallback language if some text is not available in other languages. In the course of ADOIT administration it might be necessary to change the primary language. A possible reason for this is the company-wide change of the governing language for describing enterprise architecture information. Another reason is the deployment of a new ADOIT licence which does not include the former primary language anymore.
You MUST NOT change the primary language in a production database! Severe data inconsistencies might occur. If you want to change the primary language:
Create a new ADOIT database.
Change the primary language of the new ADOIT database as described below.
Migrate all relevant ADOIT data to the new database (see sections Make a Manual Backup and Restore a Manual Backup).
In order to change the primary language of the library, the following steps are necessary:
Assign Primary Language
In order to assign the primary language of the library:
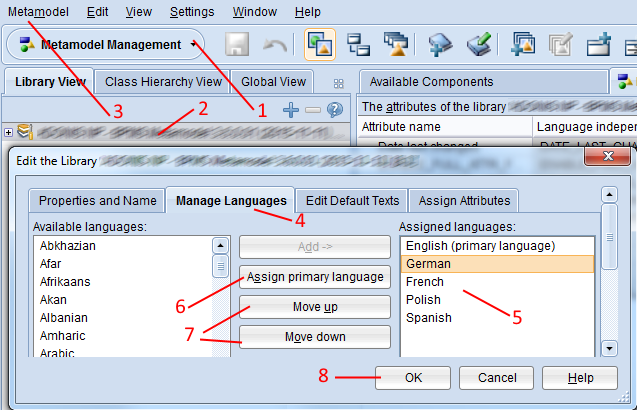
Open the Metamodel Management component via the component selection (1).
Select the library for which you want to change the primary language in the Library View of the Metamodel Catalogue (2).
Select menu Metamodel – menu entry Edit library… (3). The Edit Library input dialogue opens.
Switch to the tab Manage Languages (4).
Select the language you want to assign as the new primary language in the right-hand list Assigned languages (5) and click Assign primary language (6).
Change the order of the assigned languages by clicking Move up and Move down (7). The primary language MUST be the first (topmost) language in the list.
Confirm with OK (8).
Depending on the library configuration, the order of the primary language and the other languages in the list Assigned languages has an impact on fallback language handling. If some text is not available in the current language, the primary language is used. If the text is not available in the primary language either, the next language on the list is used etc.
Export Notebook as Text
This function allows you to export the Notebook of a metamodel element in an XML structure as a string.
A detailed description of this functionality is beyond the scope of this manual. If you have questions, please contact your ADOIT consultant.
Generate new UUID
This function allows you to generate new unique identifier which can be used e.g. to identify a metamodel element.
A detailed description of this functionality is beyond the scope of this manual. If you have questions, please contact your ADOIT consultant.
Search for Metamodel Element
This function allows you to search for metamodel elements. Enter the unique name of the element to get the UUID and the language-specific names.
A detailed description of this functionality is beyond the scope of this manual. If you have questions, please contact your ADOIT consultant.
Sort Attributes Alphabetically
In the workspace, the appearance of the attributes of a metamodel element corresponds to the hierarchy in the Notebook. In order to sort the attributes alphabetically:
- Right-click in the workspace, and then deselect Show Notebook Hierarchy.
Save Metamodel Changes
All meta model changes are only stored temporarily in the database . To confirm changes, the changes have to be saved explicitly:
- Select menu Meta Model — menu entry Save metamodel changes
Before saving the changes, a library check is performed for all libraries in the database. If the library contains errors, a message window appears.
The ADOIT application server has to be restarted if these settings are changed. Otherwise the changes will not become effective.
Undo Changes
If the changes applied to the metamodel do not comply to the expectations, they can be discarded at any time:
- Select menu Edit — menu entry Undo: Discard all metamodel changes.
All changes that were applied since the last saving action are discarded.
Already saved changes can never be undone using this function.
With this function, all changes since the last save of the metamodel are discarded. Save your changes to the metamodel regularly!