Workspaces
Workspaces in ADOIT serve as collaboration hubs for enterprise architecture. They bundle together multiple functionalities to provide a guided approach to solving specific business needs and to empower the user to perform all relevant tasks and make decisions with a clear focus.
Templates
A workspace is created based on a template. In ADOIT 19.0, the following templates are available:
The Workspaces Page
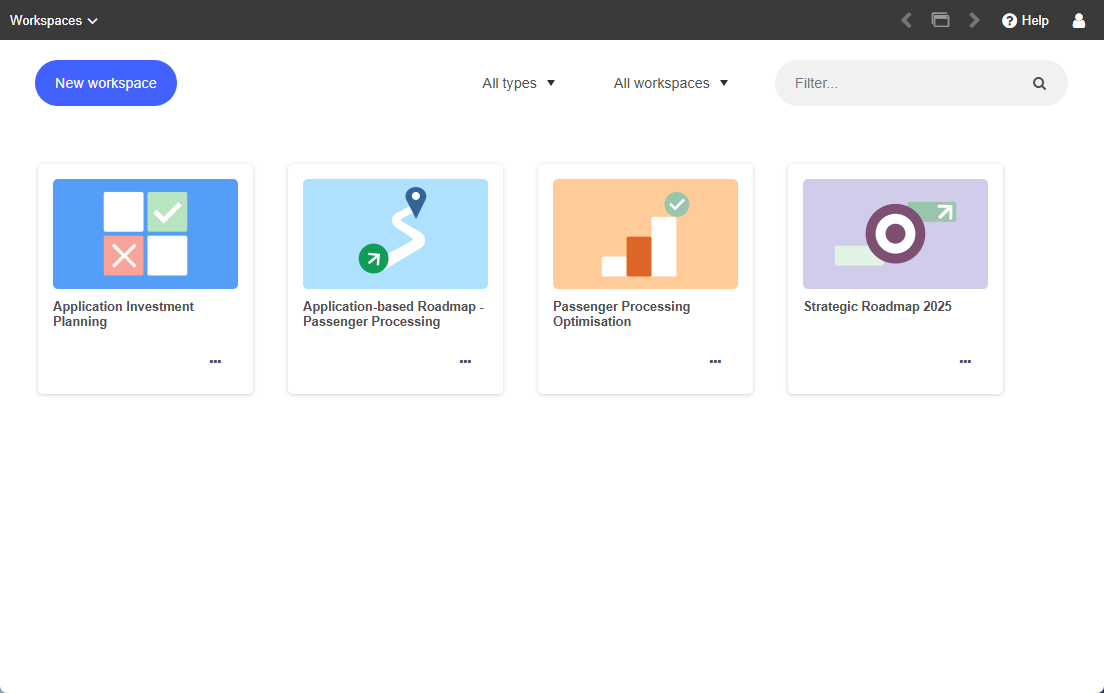
The Workspaces page shows all workspaces that have been created. If no workspaces are available yet, the templates for creating new workspaces are displayed instead.
Open Workspaces Page
To open the Workspaces page:
- Select Workspaces from the dropdown menu at the top left corner of the program window.
Create New Workspace
See Create Workspace.
Open a Workspace
All workspaces are shown as tiles, sorted alphabetically.
- To open a workspace, click it.
Create Workspace
You can create new workspaces on the Workspaces page:
Click New workspace and choose a template:
To learn more about a template, select
 Open preview.
Once you've made your decision, select Use template or click anywhere on the tile to proceed.
noteIf no workspaces have been created yet, you can pick a template directly on the Workspaces page.
A setup wizard guides you through several steps. After completing each step, select Next to continue.
Step 1: Add a name and users
Workspace name: Enter the name of the new workspace.
Description: Optionally, enter a description of the new workspace.
Add users: Select the users you want to collaborate with. Start typing the username or email address of a user, and then select the one you want when you see it.
Usernames will only appear if the user has previously been shared with the active repository in the ADOIT Administration.
If you enter an email address that is not associated with any user, you need to enter the full email address.
Choose which permissions users should have for the new workspace. Users can either be members or admins.
Private workspace: Choose whether the workspace should be private (= only visible for members and admins).
Step 2: Choose element types
- Select the element types to consider in your workspace. The available options depend on the
selected template. For example, for Application-based Roadmaps, you can select application
elements such as
 Application Components or
  Application Services.
Optional: Additional setup steps depending on the template:
Step 3: Choose prioritisation method & Step 4: Choose time periods [Roadmapping Workspaces]
The setup for Application-based Roadmaps, Capability-based Roadmaps, and Goal-based Roadmaps includes two additional steps.
Choose a prioritisation method for assessing your requirements. You can select either the Value vs. Effort Method or the Eisenhower Matrix.
Choose the time periods in which your roadmap should be planned and displayed. You can select months, quarters, or years.
Click Create workspace.
The first page of the workspace appears, and you can start working on the content right away.
User Types Explained
Any person invited to join a workspace starts out as a member. Members have access to all content within a workspace. They can capture and assess architecture artefacts if they have sufficient user rights.
The person who created the workspace starts out as an admin. Admins can do everything a member can do. Additionally, they can add or remove users from a workspace, make workspaces private or public, and rename or delete workspaces.
Who Can View and Edit Workspaces?
If a workspace is set to private, only users explicitly designated as members or admins can view and edit it.
If a workspace is not set to private, all users with write access to the "Objects" group—the main object group in the Object Catalogue—are treated as members, meaning they can capture and assess architecture artefacts within the workspace. Users with read access to the "Objects" group, however, can only view and edit workspaces where they are explicitly designated as members or admins.
Invitation Emails and Access to the Workspace
After the workspace is created, ADOIT sends invitation emails to all users you have invited to collaborate (provided they have an associated email address) as well as to any other email addresses you have specified that are not linked to a user account.
These invitation emails contain a link to the workspace. A login to ADOIT is required to access the link. If the recipient of the invitation does not yet have a ADOIT user account, one must be created.
Before ADOIT can send emails, the mail settings must be set correctly in the ADOIT Administration (see Email in the Administration Help).
Application Cost Management
The Application Cost Management template is a collaborative workspace for reviewing the costs of your application landscape based on the contracts that govern them. It guides you through scoping the relevant application elements, assigning and maintaining their contracts, allocating contract costs across application elements, and finally reviewing allocations and totals with charts and tables.
Which Elements Are Used?
Application Cost Management is enabled for
![]() Application Components and
Application Components and
![]() Application Services.
Application Services.
How Does Application Cost Management Work in ADOIT?
To begin, set up an Application Cost Management workspace (see Create Workspace).
Once you have created the workspace, follow these steps:
Scope – Select the application elements that define the scope of your cost review.
Assign Contracts – Link contracts to your application elements.
Cost Allocation – Allocate contract costs across application elements.
Summary – Review the results.
These steps are discussed in more detail in the following sections.
Scope
The first page of the Application Cost Management template lets you select the application elements that define the scope of your cost review.
Select Application Elements for Cost Review
To define which application elements you want to include:
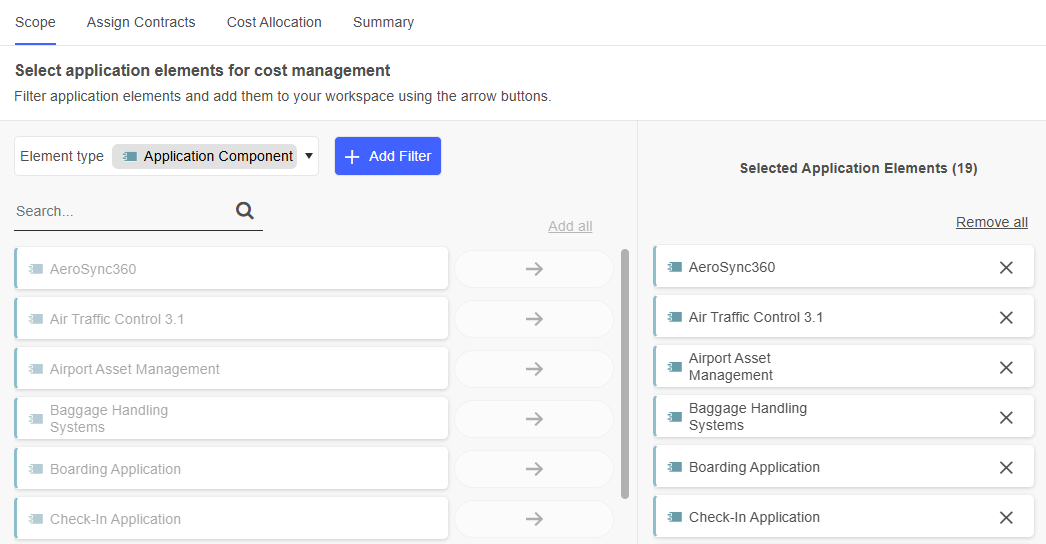
In the left pane, all application elements that can be added to the workspace are displayed. Use the search box to quickly find a specific element.
To add an element, click
 Add. To remove an element, click
 Remove. For bulk actions, use
the Add all and Remove all links at the top of the page.
Remove. For bulk actions, use
the Add all and Remove all links at the top of the page.If multiple element types are available in your workspace, the Element type list appears at the top left. Use it to control which elements are shown in the left pane. Depending on your workspace settings, you may choose
Application Components and
Application Services.
Filter by Workspace, Group, Investment Strategy or Lifecycle State
You can use filters to hone in on the specific elements you need:
Click + Add Filter, and then choose the filter you want:
Workspaces: Select elements that are already used or evaluated in another workspace.
Groups: Select elements from specific object groups.
Investment strategy: Select elements with confirmed investment strategies according to Gartner's TIME model (Tolerate, Invest, Migrate, and Eliminate), as well as those with no confirmed investment strategy (indicated by "No entry").
Lifecycle state: Select elements based on their lifecycle state (Draft, In development, In production, and Retired). You can also include elements without a confirmed lifecycle state (indicated by "No entry").
You can apply multiple conditions to each filter and combine different filters if required.
Additional Options
The following additional options are available on the Scope page:
To open the Insights dashboard of an element, hover over the element, and then click Insights
 .
.To rename an element that has been added to the workspace, hover over the element, and then click Edit
 .
.
After selecting your application elements, switch to the Assign Contracts tab to continue.
Assign Contracts
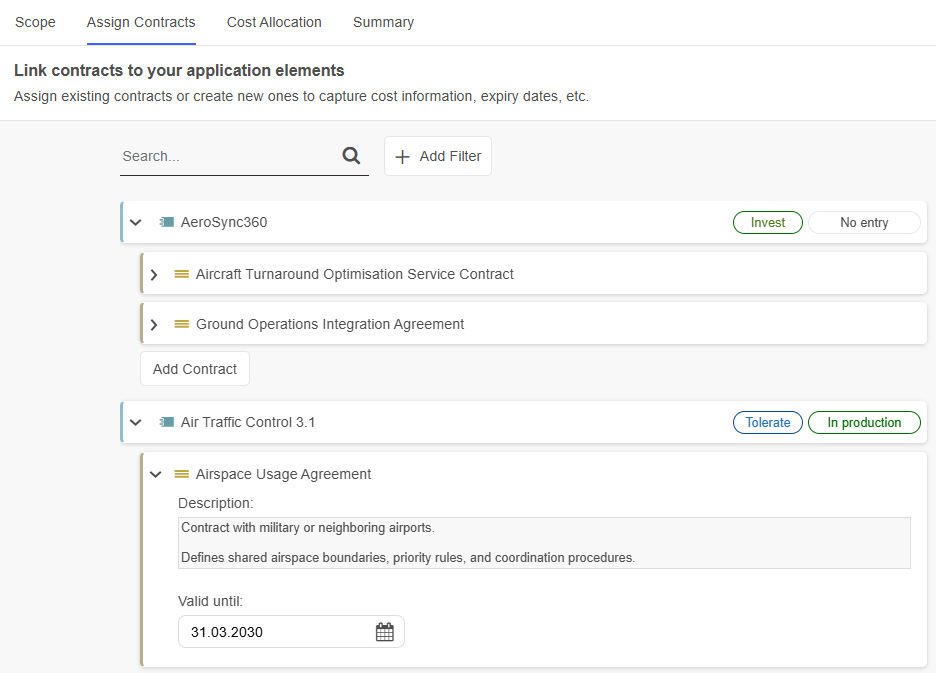
On the second page of the Application Cost Management template, you can link contracts to your application elements and capture key contract information such as expiry dates.
The application elements are listed along with their linked contracts. Application elements also display their current investment strategy and lifecycle state.
Link Contracts to Application Elements
To link contracts to an application element:
Click Add Contract below the element to search for an existing contract or create a new one.
Start typing the name of a contract, and then select the one you want when you see it. If the contract does not yet exist, finish typing the name and press <Enter> to create it.
To see more options, click Show more. This opens a support dialogue with the following tabs:
Assigned contracts: Displays all contracts already assigned to the element.
All existing contracts: Lists all contracts in the repository. You can filter contracts, select the ones you want to assign, and click Add.
Capture Contract Details
Expand a contract to view or edit additional information. Two fields are available:
Description: A textual description of the contract.
Valid until: Specifies the date until which the contract remains in effect.
Both fields are optional and can be filled in at any time.
Additional Options
The following additional options are available on the Assign Contracts page:
To find contracts or application elements, in the Search... box, type the text you want to search for.
To filter application elements, click + Add Filter and choose the filter you want. You can filter by investment strategy, lifecycle state or application element.
To remove a contract, hover over the contract, and then click Remove element
 . Choose whether to:
Remove the contract only from the application element it has been added to.
Remove it from all application elements in the workspace.
Delete it entirely from all workspaces and the repository.
To open the Insights dashboard of an element, hover over the element, and then click Insights
.To rename a contract, hover over the contract, and then click Edit
.
After linking contracts to your application elements, switch to the Cost Allocation tab to continue.
Cost Allocation
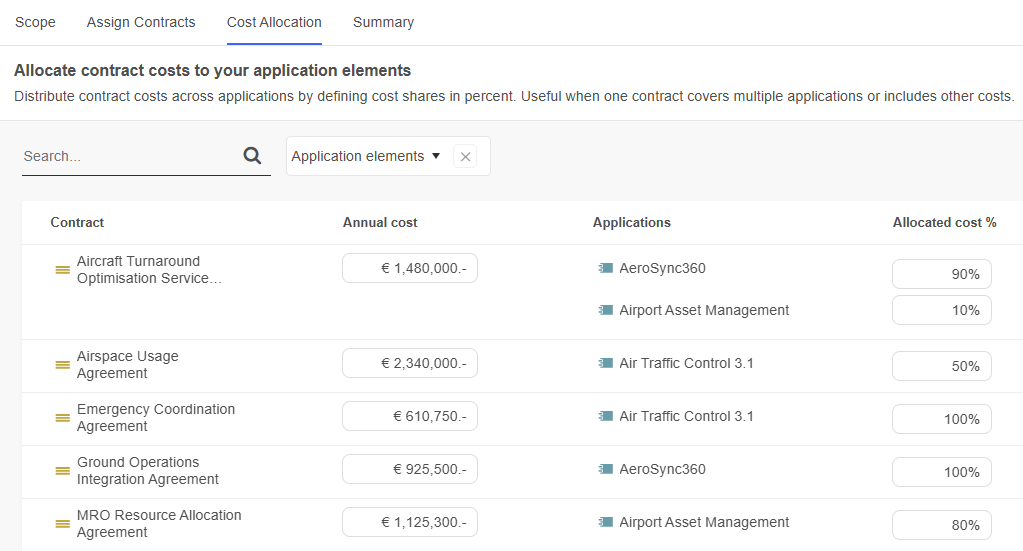
The third page of the Application Cost Management template lets you allocate the costs of a contract across one or more application elements. This is useful when a single contract covers multiple applications or includes bundled cost items.
On this page, you will find a table listing all contracts in alphabetical order. For each contract, you can review the total annual cost, see which application elements it is linked to, and view how the annual cost is allocated across those applications.
Distribute Contract Costs
To allocate the costs of a contract, two fields are available:
Annual cost: Enter the expected cost of the contract for a 12-month period.
Allocated cost %: For each application element supported by the contract, enter the percentage of the total annual cost allocated to it. The combined allocation for a contract cannot exceed 100%.
Additional Options
The following additional options are available on the Cost Allocation page:
To find contracts, in the Search... box, type the text you want to search for.
To open the Insights dashboard of an element, hover over the element, and then click Insights
.
After finishing the cost allocation, switch to the Summary tab to continue.
Summary
The last page of the Application Cost Management template offers a summary of all application elements in the workspace, their assigned contracts, and the resulting cost allocations. This page has the following areas:
Applications in total: Shows the total number of application elements in the workspace.
Contracts in total: Shows the total number of contracts considered in the workspace.
Table/bar chart summary: You can switch between a table view and a bar chart using the
 Table view and
 Chart view icons. The table
view provides a detailed overview of all application elements in the workspace, including their
investment strategy, assigned contracts, total annual contract costs, and allocated costs per
contract. The bar chart breaks down annual contract costs for application elements by investment
strategy (Tolerate, Invest, Migrate, and Eliminate, according to the TIME model). TIME
classifications are based on the assessments described in TIME Definition.
Chart view icons. The table
view provides a detailed overview of all application elements in the workspace, including their
investment strategy, assigned contracts, total annual contract costs, and allocated costs per
contract. The bar chart breaks down annual contract costs for application elements by investment
strategy (Tolerate, Invest, Migrate, and Eliminate, according to the TIME model). TIME
classifications are based on the assessments described in TIME Definition.What's next?: Check out possible next steps here. How about creating another workspace, or taking part in a free online training for ADOIT?
Application Investment Planning
The Application Investment Planning template is a collaborative tool for assessing your application portfolio and defining an appropriate investment strategy. It guides you through selecting relevant elements, evaluating their Business fitness and Technology fitness, visualising the results in a TIME model, and assigning or adjusting investment strategies. This provides a transparent, evidence-based foundation for planning application investments.
Which Elements Are Used?
Application Investment Planning is enabled for
![]() Application Components (=
applications) and
Application Components (=
applications) and ![]() Application
Services.
Application
Services.
How Does Application Investment Planning Work in ADOIT?
To begin, set up an Application Investment Planning workspace (see Create Workspace).
Once you have created the workspace, follow these steps:
Scope – Select the application elements that you want to evaluate and invest in.
Business Fitness & Technology Fitness – Perform the assessments.
TIME – Review the TIME categorisation of the selected elements.
Investment Strategy – Define the investment strategies.
Summary – Review the results.
These steps are discussed in more detail in the following sections.
Scope
The first page of the Application Investment Planning template lets you add the application elements you want to evaluate and invest in to your workspace.
Select Elements for Investment Planning
To define which elements you want to assess:
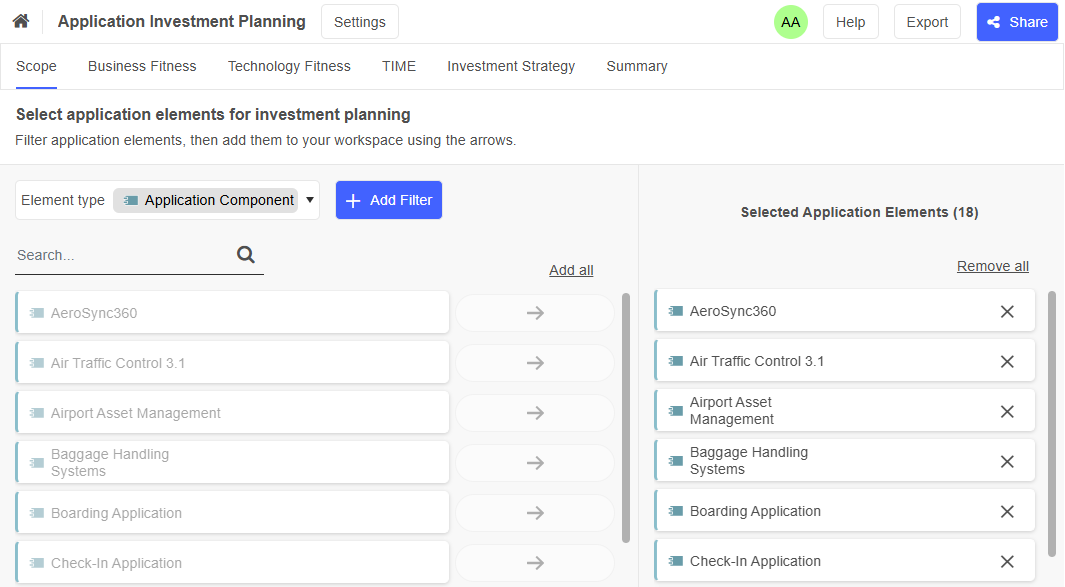
In the left pane, all elements that can be added to the workspace are displayed. Use the search box to quickly find a specific element.
To add an element, click
Add. To remove an element, click
Remove. For bulk actions, use
the Add all and Remove all links at the top of the page.If multiple element types are available in your workspace, the Element type list appears at the top left. Use it to control which elements are shown in the left pane. Depending on your workspace settings, you may choose
Application Components and
Application Services.
Filter by Workspace, Group, Investment Strategy or Lifecycle State
You can use filters to hone in on the specific elements you need:
Click + Add Filter, and then choose the filter you want:
Workspaces: Select elements that are already used or evaluated in another workspace.
Groups: Select elements from specific object groups.
Investment strategy: Select elements with confirmed investment strategies according to Gartner's TIME model (Tolerate, Invest, Migrate, and Eliminate), as well as those with no confirmed investment strategy (indicated by "No entry").
Lifecycle state: Select elements based on their lifecycle state (Draft, In development, In production, and Retired). You can also include elements without a confirmed lifecycle state (indicated by "No entry").
You can apply multiple conditions to each filter and combine different filters if required.
Additional Options
The following additional options are available on the Scope page:
To open the Insights dashboard of an element, hover over the element, and then click Insights
.To rename an element that has been added to the workspace, hover over the element, and then click Edit
.
After selecting your application elements, switch to the Business Fitness tab to continue.
Business Fitness & Technology Fitness
On the second and third pages of the Application Investment Planning template, you can assess the business fit and technology fit of your application elements. As both assessments work in a similar way, the information for these pages is combined here in one section to avoid repetition.
Assess an Element
No matter whether you are assessing business fit or technology fit, there are two ways to proceed:
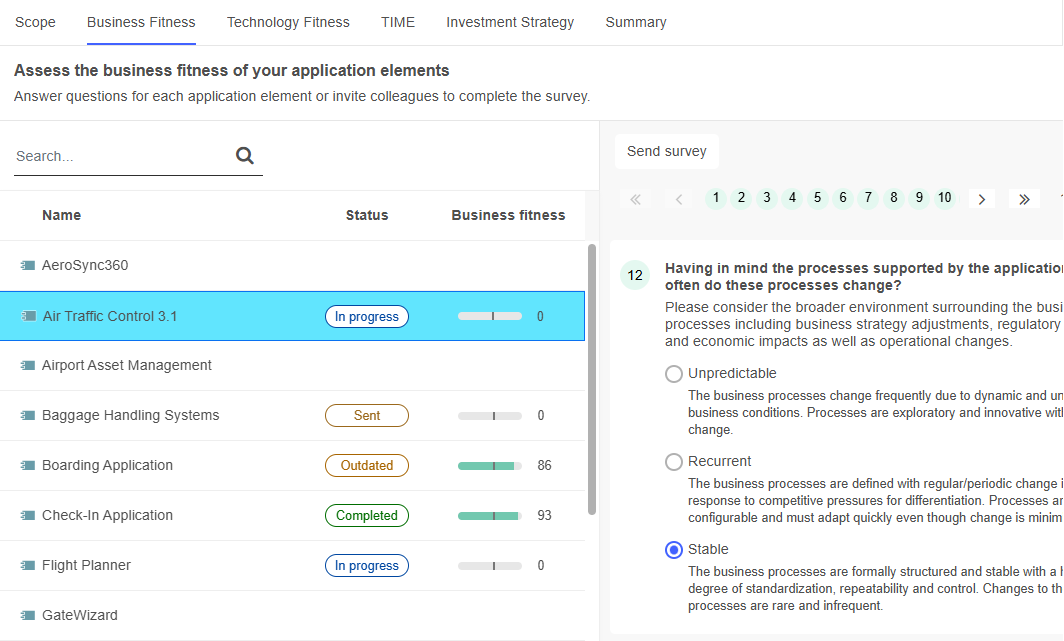
Fill Out a Survey on Your Own: In the left pane, select the element you want to assess. You can use the search box to quickly find it. Answer the survey questions, and optionally enter a note in the Additional information box once you are done.
Send Out a Survey to an Editor: After selecting an element, click Send survey. Start typing the username of a user, and then select the one you want when you see it. If you want, you can customise the email notification and toggle whether you receive email updates when the survey is completed or the editor is removed. Click Send to send out the survey.
When the assessment is finished, the survey will be marked as Completed
![]() in the Status column. The
overall score will appear in the Business fitness or Technology fit column. The user who filled
out the survey, as well as the time and date of completion, will be shown above the survey
questions.
in the Status column. The
overall score will appear in the Business fitness or Technology fit column. The user who filled
out the survey, as well as the time and date of completion, will be shown above the survey
questions.
See Workspaces: How the Score of a Survey Is Calculated for an explanation of how the overall score for an element is calculated.
Before you can send out a survey to another user, the mail settings must be set correctly in the ADOIT Administration (see Email in the Administration Help).
Survey recipients are automatically added to the workspace as members - they do not have to be explicitly added on the Set up your workspace page.
Other Survey Status
If the assessment of an element has already started but not yet been completed, the survey will be marked as In progress
 .
.If the survey was sent out to an editor but has not yet been completed, it will be marked as Sent
 .
.If an element has already been assessed, but the assessment is more than 365 days old, the survey will be marked as Outdated
 .
.If an element has already been assessed in a different workspace, a message indicating this appears above the survey questions. You can continue the survey, as elements can have different assessments in different workspaces.
Additional Options
The following additional options are available on the Business Fitness & Technology Fitness pages:
- To remove an already filled-out reply from a survey, click Remove selection
 .
.
After finishing the assessment, switch to the TIME tab to continue.
TIME Definition
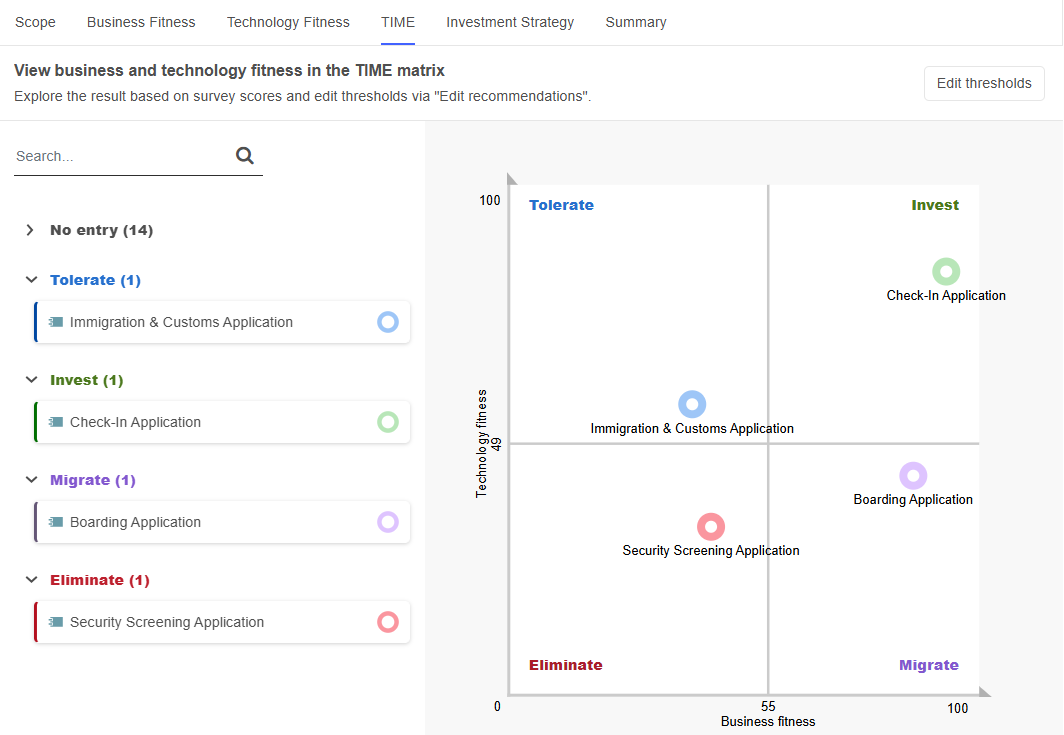
The fourth page of the Application Investment Planning template lets you review the TIME categorisation of your application elements. Gartner’s TIME model proposes four investment strategies (Tolerate, Invest, Migrate and Eliminate).
For additional information about the four investment strategies, take a look at Application Portfolio Strategy: Five Steps To Assessing Your Investment Decisions.
ADOIT will calculate the fitness scores of your application elements based on the survey results (see Assess an Element) and place them in the appropriate investment strategy quadrant. The quadrants measure the technical quality of an application against the business value it brings to the organisation.
Change Thresholds
The x and y axes represent the thresholds between the TIME categories in the chart. You can change the thresholds to influence the automatic assignment of application elements to investment strategies:
Click Edit thresholds. The chart opens in a new dialogue.
Drag the axes to a new position, check which elements will be affected, and then click Edit thresholds.
The new thresholds will be saved to the workspace. Application elements will be re-rendered in a different colour if they fall into a different category after a threshold change. Additionally, the Kanban board on the Investment Strategy page will be updated to reflect the changes.
Use the Categories List
The TIME categories and the application elements that belong to these categories are listed next to the chart. The following options are available:
To find elements, in the Search... box, type the text you want to search for.
To collapse or expand one of the assessment categories, click on it.
To highlight an element in the chart, select it in the list.
To open the Insights dashboard of an element, hover over the element, and then click Insights
.
Once you have gained an overview of the suggested investment strategies, switch to the Investment Strategy tab to continue.
Investment Strategy
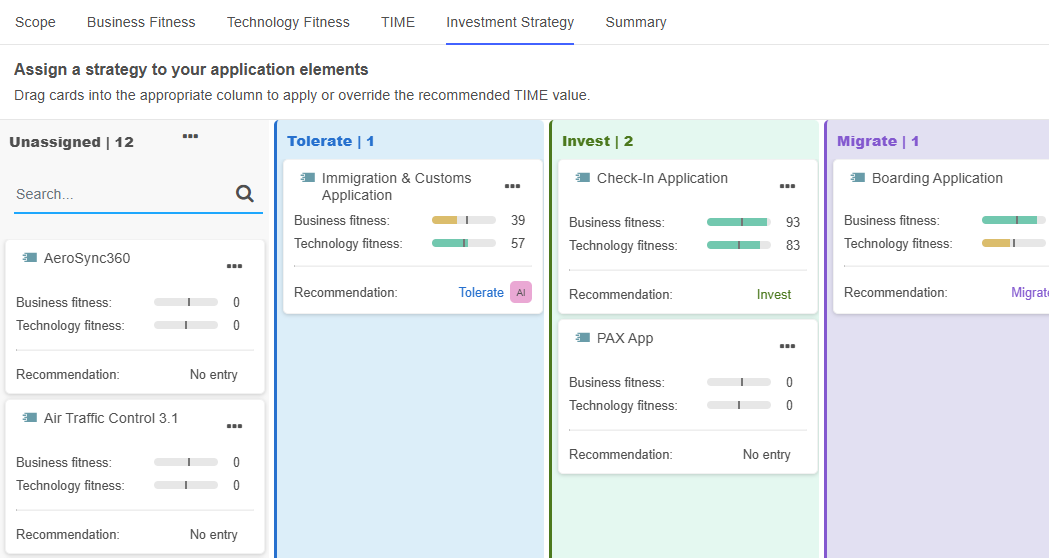
The fifth page of the Application Investment Planning template allows you to view and define the investment strategies for your application elements. The page contains a Kanban board where each column represents a specific investment strategy.
All elements appear as cards that initially start in the Unassigned column. You can have ADOIT automatically place them in the recommended columns based on the previously assessed fitness score, or manually drag cards to other columns if you disagree with the recommendations.
Get More Information
Before you decide on an investment strategy, make sure to review all the information ADOIT provides. The cards on the Kanban board show the current assessment state of an element:

The following information appears on each card:
The Name of the element, as well as the Business fitness and Technology fitness scores from the assessments on the Business Fitness & Technology Fitness pages.
The Recommendation shows the calculated investment strategy based on the survey data.
In addition to the calculated recommendation, an alternative AI suggestion may be available. Click AI to view it.
AI suggestions are based on a machine learning analysis of previous decisions made for similarly assessed elements in your organisation. ADOIT only displays an AI suggestion when there is enough training data and the likelihood of the predicted alternative is greater than 50%.
Choose the Investment Strategy
Once you have gathered all necessary information, you can make a final decision on the investment strategy for each application element. Choose one of the following options:
Use Recommended Strategy: To automatically place an element in the proposed column according to the calculated investment strategy, click More
 on the
card and then select Move to recommended. You can also place all elements at once: Click
More at the top of the
Unassigned column and then select Assign all according to recommendations.
on the
card and then select Move to recommended. You can also place all elements at once: Click
More at the top of the
Unassigned column and then select Assign all according to recommendations.Use AI Suggestion: If an alternative AI suggestion is available, click AI on the card to view it. In the dialogue, click Move to <column name> to apply the suggestion and automatically move the element to the corresponding column.
Make Your Own Choice: Drag the card to any column on the Kanban board. In this way, you can even define an investment strategy for elements that have not yet been assessed.
When you choose an investment strategy on the Kanban board, the following properties of the element are updated:
Business fitness
Technology fitness
Investment strategy
You can access these properties in another ADOIT scenario, such as "Design & Document", in the "Classification" and "Lifecycle" chapters.
During the update, the Business fitness and Technology fitness assessment scores are converted to the predefined property values as follows:
- 0-25: Bad | 26-50: Medium | 51-75: Good | 76-100: Excellent
Additional Options
The following additional options are available on the Investment Strategy page:
To find elements, in the Search... box, type the text you want to search for.
To change an element’s investment strategy, simply drag its card into the appropriate column on the Kanban board. You can also click More
on the card and select the new
strategy using Move to <column name>.To open the Insights dashboard of an element, click More
on the card, and then select
Insights.
Once you have confirmed the investment strategy, switch to the Summary tab to continue.
Summary
The last page of the Application Investment Planning template offers a summary of all the application elements in the workspace. This page has the following areas:
Applications in total: Shows the total number of elements in the workspace.
Applications without investment strategy: Shows how many elements do not yet have an assigned investment strategy.
Investment strategy: Click Show chart to open a donut chart in which each segment represents an investment category. Below the chart, the number of elements per category is listed. Hover over a segment to see the names of the elements in that category.
Table/bar chart summary: Provides a detailed overview of all elements in the workspace, including their Business Fitness and Technology Fitness scores from the Business Fitness & Technology Fitness pages, as well as their assigned investment strategies. You can switch between a table view and a bar chart using the
Table view and
Chart view icons. The table
view also shows the categorised assessment scores after they have been converted into the
corresponding property values in the "Classification" chapter for each element (e.g. Business
Fitness: "Excellent"; see Choose the Investment Strategy for details).Hovering over a row reveals icons to open an element's Insights dashboard
, or access the surveys and the
Kanban board  .
.What's next?: Check out possible next steps here. How about creating another workspace, or taking part in a free online training for ADOIT?
Best Practices
Here are some tips to help you use Application Investment Planning in ADOIT more effectively.
One or Many Workspaces?
Rather than using a single large workspace, organise your applications into different workspaces for different areas of the organisation. This helps in maintaining confidentiality and makes it easier to keep an overview.
Assess Regularly, Reuse Workspaces
Assess your applications regularly (at least once a year) to make sure the evaluation is still valid. Reuse existing workspaces for this so that the survey data remains, since it would otherwise be lost because it is saved in the context of the workspace.
Applications in Multiple Workspaces
An application can be in more than one workspace. Be aware that the last accepted investment strategy applies to all workspaces.
Capability Investment Planning
The Capability Investment Planning template is a collaborative tool for evaluating your
![]() Capabilities and
Capabilities and
![]() Business Functions as well as
determining how best to invest in them. It supports you in selecting the elements to evaluate,
assessing their strategic importance and maturity, and ultimately assigning an investment strategy
(either by applying the recommendation offered by ADOIT or by selecting a different strategy
manually). This provides a clear, evidence-based foundation for planning capability development and
resource allocation.
Business Functions as well as
determining how best to invest in them. It supports you in selecting the elements to evaluate,
assessing their strategic importance and maturity, and ultimately assigning an investment strategy
(either by applying the recommendation offered by ADOIT or by selecting a different strategy
manually). This provides a clear, evidence-based foundation for planning capability development and
resource allocation.
Which Elements Are Used?
Capability Investment Planning is enabled for
![]() Capabilities and
Capabilities and
![]() Business Functions.
Business Functions.
How Does Capability Investment Planning Work in ADOIT?
To begin, set up a Capability Investment Planning workspace (see Create Workspace).
Once you have created the workspace, follow these steps:
Scope – Select the elements that you want to evaluate and invest in.
Strategic Importance & Capability Maturity – Perform the assessments.
Investment Strategy – Define the investment strategies.
Summary – Review the results.
These steps are discussed in more detail in the following sections.
Scope
The first page of the Capability Investment Planning template lets you add the elements you want to evaluate and invest in to your workspace.
Select Elements for Investment Planning
To define which elements you want to assess:
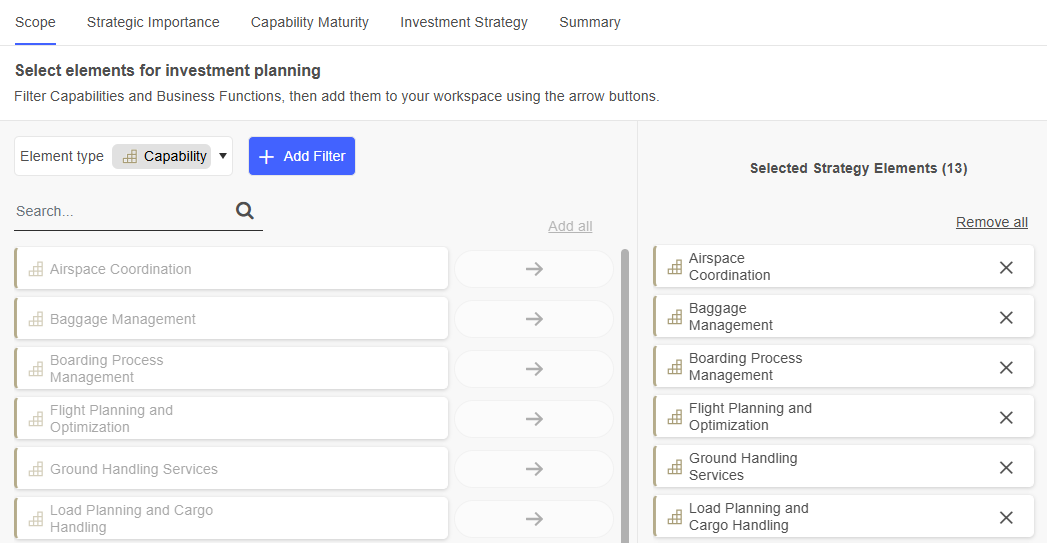
In the left pane, all elements that can be added to the workspace are displayed. Use the search box to quickly find a specific element.
To add an element, click
Add. To remove an element, click
Remove. For bulk actions, use
the Add all and Remove all links at the top of the page.If multiple element types are available in your workspace, the Element type list appears at the top left. Use it to control which elements are shown in the left pane. Depending on your workspace settings, you may choose
 Capabilities and
 Business Functions.
Filter by Workspace, Group or Level
You can use filters to hone in on the specific elements you need:
Click + Add Filter, and then choose the filter you want:
Workspaces: Select elements that are already used or evaluated in another workspace.
Groups: Select elements from specific object groups.
Level (
Capabilities
only): Select capabilities from a specific hierarchical level.
The level can be set in another ADOIT scenario, such as "Design & Document", by changing the value of the Level property in the "General" chapter.
You can apply multiple conditions to each filter and combine different filters if required.
Additional Options
The following additional options are available on the Scope page:
To open the Insights dashboard of an element, hover over the element, and then click Insights
.To rename an element that has been added to the workspace, hover over the element, and then click Edit
.
After adding your elements, switch to the Strategic Importance tab to continue.
Strategic Importance & Capability Maturity
On the second and third pages of the Capability Investment Planning template, you can assess the strategic importance and the maturity level of your elements. As both assessments work in a similar way, the information for these pages is combined here in one section to avoid repetition.
Assess an Element
No matter whether you are assessing strategic importance or maturity, there are two ways to proceed:
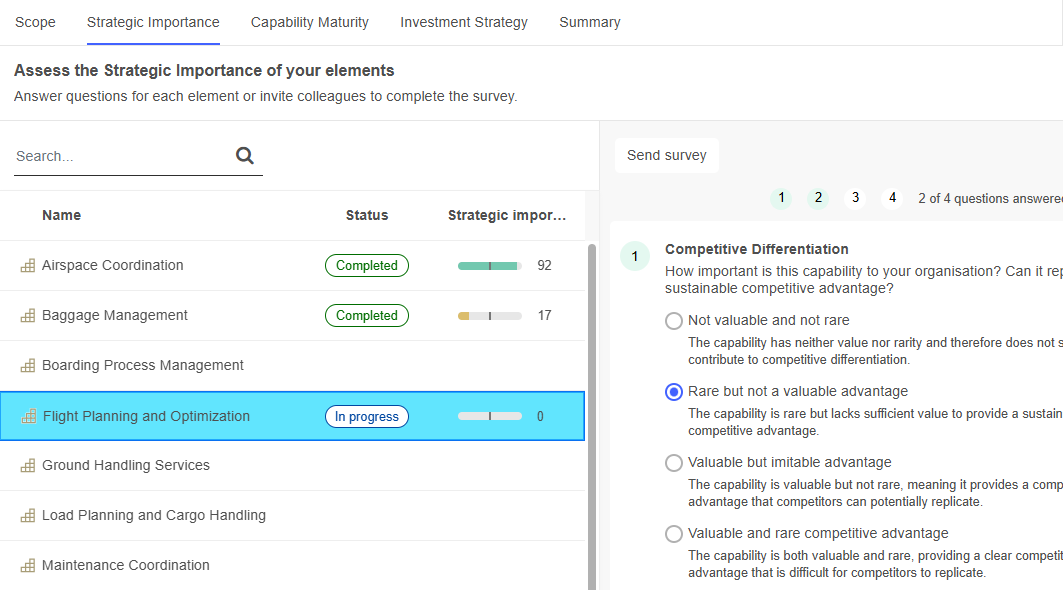
Fill Out a Survey on Your Own: In the left pane, select the element you want to assess. You can use the search box to quickly find it. Answer the survey questions, and optionally enter a note in the Additional information box once you are done.
Send Out a Survey to an Editor: After selecting an element, click Send survey. Start typing the username of a user, and then select the one you want when you see it. If you want, you can customise the email notification and toggle whether you receive email updates when the survey is completed or the editor is removed. Click Send to send out the survey.
When the assessment is finished, the survey will be marked as Completed
![]() in the Status column. The
overall score will appear in the Strategic importance or Maturity column. The user who filled
out the survey, as well as the time and date of completion, will be shown above the survey
questions.
in the Status column. The
overall score will appear in the Strategic importance or Maturity column. The user who filled
out the survey, as well as the time and date of completion, will be shown above the survey
questions.
See Workspaces: How the Score of a Survey Is Calculated for an explanation of how the overall score for an element is calculated.
Before you can send out a survey to another user, the mail settings must be set correctly in the ADOIT Administration (see Email in the Administration Help).
Survey recipients are automatically added to the workspace as members - they do not have to be explicitly added on the Set up your workspace page.
Other Survey Status
If the assessment of an element has already started but not yet been completed, the survey will be marked as In progress
.If the survey was sent out to an editor but has not yet been completed, it will be marked as Sent
.If an element has already been assessed, but the assessment is more than 365 days old, the survey will be marked as Outdated
.If an element has already been assessed in a different workspace, a message indicating this appears above the survey questions. You can continue the survey, as elements can have different assessments in different workspaces.
Additional Options
The following additional options are available on the Strategic Importance & Capability Maturity pages:
- To remove an already filled-out reply from a survey, click Remove selection.
After finishing the assessment, switch to the Investment Strategy tab to continue.
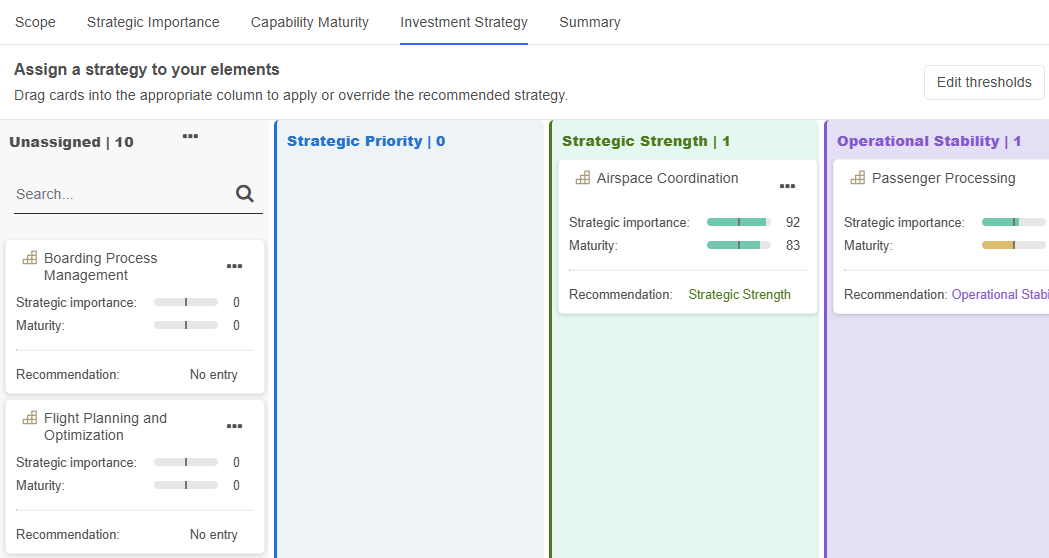
Investment Strategy
The fourth page of the Capability Investment Planning template allows you to view and modify the investment strategies for your elements.
ADOIT uses four investment strategies to classify
![]() Capabilities and
Capabilities and
![]() Business Functions: Minimal
attention, Operational Stability, Strategic Priority, and Strategic Strength. These
strategies are represented as columns on a Kanban board.
Business Functions: Minimal
attention, Operational Stability, Strategic Priority, and Strategic Strength. These
strategies are represented as columns on a Kanban board.
All elements appear as cards that initially start in the Unassigned column. You can have ADOIT automatically place them in the recommended columns based on the previously assessed strategic importance and maturity scores, or manually drag cards to other columns if you disagree with the recommendations.
Get More Information
Before you decide on an investment strategy, make sure to review all the information ADOIT provides. The cards on the Kanban board show the current assessment state of an element:

The following information appears on each card:
The Name of the element, as well as the Strategic importance and Maturity scores from the assessments on the Strategic Importance & Capability Maturity pages.
The Recommendation shows the calculated investment strategy based on the survey data.
In addition to the calculated recommendation, an alternative AI suggestion may be available. Click AI to view it.
AI suggestions are based on a machine learning analysis of previous decisions made for similarly assessed elements in your organisation. ADOIT only displays an AI suggestion when there is enough training data and the likelihood of the predicted alternative is greater than 50%.
Choose the Investment Strategy
Once you have gathered all necessary information, you can make a final decision on the investment strategy for each element. Choose one of the following options:
Use Recommended Strategy: To automatically place an element in the proposed column, click More
on the card and then select
Move to recommended. You can also place all elements at once: Click More
at the top of the Unassigned
column and then select Assign all according to recommendations.Use AI Suggestion: If an alternative AI suggestion is available, click AI on the card to view it. In the dialogue, click Move to <column name> to apply the suggestion and automatically move the element to the corresponding column.
Make Your Own Choice: Drag the card to any column on the Kanban board. In this way, you can even define an investment strategy for elements that have not yet been assessed.
When you choose an investment strategy on the Kanban board, the following properties of the element are updated based on the survey results:
Strategic importance
Maturity
You can access these properties in another ADOIT scenario, such as "Design & Document". During the update, the assessment scores are converted to the predefined values in the "Classification" chapter as follows:
Strategic importance: 0-25: Very low | 26-50: Low | 51-75: High | 76-100: Very high
Maturity: 0-25: Bad | 26-50: Medium | 51-75: Good | 76-100: Excellent
Change Thresholds
ADOIT proposes four investment strategies for
![]() Capabilities and
Capabilities and
![]() Business Functions: Minimal
attention, Operational Stability, Strategic Priority, and Strategic Strength.
Business Functions: Minimal
attention, Operational Stability, Strategic Priority, and Strategic Strength.
The recommended investment category for your elements is calculated based on the survey results (see Assess an Element) by measuring the Strategic importance of an element against its Maturity.
You can change the thresholds between categories to influence the automatic assignment:
- Click Edit thresholds.
This opens a chart that visually represents the investment strategy categories as four quadrants. The x and y axes represent the thresholds between the categories. To change a threshold:
- Drag the axis to a new position, check which elements will be affected, and then click Edit thresholds.
The new threshold will be saved to the workspace. If the recommended strategy for an element changes, the information on the card will be updated, and you can move the card to the recommended category.
Additional Options
The following additional options are available on the Investment Strategy page:
To find elements, in the Search... box, type the text you want to search for.
To change an element’s investment strategy, simply drag its card into the appropriate column on the Kanban board. You can also click More
on the card and select the new
strategy using Move to <column name>.To open the Insights dashboard of an element, click More
on the card, and then select
Insights.
Once you have confirmed the investment strategy, switch to the Summary tab to continue.
Summary
The last page of the Capability Investment Planning template offers a summary of all the elements in the workspace. This page has the following areas:
Capabilities in total: Shows the total number of elements in the workspace.
Capabilities without investment strategy: Shows how many elements do not yet have an assigned investment strategy.
Investment strategy: Click Show chart to open a donut chart in which each segment represents an investment category. Below the chart, the number of elements per category is listed. Hover over a segment to see the names of the elements in that category.
Table/bar chart summary: Provides a detailed overview of all elements in the workspace, including their Strategic importance and Maturity scores from the Strategic Importance & Capability Maturity pages, as well as their assigned investment strategies. You can switch between a table view and a bar chart using the
Table view and
Chart view icons. The table
view also shows the categorised assessment scores after they have been converted into the
corresponding property values in the "Classification" chapter for each element (e.g. Strategic
importance: "Very high"; see Choose the Investment Strategy for details).Hovering over a row reveals icons to open an element's Insights dashboard
, or access the surveys and the
Kanban board .What's next?: Check out possible next steps here. How about creating another workspace, or taking part in a free online training for ADOIT?
Application-Based Roadmap
The Application-based Roadmap template provides a shared workspace for application-based planning. It helps you define, prioritise, schedule, and track Requirements that support the evolution, transformation, or retirement of your application landscape.
Structure your roadmap around your application elements to ensure that planning decisions are aligned with your architectural and strategic direction.
Which Elements Are Used?
Application-based Roadmaps start from a set of application elements, such as
![]() Application Components,
Application Components,
![]() Application Services,
Application Services,
![]() Application Functions, or
Application Functions, or
![]() Application Interfaces. Based on
these elements, you define and manage the associated
Application Interfaces. Based on
these elements, you define and manage the associated
![]() Requirements.
Requirements.
How Do Application-Based Roadmaps Work in ADOIT?
You can start from scratch or build on application elements that have already been analysed in an Application Investment Planning workspace.
To begin, set up an Application-based Roadmap workspace (see Create Workspace).
Once you have created the workspace, follow these steps:
Scope – Select the application elements that define the scope of your roadmap.
Requirements – Define the requirements for the selected elements.
Priority – Prioritise the defined requirements.
Schedule – Plan the requirements on a Kanban board.
Status – Track the progress of your requirements.
Summary – Review the results and determine your next steps.
These steps are discussed in more detail in the following sections.
Scope
The first page of the Application-based Roadmap template lets you select the application elements that define the scope of your roadmap.
Select Application Elements for Roadmap
To define which application elements you want to include:
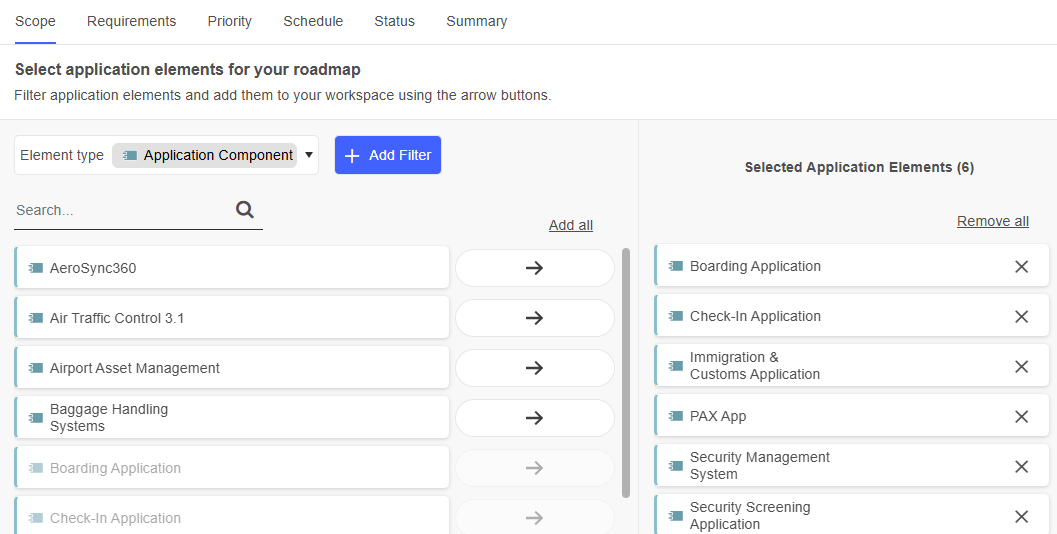
In the left pane, all application elements that can be added to the workspace are displayed. Use the search box to quickly find a specific element.
To add an element, click
Add. To remove an element, click
Remove. For bulk actions, use
the Add all and Remove all links at the top of the page.If multiple element types are available in your workspace, the Element type list appears at the top left. Use it to control which elements are shown in the left pane. Depending on your workspace settings, you may choose
Application Components,
Application Services,
 Application Functions and
 Application Interfaces.
Filter by Workspace, Group, Investment Strategy or Lifecycle State
You can use filters to hone in on the specific elements you need:
Click + Add Filter, and then choose the filter you want:
Workspaces: Select application elements that are already used or evaluated in another workspace.
Groups: Select application elements from specific object groups.
Investment strategy: Use this filter to select application elements with confirmed investment strategies according to Gartner's TIME model (Tolerate, Invest, Migrate, and Eliminate), as well as those with no confirmed investment strategy (indicated by "No entry").
Lifecycle state: Use this filter to select application elements based on their lifecycle state (Draft, In development, In production, and Retired). You can also include elements without a confirmed lifecycle state (indicated by "No entry").
You can apply multiple conditions to each filter and combine different filters if required.
Additional Options
The following additional options are available on the Scope page:
To open the Insights dashboard of an element, hover over the element, and then click Insights
.To rename an element that has been added to the workspace, hover over the element, and then click Edit
.
After selecting your application elements, switch to the Requirements tab to continue.
Requirements
On the second page of the Application-based Roadmap template, you can define requirements for all application elements that have been added to the workspace.
The application elements are listed along with their associated requirements. Furthermore, for application elements, the current investment strategy and lifecycle state are visible, while requirements display their status.
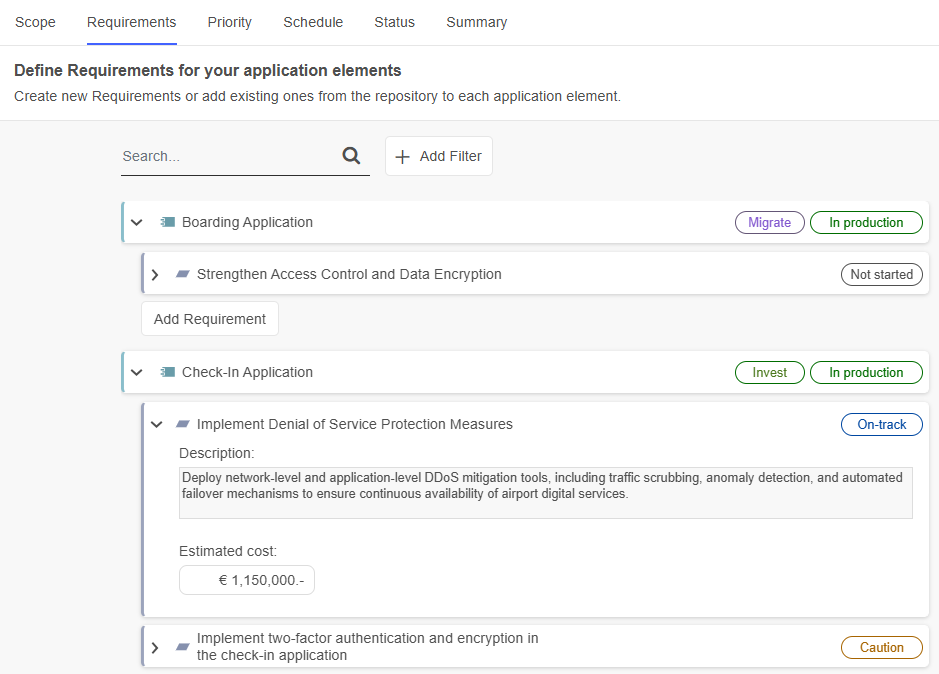
Add Requirements to Application Elements
There are two ways to add requirements to an application element. Choose one of the following options:
Add Requirement: Click Add Requirement below the element to search for an existing requirement or create a new one.
Start typing the name of a requirement, and then select the one you want when you see it. If the requirement does not yet exist, finish typing the name and press <Enter> to create it.
To see more options, click Show more. This opens a support dialogue with the following tabs:
Assigned requirements: Displays all requirements already assigned to the element.
All existing requirements: Lists all requirements in the repository. You can filter requirements, select the ones you want to assign, and click Add.
AI: Click AI to browse AI-generated requirement suggestions. A list of relevant requirements will be created based on an AI model.
You can filter the results, select the requirements you want to assign, and click Add.
AI-generated suggestions must be enabled by your ADOIT administrator for each repository.
View and Edit Requirement Details
Expand a requirement to view or edit additional information. Two fields are available:
Description: A textual description of the requirement.
Estimated cost: The estimated cost associated with the requirement.
Both fields are optional and can be filled in at any time.
Additional Options
The following additional options are available on the second page of the Application-based Roadmap template:
To find requirements, in the Search... box, type the text you want to search for.
To filter application elements or requirements, click + Add Filter and choose the filter you want:
Application elements: Filter by investment strategy or lifecycle state.
Requirements: Filter by status or by the application elements they are associated with.
To remove a requirement, hover over the requirement, and then click Remove element
. Choose whether to:Remove the requirement only from the application element it has been added to.
Remove it from all application elements in the workspace.
Delete it entirely from all workspaces and the repository.
To open the Insights dashboard of an element, hover over the element, and then click Insights
.To rename a requirement, hover over the requirement, and then click Edit
.
After adding requirements to your application elements, switch to the Priority tab to continue.
Priority
The third page of the Application-based Roadmap template lets you prioritise the requirements that you defined in the previous step.
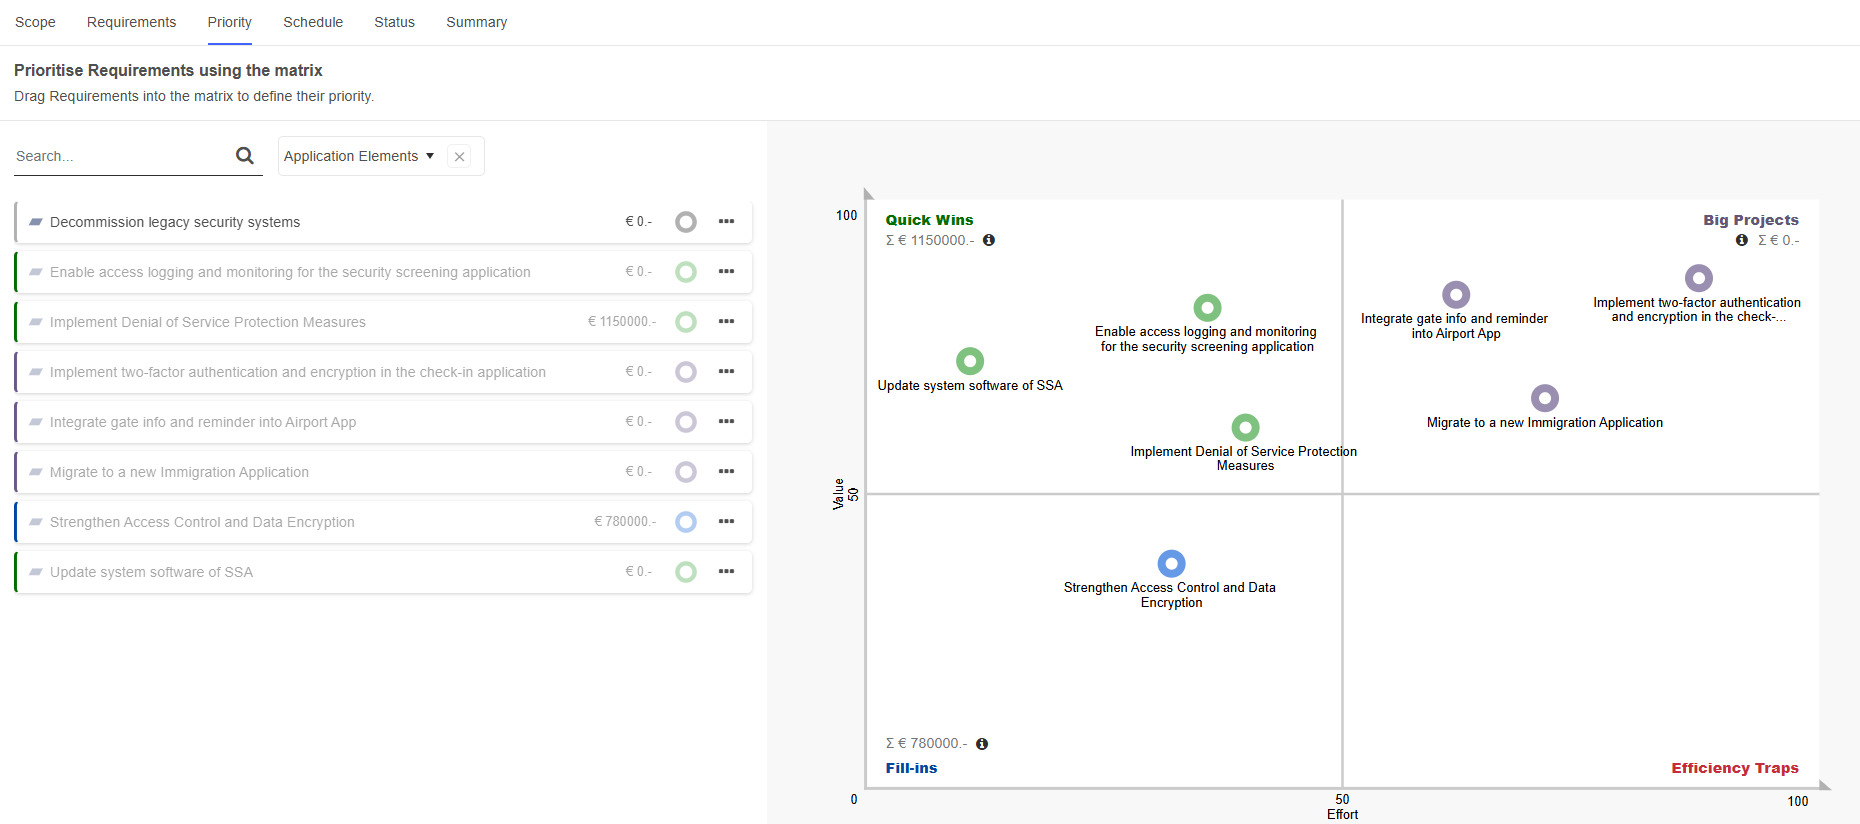
Value vs. Effort Method and Eisenhower Matrix
The appearance of the page depends on the prioritisation method chosen during the setup of the workspace:
The Value vs. Effort Method allows your team to prioritise requirements based on their value and the effort required to implement them.
The Eisenhower Matrix allows your team to organise requirements based on their urgency and importance.
The common visual element in both of these prioritisation methods is a 2×2 grid, which divides requirements into four quadrants. The quadrants are labelled to indicate the level of value and effort or importance and urgency required. Each quadrant displays the total estimated cost of the requirements placed in it.
Put Requirements into Quadrants
All requirements are listed in the column on the left. Requirements that have already been prioritised are greyed-out.
There are two ways to prioritise a requirement:
Drag it to the quadrant you want.
Click the More button
, and
then click Add to <quadrant-name>.
If you need to change the prioritisation, you can also move requirements from one quadrant to another.
Consider performing pairwise comparisons within each quadrant: Adapt the position of different requirements relative to each other to further refine their priority. This helps in determining which requirements within a specific category should be implemented first.
Change Thresholds
The x and y axes represent the thresholds between the quadrants in the chart. To change a threshold:
- Drag the axis to a new position.
The new threshold will be saved to the workspace.
Once you have prioritised the requirements, switch to the Schedule tab to continue.
Schedule
The fourth page of the Application-based Roadmap template lets you schedule the requirements that you prioritised in the previous step. The page contains a Kanban board where each column represents a specific time period (months, quarters, or years depending on your workspace settings).
All requirements appear as cards that initially start in the Unassigned area on the left and can be dragged to a column to put them on the roadmap.
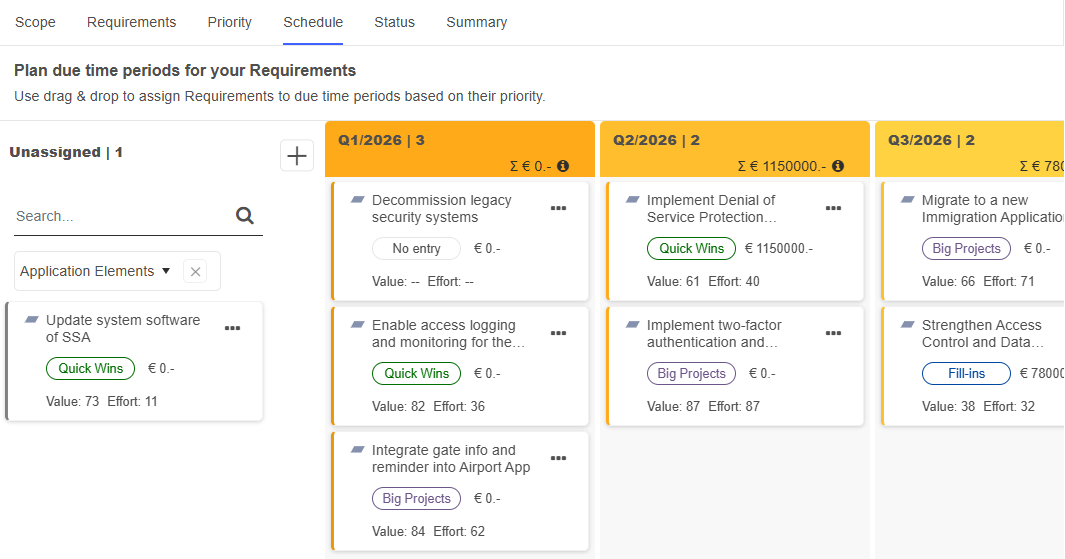
Get Information
Before deciding when a requirement should be implemented, it's essential to check all the information provided by ADOIT. The Kanban board cards display the prioritisation category (quadrant) and the scores assigned to the two evaluation criteria from the Priority page, as well as the estimated costs from the Requirements page.

Place Requirements on the Roadmap
Once you have all the necessary information, you can define when a requirement should be implemented. There are two ways to place a requirement on the roadmap:
Drag its card to the desired column on the Kanban board.
Click More
on the card, and
then select a column under Move to <column name>.
If you need to reassign a requirement, you can simply move it to a different column.
Add or Remove Columns
You can manage the columns on your roadmap. Depending on your workspace settings, these columns may represent months, quarters, or years:
To add a column, click the Add column button
 at the top, on the left or
right side of the Kanban board.
at the top, on the left or
right side of the Kanban board.To remove a column, hover over it and click Remove column
. Columns can only be removed at
the beginning or end of the roadmap.
Once you have planned your requirements, switch to the Status tab to continue.
Status
On the fifth page of the Application-based Roadmap template, you can track the implementation status of requirements over time using a Kanban board.
The Kanban board consists of columns that represent different statuses, with each requirement displayed as a card. Initially, all requirements appear in the Unassigned area on the left. You can assign a status by dragging a requirement card into the corresponding column. As progress is made, you can update the status by moving the cards between columns.
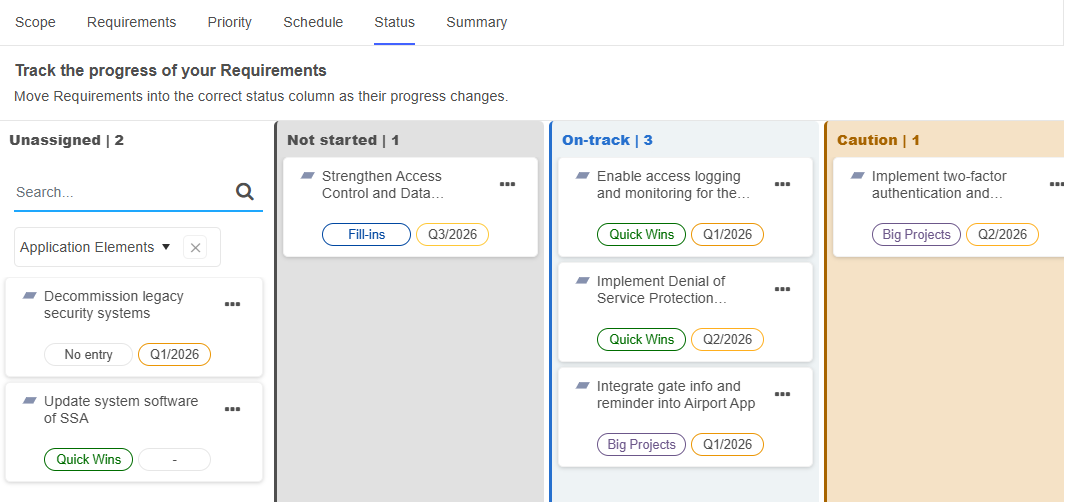
Get Information
Each card on the Kanban board displays the assigned prioritisation category (quadrant) from the Priority page, as well as the planned implementation timeframe from the Schedule page. Check this information before you assign a status to a requirement.

Set the Status of the Requirements
There are two ways to set the status of a requirement:
Drag its card to the desired column on the Kanban board.
Click More
on the card, and
then select a status under Move to <column name>.
If you need to update the status, you can simply move it to a different column.
The available statuses are: Not started, On-track, Caution, Off-track, and Completed.
Once all statuses are set, switch to the Summary tab to continue.
Summary
The last page of the Application-based Roadmap template offers a summary of all the requirements in the workspace. This page has the following areas:
Application elements in total: Displays the total number of application elements in the workspace.
Requirements in total: Shows the total number of requirements in the workspace.
Status per prioritisation: Click Show chart to open a sunburst chart that visually represents how requirements are categorised and their current progress. The inner rings indicate the assigned prioritisation category (quadrant) from the Priority page, while the outer rings show the status from the Status page. Below the chart, the number of requirements per status is listed. Hover over a slice in the outer ring to see the names of requirements in that specific category and status.
Status per time period: Click Show Chart to open a bar chart displaying the number of requirements per time period and status. Hover over a bar to view the names of the requirements that fall within that specific time period and status.
Table/Kanban summary: Provides a detailed overview of all application elements and their assigned requirements, including prioritisation category, planned timeframe, and current status. You can switch between a table view and a Kanban board using the
Table view and
 Kanban view icons.
What's next?: Check out possible next steps here. How about creating another workspace, or taking part in a free online training for ADOIT?
Capability-Based Roadmap
The Capability-based Roadmap template provides a shared workspace for capability-based planning. It helps you define, prioritise, schedule, and track the Requirements needed to build, enhance, or transform your business capabilities and related strategic elements.
Structure your roadmap around core business elements to ensure that all planning activities remain aligned with your strategic direction.
Which Elements Are Used?
Capability-based Roadmaps start from a set of strategy elements, such as
![]() Capabilities,
Capabilities,
![]() Courses of Action,
Courses of Action,
![]() Business Actors, or
Business Actors, or
![]() Business Functions. Based on
these elements, you define and manage the associated
Business Functions. Based on
these elements, you define and manage the associated
![]() Requirements.
Requirements.
How Do Capability-Based Roadmaps Work in ADOIT?
To begin, set up a Capability-based Roadmap workspace (see Create Workspace).
Once you have created the workspace, follow these steps:
Scope – Select the strategy elements that define the scope of your roadmap.
Requirements – Define the requirements for the selected elements.
Priority – Prioritise the defined requirements.
Schedule – Plan the requirements on a Kanban board.
Status – Track the progress of your requirements.
Summary – Review the results and determine your next steps.
These steps are discussed in more detail in the following sections.
Scope
The first page of the Capability-based Roadmap template lets you select the strategy elements that define the scope of your roadmap.
Select Strategy Elements for Roadmap
To define which strategy elements you want to include:
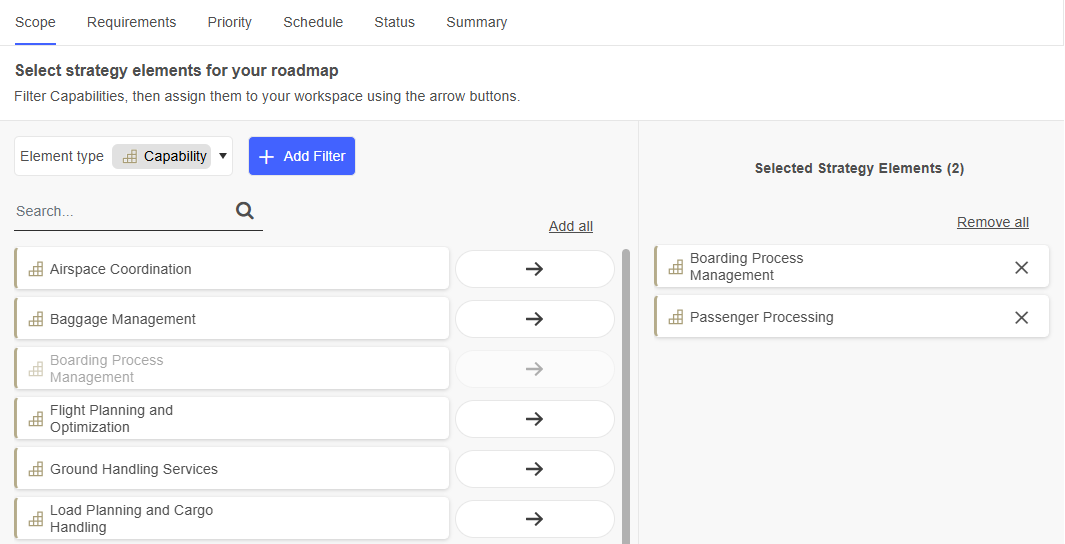
In the left pane, all elements that can be added to the workspace are displayed. Use the search box to quickly find a specific element.
To add an element, click
Add. To remove an element, click
Remove. For bulk actions, use
the Add all and Remove all links at the top of the page.If multiple element types are available in your workspace, the Element type list appears at the top left. Use it to control which elements are shown in the left pane. Depending on your workspace settings, you may choose
Capabilities,
 Courses of Action,
 Business Actors and
Business Functions.
Business Actors and
Business Functions.
Filter by Workspace, Group or Level
You can use filters to hone in on the specific elements you need:
Click + Add Filter, and then choose the filter you want:
Workspaces: Select strategy elements that are already used or evaluated in another workspace.
Groups: Select strategy elements from specific object groups.
Level (
Capabilities
only): Select capabilities from a specific hierarchical level.
The level can be set in another ADOIT scenario, such as "Design & Document", by changing the value of the Level property in the "General" chapter.
You can apply multiple conditions to each filter and combine different filters if required.
Additional Options
The following additional options are available on the Scope page:
To open the Insights dashboard of an element, hover over the element, and then click Insights
.To rename an element that has been added to the workspace, hover over the element, and then click Edit
.
After selecting your strategy elements, switch to the Requirements tab to continue.
Requirements
On the second page of the Capability-based Roadmap template, you can define requirements for all strategy elements that have been added to the workspace.
The strategy elements are listed along with their associated requirements. Furthermore, for
![]() Capabilities, their hierarchical
level is also visible, while requirements display their status.
Capabilities, their hierarchical
level is also visible, while requirements display their status.
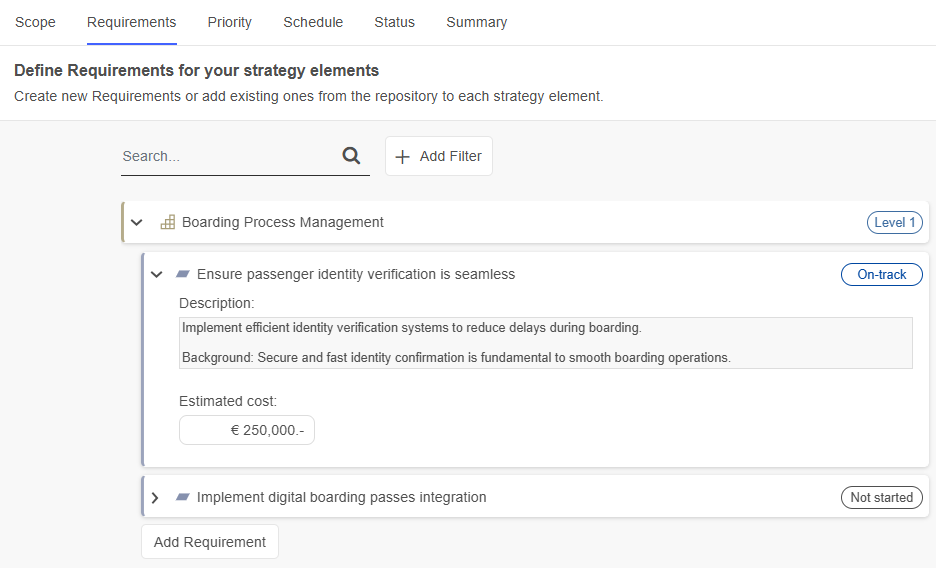
Add Requirements to Strategy Elements
There are two ways to add requirements to a strategy element. Choose one of the following options:
Add Requirement: Click Add Requirement below the element to search for an existing requirement or create a new one.
Start typing the name of a requirement, and then select the one you want when you see it. If the requirement does not yet exist, finish typing the name and press <Enter> to create it.
To see more options, click Show more. This opens a support dialogue with the following tabs:
Assigned requirements: Displays all requirements already assigned to the element.
All existing requirements: Lists all requirements in the repository. You can filter requirements, select the ones you want to assign, and click Add.
AI: Click AI to browse AI-generated requirement suggestions. A list of relevant requirements will be created based on an AI model.
You can filter the results, select the requirements you want to assign, and click Add.
AI-generated suggestions must be enabled by your ADOIT administrator for each repository.
View and Edit Requirement Details
Expand a requirement to view or edit additional information. Two fields are available:
Description: A textual description of the requirement.
Estimated cost: The estimated cost associated with the requirement.
Both fields are optional and can be filled in at any time.
Additional Options
The following additional options are available on the second page of the Capability-based Roadmap template:
To find requirements, in the Search... box, type the text you want to search for.
To filter strategy elements or requirements, click + Add Filter and choose the filter you want:
Strategy elements: Filter by level.
Requirements: Filter by status or by the strategy elements they are associated with.
To remove a requirement, hover over the requirement, and then click Remove element
. Choose whether to:Remove the requirement only from the strategy element it has been added to.
Remove it from all strategy elements in the workspace.
Delete it entirely from all workspaces and the repository.
To open the Insights dashboard of an element, hover over the element, and then click Insights
.To rename a requirement, hover over the requirement, and then click Edit
.
After adding requirements to your strategy elements, switch to the Priority tab to continue.
Priority
The third page of the Capability-based Roadmap template lets you prioritise the requirements that you defined in the previous step.
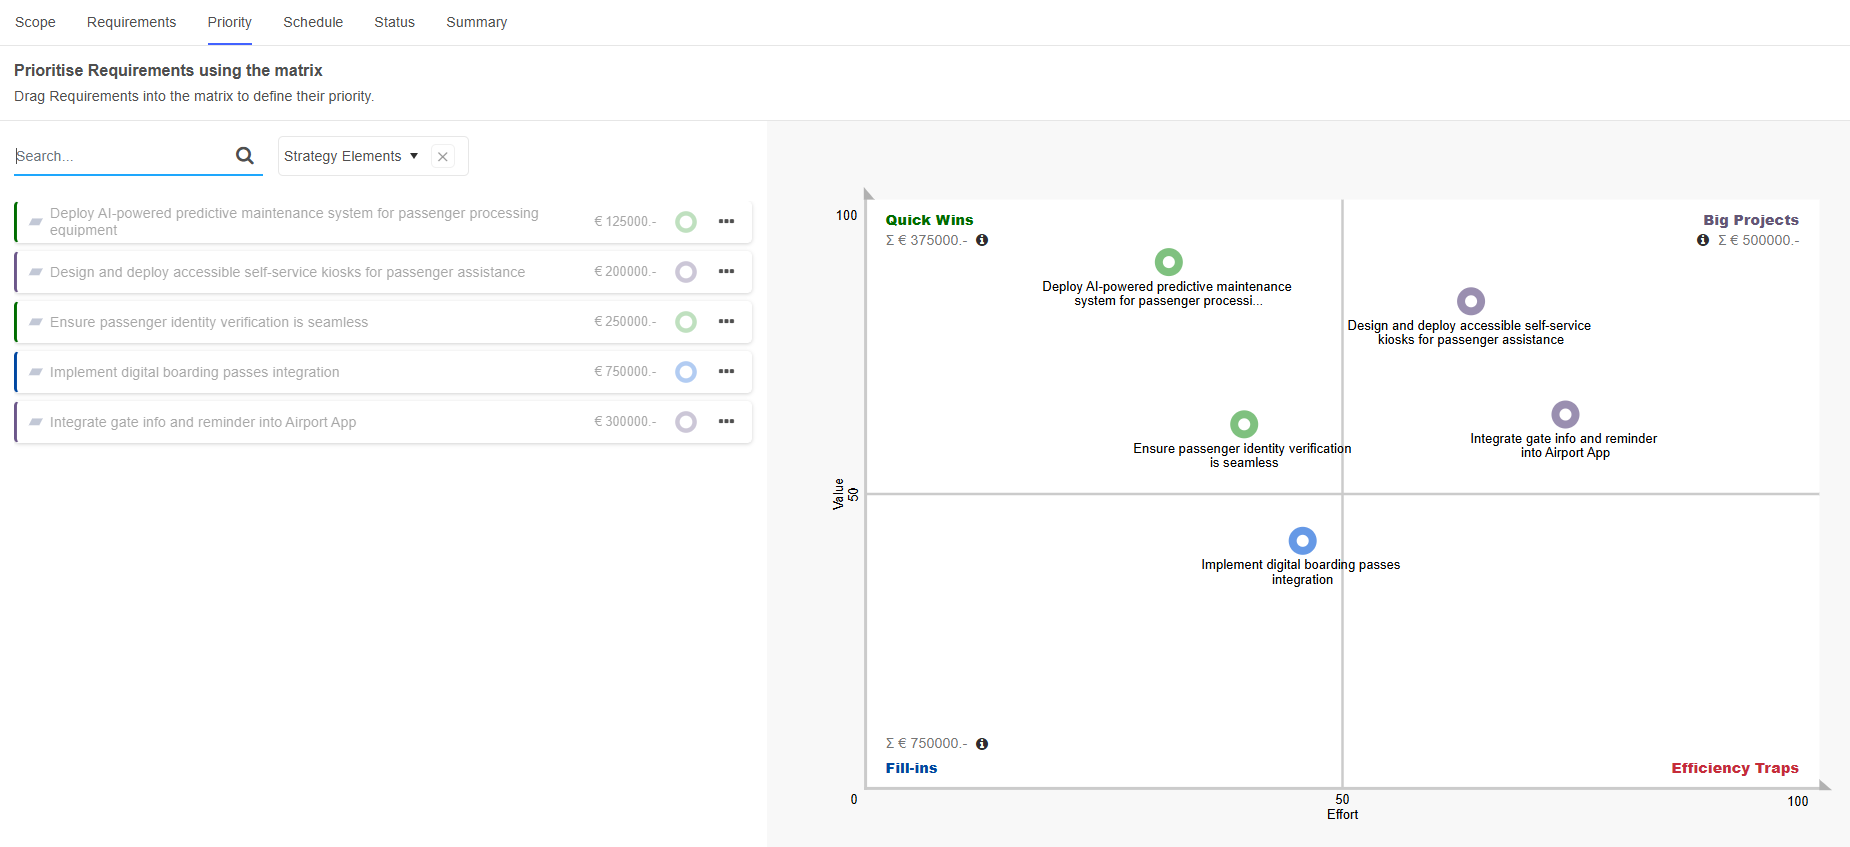
Value vs. Effort Method and Eisenhower Matrix
The appearance of the page depends on the prioritisation method chosen during the setup of the workspace:
The Value vs. Effort Method allows your team to prioritise requirements based on their value and the effort required to implement them.
The Eisenhower Matrix allows your team to organise requirements based on their urgency and importance.
The common visual element in both of these prioritisation methods is a 2×2 grid, which divides requirements into four quadrants. The quadrants are labelled to indicate the level of value and effort or importance and urgency required. Each quadrant displays the total estimated cost of the requirements placed in it.
Put Requirements into Quadrants
All requirements are listed in the column on the left. Requirements that have already been prioritised are greyed-out.
There are two ways to prioritise a requirement:
Drag it to the quadrant you want.
Click the More button
, and
then click Add to <quadrant-name>.
If you need to change the prioritisation, you can also move requirements from one quadrant to another.
Consider performing pairwise comparisons within each quadrant: Adapt the position of different requirements relative to each other to further refine their priority. This helps in determining which requirements within a specific category should be implemented first.
Change Thresholds
The x and y axes represent the thresholds between the quadrants in the chart. To change a threshold:
- Drag the axis to a new position.
The new threshold will be saved to the workspace.
Once you have prioritised the requirements, switch to the Schedule tab to continue.
Schedule
The fourth page of the Capability-based Roadmap template lets you schedule the requirements that you prioritised in the previous step. The page contains a Kanban board where each column represents a specific time period (months, quarters, or years depending on your workspace settings).
All requirements appear as cards that initially start in the Unassigned area on the left and can be dragged to a column to put them on the roadmap.

Get Information
Before deciding when a requirement should be implemented, it's essential to check all the information provided by ADOIT. The Kanban board cards display the prioritisation category (quadrant) and the scores assigned to the two evaluation criteria from the Priority page, as well as the estimated costs from the Requirements page.

Place Requirements on the Roadmap
Once you have all the necessary information, you can define when a requirement should be implemented. There are two ways to place a requirement on the roadmap:
Drag its card to the desired column on the Kanban board.
Click More
on the card, and
then select a column under Move to <column name>.
If you need to reassign a requirement, you can simply move it to a different column.
Add or Remove Columns
You can manage the columns on your roadmap. Depending on your workspace settings, these columns may represent months, quarters, or years:
To add a column, click the Add column button
at the top, on the left or
right side of the Kanban board.To remove a column, hover over it and click Remove column
. Columns can only be removed at
the beginning or end of the roadmap.
Once you have planned your requirements, switch to the Status tab to continue.
Status
On the fifth page of the Capability-based Roadmap template, you can track the implementation status of requirements over time using a Kanban board.
The Kanban board consists of columns that represent different statuses, with each requirement displayed as a card. Initially, all requirements appear in the Unassigned area on the left. You can assign a status by dragging a requirement card into the corresponding column. As progress is made, you can update the status by moving the cards between columns.
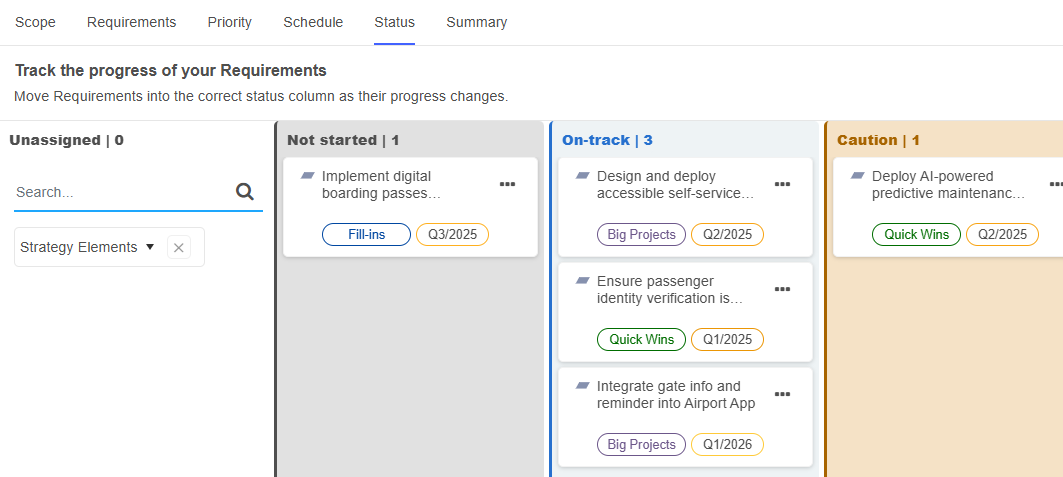
Get Information
Each card on the Kanban board displays the assigned prioritisation category (quadrant) from the Priority page, as well as the planned implementation timeframe from the Schedule page. Check this information before you assign a status to a requirement.
Set the Status of the Requirements
There are two ways to set the status of a requirement:
Drag its card to the desired column on the Kanban board.
Click More
on the card, and
then select a status under Move to <column name>.
If you need to update the status, you can simply move it to a different column.
The available statuses are: Not started, On-track, Caution, Off-track, and Completed.
Once all statuses are set, switch to the Summary tab to continue.
Summary
The last page of the Capability-based Roadmap template offers a summary of all the requirements in the workspace. This page has the following areas:
Strategy elements in total: Displays the total number of strategy elements in the workspace.
Requirements in total: Shows the total number of requirements in the workspace.
Status per prioritisation: Click Show chart to open a sunburst chart that visually represents how requirements are categorised and their current progress. The inner rings indicate the assigned prioritisation category (quadrant) from the Priority page, while the outer rings show the status from the Status page. Below the chart, the number of requirements per status is listed. Hover over a slice in the outer ring to see the names of requirements in that specific category and status.
Status per time period: Click Show Chart to open a bar chart displaying the number of requirements per time period and status. Hover over a bar to view the names of the requirements that fall within that specific time period and status.
Table/Kanban summary: Provides a detailed overview of all strategy elements and their assigned requirements, including prioritisation category, planned timeframe, and current status. You can switch between a table view and a Kanban board using the
Table view and
Kanban view icons.What's next?: Check out possible next steps here. How about creating another workspace, or taking part in a free online training for ADOIT?
Goal-Based Roadmap
The Goal-based Roadmap template provides a shared workspace for goal-driven planning. It helps you define, prioritise, schedule, and track the Requirements needed to achieve your strategic goals and desired outcomes.
Structure your roadmap around clear goals or outcomes to ensure that all planning activities remain aligned with your strategic direction.
Which Elements Are Used?
Goal-based Roadmaps start from a set of motivation elements, such as
![]() Goals,
Goals,
![]() Outcomes, or
Outcomes, or
![]() Drivers. Based on these elements,
you define and manage the associated
Drivers. Based on these elements,
you define and manage the associated
![]() Requirements.
Requirements.
How Do Goal-based Roadmaps Work in ADOIT?
To begin, set up a Goal-based Roadmap workspace (see Create Workspace).
Once you have created the workspace, follow these steps:
Scope – Select the motivation elements that define the scope of your roadmap.
Requirements – Define the requirements for the selected elements.
Priority – Prioritise the defined requirements.
Schedule – Plan the requirements on a Kanban board.
Status – Track the progress of your requirements.
Summary – Review the results and determine your next steps.
These steps are discussed in more detail in the following sections.
Scope
The first page of the Goal-based Roadmap template lets you select the motivation elements that define the scope of your roadmap.
Select Motivation Elements for Roadmap
To define which motivation elements you want to include:
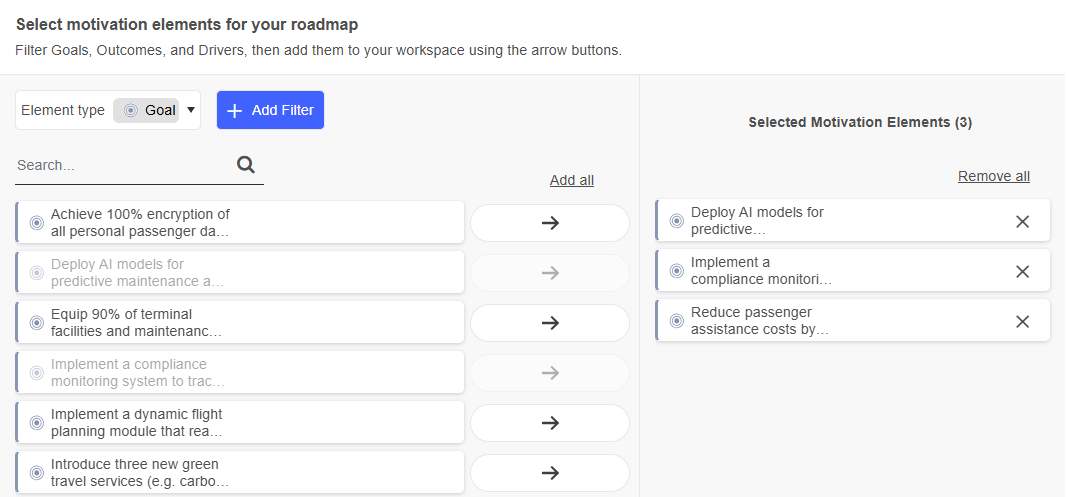
In the left pane, all elements that can be added to the workspace are displayed. Use the search box to quickly find a specific element.
To add an element, click
Add. To remove an element, click
Remove. For bulk actions, use
the Add all and Remove all links at the top of the page.If multiple element types are available in your workspace, the Element type list appears at the top left. Use it to control which elements are shown in the left pane. Depending on your workspace settings, you may choose
 Goals,
 Outcomes and
 Drivers.
Filter by Workspace or Group
You can use filters to hone in on the specific elements you need:
Click + Add Filter, and then choose the filter you want:
- Groups: Select motivation elements from specific object groups.
You can apply multiple conditions to each filter and combine different filters if required.
Additional Options
The following additional options are available on the Scope page:
To open the Insights dashboard of an element, hover over the element, and then click Insights
.To rename an element that has been added to the workspace, hover over the element, and then click Edit
.
After selecting your motivation elements, switch to the Requirements tab to continue.
Requirements
On the second page of the Goal-based Roadmap template, you can define requirements for all motivation elements that have been added to the workspace.
The motivation elements are listed along with their associated requirements. Furthermore, requirements display their status.
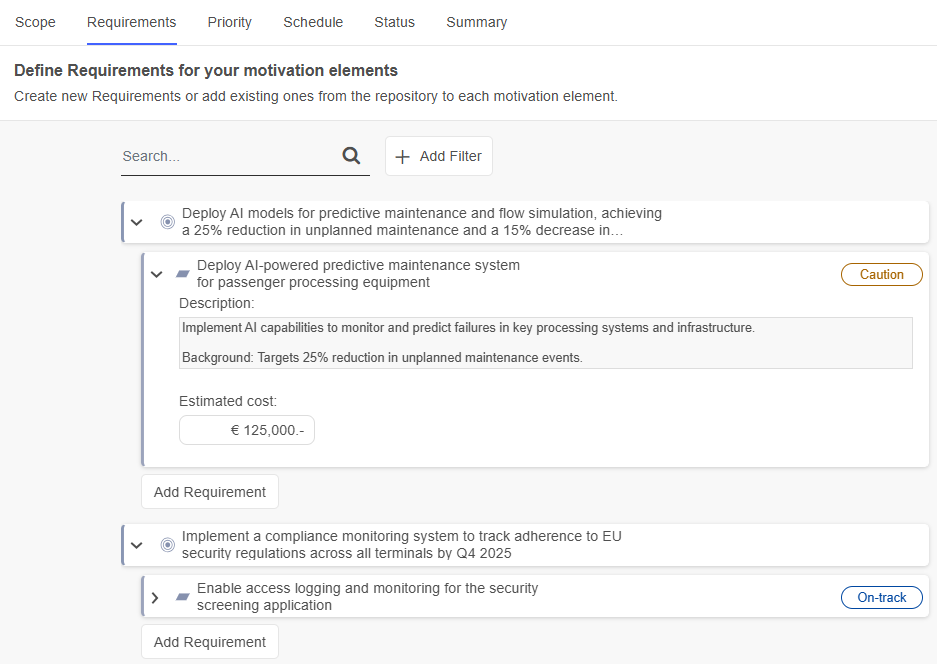
Add Requirements to Motivation Elements
There are two ways to add requirements to a motivation element. Choose one of the following options:
Add Requirement: Click Add Requirement below the element to search for an existing requirement or create a new one.
Start typing the name of a requirement, and then select the one you want when you see it. If the requirement does not yet exist, finish typing the name and press <Enter> to create it.
To see more options, click Show more. This opens a support dialogue with the following tabs:
Assigned requirements: Displays all requirements already assigned to the element.
All existing requirements: Lists all requirements in the repository. You can filter requirements, select the ones you want to assign, and click Add.
AI: Click AI to browse AI-generated requirement suggestions. A list of relevant requirements will be created based on an AI model.
You can filter the results, select the requirements you want to assign, and click Add.
AI-generated suggestions must be enabled by your ADOIT administrator for each repository.
View and Edit Requirement Details
Expand a requirement to view or edit additional information. Two fields are available:
Description: A textual description of the requirement.
Estimated cost: The estimated cost associated with the requirement.
Both fields are optional and can be filled in at any time.
Additional Options
The following additional options are available on the second page of the Goal-based Roadmap template:
To find requirements, in the Search... box, type the text you want to search for.
To filter requirements, click + Add Filter and choose the filter you want:
- Filter by status or by the motivation elements they are associated with.
To remove a requirement, hover over the requirement, and then click Remove element
. Choose whether to:Remove the requirement only from the motivation element it has been added to.
Remove it from all motivation elements in the workspace.
Delete it entirely from all workspaces and the repository.
To open the Insights dashboard of an element, hover over the element, and then click Insights
.To rename a requirement, hover over the requirement, and then click Edit
.
After adding requirements to your motivation elements, switch to the Priority tab to continue.
Priority
The third page of the Goal-based Roadmap template lets you prioritise the requirements that you defined in the previous step.
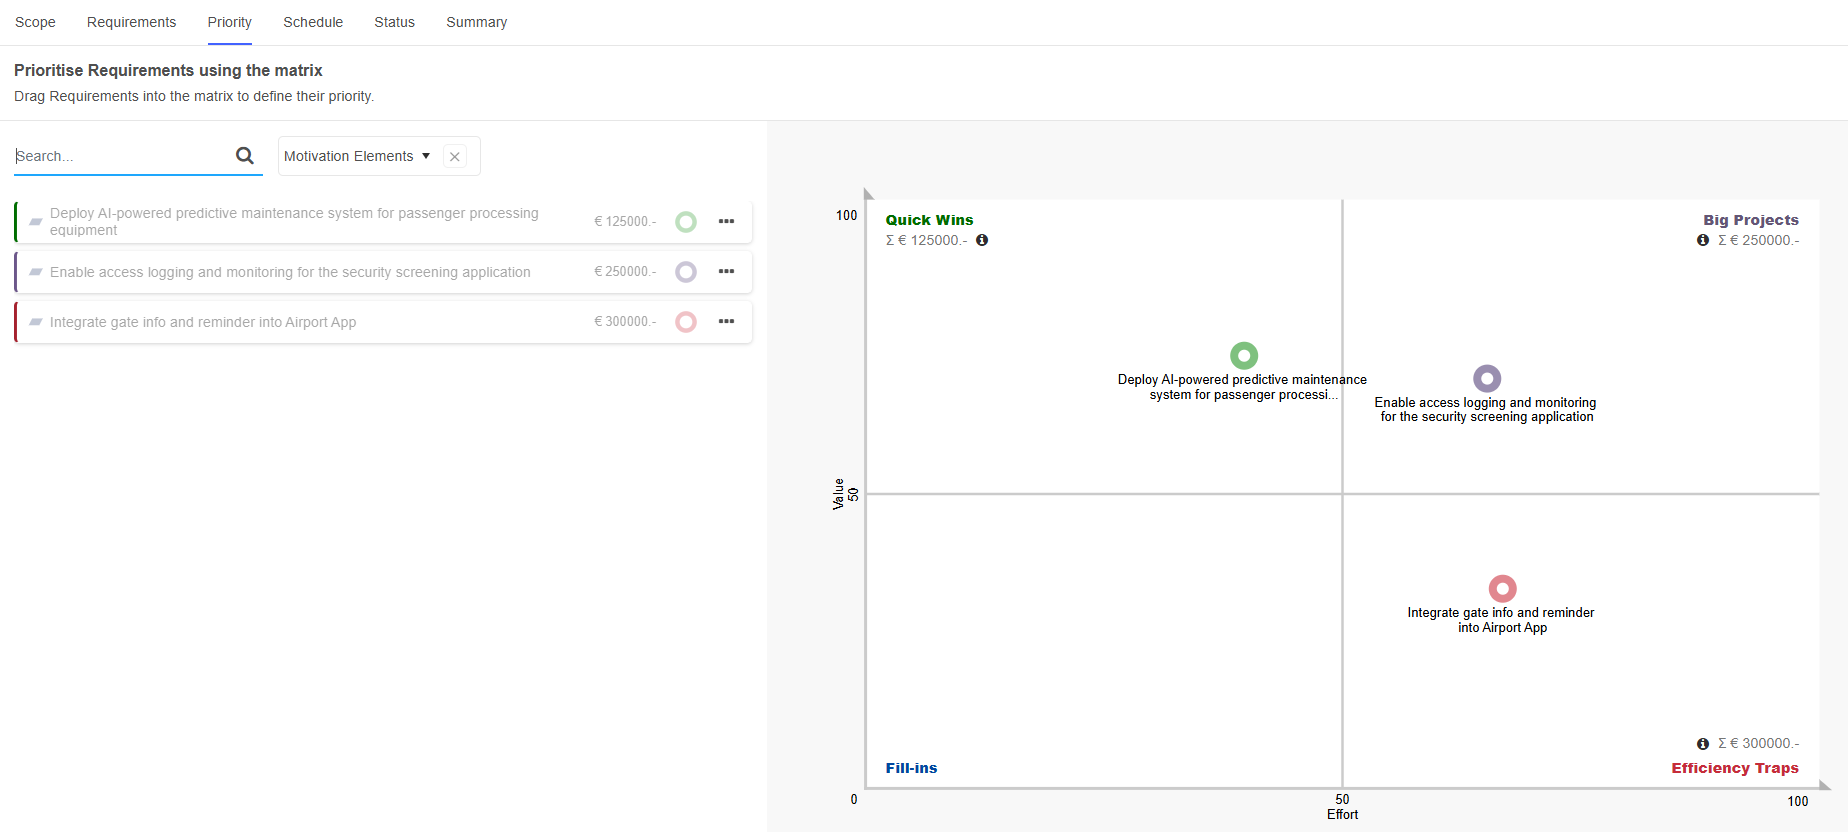
Value vs. Effort Method and Eisenhower Matrix
The appearance of the page depends on the prioritisation method chosen during the setup of the workspace:
The Value vs. Effort Method allows your team to prioritise requirements based on their value and the effort required to implement them.
The Eisenhower Matrix allows your team to organise requirements based on their urgency and importance.
The common visual element in both of these prioritisation methods is a 2×2 grid, which divides requirements into four quadrants. The quadrants are labelled to indicate the level of value and effort or importance and urgency required. Each quadrant displays the total estimated cost of the requirements placed in it.
Put Requirements into Quadrants
All requirements are listed in the column on the left. Requirements that have already been prioritised are greyed-out.
There are two ways to prioritise a requirement:
Drag it to the quadrant you want.
Click the More button
, and
then click Add to <quadrant-name>.
If you need to change the prioritisation, you can also move requirements from one quadrant to another.
Consider performing pairwise comparisons within each quadrant: Adapt the position of different requirements relative to each other to further refine their priority. This helps in determining which requirements within a specific category should be implemented first.
Change Thresholds
The x and y axes represent the thresholds between the quadrants in the chart. To change a threshold:
- Drag the axis to a new position.
The new threshold will be saved to the workspace.
Once you have prioritised the requirements, switch to the Schedule tab to continue.
Schedule
The fourth page of the Goal-based Roadmap template lets you schedule the requirements that you prioritised in the previous step. The page contains a Kanban board where each column represents a specific time period (months, quarters, or years depending on your workspace settings).
All requirements appear as cards that initially start in the Unassigned area on the left and can be dragged to a column to put them on the roadmap.
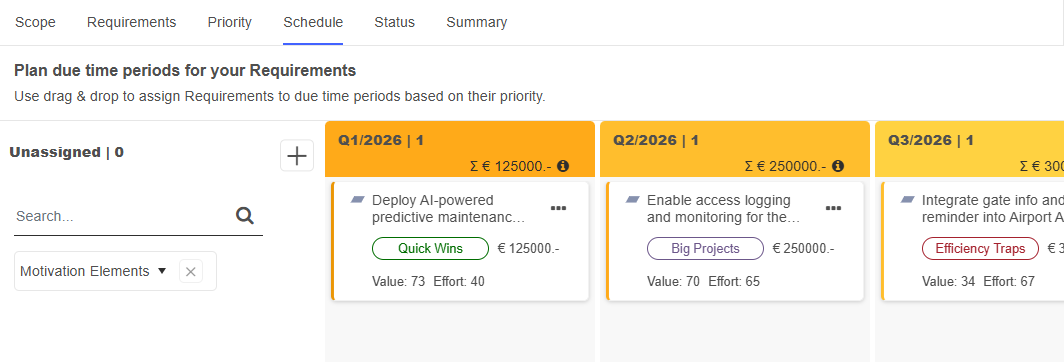
Get Information
Before deciding when a requirement should be implemented, it's essential to check all the information provided by ADOIT. The Kanban board cards display the prioritisation category (quadrant) and the scores assigned to the two evaluation criteria from the Priority page, as well as the estimated costs from the Requirements page.

Place Requirements on the Roadmap
Once you have all the necessary information, you can define when a requirement should be implemented. There are two ways to place a requirement on the roadmap:
Drag its card to the desired column on the Kanban board.
Click More
on the card, and
then select a column under Move to <column name>.
If you need to reassign a requirement, you can simply move it to a different column.
Add or Remove Columns
You can manage the columns on your roadmap. Depending on your workspace settings, these columns may represent months, quarters, or years:
To add a column, click the Add column button
at the top, on the left or
right side of the Kanban board.To remove a column, hover over it and click Remove column
. Columns can only be removed at
the beginning or end of the roadmap.
Once you have planned your requirements, switch to the Status tab to continue.
Status
On the fifth page of the Goal-based Roadmap template, you can track the implementation status of requirements over time using a Kanban board.
The Kanban board consists of columns that represent different statuses, with each requirement displayed as a card. Initially, all requirements appear in the Unassigned area on the left. You can assign a status by dragging a requirement card into the corresponding column. As progress is made, you can update the status by moving the cards between columns.
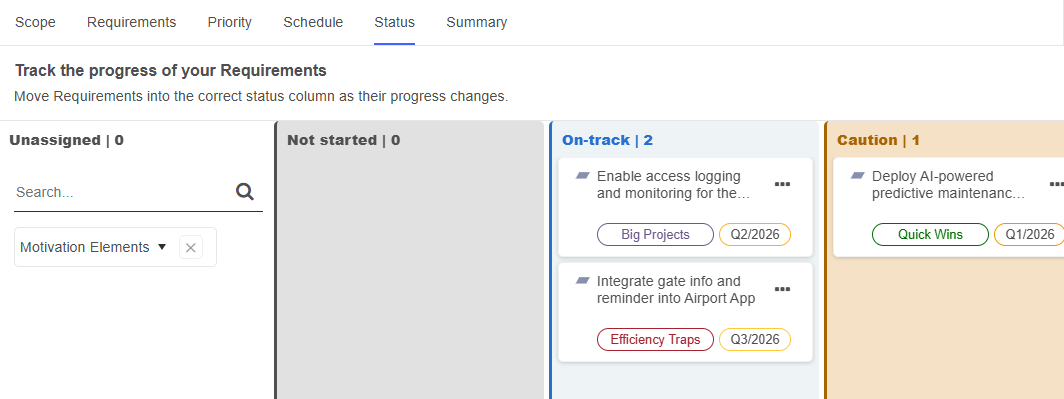
Get Information
Each card on the Kanban board displays the assigned prioritisation category (quadrant) from the Priority page, as well as the planned implementation timeframe from the Schedule page. Check this information before you assign a status to a requirement.
Set the Status of the Requirements
There are two ways to set the status of a requirement:
Drag its card to the desired column on the Kanban board.
Click More
on the card, and
then select a status under Move to <column name>.
If you need to update the status, you can simply move it to a different column.
The available statuses are: Not started, On-track, Caution, Off-track, and Completed.
Once all statuses are set, switch to the Summary tab to continue.
Summary
The last page of the Goal-based Roadmap template offers a summary of all the requirements in the workspace. This page has the following areas:
Motivation elements in total: Displays the total number of motivation elements in the workspace.
Requirements in total: Shows the total number of requirements in the workspace.
Status per prioritisation: Click Show chart to open a sunburst chart that visually represents how requirements are categorised and their current progress. The inner rings indicate the assigned prioritisation category (quadrant) from the Priority page, while the outer rings show the status from the Status page. Below the chart, the number of requirements per status is listed. Hover over a slice in the outer ring to see the names of requirements in that specific category and status.
Status per time period: Click Show Chart to open a bar chart displaying the number of requirements per time period and status. Hover over a bar to view the names of the requirements that fall within that specific time period and status.
Table/Kanban summary: Provides a detailed overview of all motivation elements and their assigned requirements, including prioritisation category, planned timeframe, and current status. You can switch between a table view and a Kanban board using the
Table view and
Kanban view icons.What's next?: Check out possible next steps here. How about creating another workspace, or taking part in a free online training for ADOIT?
Adjust Workspaces
Workspaces can be renamed, deleted, and more.
Change Workspace Settings
You can change general workspace settings such as the name, assigned users and permissions. Choose one of the following options:
On the Workspaces Page: Click the More button
on the
tile of the workspace, and then click Settings. Select the settings you want, and then click
Save & Close.From the Workspace: Click the Settings button. Select the settings you want, and then click Save & Close.
For more information on the available settings, see Create Workspace.
Delete Workspace
Administrators can delete a workspace. Choose one of the following options:
On the Workspaces Page: Click the More button
on the
tile of the workspace, and then click Delete.From the Workspace: Click the Settings button, and then click Delete workspace.
Search and Filter Workspaces
To help you quickly find a workspace on the Workspaces page, the following options are available:

Filter by Permissions
To filter workspaces by permissions:
- Click All workspaces, and then select the option you want.
You can view all workspaces, filter by creator, or view my workspaces (= all workspaces where you have been added as a member or admin).
Filter by Type
To filter workspaces by type:
- Click All types, and then select the option you want.
You can view all workspaces or just workspaces of a specific type.
Search
To find a workspace:
- In the Filter... box, type the text you want to search for.
All workspaces that contain the search string in their name are shown.
Export Summary
From any page within a workspace, you can export a summary as an Excel file (XLSX format):
- Click Export at the top right of the workspace.
Content of the Export File
The exported Excel file contains one or more sheets, depending on the workspace type:
Planning: Exports for Application Investment Planning and Capability Investment Planning workspaces contain three sheets:
One sheet per survey, containing all questions and recorded answers.
A summary sheet with relevant data for all elements in the workspace.
Roadmapping: Exports for Application-based Roadmaps, Capability-based Roadmaps, and Goal-based Roadmaps contain a single sheet. This sheet provides an overview of all elements and their assigned requirements.
Cost Management: Exports for Application Cost Management workspaces contain one sheet with relevant data for all application elements and their associated contracts.