Workspaces
Workspaces in ADOIT serve as collaboration hubs for enterprise architecture. They bundle together multiple functionalities to provide a guided approach to solving specific business needs and to empower the user to perform all relevant tasks and make decisions with a clear focus.
Templates
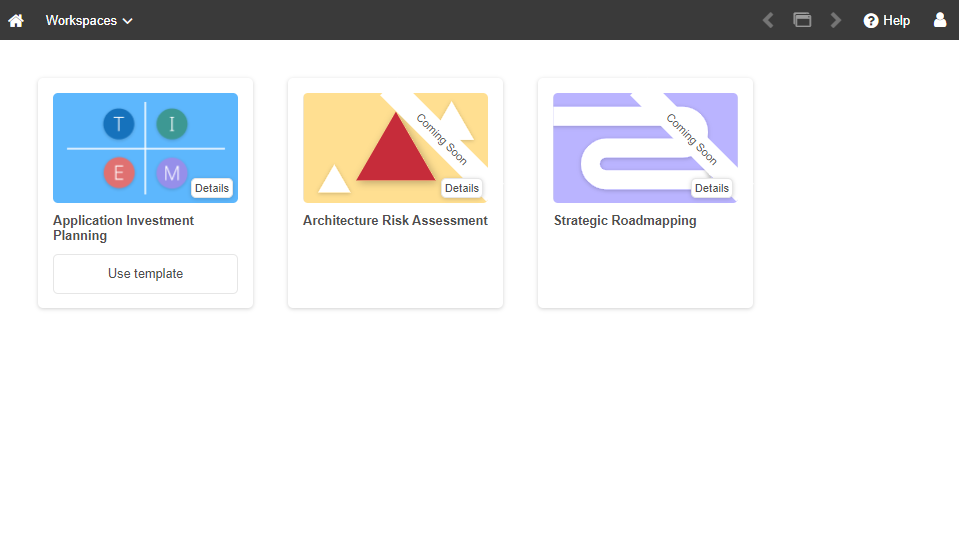
A workspace is created based on a template. In ADOIT 16.0, the following template is available (with more coming soon):
The Workspaces Page
The Workspaces page shows all workspaces that have been created. If no workspaces are available yet, the templates for creating new workspaces are displayed instead.

Open Workspaces Page
To open the Workspaces page:
- Select Workspaces from the dropdown menu at the top left corner of the program window.
Create New Workspace
See Create Workspace.
Open a Workspace
All workspaces are shown as tiles, sorted alphabetically.
- To open a workspace, click it.
Create Workspace
You can create new workspaces on the Workspaces page:
Click New workspace and choose a template. If no workspaces are available yet, you can pick a template directly.
On the Set up your workspace page, enter the required information and set permissions:
Workspace name: Enter the name of the new workspace.
Add users: Select the users you want to collaborate with. Start typing the username or email address of a user, and then select the one you want when you see it. If you enter an email address that is not associated with any user, you need to enter the full email address. Add additional users as needed.
Choose which permissions users should have for the new workspace. Users can either be members or admins (see below).
Private workspace: Choose whether the workspace should be private (= only visible for members and admins).
Click Create workspace.
The first page of the workspace appears, and you can start working on the content right away.
User Types Explained
Any person invited to join a workspace starts out as a member. Members have access to all content within a workspace. They can capture and assess architecture artefacts if they have sufficient user rights.
The person who created the workspace starts out as an admin. Admins can do everything a member can do. Additionally, they can add or remove users from a workspace, make workspaces private or public, and rename or delete workspaces.
If a workspace is not set to private, everyone is treated like a member, meaning all users can capture and assess architecture artefacts if they have sufficient user rights.
Invitation Emails and Access to the Workspace
After the workspace is created, ADOIT sends invitation emails to all users you have invited to collaborate (provided they have an associated email address) as well as to any other email addresses you have specified that are not linked to a user account.
These invitation emails contain a link to the workspace. A login to ADOIT is required to access the link. If the recipient of the invitation does not yet have a ADOIT user account, one must be created.
Before ADOIT can send emails, the mail settings must be set correctly in the Administration Toolkit.
Application Investment Planning
The Application Investment Planning template is a collaborative tool for assessing the fitness of your application portfolio and defining an investment strategy accordingly.
Which Elements Are Used?
Application Investment Planning is enabled for
Application Component (=
applications).
How Does Application Investment Planning Work in ADOIT?
Before you start, you need to create an Application Investment Planning workspace first (see Create Workspace).
Once you have created the workspace, follow these four steps:
These steps are discussed in more detail in the following sections.
Application Assessment
The first page of the Application Investment Planning template lets you add applications and assess them.
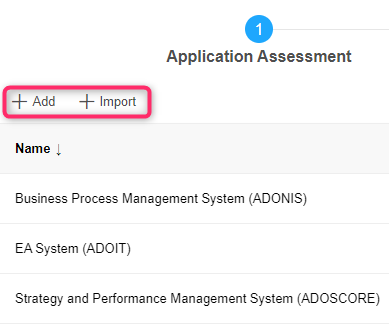
Define the Set of Applications You Want to Evaluate
First, you need to define the applications you want to assess.

Choose one of the following options:
Add
Search for existing applications, or create new ones. Start typing the name of an application, and then select the one you want when you see it. If the application does not yet exist, finish typing the name of the new application, and then press <Enter> to create a new application.
Import
Import applications from the repository. Select the applications you want to assess, and then click OK.
When you create new applications, they will be saved in the object group "Personal Objects\<user name>\Application Component". In the other ADOIT scenarios such as "Design & Document", you can access this group via the Explorer.
Assess the Fitness Level
Once the applications have been defined, they must be assessed by answering a set of questions about their business and IT fitness.

Both Business fit and IT fit must be assessed for each application. There are two ways to do so:
Fill Out a Survey on Your Own
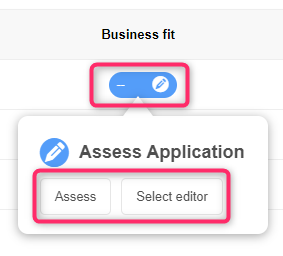
In the Business fit or IT fit column, click an Open survey
, and then click Assess. Answer the survey questions, and then click Submit.
Send Out a Survey to the Application Expert
In the Business fit or IT fit column, click an Open survey
, and then click Select editor. Start typing the username of a user, and then select the one you want when you see it. Click Send survey to send out the survey.
When the assessment is finished, the survey will be marked as Done. The button will turn green,
displaying the overall score .
See Workspaces: How the Score of a Survey Is Calculated for an explanation of how the overall score for an element is calculated.
When you send out a survey to another user, they will be automatically added to the workspace as a member - they do not have to be explicitly added on the Set up your workspace page.
Other Survey Status
If an application has already been assessed in a different workspace, it will be marked as Open, but will display the overall score
.
If an application has already been assessed, but the assessment is more than 365 days old, it will be marked as Outdated, and the button will turn orange
.
If the assessment of an application has already started but not yet been completed, it will be marked as Pending, and the button will turn dark yellow
.
Additional Options
The following additional options are available on the first page of the Application Investment Planning template:
To filter applications, in the Filter... box, type the text you want to search for.
To remove an application, hover over the application, and then click the Remove application button
.
To open the Insights dashboard of the application, hover over the application, and then click the Insights button
.
After adding your applications and finishing the assessment, select page 2 from the navigation menu at the top to advance to the next page of the template.
TIME Definition
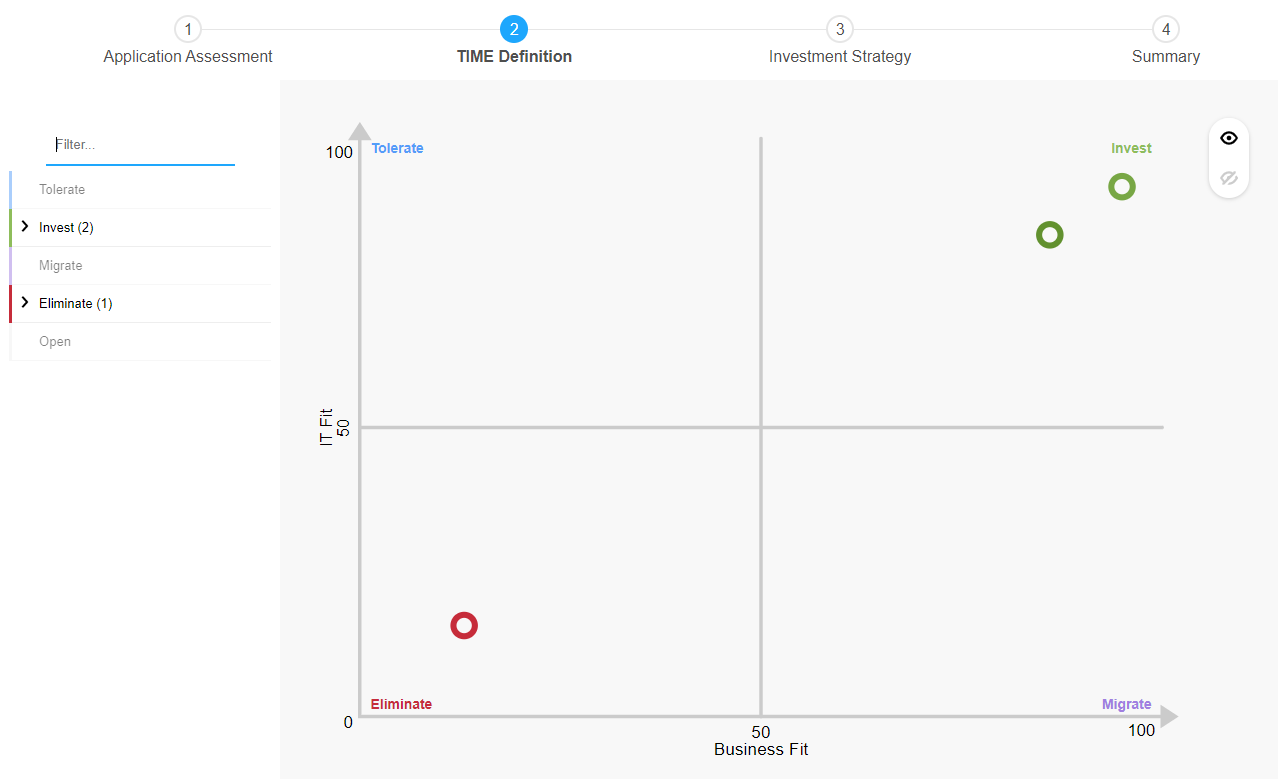
The second page of the Application Investment Planning template lets you see the TIME categorisation of your applications. Gartner’s TIME model proposes four investment strategies (Tolerate, Invest, Migrate and Eliminate).
For additional information about the four investment strategies, take a look at Application Portfolio Strategy: Five Steps To Assessing Your Investment Decisions.
ADOIT will calculate the fitness score of your applications based on the survey results (see Assess the Fitness Level) and place them in the appropriate investment strategy quadrant. The quadrants measure the technical quality of an application against the business value it brings to the organisation.

Change Thresholds
The x and y axes represent the thresholds between the TIME categories in the chart. To change a threshold:
- Drag the axis to a new position.
The new threshold will be saved to the workspace. Applications will be re-rendered in a different colour if they fall into a different category after a threshold change. Additionally, the Kanban board on the Investment Strategy page will be updated to reflect the changes.
Use the Categories List
The TIME categories and the applications that belong to these categories are listed next to the chart. The following options are available:
To filter applications, in the Filter... box, type the text you want to search for.
To collapse or expand one of the assessment categories, click on it.
To highlight an application in the chart, select it in the list.
Show or Hide Names
You can show the names of applications in the chart, and hide them again at any time:
To show the names, click the Show names button
.
To hide the names again, click the Hide names button
.
Additionally, clicking on a bubble in the chart allows you to show or hide its name.
Once you gained an overview of the suggested investment strategies, select page 3 from the navigation menu at the top to advance to the next page of the template.
Investment Strategy
The third page of the Application Investment Planning template allows you to view and modify the investment strategies for your applications.
This page contains a Kanban board where each column represents a specific investment strategy. Each application is represented by a card and is automatically placed in the appropriate column based on the previously assessed fitness score. Applications that have not yet been assessed (see Assess the Fitness Level) are listed in the Open column. You can confirm the proposed strategy, or drag the card to another column if you disagree with the suggestion.

Get More Information
Before you finally decide on an investment strategy, make sure to check all the information ADOIT provides. The cards on the Kanban board will show you the current assessment state of an application:
[no icon]
The application has not been assessed yet.
Warning Icon
The application has been assessed, but no investment strategy has been confirmed yet. Alternatively, the application has an investment strategy, but it was set outside the workspace and differs from the proposed strategy.
Outside the workspace means that the investment strategy was set in another workspace or in another ADOIT scenario such as "Design & Document" (by changing the value of the Investment strategy attribute in the Notebook chapter "Lifecycle").
Info Icon
The application has a confirmed investment strategy.
You can open a card to show more information:
- Click the
warning icon or the
info icon. The detail view of the card opens.
If an application has not been assessed yet, you cannot show more information.
The following information appears in the detail view of the card:
Name of the application as well as Business fit score and IT fit score from the assessment on the Application Assessment page.
Based on calculation: The investment strategy that ADOIT calculates based on the survey data.
Company benchmark: The predicted investment strategy according to a machine learning analysis of previous decisions made for similarly assessed applications in your organisation. The probability according to the prediction model that this prediction is a hit is shown in parentheses. If the probability is less than 35% or the application has not been assessed, no predicted investment strategy will be displayed.
Current investment strategy: If the application has an investment strategy, but it was set outside the workspace and differs from the proposed strategy, it will be displayed here.
Accept position: If the application has been assessed, you can accept the investment strategy.
Editor and Confirmed on: If the application already has a confirmed investment strategy, you can see who confirmed it and when.
Choose the Investment Strategy
Once you have gathered all of the necessary information, you can make a final decision on the investment strategy for each application. Choose one of the following options:
Based on Calculation
Confirm the investment strategy that ADOIT calculates based on the survey data. Click the
warning icon to open the card, and then click Accept position.
Company Benchmark
Choose the investment strategy recommended by a machine learning algorithm based on prior selections made for similarly assessed applications. Drag the card to the proposed column on the Kanban board.
Make Your Own Choice
Choose the investment strategy yourself. Drag the card to another column on the Kanban board. In this way, you may even define an investment strategy for applications that have not yet been assessed and are listed in the Open column.
On accepting the investment strategy on the Kanban board, the following attributes in the Notebook of the application are updated:
Business fit
IT fit
Investment strategy
These attributes can be found in the Notebook chapters "Classification" and "Lifecycle".
During the update, the Business fit and IT fit assessment scores are converted to the predefined values in the Notebook as follows:
- 0-25: Bad | 26-50: Medium | 51-75: Good | 76-100: Excellent
Once you have confirmed the investment strategy, select page 4 from the navigation menu at the top to advance to the final page.
Summary
The last page of the Application Investment Planning template offers a summary of all the applications in the workspace. This page has the following areas:
Applications in Total
The total number of applications in the workspace as well as the number of applications in each TIME category. Click a segment of the pie to see a tooltip with the names of the applications in that category.
Applications With Accepted Investment Strategy
The total number of applications with a confirmed investment strategy as well as the progress of completing the surveys for all applications. Click a segment of the pie to see a tooltip with the names of the applications in that category.
What's Next?
Check out possible next steps here. Define your requirements based on your defined investment strategy and plan your strategic roadmap (template coming soon). Or, how about a free online training about application portfolio management with ADOIT and ArchiMate?
Best Practices
Here are some tips to help you use Application Investment Planning in ADOIT more effectively.
One or Many Workspaces?
Rather than using a single large workspace, organise your applications into different workspaces for different areas of the organisation. This helps in maintaining confidentiality and makes it easier to keep an overview.
Assess Regularly, Reuse Workspaces
Assess your applications regularly (at least once a year) to make sure the evaluation is still valid. Reuse existing workspaces for this so that the survey data remains, since it would otherwise be lost because it is saved in the context of the workspace.
Applications in Multiple Workspaces
An application can be in more than one workspace. Be aware that the last accepted investment strategy applies to all workspaces.
Adjust Workspaces
Workspaces can be renamed, deleted, and more.
Change Workspace Settings
You can change general workspace settings such as the name, assigned users and permissions. Choose one of the following options:
On the Workspaces Page
Click the More button
on the tile of the workspace, and then click Settings. Select the settings you want, and then click Edit.
From the Workspace
Click the Settings button
. Select the settings you want, and then click Edit.
For more information on the available settings, see Create Workspace.
Delete Workspace
Administrators can delete a workspace. Choose one of the following options:
On the Workspaces Page
Click the More button
on the tile of the workspace, and then click Delete.
From the Workspace
Click the Settings button
, and then click Delete workspace.
Search and Filter Workspaces
To help you quickly find a workspace on the Workspaces page, the following options are available:
Filter by Permissions
To filter workspaces by permissions:
- Click All workspaces, and then select the option you want.
You can view all workspaces, filter by creator, or view my workspaces (= all workspaces where you have been added as a member or admin).
Search
To find a workspace:
- In the Filter... box, type the text you want to search for.
All workspaces that contain the search string in their name are shown.