My First Modelling Environment - in 6 Steps
This use case will guide you through the setup of a typical modelling environment for ADOIT. You will learn how to:
Example Scenario: The ADO Money Bank
The ADO Money Bank is a medium-sized private bank known for its good advice and excellent service. Recently, a new board with a focus on "organisation & IT" has been appointed. The new board wants to establish the planning and development of IT as an ongoing process. ADOIT has already been procured as a tool for IT architecture management and service management.
As the new ADOIT administrator of the ADO Money Bank you take over the user and rights management for ADOIT. The following training tasks will familiarize you with the typical activities in this context.
Set up Model Groups
Model groups organise the models in the database. This resembles the directories in the computer's file system, which contain the installed programs and saved files.
At the first start of the application, only the model groups that were predefined during tool configuration are available. Typically, there is only one directory for the current models (named e.g. “Models”). Usually, users and administrators create the necessary group structure on their own and assign their models themselves.
Example Scenario: What needs to be done here?
Your first task is to set up a basic model group structure for your colleagues to organise their models in. Create the following two model groups as subordinated elements of the standard model group:
- 01 Views
- 02 Reports
Create Model Group
To create a model group:
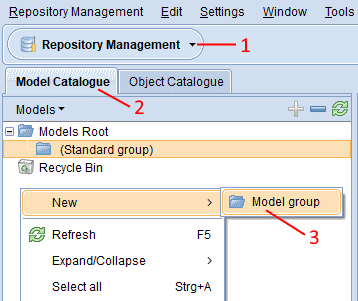
Open the Repository Management component via the component selection (1).
Select the model group in which the new group shall be created in the Model Catalogue (2).
From the context menu of the model group, select New – Model group (3).
Enter the name of the new group.
Press <Enter> to confirm.
Set up Object Groups
Object groups organise the objects in the database.
At the first start of the application, only the main groups that were predefined during tool configuration are available. Typically, there is only one directory for the current objects (named e.g. “objects”). Usually, users and administrators create the necessary group structure on their own and assign their objects themselves.
Example Scenario: What needs to be done here?
Your next task is to set up a basic object group structure for your colleagues. Create the following two object groups as subordinated elements of the standard object group:
- 01 IT Assets
- 02 Risks
Create Object Group
To create an object group:
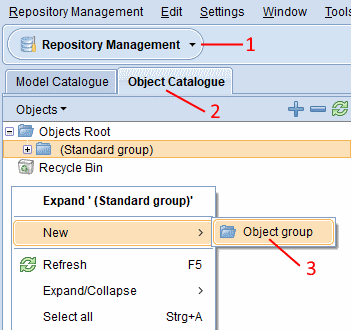
Open the Repository Management component via the component selection (1).
Select the object group in which the new group shall be created in the Object Catalogue (2).
From the context menu of the object group, select New – Object group (3).
Enter the name of the new group.
Press <Enter> to confirm.
Set up User Groups
At the first start of the application, only the main user groups that were predefined during tool configuration are available (at least one). Usually, administrators create the necessary group structure on their own. There are two types of user groups:
Top level user groups are the topmost hierarchy level in the User Catalogue.
User groups are subordinated to another group.
Example Scenario: What needs to be done here?
Your next task is to set up a user group structure that contains IT architects and reviewers. In order to do this you have to create the following two top level user groups:
- Architect
- Reviewer
Create User Group
To create a user group or top level user group:
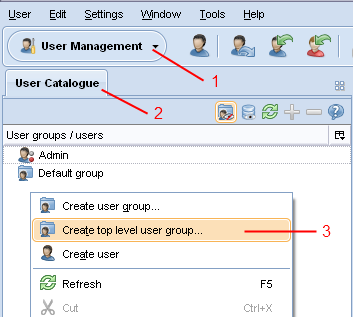
Open the User Management component via the component selection (1).
From the context menu of the User Catalogue (2), select Create user group... or Create top level user group... (3). An input dialogue appears.
Enter the name of the new group into the field New user group name.
Confirm with OK.
Add Rights for User Groups
The ADOIT rights concept allows to assign special user rights for the available database and repository content: write access (= full access), read-only access, no access and some specialised variants. These are usually defined in the component Rights Management.
Usually, no personal user rights are assigned to a single user. Instead, users are organised into user groups whose rights they inherit. This reduces administrative effort.
Usually, no rights are defined on the level of models / objects. Instead, rights are organised on the level of model groups / object groups. This reduces administrative effort.
When editing rights it is possible to modify either basic rights or detailed rights. Changing basic access rights is sufficient for most situations when managing user rights.
Example Scenario: What needs to be done here?
Reviewers do not need full write access to the modelling environment. Edit the access rights of the user group "Reviewer" so that it has the following rights:
- Read access to the standard model group
- Write access to the model group “02 Reports”
- Read access to the standard object group
- Write access to the object group “02 Risks”
Change Basic Access Rights
To change rights:
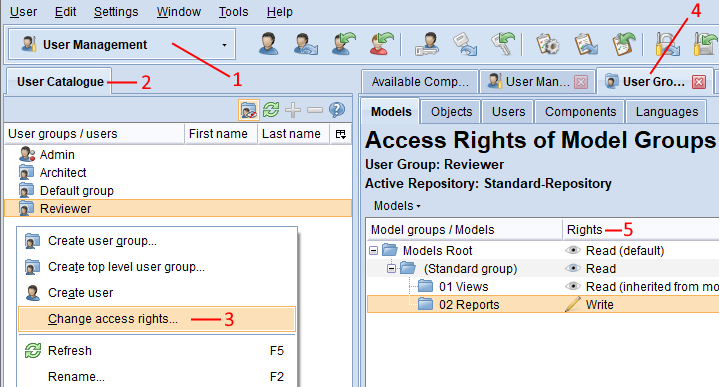
Open the User Management component via the component selection (1).
Select a user group or user in the User Catalogue (2).
From the context menu of the user group or user, select Change access rights... (3). A tab with the associated rights opens (4).
Select the relevant subtab, e. g. “Models” (default selection) or “Objects”.
The momentary rights status for each element is shown in the column “Rights” (5). Double-click on an element here until you reach the desired status.
Set up Users and Add Users to Groups
Every person who wants to work with ADOIT needs a valid user access. With that a user can log in and in turn receives the user rights assigned to him. As an administrator you can create new user accounts.
Example Scenario: What needs to be done here?
Now create the following two new ADOIT users and assign them the current standard repository:
User name: Arch, Password: Start123++
Email: archibald.arch\@test.de
Last name: Arch, first name: Archibald
This user belongs to the user group "Architect".
User name: Owner, Password: Start123++
Email: owen.owner\@test.de
Last name: Owner, first name: Owen
This user belongs to the user group "Reviewer".
Create User
In order to create a new user:
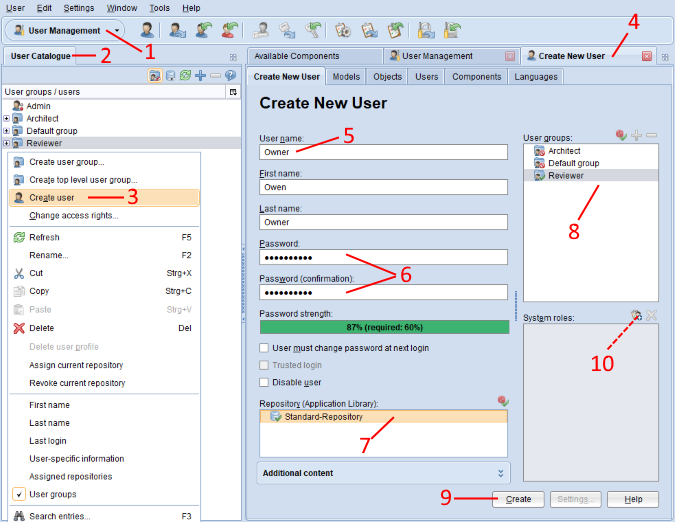
Open the User Management component via the component selection (1).
From the context menu of the User Catalogue (2), select Create user (3). A tab with user data input fields opens (4).
Enter the name of the new user into the field User Name (5).
Enter and confirm a password for the user (6).
Double-click at least one repository to assign it to the user as his working place to create and save content in (7).
Double-click at least one user group to allocate the user to it (8).
Confirm with Create (9).
Optionally you can also:
Once the user has been created, assign sytem roles to the user (10). System roles grant access to features of the ADOIT web client (e.g. application scenarios, charts etc.) and on the available metamodel elements.
Designate the user as a named user to provide guaranteed access to a specific scenario. This function is only available if a scenario licence is in use.
Enter the name and surname of the person who will use this user account.
Force the user to change his password at the next login by ticking the check box.
Once the user has been created, enable trusted login. This setting is only relevant in certain web client scenarios. It enables simple and quick access to ADOIT via single sign-on (SSO).
Disable the user so he cannot log in to ADOIT respectively unlock a user that has been disabled.
Display additional content. Here you can enter an email address for the user, add user-specific information that can be displayed on request in the User Catalogue etc.
A user may have access rights to any number of repositories. Users with access rights to more than one repository are presented with a selection window during startup.
Share Users with a Repository
It is necessary to share users with a repository to make them available as objects in modelling, e. g. to assign them as responsible person for an application.
To assign a user to an object, you have to switch to the web client, update the Object Catalogue and then make the assignment in the object´s Notebook.
Example Scenario: What needs to be done here?
Share your newly created users with the standard repository. Now you can assign them to objects in the web client.
With this step you have accomplished setting up your first modelling environment.
Share User with Standard-Repository
To share a user with the currently active repository:
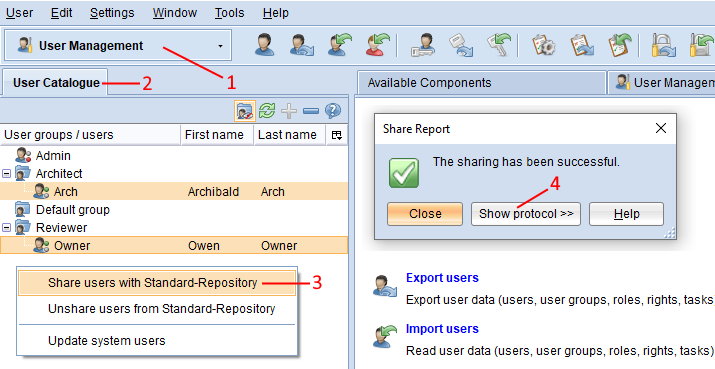
Open the User Management component via the component selection (1).
Select one or more users in the User Catalogue (2).
From the context menu, select Share users with Standard-Repository (3). A dialog box containing a report opens.
Click Show protocol >> to verify if all selected users have been correctly shared with the repository (4).