Search & Analysis
You can quickly search for specific models and objects using the search function of ADOIT. At the same time, you can perform a full-text search in all documents in the database.
The extended search options and filters allow you to seamlessly refine your search for structured analysis of your data and for your reporting.
Execute Search
To execute a search:
On the toolbar at the top of the screen, click Find
.
In the Search box, type the text you want to search for.
Press <Enter>.
Optionally you can also:
- Use quotes to search for an exact set of words.
Search Results
The search results consist of:
All models (including saved analyses) and objects containing the search term in their Name, Description, First name or Last name and:
All documents in the database which contain the search term (inside the document or in the file name).
The models and objects are presented as table rows in the search results, while the table columns hold their attributes. Found search terms are highlighted in yellow in the search result.
Depending on the Application Library and product configuration, a different set of attributes than Name, Description, First name and Last name may be considered to find matching objects or models.
Display Hits in Documents
In order to display hits in documents:
- In the search results, click the icon
in the column Referenced representation or Referenced document.
All hits in the document are listed in a separate dialogue along with their immediate context.
The object type for documents depends on the Application Library and product configuration. By default, imported files are Representations in the ArchiMate Application Library and Documents in the ADOIT Standard Application Library.
Select Columns
By default, only the attributes Name and Description are displayed for the models and objects in the search result. For modelling objects and models, the model name is additonally displayed as a link. In order to select which columns are displayed:
The button
is activated in the header of any column by mouseover. Click this button to open a drop-down menu.
Select the menu entry Select Columns, and then do one or more of the following:
To display additional attributes, select the attributes in the list.
To display all attributes, select the Select all check box.
To display the model name as a link in a separate column for modelling objects and models, select the Show model name check box. For repository objects, this column remains blank.
To display the folder path for repository objects and models, select the Show group path check box. For modelling objects, this column remains empty because they are not maintained in the Object Catalogue.
Click OK.
Column Order
The columns are arranged as follows:
On the left, the Type and the Name are displayed.
Next, the Model and Group path columns are displayed.
This is followed by the Description column.
Next, the Referenced representation or Referenced document column is displayed (only if objects containing this attribute are found).
Next, the First name and Last name columns are displayed (only if user objects are found).
If you select additional attributes, they are displayed to the right.
If an attribute is contained in multiple model or object types, it is shown only once. For example, descriptions of different object types are all shown in the Description column.
Filter Results by Topic
In order to filter the search results so that only a topic-specific selection of model or object types is displayed:

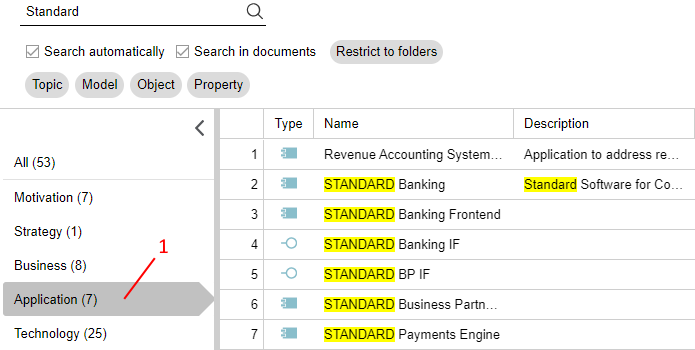
- Click the corresponding topic in the list to the left of the search results (1). The selected topic is highlighted.
In order to switch back to the overview of all topics:
- Click All.
Example ArchiMate Application Library
You are looking for an Application Component, but your search returns too many results of different architectural levels. Among others, Business Processes and Requirements are returned. Proceed as follows:
- Enter the search string into the input field and press <Enter>.
- Select the topic Application Layer Elements so that only relevant object types are displayed in the search result.
Available Topics ArchiMate Application Library
Motivation
Search for Requirements, Meanings, Assessments, Outcomes, Principles and Goals.
Strategy
Search for Capabilities, Resources, Value Streams and Course of Actions.
Business
Search for Business Processes, Products, Business Objects, Business Actors, Business Interactions, Representations, Contracts and Business Roles.
Application
Search for Application Collaborations, Application Components, Application Interfaces and Application Services.
Technology
Search for Artifacts, Devices, Nodes, System Software, Technology Collaborations and Technology Services.
Physical Elements
Search for Facilities, Distribution Networks, Equipments and Materials.
Implementation and Migration
Search for Gaps, Work Packages, Plateaus and Deliverables.
Composite
Search for Groupings and Locations.
From Search to Analysis
Use the extended search options and filters to narrow down your search results.
Refine Criteria
In order to refine your search:

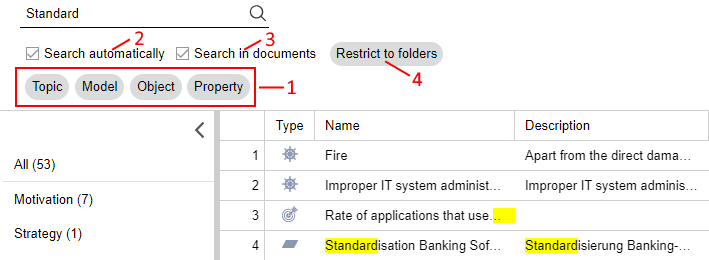
- Select a filter like Topic or Model to narrow down your search results (1).
Optionally you can also:
Remove a filter by clicking the "x" icon included in the respective button.
Add or remove rows of filters by clicking the "+" and "x" icons.
Toggle Search automatically (2). If this check box is selected, ADOIT automatically adjusts the search results whenever you edit a filter.
Toggle Search in documents (3). Deselect this check box so that the search results are limited to only models and objects.
Click the Restrict to folders button (4) to restrict the search to specific model groups and object groups:
In the Models and Object areas, select groups to search.
Click OK.
Example ArchiMate Application Library
You are looking for an Application Component, but your search returns too many results. Proceed as follows:
Enter the search string into the input field and press <Enter>. The search results are displayed.
Click the filter Object and select the object type Application Component from the drop-down list. Confirm with OK.
As a result, only Application Components are displayed now. The search term may be contained in their Name or Description.
Available Filters for Data Analysis
The following filters are available:
Topic
Use this drop-down list to only display a topic-specific selection of model and object types in the search results. Additionally, you can display all models or all objects. For details please refer to the section Filter Results by Topic.
Model
Use this drop-down list to only display certain model types in the search results.
Object
Use this drop-down list to only display certain object types in the search results.
Property
Use this drop-down list to only display attributes which contain a specific attribute value in the search results. This process is broken into two steps:
First select an attribute from the drop-down list.
Then select, depending on the attribute type, an operator and a specific attribute value.
When defining the filter Property, the following operators may be used:
Available Operators
Equals (
=)Returns a match if the search value corresponds exactly to the attribute value.
Like (~)
Returns a match if the search value is contained in the attribute value.
Not Equals (
≠)Returns a match if the search value does not exactly correspond to the attribute value.
Greater (
>)Returns a match if the search value is greater than the attribute value.
Greater or Equals (
≥)Returns a match if the search value is greater than or equal to the attribute value.
Smaller (
<)Returns a match if the search value is smaller than the attribute value.
Smaller or Equals (
≤)Returns a match if the search value is smaller than or equal to the attribute value.
Colon (:)
Returns a match if the search value is contained in a document. See Search in Documents only.
Analysis without Search Term
You can analyse the models and objects saved in the database without entering a search term. In order to do so:
Select any of the filters Topic, Model or Object to display all models/objects of a type.
Select the filter Property to display all attributes of a type which contain a specific attribute value.
Example
To display a list of all Application Components in the database, proceed as follows:
- Do NOT enter a search term.
- Click the filter Object and select the object type Application Component from the drop-down list. Confirm with OK.
Search in Documents only
You can search so that the search results are limited to only hits in documents in the database. In order to do so:
Click the filter Object and select the object type Representation or Document from the drop-down list. Confirm with OK.
Click the filter Property and select the check box Referenced representation or Referenced document . Confirm with OK. A dialogue window opens.
Select the operator :, and then enter the search term. Confirm with OK. All documents which contain the search term are now displayed.
The object type for documents depends on the Application Library and product configuration. By default, imported files are Representations in the ArchiMate Application Library and Documents in the ADOIT Standard Application Library.
Combine Filters
You can combine multiple filters to create complex queries.
Add Multiple Conditions to a Filter
When you specify a filter, you can select multiple conditions from the respective drop-down list. The search result contains all elements that match at least one condition (logical OR operator).
Example ArchiMate Application Library
To display a list of all Application Components and Application Interfaces in the database, proceed as follows:
- Do NOT enter a search term.
- Click the filter Object and select the object types Application Component and Application Interface from the drop-down list. Confirm with OK.
Combine Multiple Filters within a Row
You can combine multiple filters in a row to narrow down the search results. The search result contains only elements which meet all conditions set in this row (logical AND operator):
Choosing a topic determines which model/object types are available.
Choosing a model type determines which object types and model attributes are available.
Choosing an object type determines which object attributes are available.
Example ArchiMate Application Library
You want to know which Application Components manipulate the Business Object "Partner". Proceed as follows:
Click the filter Object and select the object type Application Component from the drop-down list. Confirm with OK.
Click the filter Property and select the check box Accesses in the chapter Relationships. Confirm with OK. A dialogue window opens.
Choose equals (icon =) and enter the search term "Partner". Confirm with OK.
As a result, only Application Components which manipulate the Business Object "Partner" are displayed now.
Combine Multiple Rows of Filters
You can combine multiple rows of filters. The search result contains all elements that match the conditions specified in any row (logical OR operator).
Example ArchiMate Application Library
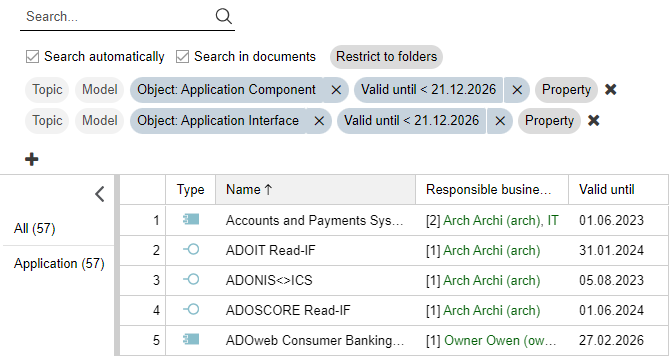
For the planning of your application architecture you may want to know which Application Components and Application Interfaces will be replaced within the next few years. Proceed as follows:

Click the filter Object and select the object type Application Component from the drop-down list. Confirm with OK.
Click the filter Property and select the check box Valid until in the chapter Lifecycle. Confirm with OK. A dialogue window opens.
To get those Application Components that will be replaced within the next five years, choose smaller (icon <) and a date five years in the future. Confirm with OK.
Add a row of filters by clicking the "+" icon.
Now repeat the above steps for the object type Application Interface.
All Application Components and all Application Interfaces that will be replaced within the next few years are now displayed.
Clear Search Results
In order to clear the search results:
- Click the Clear search button
.
Save Search Query
You can save a search query to run it again later and share it with other users:
Click the Save button
.
Type a name and description for the new query.
Click Save.
Alternatively, you can create a copy of an already saved search query:
- Click the Save as button
.
Manage Saved Queries
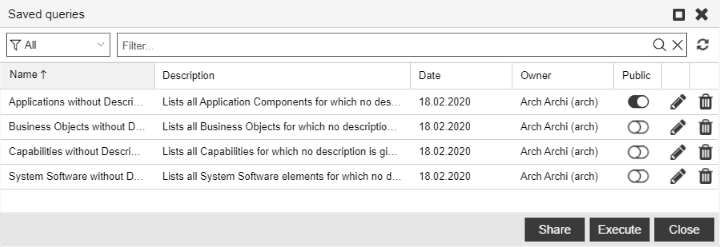
You can do administrative tasks for saved queries, such as modify, delete, publish, or run a saved query. To manage your saved queries:
- Click the My Searches button
.
A support dialogue opens. The following options are available:

Run Saved Query
To run a saved query:
- Select the query you want, and then click Execute.
Make Saved Query Available to Other Users
To make a saved query available to other users:
- Click the Publish button
.
Stop Sharing a Saved Query
To stop sharing a saved query:
- Click the Unpublish button
.
Normally, users can only stop sharing their own queries. Your ADOIT administrator may also designate power users that can unpublish queries from other users. The administrator must grant the "Saved queries (advanced options)" system role in order to accomplish this.
Generate URL for Search Query
You can generate a URL for a search query. This way you can e.g. easily share it with your colleagues via email.
To generate a URL:
Select the search query, and then click the Share button.
Now do one of the following:
Share the URL by email. In the Add people box, start typing the username or email address of a user, and then select the one you want when you see it. If the recipient is not a user or has no email address associated, you need to enter the full email address. Add additional recipients as needed. In the Include a message box, you can add a personal message if you want. When you are done, click Share and the message will be sent.
Paste the URL wherever you need it. Click Copy to directly copy the URL to the clipboard, or copy the URL manually from the Copy link box.
If the search query is private, it will be published (= become visible to all users) when you generate a URL for it.
Edit Saved Query
To change the name and description of a saved query:
- Click the Edit button
.
Delete Saved Query
To delete a saved query:
- Click the Delete button
.
Filter Saved Queries by Type
To fine-tune which types of saved queries are displayed:
Click the button
, and then select the option you want:
My lists all saved queries that you have created.
Public lists all search queries that you or other users have published.
All lists all saved queries.
Search
To find saved queries:
In the Filter... box, type the text you want to search for.
Press <Enter> or click the icon
.
All saved queries that contain the search string in their name or description are displayed.
To clear the search filter:
- Click the icon
.
Assign Saved Query to My User
From time to time it may become necessary to assign a published saved query to a new user (user leaves organisation, but the saved search query needs to be edited or deleted, etc.).
To assign the saved query to your user:
Select the query you want, and then click Assign to me.
When you're prompted to assign the query to your user, click Yes.
Your ADOIT administrator must designate you as a power user so that you can assign yourself published saved queries from other users. The administrator must grant the "Saved queries (advanced options)" system role in order to accomplish this.
Export Search and Analysis Results
In order to export the search results as an Excel file (XLSX format):
Click the Export button
, and then select the desired export configuration:
Excel (grouped): A separate Excel sheet is created for each topic. Table attributes are shown only to a limited extent: Brackets indicate how many rows the attribute contains.
Excel (grouped with table attributes): A separate Excel sheet is created for each topic. All columns and rows of table attributes are displayed.
Excel (current view): The appearance of the Excel spreadsheet corresponds to the display in the web client. Table attributes are shown only to a limited extent: Brackets indicate how many rows the attribute contains.
Excel (current view with table attributes): The appearance of the Excel spreadsheet corresponds to the display in the web client. All columns and rows of table attributes are displayed.