Installation Manual
1. Overview
This section describes
the installation of the ADONIS Process Manager for SharePoint app for Microsoft SharePoint Online
the set-up of the connection between the SharePoint instance and one or more ADONIS instances
2. Where to get ADONIS Process Manager for SharePoint
The ADONIS Process Manager for SharePoint app can be found on Microsoft AppSource.
3. Configuration of ADONIS
This chapter describes the needed configuration to allow access to the ADONIS instances by ADONIS Process Manager for SharePoint.
For more details about RESTful services, OAUTH 2.0, and CORS policy, please refer to the ADONIS documenation.
REST API and OAuth 2.0 configurations require a restart of the ADONIS environment.
3.1. REST API
For ADONIS Version 16.0 and newer
RESTful services
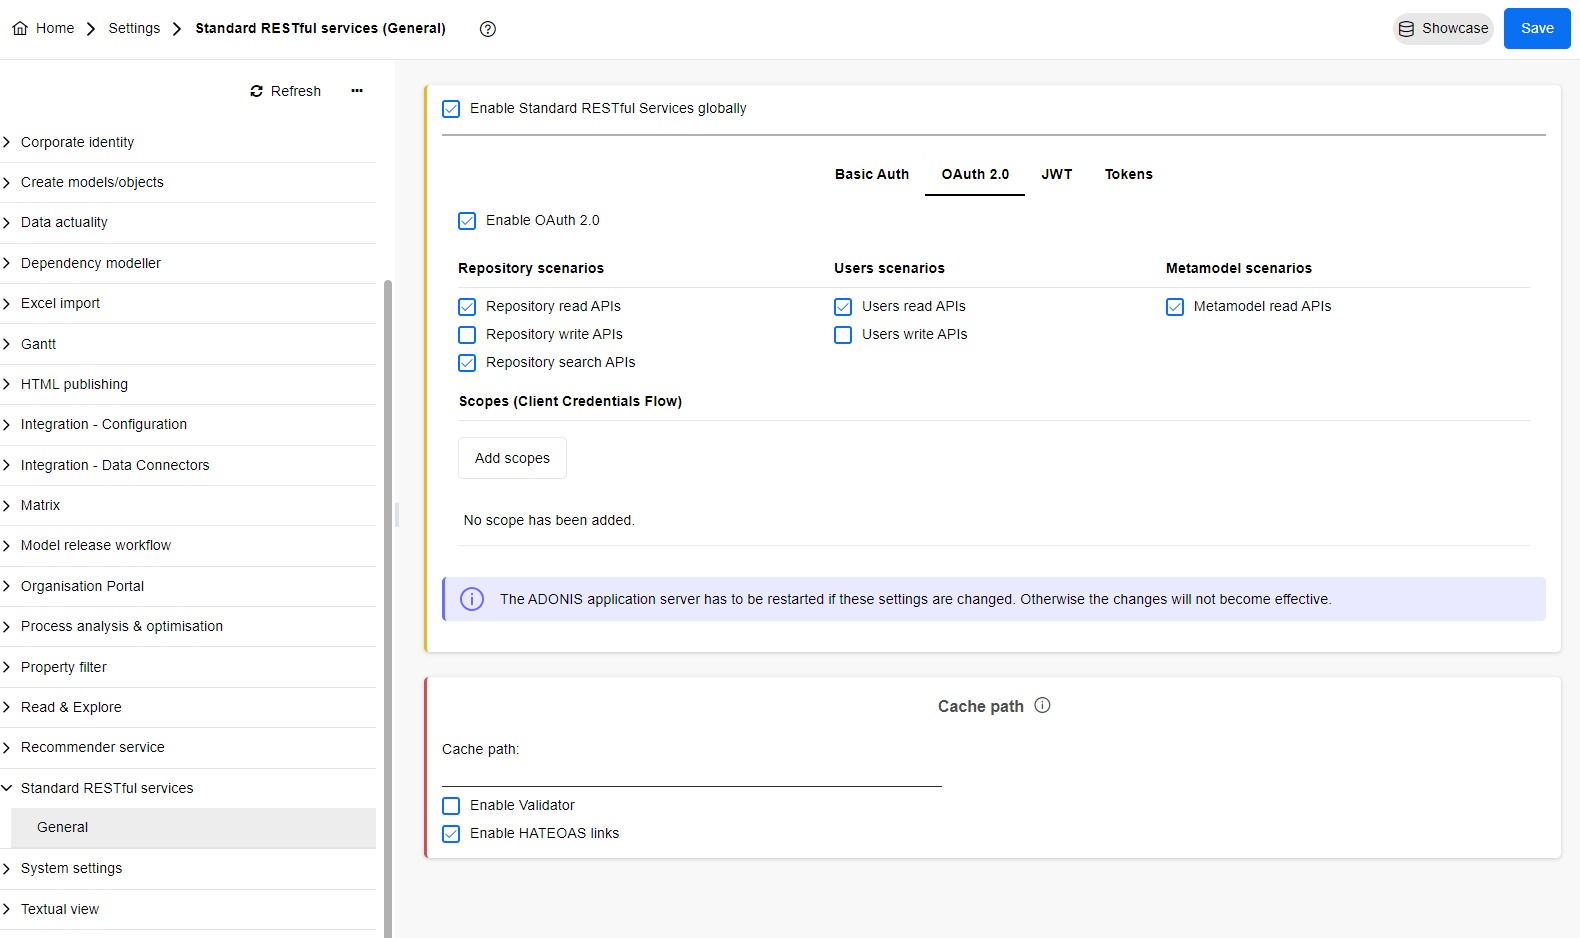
In the new ADONIS Administration open Settings and go to Standard RESTful services. Make sure that Enable Standard RESTful Services globally is checked and open OAuth 2.0.
There Enable OAuth 2.0 has to be checked and some specific settings are required:
Repository read APIs
Repository search APIs
Users read APIs
Metamodel read APIs
Enable HATEOAS links
The configuration should look similar to the screenshot. Please note, that changes have to be saved by clicking on Save.
For ADONIS Versions older than 16.0
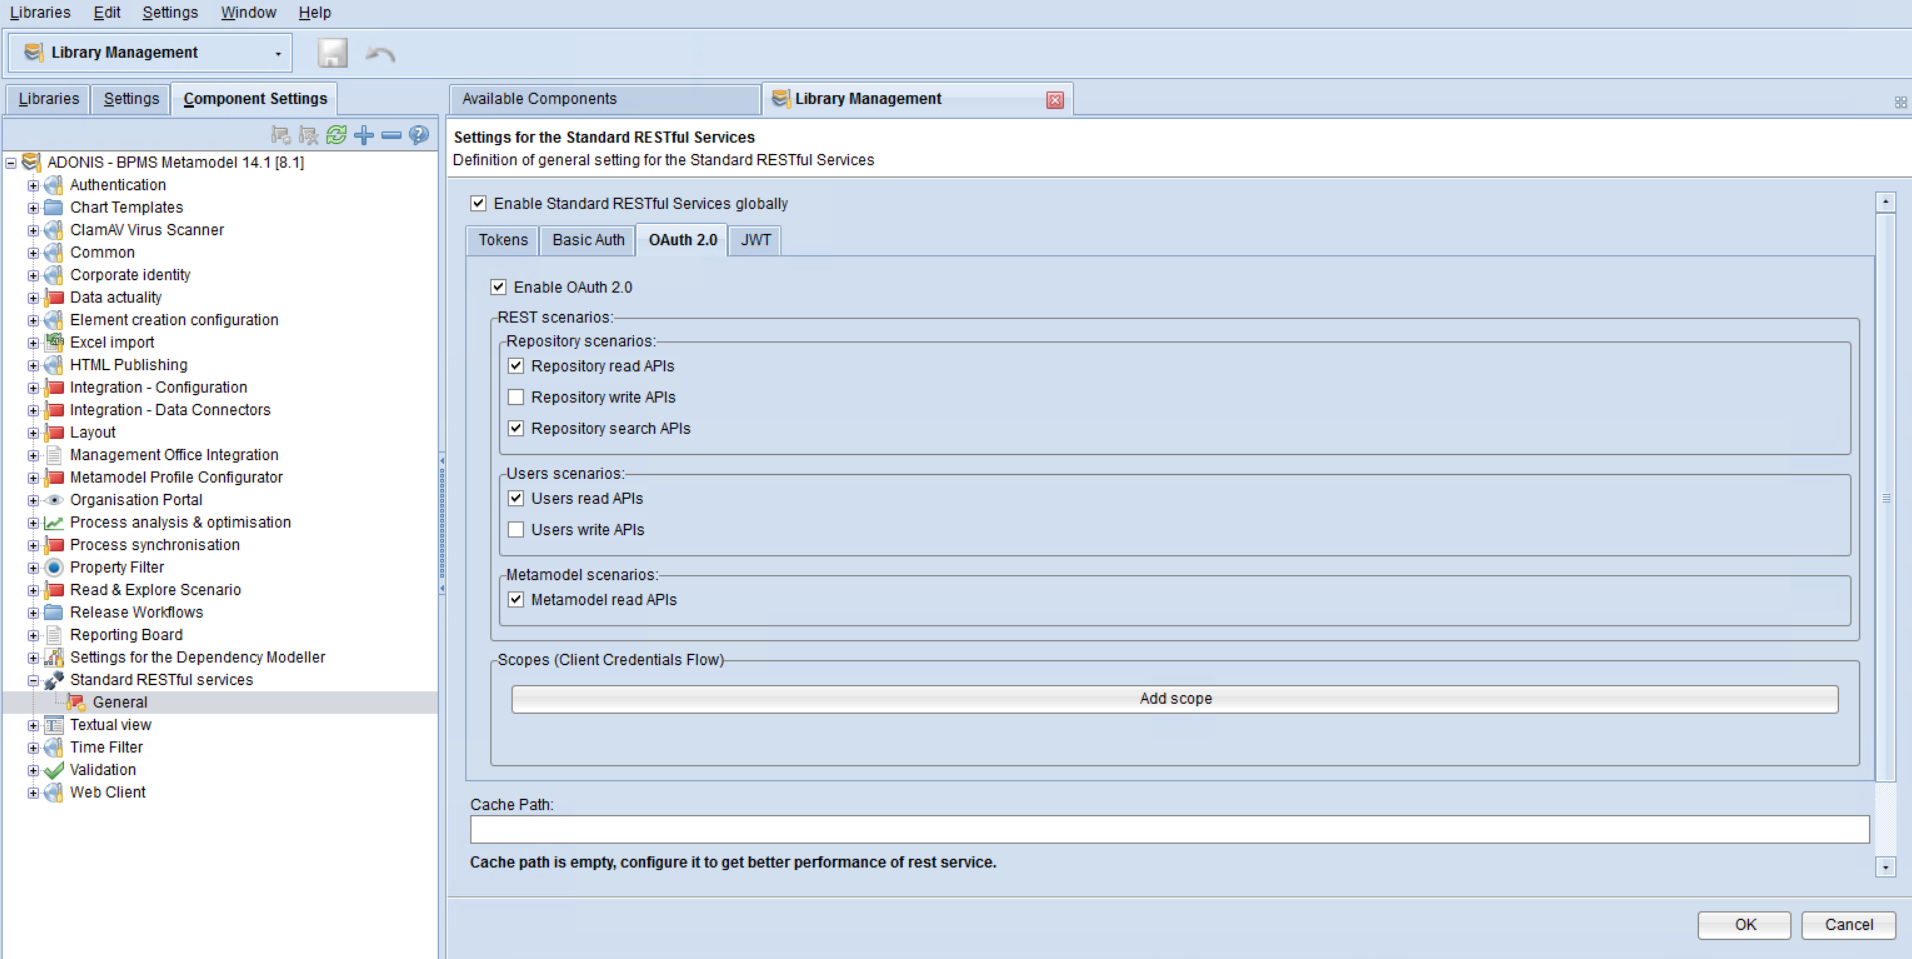
Please note that some specific settings are required.
Administration Toolkit REST scenarios:
Repository read APIs
Repository search APIs
Users read APIs
Metamodel read APIs
The configuration should look similar to the screenshot. Please note, that changes have to be saved by clicking on OK.
3.2 OAuth 2.0
For ADONIS Versions 16.1 and newer
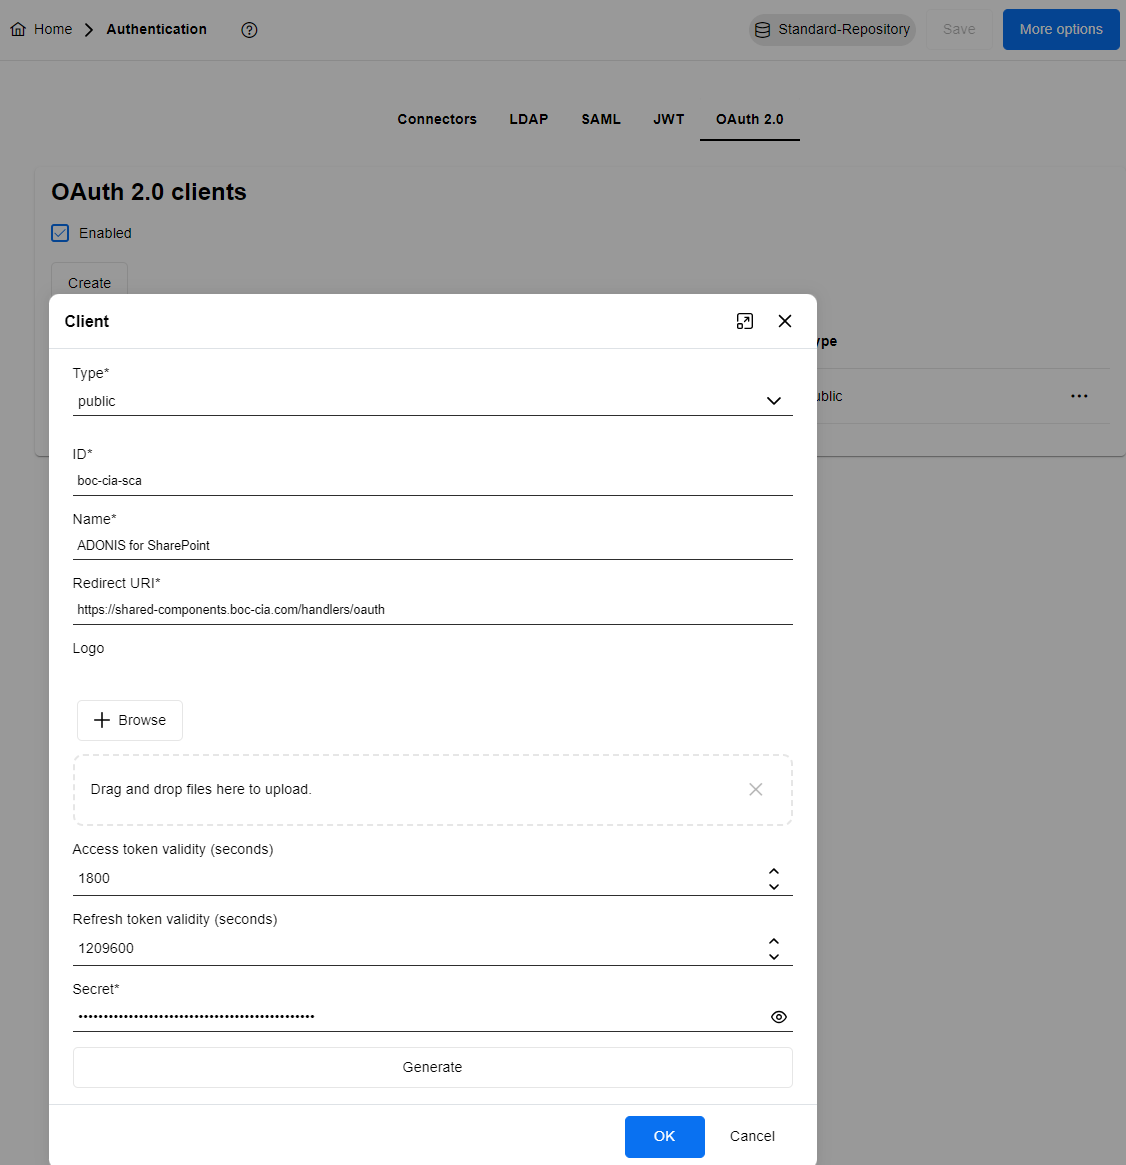
In the new ADONIS Administration open Authentication, go to OAuth 2.0 and Create with the following details:
Type: Public
ID: boc-cia-sca
Redirect URI: https://shared-components.boc-cia.com/handlers/oauth
The configuration should look similar to the screenshot. Please note, that changes have to be saved by clicking on Save.
For ADONIS Version 16.0
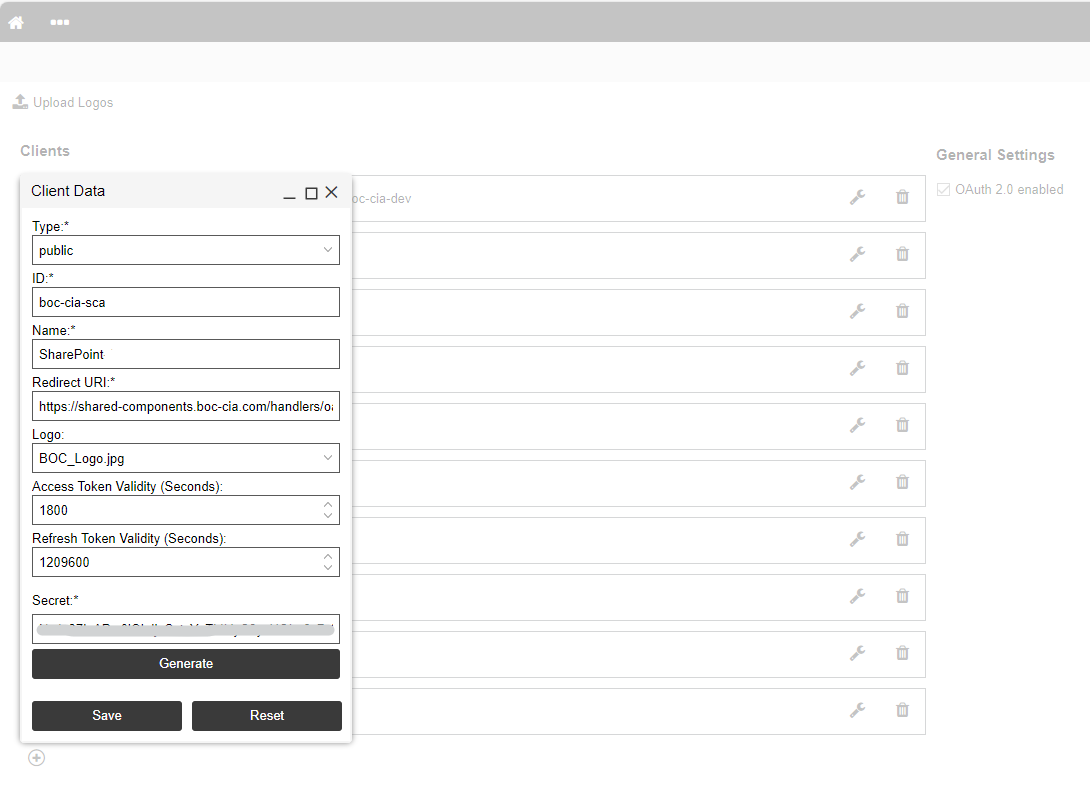
In the new ADONIS Administration Home, open More options and OAuth 2.0 and use the + icon to add a New connector with the following details:
Type: Public
ID: boc-cia-sca
Redirect URI: https://shared-components.boc-cia.com/handlers/oauth
The configuration should look similar to the screenshot. Please note, that changes have to be saved by clicking on Save in the Client Data dialogue and Save changes at the bottom right corner of the OAuth 2.0 screen.
For ADONIS Versions older than 16.0
Access the web admin page (./admin.view) and open via the 3-dots-menu Authentication -> OAuth 2.0.
There you can make sure that OAuth 2.0 enabled is checked and with the + icon a New connector can be created with the following details:
Type: Public
ID: boc-cia-sca
Redirect URI: https://shared-components.boc-cia.com/handlers/oauth
The configuration should look similar to the screenshot. Please note, that changes have to be saved by clicking on Save in the Client Data dialogue and Save changes at the bottom right corner of the OAuth 2.0 screen.

3.3. ADONIS CORS policy
For ADONIS Versions 16.1 and newer
In the new ADONIS Administration open Authentication, go to More options and open Security settings.
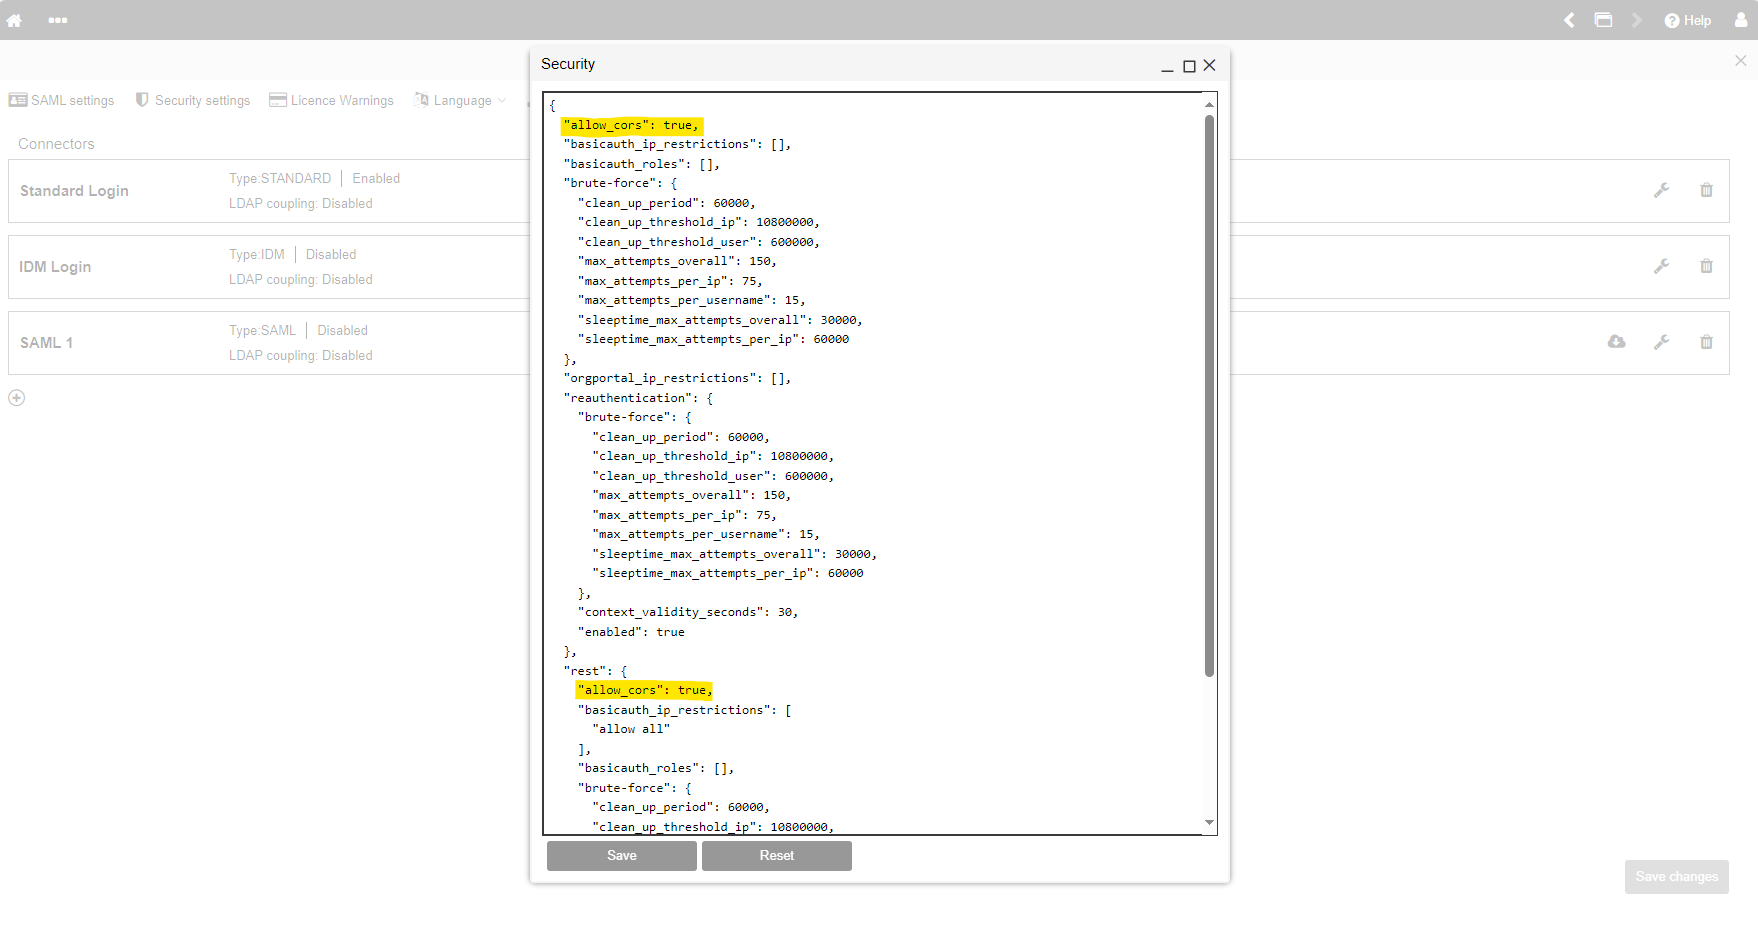
Allow CORS has to be enabled both in the chapters General and REST.
For ADONIS Version 16.0
In the new ADONIS Administration Home, open More options, select General Settings and open Security settings.
In the Security window, "allow_cors:" has to be set to "true" twice and confirmed by Save changes.
For ADONIS Versions 14.1.14 or 15.0.9 and newer
These ADONIS versions support the configuration of CORS settings via Authentication Configuration settings on the web admin page (./admin.view).
Once logged in to the admin page, navigate to Authentication and open the Security settings.
In the Security window, "allow_cors:" has to be set to "true" twice and confirmed by Save changes.

For ADONIS Versions older than 14.1.14 or 15.0.9
All ADONIS REST API requests are sent directly from the client web browser. To allow such requests, the following settings of the adoxx_web.properties server file must be set to true:
for all requests: security.rest.allow.cors
for OAuth 2.0 authentication process requests: security.allow.cors
4. Installation of the ADONIS Process Manager for SharePoint app in SharePoint Online
This chapter describes the steps to install the ADONIS Process Manager for SharePoint app in Microsoft SharePoint Online. You can either
- As a user: Search for the ADONIS Process Manager for SharePoint app on Microsoft AppSource and click Get it now. You will get redirected to the SharePoint Store where you have to Request the app. Your SharePoint administrator can continue then with the needed steps to install the app.
- As a SharePoint admin: Open your SharePoint Admin Center and navigate to the SharePoint Store. Search for the ADONIS Process Manager for SharePoint app and Add to Apps site. You can add the app to all sites then and optionally also to Microsoft Teams.
5. Set-up the connection from your SharePoint instance to your ADONIS instance(s)
After the app has been obtained, please directly contact cloud-integration-boc-ag@boc-group.com to provide the following inputs for the Customer Map Service:
URL of your SharePoint instance
URL(s) of your ADONIS instance(s) that should be accessible by ADONIS Process Manager for SharePoint