Localisation Management
The Localisation Management is the component for editing all metamodel texts and translating them into arbitrary languages.
Activate the Localisation Management
In order to use the Localisation Management:
Click on the component selection on the top left of the application window.
Select Localisation Management.
The Localisation Management only has one single tab: Objects for translation.
Objects For Translation
The translation editor presents its content as a hierarchical table structure containing all metamodel content in all available languages at the same time. Thus extensive, structured editing and translating of metamodel elements (model types, classes, attributes,...) is facilitated.
Every row represents a single metamodel element.
The first table column contains the name of the element.
The second column contains the text in the translation source language (as defined in the library).
Each of the other columns contain the text in another content language the active user has read or write access to.
Table entries marked red are potential translation candidates: The content in this cell is older than the text in the source language.
If a cell has to be translated, the name in the first column of the row is coloured red too. This facilitates recognising necessary translations.
Translate Element
In order to translate an element in the translation editor:
Double-click the element in the corresponding column.
Enter a new name and confirm by pressing <Enter>.
Select menu Localisation - menu entry Save when you have finished editing.
If you have further questions about the Localisation Management, please do not hesitate to contact you ADONIS consultant.
Note that the Localisation Management only serves for editing or translating existing text resources, not for creating new ones from scratch.
Import Translation
This procedure allows importing translated metamodel texts that have been saved in an external XML file to the ADONIS database. In order to import a translation:

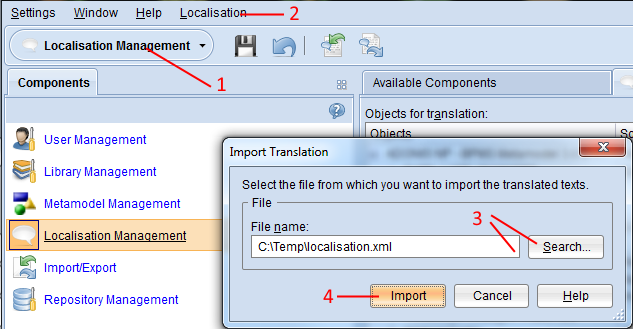
Open the Localisation Management component via the component selection (1).
Select menu Localisation – menu entry Import translation (2). A file selection dialogue appears.
Enter the path and name of the import file into the field Import file (either manually or via the support dialogue Search…) (3).
Confirm with Import (4).
Export Translation
This procedure allows exporting translated metamodel texts into an external XML file. In order to export a translation:

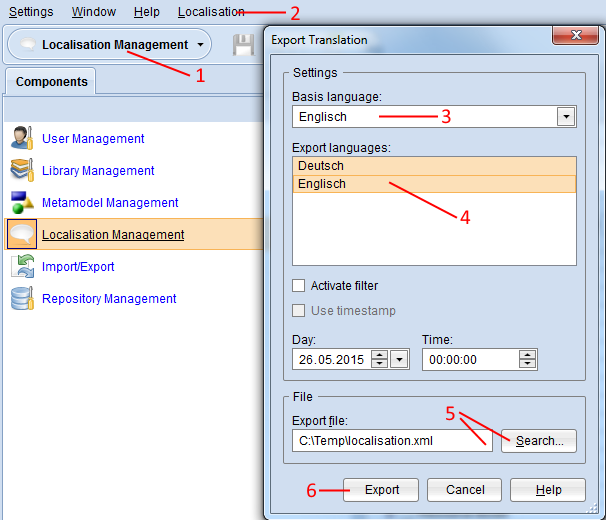
Open the Localisation Management component via the component selection (1).
Select menu Localisation – menu entry Export translation (2). A dialogue window containing the export settings appears.
Select the Basis language, i.e. the source language for the translation (3).
Select the Export languages you wish to export (4).
Enter the path and name of the future export file into the field Export File (either manually or via the support dialogue Search…) (5).
Confirm with Export (6). The data is exported and a confirmation box appears.
Optionally you can also:
Select Activate filter to only export rows which are potential translation candidates: The content in the target language is older than the text in the source language. Which language is treated as the source language depends on the selection of the Basis language (see above).
Select Use timestamp and choose a date to further narrow down the results when Activate filter is selected: Only rows where the text in the source language was edited after the chosen date are exported.