User Management
The User Management is a component that actually enables distributed working with ADONIS. For every further person who wants to work (simultaneously) with the program, an additional user account (short: user) has to be created in the database and equipped with rights. The User Management provides all necessary functions.
Activate the User Management
In order to use the User Management:
Click on the component selection on the top left of the application window.
Select User Management.
On the start screen of the User Management, links to the most important functions are provided.
Default User
During the installation of ADONIS, a user account is created automatically: The user Admin (with the starting password password) is a super user for administrating ADONIS. It has full access to all tool components and database contents. Its rights cannot be restricted.
Manage User Groups
ADONIS users are organised in user groups for better overview and access rights handling. Please note that ADONIS user groups do not directly contain the users, but reference them: the same user can be referenced from any number of user groups at the same time (and thus exist in them).
Create User Group
Please refer to the section Set Up User Groups for details.
Rename User Group
In order to rename an existing user group:
Select the user group in the User Catalogue.
Press the "F2" key. An input dialogue appears.
Enter the new name.
Confirm with OK. The new name is applied and the dialogue window closed.
Manage Users
The following sections provide an overview of the most important functions for managing users.
Create User
Please refer to the section Set up Users and Add Users to Groups for details.
Edit User
From time to time it may be necessary to edit the user data (forgotten passwords, a new repository is available, the user moves to another department of the company and in the course of that his virtual alter ego moves to a new user group…).
In order to edit a user:
Double-click the user in the User Catalogue. A tab with the user data is shown.
Modify the user data as required.
Confirm with Change.
Optionally you can also:
- On the Settings menu, click User Preferences to change various program settings in order to adapt ADONIS for a user.
For details about the user data please refer to the section Set up Users and Add Users to Groups.
Change User Rights
In the standard view, the user tab shows the available user data. If a single user needs to have special rights, the function Edit User provides sub tabs allowing to assign personal access rights.
In order to change user rights:
Activate the corresponding sub tab.
Change the user rights as desired. The settings are saved automatically.
For details about changing user rights please refer to the sections Add Rights for User Groups and Assign Access Rights to the Rights Management of Users / User Groups
Change System Roles
You can change the system roles of a user in the user tab in the System roles area.
Add System Roles
In order to add system roles:
- Click the Add System Role... button
 ,
select the system roles you wish to add, and then click OK.
,
select the system roles you wish to add, and then click OK.
Remove System Roles
In order to remove system roles:
- Select the system roles you wish to remove, and then click the Remove System Role... button
 .
.
Clone User
Using the function Clone User an exact copy of an already existing user can be created. The new user adopts all assignments and authorisations of the original user, except the user name and the personal settings stored in the user profile (e.g. language or dialogue settings).
In order to clone a user:
Select a user in the User Catalogue.
Select context menu of the user — menu entry Clone User. An input dialogue appears.
Enter the new user name into the field New user name.
Confirm with OK. The user including all user rights and assignments is cloned.
Please note that the cloned user also starts with the same password as the original user!
Delete User
Users which are no longer needed can be deleted from the database by ADONIS administrators who hold the necessary rights.
In order to delete a user:
- Select a user in the User Catalogue and press the <Del> key. After a security query the user is deleted permanently.
The default user Admin can neither be deactivated nor deleted.
Delete User Profile
Every user has a user profile. While working with ADONIS, various bits of information are stored in the user profile: open models and their current settings, dialogue settings, paths for saving files etc. After database problems have occurred or when large quantities of models are reorganised, as well as before migration scenarios (e.g. product updates or database change), it can be of advantage to delete the user profiles in order to reduce the size of the database, gain performance and prevent general problems.
In order to delete a user profile:
Select a user in the User Catalogue.
Select context menu of the user — menu entry Delete user profile. After a security query the user profile is deleted and replaced by the default settings.
Assign current repository
ADONIS administrators can assign the current repository to multiple users at once. In order to do so:
Select one or more users in the User Catalogue.
Select context menu — menu entry Assign current repository.
Make sure the correct repository is selected before you start. Please refer to the section Switch Repository for details.
Revoke current repository
ADONIS administrators can revoke access to the current repository from multiple users at once. In order to so:
Select one or more users in the User Catalogue.
Select context menu — menu entry Revoke current repository.
Make sure the correct repository is selected before you start. Please refer to the section Switch Repository for details.
Share Users with Standard-Repository
Please refer to the section Share Users with a Repository for details.
Export Users
For external data backup and to transfer user data to ADONIS administrators not networked, it is possible to save user accounts into an external AXR file.
In order to export users:
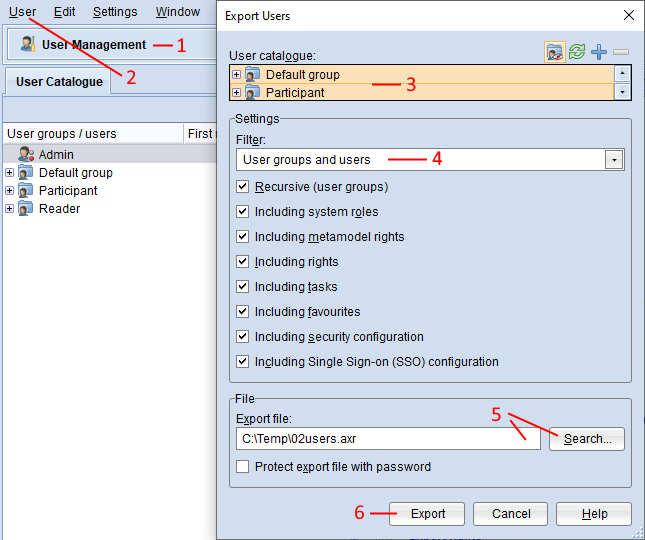
Open the User Management component via the component selection (1).
On the User menu, click Export users... (2). A dialogue window containing the export settings appears.
In the User catalogue box, select the users and/or user groups you wish to export (3). By clicking on a user group, all users included in this group are also automatically selected.
From the Filter list, select whether to export only users, only user groups or both (4).
In the Export file box, enter the path and name of the future export file (either manually or via the support dialogue Search…) (5).
Confirm with Export (6). The data is exported and a confirmation box appears.
Click Show protocol >> to verify if all the selected users and/or user groups have been exported correctly.
Optionally you can also:
Select Recursive (user groups) to export the entire hierarchy (all sub groups and their sub groups including their content) of the selected user groups.
Select Including system roles to export all system roles for users and user groups.
Select Including metamodel rights to export all metamodel rights together with the system roles.
Select Including rights to export all user rights together with the users.
Select Including tasks to export all user tasks together with the users.
Select Including favourites to export all favourites together with the users.
Select Including security configuration to export the password strength settings and security relevant login settings.
Select Including Single Sign-on (SSO) configuration to export the SSO provider settings and LDAP-fields mapping.
Select the check box Protect export file with password to encrypt the export file.
The special user Admin cannot be exported.
Import Users
Users previously exported can be imported and stored in the ADONIS database.
In order to import users:
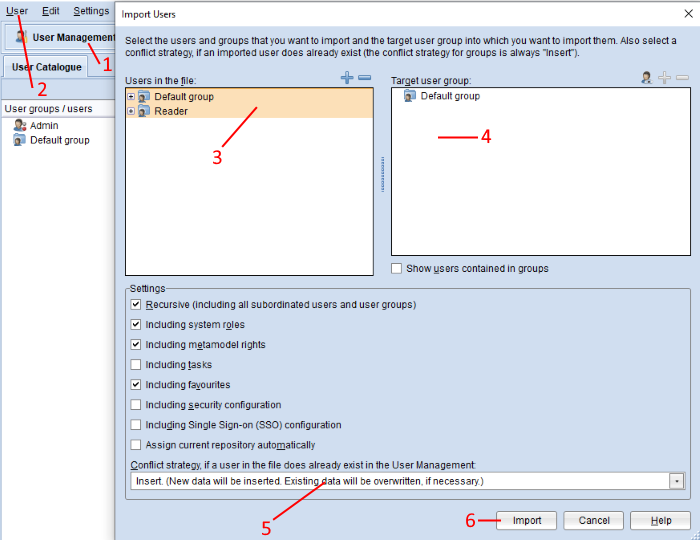
Open the User Management component via the component selection (1).
Select menu User – menu entry Import users… (2). A file selection dialogue appears.
Enter the path and name of the backup file into the field Import file (either manually or via the support dialogue Search…).
Confirm with Import. If the import file is encrypted, enter the password and click OK. Another dialogue window containing detailed import settings appears.
Select the users and/or user groups you wish to import (3).
Select the user group into which the data shall be imported (4).
Define the behaviour if a user / user group to be imported already exists in the database (5). You can choose to insert the import user and combine the information from both sources (default selection), overwrite the user in the database or ignore the import user and preserve the original user.
Confirm with Import (6). The data is imported and a confirmation box appears.
Click Show protocol >> to verify if the import was successful.
Optionally you can also:
Select Show users contained in groups to display the hierarchy of the user group into which the data shall be imported.
Select Recursive to import the entire hierarchy (all sub groups and their sub groups including their content) of the selected user groups.
Select Including system roles to import all system roles for users and user groups.
Select Including metamodel rights to import all metamodel rights together with the system roles.
Select Including tasks to import all user tasks together with the users.
Select Including favourites to import all favourites together with the users.
Select Including security configuration to import the password strength settings and security relevant login settings.
Select Including Single Sign-on (SSO) configuration to import the SSO provider settings and LDAP-fields mapping.
Assign the current repository automatically.
Named Users
If you designate a user as a named user, this user is guaranteed access to a specific scenario in ADONIS. Otherwise, the user will be a concurrent user. Concurrent users share the available slots and can log in as long as there are free slots available.
This function is only available if a scenario licence is in use.
Activate the Named Users Management
In order to activate the named users management:
- In the User Management tab, click Named users
 .
.
Add Named User
In order to designate a user as a named user for a specific scenario:
Select the scenario in the Scenarios/Named users box, and then click the Add named users button
 .
.Add named users from the user catalogue, and then click OK.
If the amount of selected users exceeds the amount of free named users for a scenario, the assignment will fail.
You can select a user who does not have access to the scenario with his current system roles.
However, a warning icon ![]() will be displayed next
to the user name.
will be displayed next
to the user name.
Please refer to the section Set up Access to Role-Specific Scenarios for details on how to provide access to a scenario to a user.
User Access Rights in ADONIS: An Overview
The starting point for access to certain parts of ADONIS are the users:
Users can belong to one or more user groups
Users (or user groups) are assigned one or more system roles
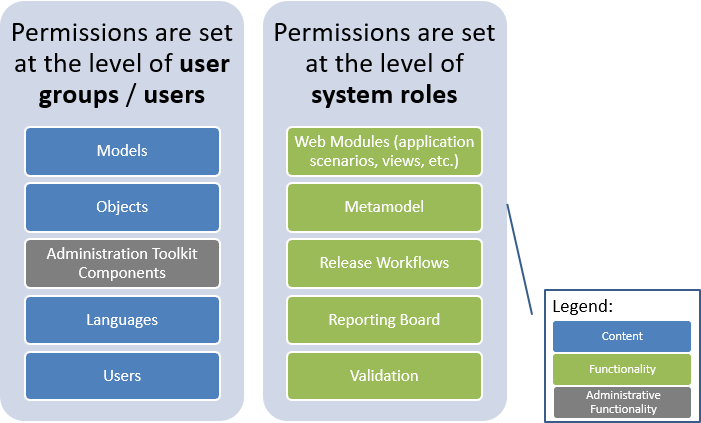
Permissions for Content
Permissions for content are mainly set at the level of users groups or directly at the user level:
Models
Objects
Languages
Users
For details about the permissions that may be assigned to user groups or users, please refer to the section Rights Management.
Permissions for Functionalities
Permissions for functionalities are mainly set at the level of system roles:
Web modules (application scenarios, views, etc.)
Metamodel
Release Workflows
Reporting Board
Validation
For details about the permissions that may be assigned to system roles, please refer to the section System Roles Management .
Rights Management
User groups, but also single users, are equipped with a set of rights defining and limiting their possibilities within ADONIS. These rights are administered by ADONIS administrators and grant or deny access to certain parts of ADONIS for these users/groups.
The Inheritance Concept of the Rights Management
Rights can be inherited in hierarchies. This means, that it is not necessary to set rights on all ADONIS elements explicitly, but that rights set in a certain place also automatically apply to all subordinated structures and content – as long as there is no explicit right set there. If a subordinated element has explicit rights, this overrides the automatic inheritance (and starts a new rights hierarchy).
How Permissions Combine
A user's permissions are based on:
Permissions from user group memberships
Permissions assigned explicitly to the user
The user's effective permissions are the combination of the user and user group permissions. The following rules apply:
Users with Explicit Permissions
- Permissions assigned explicitly to a user override permissions inherited from groups.
If a user has Read permission and is a member of a group with Write permission, the user's effective permission is Read.
The Maximum Right
- If the user is a member of multiple user groups, and no explicit permissions have been assigned to the user, the maximum right applies: Even if the action is allowed only in one single of these groups, then the user has this permission.
If a user is a member of a group with Write permission and another group with Read permission, the user's effective permission is Write.
If a user is a member of a group with Read permission and another group with No Access permission, the user's effective permission is Read.
Inheritance of "No Access"
If the No access permission is set on an element, that permission is automatically applied to all subordinated elements - even if other explicit permissions are set there. In the Rights column, the momentary rights status of all subordinate elements is greyed out to indicate this.
Changing the permissions on the subordinate element does not affect the effective permissions. The actual permissions will not be applied until the No access permission in a superior hierarchy level is removed.
If a user is a member of a group with No Access permission to a model group, the user's effective permission is No Access to this model group and all subordinate groups.
If permissions are assigned depending on the content in the Repository Management, the following applies: models, model groups, objects and object groups are treated like user groups.
Types of Access Permissions
These types of access can occur:
Write
The user may use, modify, save, and delete the element as he/she wants. If it is a group right, it also applies to the contents of the group (as long as these do not contain differing rights).
Read
The user can access this element, but is not allowed to make changes or to save potential changes.
No Access
This element is not available for the user (it is invisible for them in the various lists and catalogues).
Limited Write Access
The user may perform some manipulations while others are forbidden; read access is unlimited. Typical example: A user may be allowed to create user accounts in a user group, but is not allowed to delete existing users. A special case of the limited write access is Read Models With Translation Option: Here, models may not be modified in structure and size, but existing attribute values may be translated into other content languages.
Change Rights
This right allows a user to change the user rights associated with this element.
To allow a user to change the access rights of users/user groups to models and objects, "Change rights" must be activated on both sides: On the side of the users and on the side of the models/objects. By default, "Change rights" is set to allowed for model/object groups and set to denied for user groups.
Example: Members of the user group "Admin" should be able to change the access rights of the user group "Architects" to models in the group "Reports". The access rights of the user group "Admin" must be set as follows: "Change rights" to allowed on the user group "Architects" and the model group "Reports".
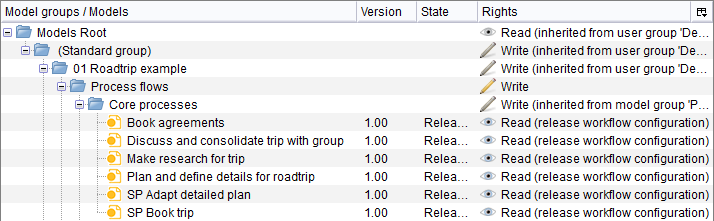
Rights can either be assigned directly or indirectly via inheritance. The source of the right is listed in the Rights column:
No additional information
The right was set explicitly in this place and is also valid here.
(inherited from ...)
The right was set in a superior hierarchy level (group) and is beqeathed down here.
(release workflow configuration)
This right is derived from a release workflow role of the user (Configuration of Rights).
(default)
No rights are set explicitly for this element and no rights have been inherited. The default rights set by ADONIS apply.
Change Rights
When editing rights it is possible to modify either basic rights or detailed rights.
Change Basic Access Rights
Please refer to the section Add Rights for User Groups for details.
Change Detailed Access Rights
Please refer to the section Assign Access Rights to the Rights Management of Users / User Groups for details.
Special Cases in the Rights Management
In the Rights Management, some special cases apply which have to be regarded by the ADONIS administrators but can be utilised as well.
Dependent Rights
Some authorisations do not only apply for themselves, but are as well dependent from each other for logical reasons. Therefore many right states automatically trigger other certain states:
Reading forbidden
Also Writing and, if available, Reading with possible translation are forbidden automatically.
Writing allowed
Also Reading and, if available, Reading with possible translation are allowed automatically.
Reading with possible translation allowed
Also Reading is allowed automatically.
Reading with possible translation forbidden
Also Writing is forbidden automatically.
Assign Global Administration Rights
By default, new users only get access to the web client, not to the Administration Toolkit. If Administration Toolkit access is granted later (see section Assign Access Rights to the Administration Toolkit) to a single user, ADONIS offers to automatically assign global administration rights to this user:
- Set the Administration Toolkit rights to Access.
A confirmation box appears:

Click Yes to automatically assign write access on all model groups, models, user groups, and users to the user in question, or:
Click No to leave these rights categories untouched.
The rights situation is adjusted accordingly.
Users with global administration rights can perform the same administrative tasks as the super user Admin, with one exception: Only the user Admin has full access to all files in the database (see section File Management).
Model Release Workflow - Represent state as model groups
Depending on the Configuration of States, models will cycle through folders which bear the name of the current state during versioning (e.g. "Archived). Permissions to these model groups must not be set to No access for any users. Users need at least read access to these model groups. However, you can deny access to individual subordinated model groups.
Object Ownership
In ADONIS rights can be dynamically set via relations. For example, a user can be assigned ownership of a repository object.
Please refer to the section Object Owners for details.
Export Rights
For external data backup and to transfer user rights to ADONIS administrators not networked, it is possible to save the user rights into an external AXR file.
In order to export rights:
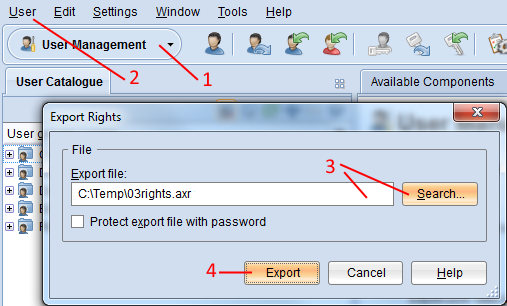
Open the User Management component via the component selection (1).
Select menu User – menu entry Export rights… (2). A dialogue window containing the export settings appears.
Enter the path and name of the future export file into the field Export File (either manually or via the support dialogue Search…) (3).
Confirm with Export (4). The data is exported and a confirmation box appears.
Optionally, you can also:
- Select the check box Protect export file with password to encrypt the export file.
Import Rights
This procedure allows importing user rights that have been saved in an external AXR file to the ADONIS database.
In order to import rights:
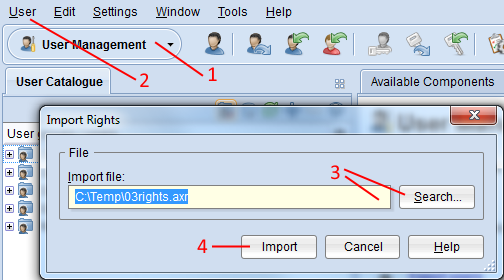
Open the User Management component via the component selection (1).
Select menu User – menu entry Import rights… (2). A file selection dialogue appears.
Enter the path and name of the user rights file into the field Import file (either manually or via the support dialogue Search…) (3).
Confirm with Import (4). If the import file is encrypted, enter the password and click OK. The data is imported and a confirmation box appears.
System Roles Management
The system roles management serves two functions. You can use it to:
Grant access to ADONIS web client features. For example, you can specify whether users can create Cluster Maps or which application scenarios are available to them in the ADONIS web client.
Assign user rights for the available metamodel elements (= metamodel rights). For example, you can specify whether users can create models of a certain type or only open them read-only.
Activate the System Roles Management
In order to activate the system roles management:
- In the User Management tab, click Manage system roles
 .
.
The system roles management opens and the System roles catalogue is displayed.
Create System Role
Please refer to the section Create System Roles and Assign Users for details.
Edit System Role
In the system roles management, you can edit all system roles that display the icon
![]() . In order to do so:
. In order to do so:
- Select the system role in the System roles catalogue, and then click the Edit system role...
button
 .
.
System roles that display the icon ![]() are
read-only. These system roles are created by ADONIS and cannot be edited.
are
read-only. These system roles are created by ADONIS and cannot be edited.
For details about the system role properties please refer to the section Create System Roles and Assign Users.
Assign Web Client Modules to System Roles
To assign web client modules to system roles, you have to switch to the Library Management component. Please refer to the section Web Modules for details.
Edit Metamodel Rights
In order to edit the metamodel rights of a system role:
Select the system role you want to edit in the System roles catalogue.
Right-click the system role, and then click Edit metamodel rights….
The Metamodel Rights editor opens.
The check box Relevant for metamodel rights must be activated before you can edit the metamodel rights of a system role.
To which Metamodel Elements Can I Assign Metamodel Rights?
Metamodel rights allow you to assign user rights to the following metamodel elements:
Model types
Classes (= object classes)
Relations (= relation classes)
Attributes
Additionally, you can restrict target classes of relations.
Switch between Global Rights and Context-Specific Rights
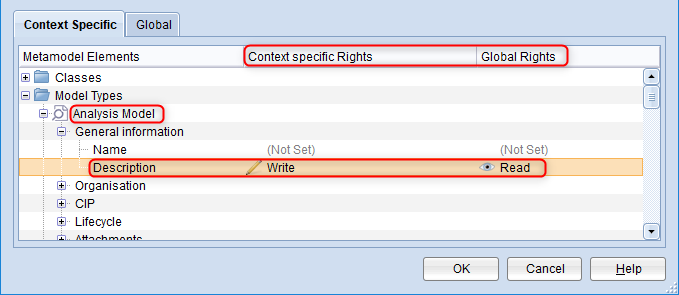
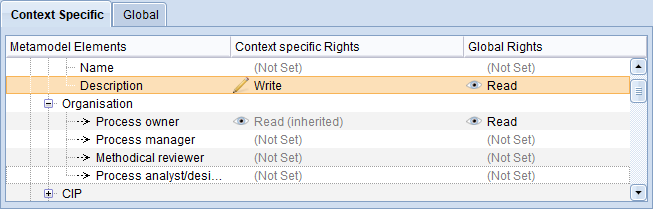
In ADONIS, rights to specific metamodel elements can be set globally as well as context-specific. Global rights are identical everywhere an element is used. Context-specific rights overwrite global rights in the context of a specific model type, class etc.
Access to the Description attribute has been globally set to read access for users with a specific system role. They cannot edit the description of models, objects or relations.
However, in the context of the Analysis Model, they have write access to the Description attribute. Therefore, the users can edit the description of Analysis Models.
By default, context-specific rights are displayed in the Metamodel Rights editor.
Switch to Global Rights
In order to switch to global rights:
- Click the Global tab.
Switch to Context-Specific Rights
In order to switch back to context-specific rights:
- Click the Context-Specific tab.
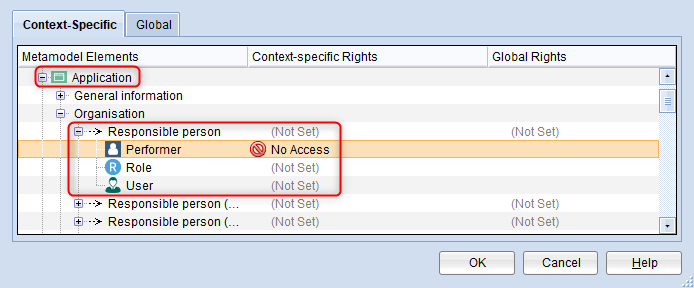
Restrict Target Classes of Relations
In context of models and objects, you can specify for outgoing relations which target classes are available to members of a system role.
Possible permissions are: Users have access to a target class (Not Set) or not (No Access). Other types of permissions are not available for target classes.
Starting from the source object Application, you can define e.g. for the relation Responsible person, that Roles and Users are available as target objects, but Performers are not.
Edit Basic Metamodel Rights
When editing metamodel rights it is possible to modify either basic rights or detailed rights. Changing basic rights is sufficient for most situations when managing metamodel rights.
In order to change the basic metamodel rights:
Select a metamodel element from the list in the Metamodel Rights editor.
Right-click the selection, and then click either No access, Read, Read with translation option or Write.
The types of permissions that are possible are listed in the section Types of Access Permissions to Metamodel Elements. Look up examples that illustrate how changing metamodel rights affects working with the ADONIS web client in the chapter Impact of Restricting Access to Metamodel Elements.
Edit Detailed Metamodel Rights
Detailed metamodel rights allow you to assign special user rights for the available metamodel elements. For example, you can specify that users with a specific system role can create models, but cannot delete models.
In order to change the detailed metamodel rights:
Select an attribute, model type, class or relation from the list in the Metamodel Rights editor.
Right-click the selection, and then click Edit rights.... The editor for managing detailed rights is displayed.
Select a permission from the list, and then click either Allow or Forbid.
No detailed metamodel rights can be assigned on target classes of relations.
Types of Access Permissions to Metamodel Elements
These types of access can occur:
Not Set
No rights are set explicitly for this element.
Write (with Detailed Rights Create, Delete and Edit)
The user may create, delete and edit the element as they want. You can specify which actions are allowed by assigning detailed metamodel rights.
Read with Translation Option
The user may translate the attribute values into other content languages.
Read
The user can access this element, but is not allowed to make changes or to save potential changes.
No Access
This element is not available for the user (it is invisible for them in the various lists and catalogues).
The following permissions CANNOT be assigned for attributes: Read with translation option and the detailed rights Create, Delete and Edit.
For target classes of relations, you can ONLY specify whether users have access to them (Not Set) or not (No Access).
Combining Permissions to Metamodel Elements
When a user is a member of multiple system roles which are relevant for metamodel rights, the following rules apply:
The least restrictive permissions applies ("Read" and "Write" results in "Write").
Any explicit permissions override "Not Set" ("Read" and "Not set" results in "Read").
Visualization of the Source of Metamodel Rights
Metamodel rights can either be assigned directly or indirectly via inheritance. The source of the right is listed in the Context specific Rights and Global Rights columns:
No additional information
The right was set explicitly in this place and is also valid here.
(inherited)
The right was set globally and applies in the context of this specific model type, class etc., because no context-specific rights are set.
Copy Metamodel Rights
You can copy metamodel rights:
from metamodel element to metamodel element
from system role to system role
Copy Metamodel Rights from Element to Element
In order to copy metamodel rights from one metamodel element to another:
Select an attribute, model type, class or relation from the list in the Metamodel Rights editor.
Right-click the selection, and then click Copy Right.
Select one or more target elements from the list. The target elements must be of the same type as the source element (attribute - attributes etc.).
Right-click the selection, and then click Paste Right.
Copy Metamodel Rights from System Role to System Role
In order to copy metamodel rights from one system role to another:
Select the target role in the System roles catalogue.
Right-click the target role, and then click Copy metamodel rights….
Select the source role from the list, and then click OK.
A dialogue box appears. You will be asked whether you want to copy the metamodel rights or not. Click Yes and copy the metamodel rights.
Reset Metamodel Rights
You can reset the metamodel rights of individual metamodel elements or entire system roles.
Reset Metamodel Rights of an Element
In order to reset the metamodel rights of a metamodel element back to the default:
Select one or more attributes, model types, classes or relations from the list in the Metamodel Rights editor.
Right-click the selection, and then click Reset Rights.
Reset Metamodel Rights of a System Role
In order to reset the metamodel rights of a system role back to the default:
Select the system role in the System roles catalogue.
Right-click the system role, and then click Reset metamodel rights….
A dialogue box appears. You will be asked whether you want to reset the metamodel rights of the system role back to the default. Click Yes and reset the metamodel rights.
Export System Roles
In order to export system roles:
Open the User Management component via the component selection.
Click the Export system roles button
 .
.In the System roles catalogue area, select the system roles you wish to export.
Enter the path and name of the future export file into the field Export File (either manually or via the support dialogue Search…).
Click OK. The system roles are exported and a confirmation box appears.
Optionally, you can also:
Select the Including metamodel rights check box to export all metamodel rights together with the system roles.
Select the Protect export file with password check box to encrypt the export file.
Import System Roles
In order to import system roles:
Open the User Management component via the component selection.
Click the Import system roles button
 .
.Enter the path and name of the user rights file into the field Import file (either manually or via the support dialogue Search…).
Click OK. If the import file is encrypted, enter the password and click OK.
In the System roles in the file area, select the system roles you wish to import.
Define the behaviour if a system role to be imported already exists in the database. You can choose to insert the import system role and combine the information from both sources (default selection), overwrite the system role in the database or ignore the import system role and preserve the original system role.
Click OK. The system roles are imported and a confirmation box appears.
Optionally, you can also:
Select the Including metamodel rights check box to import all metamodel rights together with the system roles.
Select the Write Protocol File check box to create a log file during the process of the export. It is saved as a plain text file in the file system.
Export Security Configuration
This procedure allows exporting security configuration data to an external AXR file for backup and distribution matters.
In order to export the security configuration:
Open the User Management component via the component selection.
Select menu User – menu entry Export security configuration …. A dialogue window containing the export settings appears.
Select Including security configuration to export the password strength settings and security relevant login settings.
Select Including Single Sign-on (SSO) configuration to export the SSO provider settings and LDAP-fields mapping.
Enter the path and name of the security configuration file into the field Export file (either manually or via the support dialogue Search…).
Confirm with Export.
Optionally, you can also:
- Select the check box Protect export file with password to encrypt the export file.
Import Security Configuration
This procedure allows importing security configuration data to the ADONIS database.
In order to import a security configuration:
Open the User Management component via the component selection.
Select menu User – menu entry Import security configuration …. A dialogue window containing the import settings appears.
Select Including security configuration to import the password strength settings and security relevant login settings.
Select Including Single Sign-on (SSO) configuration to import the SSO provider settings and LDAP-fields mapping.
Enter the path and name of the security configuration file into the field Import file (either manually or via the support dialogue Search…).
Confirm with Import. If the import file is encrypted, enter the password and click OK. The data is imported and a confirmation box appears.
Audit Log
ADONIS allows you to track administrative actions, such as
creating and deleting users,
changing access rights and
importing and exporting repository data.
For a complete list of logged actions, please refer to the chapter Audit Log - Logged Actions.
When the audit log is enabled, the results are stored in the database. The content of the audit log can be exported to a CSV file.
Enable Audit Log
To enable logging of administrative actions:
On the Settings menu, click System Preferences.
Click the Audit log button.
Select the Logging enabled check box.
To log the name of the administrator who made the change, select the Log author check box. If you clear this check box, these actions will be logged in an anonymous way and cannot be tracked to the administrator.
Confirm with OK.
Administrative actions will now be logged.
Export Audit Log
To export the audit log:
Open the User Management component via the component selection.
On the User menu, click Export audit log
 .
.Enter the path and name of the export file into the field Export file (either manually or via the support dialogue Search…).
To export administrative actions from a selected period of time, choose a From date and an Until date. Otherwise, all logged administrative actions will be exported.
To display timestamps in the audit log in local time, select the Export with local time check box. Otherwise, timestamps are displayed in UTC.
From the Language list, select the language in which to display content (action type, models and objects as well as model groups and object groups etc.) in the export file.
Confirm with Export. The data is exported and a confirmation box appears.
Examine the Audit Log
Once the export is complete, you can examine the results. The audit log contains the following columns of information:
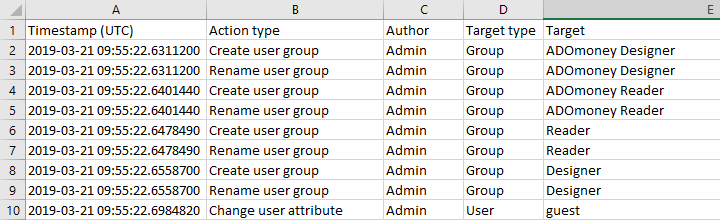
Timestamp
The timestamp of the date and time of the event, in local time or UTC.
Action type
The type of action executed by the administrator.
noteFor a complete list of logged actions, please refer to the chapter Audit Log - Logged Actions.
Author
Identifies the administrator who performed the action.
Target type
Identifies the type of the action target.
Target
Identifies the target of the action.
Target ID
The unique identifier of the target of the action.
Aspect
Identifies more closely what is affected at the target.
Aspect ID
The unique identifier of the aspect of the target where the action takes place.
Global context
The unique identifier of the global context where the action takes place, e.g. the repository or the library.
Local context
The unique identifier of the local context where the action takes place, e.g. the user group where a right is changed.
Language ID
Identifies the language in which the change took place.
Old value
Identifies the value of the item before the change.
New value
Identifies the value of the item after the change.
Delete Audit Log Entries
Entries which are older than a specific date and time can be permanently removed from the audit log. This action cannot be undone.
To delete audit log entries:
Open the User Management component via the component selection.
On the User menu, click Delete audit log entries
 .
.Choose a Day and Time.
Confirm with OK. Another dialogue box appears. You will be asked whether you want to delete the selected entries or not. Click Yes and delete the entries.
Anonymize Audit Data
Audit log entries for specific users can be anonymized to prevent identification of individuals. Anonymizing will replace the user name with "####" across all columns in the audit log. This action cannot be undone.
To anonymize a user name in the audit log:
Open the User Management component via the component selection.
On the User menu, click Anonymize audit data
 .
.In the User name box, enter the name of the user.
To anonymize administrative actions which are older than a specific date and time, choose a Day and Time. Otherwise, all logged administrative actions will be anonymized.
Confirm with Anonymize. The user name is anonymized and a confirmation box appears.