Make a Manual Backup
This scenario will teach you how to make a manual backup of all relevant ADONIS data, e. g. for upgrading purposes. You will learn how to:
Example Scenario: The ADO Money Bank
As the ADONIS administrator of the ADO Money Bank you have to migrate all ADONIS data to a new version. You prepare for the update by exporting all relevant data. This data consists of the component settings, users, repository, rights, collaboration data and deployment-specific configuration settings.
This scenario is split into two parts. This chapter represents the first part. Here you will learn all steps necessary to make a manual backup. The next chapter will teach you how to import your backup files to a newer ADONIS version.
Backup Library-Specific Component Settings
Library-specific component settings can be exported from the database and saved into an AXS file in the file system. This is useful to e.g. migrate chart templates which you have created to another ADONIS version.
Example Scenario: What needs to be done here?
Your first task is to export all component settings to your local hard drive. Create the following export file:
- 01componentsettings.axl
Export Component Settings
To either export specific component settings or all component settings at once:
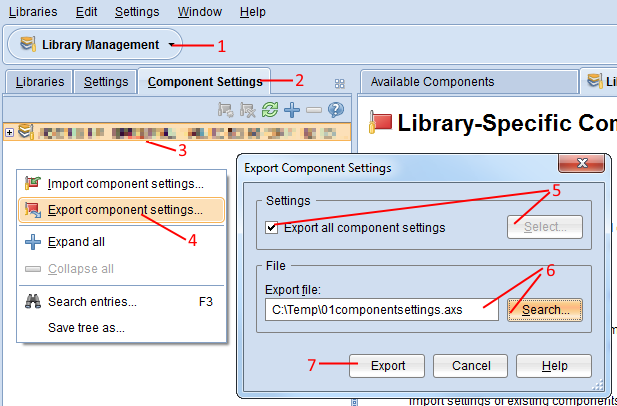
Open the Library Management component (1) and switch to the tab Component Settings (2).
Select the appropriate library in the Component Settings Catalogue (3).
From the context menu of the library, select Export component settings (4). The export dialogue opens.
Either select the check box to Export all component settings or choose a selection of specific component settings via the support dialogue Select... (5).
Enter the path and name of the future export file into the field Export file (either manually or via the support dialogue Search…) (6).
Confirm with Export (7). The data is exported and a confirmation box appears.
Backup a Migration Package
A migration package contains the repository (including all models and objects and their relations), the users and the defined user rights.
Repositories, users and user rights can be exported individually as well. However, when migrating all ADONIS data to a new version, the export of a migration package is the preferred variant as it prevents errors, guarantees the integrity of all relations and speeds up the process.
Example Scenario: What needs to be done here?
Export the migration package from the source database. Create the following export file:
02migrationpackage.axr
Now you have collected all data you need for a successful import to another ADONIS instance. Find out how to proceed with the migration in the next chapter.
Export Migration Package
To export a migration package:
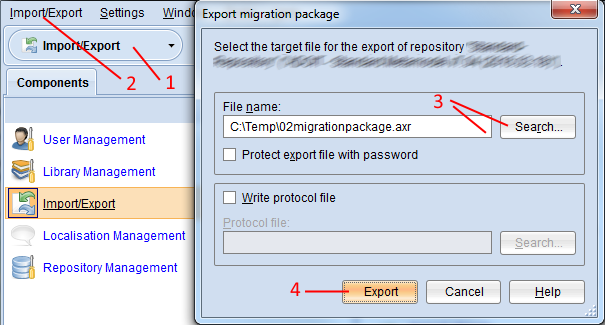
Open the Import/Export component via the component selection (1).
Select menu Import/Export – menu entry Export migration package… (2). A dialogue window containing the export settings appears.
Enter the path and name of the future export file into the field File name (either manually or via the support dialogue Search…) (3).
Confirm with Export (4). The data is exported and a confirmation box appears.
Click Show messages >> to verify that all data has been correctly exported.
Optionally you can also:
Select the check box Protect export file with password to encrypt the export file.
Select Write Protocol File to create a log file during the process of the export. It is saved as a plain text file in the file system.
Backup Comments
Comments are not stored in the database. Therefore, they cannot be exported as part of a migration package. Instead, this data is stored on the Apache Tomcat web server and needs to be migrated separately.
Example Scenario: What needs to be done here?
Saving and restoring comments is an important step in the migration process, and therefore part of this chapter. However, this topic is too complex for an entry-level tutorial. Therefore skip this section now and return to it when you need to later.
Save a Backup Copy of the Comments
To save a backup copy of the comments:
Open the folder “<Tomcat installation>/webapps/ADONIS14_0/WEB-INF/registry/“
Save a backup copy of the folders “collaboration” and “upload” and the file
axw.idson your local hard drive.
When you make a manual backup of all relevant data from ADONIS NP 8.0 or lower, the “collaboration” folder will also contain the favourites (= favourite models and objects of the users). They will be migrated together with the comments.
Starting with ADONIS NP 9.0, the favourites are stored in the database and will be exported as part of the migration package.
Backup Deployment-Specific Configuration Settings
Deployment-specific configuration settings include different settings not stored in the database. This includes settings like server ports, the standard language the web client should be started with etc.
Example Scenario: What needs to be done here?
Saving and restoring deployment-specific configuration settings is an important step in the migration process, and therefore part of this chapter. However, this topic is too complex for an entry-level tutorial. Therefore skip this section now and return to it when you need to later.
Save Backup Copies of the Configuration Files
Depending on your ADONIS installation, you have to create backup copies of the following files:
ADONIS Application Server Configuration
"<ADONIS installation>/conf/server.conf"
"<ADONIS installation>/conf/adoxx.conf"
"<ADONIS installation>/conf/adoxx_web_conf.js"
Apache Tomcat Web Server Configuration
“<Tomcat installation>/webapps/ADONIS14_0/adoxx_web.properties“
“<Tomcat installation>/webapps/ADONIS14_0/WEB-INF/classes/log4j.properties“
“<Tomcat installation>/webapps/ADONIS14_0/WEB-INF/web.xml“
“<Tomcat installation>/webapps/ADONIS14_0/WEB-INF/registry/
rest/RESTAuthorization.xml“
“<Tomcat installation>/conf/server.xml“ (if you want to switch to a different Apache Tomcat web server installation)