Set up an Independent Environment for a Project
To set up an environment with its own model group structure, the following steps are necessary:
Example Scenario: The ADO Money Bank
As the ADONIS administrator of the ADO Money Bank you have already set up a modelling environment for your company. Now, the board wants you to set up another independent environment for the new project “Future”. This project will later be managed by a sub admin. The following training tasks will familiarize you with the typical activities in this context.
Complete the training exercise in the chapter “My first Modelling Environment” first if you do not yet feel confident with the administration of users and user rights in ADONIS.
Add Separate Model Groups/Object Groups
Please refer to the sections Create Model Group and Create Object Group for details.
Example Scenario: What needs to be done here?
Create the following model group as a subordinated element of the root model folder:
Models (Project Future)
Then create the following object group as a subordinated element of the root object group:
Objects (Project Future)
These groups will be used to manage the models and objects created in the project “Future”.
Add Separate User Groups
Please refer to the section Create User Group for details.
Example Scenario: What needs to be done here?
Create the following top level user groups:
Sub Admin Project Future
Contributor Project Future
The sub admin users will manage all contributing users and their access rights in this project.
Assign Rights
Please refer to the section Change Basic Access Rights for details.
Example Scenario: What needs to be done here?
Now edit the access rights of the user groups “Sub Admin Project Future “ and “Contributor Project Future”:
- Read access to the standard model group
- Write access to the model group “Models (Project Future)”
- Write access to the object group “Objects (Project Future)”
Do not restrict access rights to the standard object group, as these are needed to create objects directly in models in the web client.
Assign Sub Admin
A sub admin can be assigned to manage users and user rights in an independent environment.
The following procedures are required to set up a sub admin:
Assign Access Rights to the Administration Toolkit
The user management component is only accessible in the Administration Toolkit, so a sub admin must be authorized to use it.
Example Scenario: What needs to be done here?
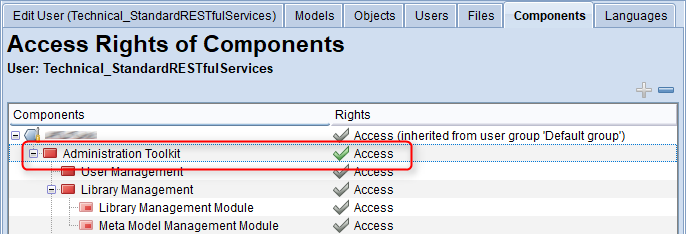
Change the access rights of the user group “Sub Admin Project Future“ to the Administration Toolkit. Double-click until you reach the status “Access”. With this setting, any member of the user group can now start the Administration Toolkit with all its sub components.
Change Access Rights to Components
To assign access rights to the Administration Toolkit:
Open the User Management.
In the User Catalogue, right-click the user you want to grant access rights to the Administration Toolkit, and then click Change access rights.
Switch to the Components tab.
The momentary rights status for the Administration Toolkit is shown in the column Rights. Double-click here until you reach the status Access.
When prompted whether the user shall also receive global administration rights, click No.
Assign Access Rights to the Rights Management of Users/User Groups
To allow someone access to the rights management of users / user groups, the detailed access rights must be edited. With the help of detailed rights, every single action can be permitted, prohibited or made dependent on inheritance.
Example Scenario: What needs to be done here?
Change the access rights of the user group “Sub Admin Project Future“ to the following user groups:
Sub Admin Project Future
Contributor Project Future
Set “Change rights” and “Write” to allowed. Now any member of the user group “Sub Admin Project Future“ can manage users and user rights for these two groups.
Please note: To change the access rights of users/user groups to models and objects, "Change rights" must be activated on both sides: On the side of the users and on the side of the models/objects. By default, "Change rights" is set to allowed for all model/object groups. Therefore, any member of the user group "Sub Admin Project Future" can now change the permissions to ALL model/object groups for both user groups in the context of the project "Future".
However, we want to restrict the sub admin to only managing permissions for the models and objects created in the project “Future”. Therefore, change the access rights of the user group “Sub Admin Project Future“ as follows:
“Change rights” to denied for the root model group
“Change rights” to allowed for the model group "Models (Project Future)"
“Change rights” to denied for the root object group
“Change rights” to allowed for the object group "Models (Project Future)"
Now any member of the user group “Sub Admin Project Future“ can manage permissions for the independent project environment you created.
Change Detailed Rights
In order to change detailed rights:
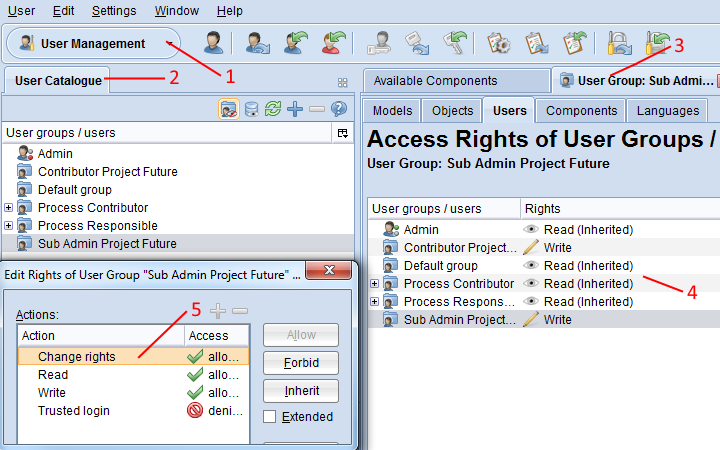
Open the User Management component via the component selection (1).
In the User Catalogue (2), right-click the user group or user whose permissions you want to change, and then click Change access rights. A tab with the associated rights opens (3).
Select the relevant subtab, e. g. “Models” (default selection) or “Objects”.
To show the detailed rights on a list entry, right-click the entry, and then select Edit rights (4). The rights management dialogue for special rights is displayed.
To change the authorisation of an action, right-click the action, and then click the desired status (5).
Select Allow to permit the action explicitly.
Select Forbid to forbid the action explicitly
Select Inherit to make the authorisation dependent on the next higher hierarchy level.
Optionally, you can also:
- Select the Extended check box to display all available actions.
Assign Users
Please refer to the sections Create User and Create System Roles and Assign Users for details.
Example Scenario: What needs to be done here?
Now create the following new ADONIS user and assign the current standard repository to it:
User name: Sub_Admin, Password: Start123++
This user belongs to the user group "Sub Admin Project Future".
To check if the newly assigned Sub Admin can manage users and user rights in the project:
Start the Administration Toolkit and log in as the user “Sub_Admin”.
Create the following user as a member of the user group "Contributor Project Future": User name: Contributor, Password: Start123++, Repository: the current standard repository.
Assign the system role "Design & Document" to the user group "Contributor Project Future".
Next, check if the contributing users can access the project:
Start the web client and log in as the user “Contributor”.
Try creating models and objects. To improve clarity, you can delete them afterwards.
With this step you have accomplished setting up an independent environment for a project.