Configurations
La page Configurations vous permet de personnaliser un large éventail de fonctionnalités spécifiques à la librairie. Vous pouvez fournir une configuration de base pour des composants tels que les circuits de validation, les fonctionnalités de validation, etc. Si un composant comporte plusieurs configurations ou modèles, vous pouvez les trouver et les modifier ici. Les paramètres des composants sont stockés dans la base de données d'ADONIS et peuvent être migrés entre différentes versions d'ADONIS pour conserver vos paramètres.
La page Configurations affiche tous les paramètres de composant spécifiques à la librairie dans la base de données. Selon la configuration d'ADONIS, différents composants peuvent être disponibles pour la configuration.
Gérer les paramètres des composants
Les paramètres des composants peuvent être importés, exportés, supprimés, etc.
Ajuster les configurations
Certains paramètres de composant offrent plusieurs configurations, servant souvent de modèles pour des graphiques ou des publications. Par exemple, vous pouvez ajouter diverses chartes graphiques à utiliser dans les rapports ou créer plusieurs modèles d'assistant à la modélisation des dépendances.
Les autres paramètres de composant ne comportent qu’une seule configuration, généralement étiquetée Paramètres généraux. Dans ces cas, vous pouvez configurer des paramètres généraux pour le composant, tels que l’ajustement des seuils d’évaluation de l’intégrité des données des objets ou la configuration des paramètres de validation. Bien que vous puissiez modifier ces configurations, il n’est pas possible de les créer ou de les supprimer.
Pour ajuster les configurations
Accédez à la page Configurations.
Dans le catalogue sur le côté gauche, recherchez le paramètre de composant que vous souhaitez ajuster, puis sélectionnez l’option souhaitée :
Pour créer une configuration, faites un clic droit sur le paramètre du composant, puis cliquez sur Créer.
Pour modifier une configuration, sélectionnez-la dans le catalogue.
Pour supprimer une configuration, faites un clic droit sur la configuration, puis cliquez sur Supprimer.
Importer les paramètres des composants
Les paramètres des composants précédemment exportés peuvent être importés et stockés dans la base de données ADONIS.
Pour importer les paramètres des composants
Allez dans Configurations > Plus d’options, puis cliquez sur Importer les paramètres.
Cliquez sur Parcourir et sélectionnez le fichier que vous souhaitez importer. Vous pouvez également faire glisser un fichier de votre ordinateur vers la zone Faites glisser et déposez des fichiers ici pour les télécharger.
Sélectionnez les paramètres du composant à importer. Vous pouvez également sélectionner Importer tous les paramètres en haut pour importer tous les paramètres des composants en une seule fois.
Cliquez sur Importer. Lorsque vous êtes invité à continuer, cliquez sur Oui. Les données sont importées.
Une fois l’import terminée, un message de confirmation s’affiche. Fermez le message pour terminer le processus.
Comportement si une configuration (par exemple « Paramètres généraux ») existe déjà dans la base de données :
Si une configuration existe déjà dans la librairie cible, elle est remplacée par le contenu du fichier d’import.
Des configurations qui n’existent pas déjà dans la librairie cible sont ajoutées.
Les configurations qui existent dans la librairie cible, mais pas dans le fichier d’import, ne sont pas modifiées.
Les configurations des modules sont une exception. Les informations provenant des deux sources sont combinées :
Si un module existe à la fois dans la librairie source et dans la librairie cible, il est écrasé par le contenu du fichier d’import.
Les modules qui existent dans la librairie cible, mais pas dans le fichier d’import, ne sont pas modifiés.
Exporter les paramètres des composants
Les paramètres des composants peuvent être exportés depuis la base de données et enregistrés dans un fichier AXS dans le système de fichiers. Ceci est utile, par exemple, pour migrer des modèles de graphiques que vous avez créés vers un autre version d'ADONIS.
Pour exporter des rôles
Allez dans Configurations > Plus d’options, puis cliquez sur Exporter les paramètres.
Sélectionnez les paramètres du composant que vous souhaitez exporter. Vous pouvez également sélectionner Exporter tous les paramètres en haut pour exporter tous les paramètres des composants en une seule fois.
Cliquez sur Exporter. Les données sont exportées.
Graphique à Barres
Les graphiques à barres dans ADONIS permettent de visualiser les objets d’une classe spécifique sous forme de barres, avec un attribut déterminant la longueur des barres.
Les modèles de graphiques à barres doivent être configurés dans ADONIS. L'Administration ADONIS fournit uniquement des paramètres limités pour ces modèles.
Ouvrir et modifier un modèle de graphique à barres
Allez dans Configurations > Graphique à barres, sélectionnez le modèle de votre choix.
Pour chaque langue disponible dans ADONIS, vous pouvez modifier le nom du modèle ainsi que la description qui le caractérise.
Diagramme de composition
Les diagrammes de composition dans ADONIS permettent de visualiser les hiérarchies et les relations entre les objets. Ils ressemblent à un arbre généalogique. Dans un diagramme de composition avec par exemple. Trois couches : la couche supérieure représente les grands-parents. La deuxième couche contient les enfants des grands-parents, qui sont frères et sœurs. La troisième couche contient les petits-enfants. Les petits-enfants ne sont frères et sœurs que s’ils partagent le même parent.
Les modèles de diagramme de composition doivent être configurés dans ADONIS. L'Administration ADONIS fournit uniquement des paramètres limités pour ces modèles.
Ouvrir et modifier un modèle de diagramme de composition
Allez dans Configurations > Diagramme de composition, puis sélectionnez le modèle de votre choix.
Pour chaque langue disponible dans ADONIS, vous pouvez modifier le nom du modèle ainsi que la description qui le caractérise.
Graphique à bulles
Les graphiques à bulles dans ADONIS affichent les objets d’une classe spécifique sous forme de bulles sur une zone définie par deux axes (axe des abscisses et axe des ordonnées), avec des attributs dictant la position des bulles sur l’axe des abscisses et l’axe des ordonnées, et éventuellement la taille de la bulle.
Les modèles de graphiques à bulles doivent être configurés dans ADONIS. L'Administration ADONIS fournit uniquement des paramètres limités pour ces modèles.
Ouvrir et modifier un modèle de graphique à bulles
Allez dans Configurations > Graphique à bulles et sélectionnez le modèle de votre choix.
Pour chaque langue disponible dans ADONIS, vous pouvez modifier le nom du modèle ainsi que la description qui le caractérise.
Scanner de virus ClamAV
En intégrant le logiciel anti-virus ClamAV dans ADONIS, les fichiers téléchargés dans la base de données d'ADONIS (documents, fichiers multimédias, fichiers joints aux commentaires, etc.) ou téléchargées sur votre appareil peuvent être vérifiées pour détecter les virus.
Pour des instructions détaillées sur la façon d’intégrer ClamAV dans ADONIS, veuillez consulter le chapitre Activer l’antivirus pour les téléchargements de fichiers dans le manuel d’installation.
Commentaires
Les commentaires permettent les utilisateurs d'ADONIS de laisser des commentaires et des suggestions qui peuvent aider à améliorer les modèles et les objets. Les utilisateurs reçoivent des notifications par e-mail s’ils sont responsables d’un objet ou d’un modèle et que quelqu’un laisse un commentaire dessus. En tant qu'administrateur d'ADONIS, vous pouvez définir les relations indiquant la responsabilité qui doivent déclencher des notifications par e-mail.
Ouvrir les paramètres des commentaires
Pour ouvrir les paramètres des commentaires :
- Allez dans Configurations > Commentaires > Paramètres généraux.
Configuration des notifications
Les paramètres suivants sont disponibles :
Modèles: Sélectionnez les relations qui doivent être prises en compte pour l’envoi de notifications par e-mail lorsque de nouveaux commentaires sont créés sur les modèles.
Objets: Sélectionnez les relations qui doivent être prises en compte pour l’envoi de notifications par e-mail lorsque de nouveaux commentaires sont créés sur des objets.
Contenu
Dans cette zone, vous pouvez gérer les options de configuration pour les paramètres généraux suivants :
Historique des modifications
Les modifications apportées aux objets du référentiel peuvent être suivies dans l’historique des modifications. Les utilisateurs d'ADONIS peuvent accéder à l’historique des modifications via le Notebook d’un objet.
Ouvrir les paramètres de l’historique des modifications
Pour ouvrir les paramètres de l’historique des modifications
- Allez dans Configurations > Contenu > Historique des modifications.
Configurer l’historique des modifications
Les paramètres suivants sont disponibles :
Activer la sauvegarde des modifications dans l'historique: Sélectionnez ou désactivez cette option pour activer ou désactiver l’historique des modifications. Toutes les autres options de cette zone seront inactives à moins que vous ne sélectionniez cette option.
Nombre maximum d’entrées dans l’historique des modifications: Sélectionnez le nombre maximal d’entrées dans l’historique des modifications.
Autoriser l’accès à l’historique des modifications: Sélectionnez ou désactivez cette option pour activer ou désactiver l’accès à l’historique des modifications dans ADONIS. Si cette option est sélectionnée, vous pouvez spécifier les colonnes de l’historique des modifications qui sont affichées.
Afficher toutes les entrées indépendamment des droits de métamodèle: Par défaut, l’historique complet des modifications d’un objet de référentiel est masqué si un utilisateur n’a pas accès à un ou plusieurs attributs d’objet en raison de droits de métamodèle. Sélectionnez cette option pour toujours afficher l’historique complet des modifications, quelles que soient les restrictions de droits sur les métamodèles.
Paramètres de la gestion des fichiers
À l’aide des paramètres de gestion des documents, vous pouvez configurer un type d’objet qui permet aux utilisateurs d'ADONIS de télécharger des documents dans la base de données afin de les utiliser dans des modèles. Par défaut, les fichiers importés sont conservés en tant qu’objets de type Document dans le catalogue d’objets.
Lorsqu’un référentiel est exporté à des fins de sauvegarde et de migration, les fichiers sont également exportés.
Ouvrir les paramètres de gestion des documents
Pour ouvrir les paramètres de gestion des documents
- Allez dans Configurations > Contenu > Gestion des documents.
Configurer la gestion des documents
Les paramètres suivants sont disponibles :
Activer la gestion des fichiers: Sélectionnez ou désactivez cette option pour activer ou désactiver le téléchargement de documents. Toutes les autres options de cette zone seront inactives à moins que vous ne sélectionniez cette option.
Classe pour la gestion de documents: Sélectionnez une classe pour la gestion des documents dans la liste déroulante.
Attribut pour la gestion de documents: Sélectionnez un attribut pour la gestion des documents dans la liste déroulante.
Taille maximale du fichier (Mo): Sélectionnez la taille maximale autorisée pour les documents de la base de données (jusqu’à 50 Mo).
Types de fichiers autorisés (extensions séparées par des espaces): Sélectionnez les types de fichiers autorisés pour les documents de la base de données. Séparez les extensions de fichier par un blanc.
Les types de fichiers autorisés sont les suivants : doc, docx, ppt, pptx, xls, xlsx, csv, txt, pdf, rtf, png, jpg, gif, jpeg, bmp, zip, rar, 7z, axr, xml, bpmn
Tous les autres types de fichiers sont bloqués par défaut. Pour permettre l’ajout de types de fichiers supplémentaires à cette liste, vous devez personnaliser un fichier de configuration.
Le serveur d’applications d'ADONIS doit être redémarré si ces paramètres sont modifiés. Sinon les modifications ne sont pas prises en compte.
Gestion des médias
À l’aide des paramètres de gestion des médias, vous pouvez configurer la façon dont les utilisateurs d'ADONIS sont autorisés à télécharger des images dans la base de données afin de les utiliser dans des modèles. Les images sont référencées dans les attributs de certains objets (Annotation et Liens inter-modèles) et affichées à la place de ces objets dans l'éditeur graphique.
Lorsqu’un référentiel est exporté à des fins de sauvegarde ou de migration, les images sont également exportées.
Ouvrir les paramètres de gestion des médias
Pour ouvrir les paramètres de gestion des médias
- Allez dans Configurations > Contenu > Gestion des médias.
Configurer la gestion des médias
Les paramètres suivants sont disponibles :
Activer la gestion de fichiers multimédia: Sélectionnez ou désactivez cette option pour activer ou désactiver le téléchargement d’images. Toutes les autres options de cette zone seront inactives à moins que vous ne sélectionniez cette option.
Attribut pour la gestion des médias: Sélectionnez un attribut pour la gestion des médias dans la liste déroulante.
Modifiable pour les objets du référentiel: Cette option ne devient pertinente que dans des scénarios de personnalisation spécifiques. L’activation de cette option et l’ajout de l’attribut de gestion des médias au Notebook d’une classe de référentiel vous permettent de définir une valeur globale pour l’attribut de gestion des médias dans tous les contextes du modèle.
Taille maximale du fichier (Mo): Sélectionnez la taille maximale autorisée pour les images dans la base de données.
Types de fichiers autorisés (extensions séparées par des espaces): Sélectionnez les types de fichiers autorisés pour les images dans la base de données. Séparez les extensions de fichier par un blanc.
Le serveur d’applications d'ADONIS doit être redémarré si ces paramètres sont modifiés. Sinon les modifications ne sont pas prises en compte.
Paramètres pour les responsables d'objet
Dans ADONIS, il est possible d’assigner à un utilisateur la responsabilité d’un objet de référentiel (par exemple, Applications, Processus etc.). Pour ce faire, l’utilisateur doit être désigné en tant que Responsable (attribut d'objet dans le chapitre « Responsabilités » du Notebook).
Vous pouvez également sélectionner une autre relation pour définir la propriété.
Cet utilisateur est responsable du contenu de l’objet.
Ouvrir les paramètres pour les responsables d’objets
Pour ouvrir les paramètres pour les responsables d’objets
- Allez dans Configurations > Contenu > Responsables d’objets.
Configuration des responsables d’objets
Les paramètres suivants sont disponibles :
Définir automatiquement l’utilisateur en tant que responsable d’objet après la création des objets: Indiquez si un utilisateur qui crée un objet est automatiquement assigné en tant que responsable.
Classe de relation qui doit être utilisée pour définir une propriété: Sélectionnez une classe de relation comme relation de propriété par défaut dans une liste déroulante de toutes les relations de propriété utilisées dans la librairie actuelle. Cette relation est ensuite utilisée, par exemple, pour créer une responsabilité entre un objet et un utilisateur lorsque l’utilisateur crée un nouvel objet et que la première option est activée.
[OOO] Lorsque vous sélectionnez une classe de relation avec le suffixe [OOO], le responsable de l’objet se voit accorder un accès en écriture à l’objet. Le type d’accès qu’ils avaient auparavant n’a généralement aucun effet. Seuls les droits de métamodèle prévalent sur les permissions définies par une relation [OOO].
Après l'assignation des administrateurs ADONIS peuvent ajuster les droits des responsabilités d’objets comme bon leur semble. Lorsque la référence à l’utilisateur est supprimée, les droits sur l’objet sont hérités tels qu’ils sont définis dans un niveau hiérarchique supérieur (groupe).
Afficher l’utilisateur responsable dans les résultats de recherche: Sélectionnez cette option si vous souhaitez qu’une colonne avec le responsable de l’objet s’affiche par défaut lorsque la recherche dans ADONIS contient des objets de référentiel.
Le serveur d’applications d'ADONIS doit être redémarré si ces paramètres sont modifiés. Sinon les modifications ne sont pas prises en compte.
Charte graphique
La charte graphique d’une organisation peut être intégrée dans diverses publications dans ADONIS (par exemple lors de l’impression de modèles au format PDF et de la création de rapports).
Créez une charte graphique ou plusieurs selon vos besoins. Entrez les informations de votre organisation, y compris le nom et l’adresse postale, pour chaque charte graphique. Vous pouvez également télécharger un logo et une image de bannière dans le cadre de la configuration.
Ajouter et configurer une charte graphique
Pour créer une charte graphique :
Accédez à la page Configurations.
Faites un clic droit sur Charte graphique, puis cliquez sur Créer.
Dans le champ Nom de la charte graphique, entrez un nom pour charte graphique, puis cliquez sur OK.
Une fois créé, vous pouvez commencer à travailler sur la charte graphique immédiatement. Les paramètres suivants sont disponibles :
Paramètres de la charte graphique: Le nom de la charte graphique, fourni lors de la création, est affiché ici. Ajustez-le si nécessaire.
Coordonnées de l’entreprise: Entrez le nom de l’organisation, l’adresse postale et d’autres données dans les champs respectifs.
Utilisation en standard: Choisissez si cette charte graphique sera définie par défaut lors de la création des publications. Ce paramètre peut être remplacé par des utilisateurs individuels d'ADONIS selon leurs préférences.
Logo de l’entreprise: Téléchargez un logo à afficher dans les en-têtes de rapport.
Image de bannière: Téléchargez une image pour les bannières dans les pages de démarrage de scénario.
URL de la bannière: Spécifiez une URL vers laquelle les utilisateurs seront redirigés lorsqu’ils cliqueront sur la bannière.
Taille des images
Les images doivent respecter les directives suivantes :
| Type | Largeur & Hauteur | Taille du fichier | Format |
|---|---|---|---|
| Bannière | 2000 x 1000 pixels recommandés (voir le tableau ci-dessous pour plus d’informations). | Moins de 5 Mo | JPEG, PNG, BMP, GIF ou SVG |
| Logo | Minimum 260 x 260 pixels. Rapport d’aspect d’environ 1:1 pour de meilleurs résultats. | Moins de 5 Mo | JPEG, PNG, BMP ou GIF |
Les images de bannière sont recadrées automatiquement en raison des différentes tailles d’écran. Cela se produit principalement sur les écrans larges, où le haut et le bas sont recadrés. Par conséquent, gardez la partie la plus importante de l’image (par exemple, le logo et le texte) au centre. La zone de contenu recommandée et sécurisée est d’environ 2000 x 150 pixels.

Créer des modèles/objets
Accompagnez les utilisateurs d'ADONIS lors de la création de nouveaux modèles et objets. Vous pouvez définir un ensemble de types de modèles et d’objets qui seront placés dans le volet Recommandations de la page Nouveau.
Ouvrez les paramètres du volet Recommandations
Pour ouvrir les paramètres du volet Recommandations
- Allez dans Configurations > créer des modèles/objets > Paramètres généraux.
Types de modèles/objets recommandés
Les paramètres suivants sont disponibles :
Ajouter des éléments: Cliquez sur Ajouter pour ajouter de nouveaux types de modèles et d’objets à afficher dans le volet Recommandations. Ils seront ajoutés en bas de la liste, dans l’ordre dans lequel vous les avez sélectionnés.
Modifier l’ordre des éléments: Vous pouvez modifier l’ordre dans lequel les éléments recommandés sont affichés dans le volet Recommandations. Utilisez la poignée de glissement (
 ) pour faire glisser un élément
vers une nouvelle position. Ou, à droite de l’élément, cliquez sur
) pour faire glisser un élément
vers une nouvelle position. Ou, à droite de l’élément, cliquez sur
 Plus, puis sur Monter ou
Descendre.
Plus, puis sur Monter ou
Descendre.Supprimer l’élément: À droite de l’élément, cliquez sur
Plus, puis sur Supprimer.
Si aucun élément recommandé n’a été configuré, le volet Recommandations ne s’affiche pas.
Intégrité des données
Il est indispensable de maintenir vos données à jour, et c’est pourquoi nous avons facilité la confirmation par les utilisateurs de l’intégrité des données des objets dans ADONIS.
Vous pouvez personnaliser l’évaluation de l’intégrité des données en sélectionnant l’attribut sur lequel elle doit être basée. De plus, vous pouvez définir des seuils qui déclencheront un indicateur « jaune » ou « rouge » si l’intégrité des données d’un objet n’a pas été confirmée.
Ouvrir les paramètres de l'intégrité des données
Pour ouvrir les paramètres de l'intégrité des données
- Allez dans Configurations > Intégrité des données > Paramètres généraux.
Paramètres généraux
Les paramètres suivants sont disponibles :
- Attribut pour l’intégrité des données: Sélectionnez l’attribut sur lequel l’évaluation de l’intégrité des données doit être basée.
Seuil global
Ici, vous pouvez définir des seuils globaux pour l’évaluation de l’intégrité des données. Ces paramètres s’appliquent à tous les types d’objets si aucune valeur spécifique à une classe n’a été définie.
Nombre de jours après lesquels un objet est marqué « jaune »: Sélectionnez le nombre de jours après lesquels un objet est marqué comme « jaune » si son intégrité de données n’a pas été confirmée par l’utilisateur responsable de cette application.
Nombre de jours après lesquels l’objet est marqué « rouge »: Sélectionnez après combien de jours un objet est marqué comme « rouge » si son intégrité de données n’a pas été confirmée par l’utilisateur responsable de cette application.
Seuils spécifiques à une classe
Ici, vous pouvez remplacer les seuils globaux en définissant des seuils individuels sur des classes spécifiques.
- Sélectionnez le nombre de jours après lesquels les objets d’un type spécifique sont marqués comme « jaunes » ou « rouges » si leur intégrité de données n’a pas été confirmée.
Assistant à la modélisation des dépendances
L'assistant à la modélisation des dépendances est une représentation graphique qui permet de découvrir et d’analyser les dépendances entre les objets architecturaux à travers plusieurs couches architecturales. Par exemple, il peut montrer quels objets d’architecture ont une influence directe ou indirecte sur les processus critiques de l’entreprise.
Les objets et leurs relations sont visualisés de manière dynamique dans un modèle avec plusieurs couloirs. Normalement, les utilisateurs d'ADONIS créent la structure de ce modèle avec l'assistant à la modélisation des dépendances au fur et à mesure. Cependant, lors de l’utilisation d’un modèle, la structure est créée automatiquement.
Un modèle définit une hiérarchie complète de types d’objets et de relations de dépendance. La hiérarchie est basée sur une classe de modélisation de départ et plusieurs autres classes liées à des classes de relations. Pour chaque classe de modélisation, une couche est construite, qui est représentée par un couloir dans l'assistant à la modélisation des dépendances. La couche peut être masquée, c’est-à-dire rendue invisible dans l'assistant à la modélisation des dépendances. La configuration stocke également la couleur sélectionnée pour chaque couche.
Ajouter et configurer un modèle
Pour créer un modèle d'assistant à la modélisation des dépendances :
Accédez à la page Configurations.
Faites un clic droit sur Assistant à la modélisation des dépendances, puis cliquez sur Créer.
Dans la zone Nom de la configuration, entrez un nom pour votre modèle, puis cliquez sur OK.
Une fois que vous avez créé l'assistant à la modélisation des dépendances, vous pouvez commencer à travailler sur la configuration immédiatement. Suivez ces trois étapes :
Ces étapes sont décrites plus en détail dans les sections suivantes.
Aperçu
La première page du modèle d'assistant à la modélisation des dépendances vous permet de définir un nom et une description tout en fournissant un résumé du modèle.
Nom du modèle: Le nom du modèle, fourni lors de la création, est affiché ici. Ajustez-le si nécessaire.
Description: Si vous le souhaitez, entrez une description du modèle dans n’importe quelle langue disponible dans ADONIS.
Résumé: Une fois que vous avez sélectionné les couches et les relations pour le modèle, un résumé apparaîtra ici. Pour afficher les relations d’une couche, sur le côté droit de la couche, cliquez sur
Plus.
Une fois que vous avez défini ces paramètres, sélectionnez la page 2 dans le menu de navigation en haut pour passer à la page suivante du modèle.
Couches
La deuxième page de l'assistant à la modélisation des dépendances vous permet de choisir une couche de départ et d’ajouter des couches supplémentaires qui seront représentées sous forme de couloirs dans l'assistant à la modélisation des dépendances.
Couche de départ: Tout d’abord, vous devez définir la couche de départ. Dans la liste Choisir la couche de départ, sélectionnez le type d’objet sur lequel toute la hiérarchie des couches et des relations doit être basée. Lors du démarrage de l'assistant à la modélisation des dépendances dans ADONIS, un ou plusieurs objets de ce type doivent être sélectionnés pour que ce modèle puisse être utilisé.
Sélectionner des couches: Pour créer une structure hiérarchique, vous devez ajouter des couches supplémentaires au modèle. Cliquez sur + Ajouter une couche et sélectionnez un type d’objet.
Modifier l’ordre
Vous pouvez réorganiser l’ordre des couches :
- Faites glisser la couche vers une nouvelle position. Vous pouvez également sélectionner une
couche, puis cliquer sur
 Déplacer vers le haut,
  Monter,
  Descendre ou
 Déplacer vers le bas.
Ajuster les couches
Les couches peuvent être renommées, supprimées, masquées, etc.
Pour renommer une couche, sur le côté droit de la couche, cliquez sur
Plus, puis sur Renommer.Pour supprimer une couche, sur le côté droit de la couche, cliquez sur
Plus, puis sur Supprimer.Pour masquer une couche, à droite de la couche, cliquez sur Masquer
 . Ce bouton est un bouton
bascule. Cliquez à nouveau dessus pour afficher à nouveau la couche.
. Ce bouton est un bouton
bascule. Cliquez à nouveau dessus pour afficher à nouveau la couche.Pour modifier la couleur d’arrière-plan d’une couche, sur le côté droit de la couche, cliquez sur
 Modifier la couleur
d’arrière-plan et choisissez une couleur.
Modifier la couleur
d’arrière-plan et choisissez une couleur.
La couche de départ ne peut pas être supprimée ou masquée.
Une fois que vous avez défini ces paramètres, sélectionnez la page 3 dans le menu de navigation en haut pour passer à la dernière page du modèle.
Relations
La troisième page du modèle d'assistant à la modélisation des dépendances vous permet d’ajouter les relations qui relient les couches dans le modèle.
- Relations entre les couches: Définissez les relations de dépendance entre les couches. Choisissez une couche, cliquez sur
Plus, puis sur Ajouter des
relations, puis sélectionnez la couche cible et une relation. Pour les relations sortantes, vous
pouvez également utiliser les cercles bleus
 à droite des couches : cliquez
sur le cercle de la couche source, puis cliquez sur le cercle de la couche cible et sélectionnez
une relation.
à droite des couches : cliquez
sur le cercle de la couche source, puis cliquez sur le cercle de la couche cible et sélectionnez
une relation.
Lorsque vous ajoutez une relation, vous devez sélectionner une couche qui fait déjà partie du flux
de traitement. Supposons que vous ayez déjà créé un modèle avec deux couches : A (= la couche de
départ) et B. Pour connecter les couches, sélectionnez A et créez une relation avec B. Qu’il
s’agisse d’une réception ou d’une sortie n’a pas d’importance. Désormais, B fera également partie du
flux de traitement et pourra être sélectionné pour créer d’autres relations. Toutefois, si vous
sélectionnez B à la place et créez une relation avec A, la relation ne sera pas
traitée![]() .
.
Options supplémentaires
Les options supplémentaires suivantes sont disponibles :
Pour afficher l’ordre dans lequel les couches de la configuration sont traitées, cliquez sur
 Afficher l’ordre de
traitement des relations. Ce bouton est un bouton bascule. Cliquez à nouveau dessus pour
masquer à nouveau la commande.
Afficher l’ordre de
traitement des relations. Ce bouton est un bouton bascule. Cliquez à nouveau dessus pour
masquer à nouveau la commande.Pour afficher les relations d’une couche, sur le côté droit de celle-ci, cliquez sur Plus, puis sur
Vue d’ensemble des
relations.Dans la vue d’ensemble des relations, toutes les relations entrantes et sortantes d’une couche sont répertoriées.
Cliquez sur
 Supprimer
pour supprimer une relation.
Supprimer
pour supprimer une relation.
Une fois ces paramètres terminés, cliquez sur Enregistrer. Le nouveau modèle est maintenant disponible dans ADONIS.
Import Excel
ADONIS fournit une interface Excel configurable pour un import rapide des données. L’interface Excel permet d'importer des objets de référentiel avec leurs attributs et leurs relations à partir d’un fichier Excel (format XLS ou XLSX). Ce processus implique que la structure du fichier Excel soit décrite dans un fichier de configuration XML.
Créer une configuration
Un fichier de configuration XML contient le mapping des objets depuis le fichier Excel vers le métamodèle d'ADONIS.
Le fichier Excel peut contenir n’importe quel nombre de feuilles
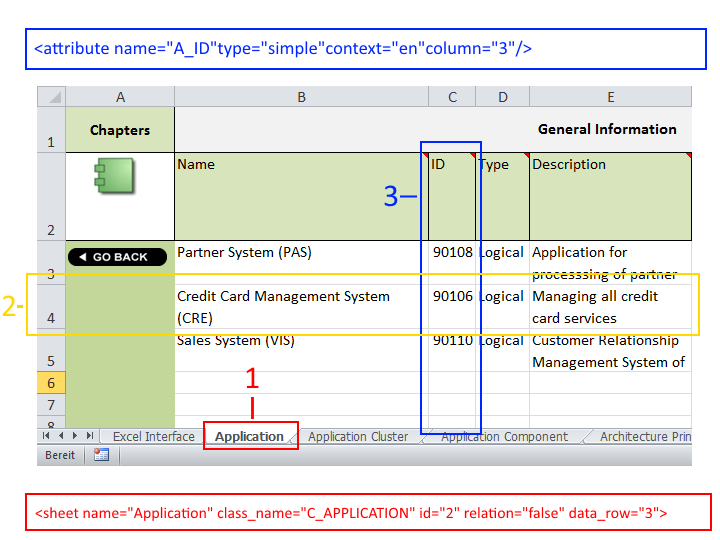
Chaque feuille ne contient que des objets d’un type (1)
Exemple - Fichier de configuration XML
La configuration d’une feuille peut ressembler à ceci :
<sheet name="Applications" class_name="C_APPLICATION" id="2" data_row="4"><sheet name>est le nom de la feuille dans Excel.<class_name>est le nom indépendant de la langue du type d’objet.<id>est le numéro de la colonne qui identifie de manière unique un objet.<data_row>est la première ligne contenant un objet.Chaque ligne de la feuille contient un objet (2)
Chaque colonne contient un attribut ou une relation avec un autre objet (3)
Exemple - Fichier de configuration XML
La configuration d’un attribut peut ressembler à ceci :
<attribute name="A_DESCRIPTION" type="simple" context="en" column="5"/><attribute name>est le nom indépendant de la langue de l’attribut.<type>est le type d’attribut.<context>définit la langue des objets importés.<column>est le numéro de colonne.Un identifiant unique (nom, identifiant, etc.) est nécessaire pour chaque objet
Les types d’attributs suivants peuvent être importés : simple, date, enum, treeenumlist, enum_list, bool, relation et file_pointer
Si vous utilisez la Librairie BPMS d'ADONIS, un ou plusieurs exemples de configurations vous seront déjà fournis dans l'Administration ADONIS. Pour chaque configuration, un fichier Excel approprié est inclus.
Les détails de la création d’une configuration d’import Excel ne sont pas abordés ici. Si vous souhaitez créer vos propres configurations, veuillez consulter le « Manuel de l’interface Excel » sur le support d’installation ADONIS dans le dossier « 02 Application Server\BOC\ADONIS 16.0\books\english ».
Pour créer une configuration, vous devez vous rendre sur la page Propriétés. Le nom indépendant de la langue des types d’objets et des attributs s’y trouve, et vous en avez besoin pour la configuration.
Importer la configuration
Afin d’utiliser une configuration spécifique dans ADONIS vous devez d’abord importer le fichier de configuration XML :
Accédez à la page Configurations.
Faites un clic droit sur Excel Import, puis cliquez sur Créer.
Dans le champ Nom de la configuration, entrez un nom pour votre configuration, puis cliquez sur OK.
Cliquez sur Importer et téléchargez le fichier de configuration XML. Le contenu du fichier de configuration sera affiché dans la zone de configuration.
Cliquez sur Enregistrer.
La configuration est enregistrée. Vous pouvez désormais importer des objets à partir de n’importe quel fichier Excel correspondant à la configuration d'ADONIS.
Importer un modèle de fichier Excel
Pour chaque configuration, vous pouvez importer un fichier Excel approprié en tant que modèle.
Allez dans Paramètres > Excel Import.
Sélectionnez la configuration pour laquelle vous souhaitez importer un modèle.
Cliquez sur Importer un modèle Excel et téléchargez le fichier Excel. Le nom du modèle s’affichera dans la zone du Modèle.
Cliquez sur OK.
La configuration est enregistrée. Le modèle est maintenant disponible en téléchargement dans la fenêtre de dialogue de l’import Excel dans ADONIS. Les utilisateurs peuvent télécharger le modèle, enregistrer les objets qu’il contient, puis les importer.
Diagramme de Gantt
Les diagrammes de Gantt dans ADONIS affiche les objets d’une classe spécifique sous forme de barres sur une chronologie, avec des attributs dictant les dates de début et de fin.
Les modèles de diagrammes de Gantt doivent être configurés dans ADONIS. L'Administration ADONIS fournit uniquement des paramètres limités pour ces modèles.
Ouvrir et modifier un modèle de diagramme de Gantt
Allez dans Configurations > Diagramme de Gantt, et sélectionnez le modèle de votre choix.
Pour chaque langue disponible dans ADONIS, vous pouvez modifier le nom du modèle ainsi que la description qui le caractérise.
Publication HTML
Par défaut, la page de recherche s’affiche en tant que page d’accueil d’une publication HTML, y compris les éléments de charte graphique intégrés. Vous pouvez configurer une page d’accueil personnalisée à la place. Pour ce faire, téléchargez une seule page HTML.
Le fichier téléchargé doit contenir toutes les images, scripts, informations de style, etc. en ligne ou téléchargé depuis un endroit sur le Web. Pour inclure des images en ligne dans la page HTML, elles doivent être intégrées encodées en base64.
Ouvrir les paramètres de publication HTML
Pour ouvrir les paramètres de publication HTML
- Allez dans Configurations > Publication HTML > Paramètres généraux.
Paramètres généraux
Les paramètres suivants sont disponibles :
Désactiver la page de démarrage personnalisée: Choisissez d’afficher ou non le fichier téléchargé dans les publications HTML. Cette option est utile si vous souhaitez désactiver temporairement une page d’accueil personnalisée.
Page d’accueil personnalisée - nom de fichier: Cliquez sur Parcourir et téléchargez la page HTML que vous souhaitez utiliser.
Page d’accueil personnalisée - contenu du fichier: Le contenu du fichier HTML téléchargé est affiché ici.
Intégration-Configuration
Le cadre d’intégration est une extension générique d'ADONIS qui peut être utilisée pour créer et configurer des adaptateurs se connectant à tout type d’outil tiers qui expose une interface HTTP permettant la récupération de données.
Dans ce champ, vous gérez les options de configuration générales de l’infrastructure d’intégration.
Une description détaillée de cette fonctionnalité dépasse le cadre de ce manuel. Si vous avez des questions, veuillez contacter votre consultant ADONIS.
Intégration - Connecteurs de données : ADOIT
ADONIS offre la synchronisation des objets entre ADONIS et ADOIT.
Dans des scénarios typiques, certains objets (tels que
![]() Composants Applicatifs dans
ADOIT ou
Composants Applicatifs dans
ADOIT ou ![]() Processus et
Processus et
![]() Rôles dans ADONIS) ne sont gérés
que dans l'un des deux produits. En synchronisant ces objets, ils sont accessibles dans l’autre
produit également.
Rôles dans ADONIS) ne sont gérés
que dans l'un des deux produits. En synchronisant ces objets, ils sont accessibles dans l’autre
produit également.
 Les Composants Applicatifs
seront importés en tant qu’
Les Composants Applicatifs
seront importés en tant qu’ Applications dans ADONIS
 Processes and
 Roles will be
imported as
Roles will be
imported as  Business
Processes and
Business
Processes and  Business
Actors in ADOIT
Business
Actors in ADOIT
Une API REST est utilisée pour la communication entre les produits.
La disponibilité de cette fonctionnalité dépend de la licence.
Configuration
La configuration s’effectue via l’intégration Framework. Si vous utilisez ADONIS 16.0, vous pouvez synchroniser des objets avec les versions suivantes ADOIT :
- ADOIT 15.1.16 ou supérieur | ADOIT 16.0.12 ou supérieur | ADOIT 17 ou supérieur
Les instructions sur la configuration de la synchronisation sont couvertes dans les sections suivantes ici dans le Aide sur l’administration.
Synchronisation
La synchronisation peut être déclenchée manuellement dans ADONIS (dans le Centre de connexion). Il est également possible de configurer la synchronisation pour qu’elle s’exécute automatiquement sur une base planifiée.
Librairies compatibles
La synchronisation des objets compatibles entre ADONIS et ADOIT est pris en charge sans effort de personnalisation supplémentaire si les librairies par défaut fournies avec le produit sont utilisées :
Du côté d’ADONIS :
- la Librairie BPMS d'ADONIS
Du côté d'ADOIT :
- la Librairie ArchiMate
Veuillez contacter votre consultant BOC pour obtenir de l’aide si d’autres librairies sont utilisées. Cela inclut les librairies par défaut avec des modifications dans le métamodèle ou d’autres librairies spécifiques.
Configuration de la synchronisation via le cadre d’intégration
Pour synchroniser des objets entre ADONIS et ADOIT via le cadre d’intégration, vous devez définir les paramètres dans les DEUX produits.
Tout d’abord, activez l’accès à l’API REST du côté d'ADOIT pour que ADONIS puisse y récupérer des données :
Ensuite, créez un utilisateur technique du côté d'ADONIS :
Ensuite, vous pouvez configurer le connecteur de données qui sera utilisé pour se connecter à ADOIT depuis ADONIS :
La synchronisation est maintenant configurée. En fonction de la Librairie et de la configuration du produit, vous devrez peut-être configurer des paramètres supplémentaires :
Une fois que vous avez terminé le processus de configuration, il est temps de fournir aux bonnes personnes l’accès aux fonctionnalités de synchronisation dans ADONIS
Ces étapes sont expliquées dans les sections suivantes.
La procédure décrite ici s’applique UNIQUEMENT à l’import d’ éléments EA depuis ADOIT dans ADONIS. Si vous souhaitez importer des éléments BPM des depuis ADONIS dans ADOIT, configurez la synchronisation comme décrit dans la page Aide sur l’administration ADOIT.
Les serveurs Web Apache Tomcat et les serveurs d’applications des DEUX produits doivent être redémarrés si ces paramètres sont modifiés. Sinon les modifications ne sont pas prises en compte.
Activer l’accès au REST API dans ADOIT
Tout d’abord, vous devez activer l’accès à l’API REST dans ADOIT (tel que décrit dans la documentation d'aide ADOIT). La synchronisation via l’infrastructure d’intégration nécessite la configuration de l’une des méthodes d’authentification suivantes :
Authentification de base
Authentification OAuth 2.0 à l’aide du flux d’informations d’identification du client
Authentification basée sur un jeton
L’infrastructure d’intégration ne prend pas en charge l’authentification OAuth 2.0 à l’aide du flux de code d’autorisation et de l’authentification JWT.
L’utilisateur dans le contexte duquel les requêtes doivent être exécutées n’a PAS besoin de droits d’accès au composant « Module d'administration ».
Vous devez activer au moins les scénarios REST suivants pour la méthode d’authentification que vous avez choisie :
APIs de lecture du référentiel
APIs d'écriture du référentiel
APIs de lecture de métamodèle
Créer un utilisateur technique
La configuration d’un connecteur de données pour l’infrastructure d’intégration nécessite l’intervention d’un utilisateur technique. Si vous mettez en place une synchronisation périodique, celle-ci sera effectuée dans le contexte de cet utilisateur technique.
Pour créer l’utilisateur technique dans l'Administration ADONIS :
Accédez à la page Utilisateurs et cliquez sur Nouvel utilisateur.
Entrez les données suivantes :
Nom : « Technical_ManagementOfficeIntegration » (et un mot de passe de votre choix)
Connexion sécurisée : Oui
Groupes d’utilisateurs : cet utilisateur appartient au groupe par défaut.
Rôles système : si les circuits de validation sont sous licence, associez l’utilisateur technique aux rôles « Administrateur » (Circuit de validation de document et circuit de validation de modèle).
Référentiel : Seul ( !) attribue le référentiel à l’utilisateur dans lequel les éléments EA devraient être importés depuis ADOIT .
La connexion sécurisée ne peut être activée qu’une fois l’utilisateur créé. Terminez la création de l’utilisateur en cliquant sur Créer, puis modifiez-le à nouveau pour activer la connexion sécurisée.
Configurer le connecteur de données pour le cadre d’intégration dans ADONIS
Maintenant, vous devez configurer le connecteur de données qui sera utilisé pour vous connecter à ADOIT dans ADONIS (dans le Centre de connexion).
Conditions préalables
Avant de continuer, vous devez attribuer trois modules à votre utilisateur dans l'Administration ADONIS. Ces modules sont nécessaires pour accéder et modifier la configuration du connecteur de données :
Allez dans Configurations > Client Web > Modules Web.
Attribuez les modules suivants à l’un de vos rôles système :
Connecteur pour ADONIS et ADOIT
Module : Connecter l’administrateur
Configurer le connecteur de données
Pour configurer le connecteur de données dans ADONIS :
Dans la barre d’outils en haut de l’écran, cliquez sur Configuration
 .
.Dans le volet gauche, sous Connecteurs, sélectionnez la configuration « ADOIT », puis cliquez sur Ouvrir la fenêtre de dialogue de la configuration
 .
.Modifiez les paramètres dans les onglets Paramètres généraux, Utilisateurs techniques, Synchronisation des données et Constantes.
Cliquez sur OK lorsque vous avez terminé les paramètres.
Paramètres généraux
Modifiez les paramètres suivants dans cet onglet :
Nom : nom de la configuration. En règle générale, il n’est pas nécessaire de modifier la valeur par défaut.
ID : L’identifiant unique de la configuration. En règle générale, il n’est pas nécessaire de modifier la valeur par défaut.
Description : (Facultatif) Description de la configuration.
Activé : cochez cette case pour activer le connecteur de données.
Type de connecteur : Doit être défini à BOC Group.
Paramètres techniques
Modifiez les paramètres suivants dans cet onglet :
- URL : Entrez l’URL où ADOIT est disponible.
Exemple
Vous configurez ADONIS. ADOIT 16.0 est l’autre produit. Vous utilisez l'application web ADOIT sur une machine dont l'adresse IP est 10.2.100.62. L’URL doit ressembler à ceci :
Type d’authentification : sélectionnez la méthode d’authentification que vous avez configurée dans ADOIT pour accéder à l’API REST :
Basique : pour l’authentification de base. De plus, les paramètres suivants doivent être ajustés :
Nom d’utilisateur : Entrez le nom de l’utilisateur dans le contexte duquel les requêtes d’API REST doivent être envoyées en ADOIT.
Mot de passe (chiffré) : Entrez le mot de passe de l’utilisateur dans le contexte duquel les requêtes d’API REST doivent être envoyées dans ADOIT. Le mot de passe doit être chiffré à l’aide d’un outil de chiffrement qui se trouve dans le répertoire « 03 Web Application\02 Tools\02 Password Encryption Tool » dans le paquet d’installation.
ADO : pour l’authentification basée sur un jeton. De plus, les paramètres suivants doivent être ajustés :
Clé : Entrez la clé (pour l’authentification par le système cible) que vous avez définie dans l'Administration d'ADOIT sur l’onglet Jetons, par exemple « boc.rest.key.mfb.ManagementOfficeIntegration ».
Secret : Entrez le Secret (pour l’authentification par le système cible) que vous avez défini dans l'Administration d'ADOIT dans l’onglet Jetons. Copiez la clé de 512 caractères directement depuis l'Administration d'ADOIT . Les deux valeurs doivent correspondre exactement.
OAuth 2.0 : pour l’authentification OAuth 2.0. De plus, les paramètres suivants doivent être ajustés :
Type d’octroi : doit être défini sur Informations d’identification du client.
ID client : Entrez l’ID du système client que vous avez spécifié dans l'Administration d'ADOIT dans le formulaire Données du client.
Secret client (chiffrée) : saisissez la clé secrète à utiliser pour l’authentification du client que vous avez spécifiée dans l'Administration d'ADOIT dans le formulaire Données du client. Le mot de passe doit être chiffré à l’aide d’un outil de chiffrement qui se trouve dans le répertoire « 03 Web Application\02 Tools\02 Password Encryption Tool » dans le paquet d’installation.
Authentification du client : doit être défini sur Envoyer les informations d’identification du client en tant qu’en-tête d’authentification de base.
URL du jeton : entrez l’URI de redirection que vous avez spécifié dans l'Administration d'ADOIT dans le formulaire Données du client.
Périmètres : Entrez le nom des périmètres que vous avez spécifiés dans l'Administration d'ADOIT sur l’onglet OAuth 2.0.
Utilisateur technique : Ajoutez l’utilisateur technique que vous avez créé, c’est-à-dire « Technical_ManagementOfficeIntegration » (voir Créer un utilisateur technique). Si vous activez la synchronisation périodique, elle sera effectuée dans le contexte de cet utilisateur.
Synchronisation périodique : (Facultatif) Ici, vous pouvez configurer la synchronisation périodique des objets entre ADONIS et ADOIT via le cadre d’intégration. Lors de la synchronisation périodique, les éléments EA et les sont importés depuis ADOIT vers ADONIS. Adaptez les paramètres suivants :
Synchroniser périodiquement : cochez cette case pour activer la synchronisation périodique.
Quotidien/Expression CRON : Si la synchronisation périodique est activée, vous pouvez définir le moment où les objets sont synchronisés ici. Vous pouvez choisir le moment de cette opération de l’une des deux manières suivantes :
Quotidien : dans la zone Temps de synchronisation, définissez le point auquel les objets sont synchronisés quotidiennement.
Expression CRON : utilisez une expression CRON pour spécifier la fréquence à laquelle les objets doivent être synchronisés.
Synchronisation des données
Modifiez les paramètres suivants dans cet onglet :
- lang : Spécification de la langue dans laquelle les données sont transmises, par exemple « de » pour l’allemand et « en » pour l’anglais. Les langues disponibles dépendent de la librairie et de la licence.
Les objets ne peuvent être transmis que dans une seule langue.
Constantes
Modifiez les paramètres suivants dans cet onglet :
adoitRepositoryID : ID du référentiel dans ADOIT qui contient les objets qui doivent être importés dans ADONIS.
importFolderPath : nom du groupe d’objets dans ADONIS qui contient les objets importés. Ce groupe sera créé automatiquement s’il n’existe pas déjà.
obsoleteFolderID : ID du groupe d’objets dans ADONIS qui contient des objets qui n’ont pas pu être supprimés.
En général, les objets importés sont supprimés pendant la synchronisation s’ils ont été supprimés de ADOIT entre-temps.
Toutefois, si des relations ont été ajoutées aux objets importés dans ADONIS, ou si elles sont utilisées dans des modèles dans ADONIS, elles ne sont pas supprimées. Elles seront déplacées vers le dossier « Objets obsolètes » à la place. Une exception à cette règle est la relation Responsable. Bien qu'une relation de ce type ait été ajoutée dans ADONIS, les objets importés seront de toute façon supprimés.
- pageSize : le nombre d’objets importés depuis ADOIT en une seule fois.
Ce paramètre peut être utilisé pour éviter les problèmes de performances et de mémoire insuffisante. Par exemple, définissez la valeur sur « 100 » afin que 3 000 objets soient transférés dans 30 blocs de 100 objets chacun.
Importer un rôle système et attribuer des utilisateurs
Utilisez-vous les librairies par défaut fournies avec le produit ? Alors, importez le rôle système Management Office Integration dans l'Administration ADONIS maintenant et attribuez-y tous les utilisateurs, à l’exception des utilisateurs techniques et de ceux désignés pour effectuer la synchronisation. Cela empêchera vos utilisateurs de modifier les objets importés qui doivent être conservés dans ADOIT.
Importer des rôles
Pour importer le rôle système Management Office Integration dans l'Administration ADONIS :
Accédez à Rôles système > Plus d’options, puis cliquez sur Importer des rôles système.
Cliquez sur Parcourir et sélectionnez le fichier de rôles système. Le fichier concerné
<date> - <library name> - MOI Role.axrse trouve dans le dossier « 04 Sample Data/Roles » du paquet d’installation. Vous pouvez également faire glisser un fichier depuis votre ordinateur vers la zone <e1>Faites glisser et déposez des fichiers ici pour les télécharger</e1>. Cliquez sur Suivant.Sélectionnez le rôle système Management Office Integration. Cliquez sur Suivant.
Assurez-vous que l’option Inclure les droits sur le métamodèle est activée. Ne modifiez pas les autres paramètres. Cliquez sur Importer. Le rôle système est importé.
Une fois l’import terminée, un message de confirmation s’affiche. Fermez le message pour terminer le processus.
Assigner des utilisateurs à un rôle système
Pour assigner des utilisateurs au rôle système au Management Office Integration dans l'Administration ADONIS :
Accédez à la page Rôles système.
Dans le catalogue des rôles système sur le côté gauche, sélectionnez le rôle système Management Office Integration.
Cliquez sur Ajouter des membres et ajoutez des groupes d’utilisateurs ou des utilisateurs individuels à partir du catalogue d’utilisateurs. Cliquez sur Ajouter.
Cliquez sur Enregistrer.
Les utilisateurs sont assignés.
N’assignez PAS les utilisateurs suivants au rôle système Management Office Integration :
Utilisateurs techniques ou leurs groupes d’utilisateurs (= groupe par défaut)
Utilisateurs chargés d’effectuer la synchronisation ou leurs groupes d’utilisateurs
Effets du rôle système
Le rôle système de Management Office Integration a les effets suivants :
- Les utilisateurs ne sont pas autorisés à créer des Applications et n’ont qu’un accès en lecture à leurs attributs
Configurer l’accès à la synchronisation des objets pour les utilisateurs
En assignant deux modules dans l'Administration ADONIS, vous pouvez fournir aux bonnes personnes l’accès aux fonctionnalités de synchronisation dans ADONIS :
Allez dans Configurations > Client Web > Modules Web.
Attribuez le module suivant aux rôles système auxquels vous souhaitez donner l’accès :
- Connecteur pour ADONIS et ADOIT
Terminé ! Tous les utilisateurs disposant des rôles système concernés peuvent désormais importer des objets depuis ADOIT vers ADONIS
Les utilisateurs ayant accès à ces modules web sont chargés d’effectuer la synchronisation et ne doivent PAS se voir attribuer le rôle restrictif « Management Office Integration » (voir Importer les rôles système et assigner des utilisateurs), sinon ils ne pourront pas effectuer la synchronisation correctement.
Matrice
Une matrice dans ADONIS affiche les relations (cellules matricielles) entre les objets de l’axe des abscisses et les objets de l’axe des ordonnées. Une relation peut être:
une relation entre un objet axe des abscisses et un objet de l’axe des ordonnées ou
un objet qui est relié aux objets de l’axe des abscisses de l’axe des ordonnées par des relations
Les modèles de graphiques matriciels doivent être configurés dans ADONIS. L'Administration ADONIS fournit uniquement des paramètres limités pour ces modèles.
Ouvrir et modifier un modèle de graphique matriciel
Rendez-vous dans Configurations > Matrice, et choisissez le modèle que vous souhaitez.
Pour chaque langue disponible dans ADONIS, vous pouvez modifier le nom du modèle ainsi que la description qui le caractérise.
Circuit de validation des modèles
ADONIS fournit un système de gestion du circuit de validation des modèles qui permet de formaliser la publication et le versionnage des modèles. Au cours du processus de publication, les contributeurs effectuent différentes tâches en fonction de leurs rôles système.
La disponibilité du circuit de validation des modèles dépend de la licence.
Configurez les droits d'accès au circuit de validation des modèles
Vous pouvez utiliser la configuration par défaut du circuit de validation des modèles ou une configuration définie par l’utilisateur.
Configuration par défaut
Pour utiliser la configuration par défaut, ajoutez les utilisateurs aux rôles système suivants selon leur tâche dans le processus du circuit de validation. Voici des sous-rôles du rôle système « Circuit de validation des modèles » :
Les Modélisateurs créent et soumettent des modèles pour révision. Ils peuvent également créer de nouvelles versions de modèles déjà publiés afin de les adapter.
Les Responsables révisions effectuent des révisions formelles [réviseur de rôle système (formel)] et des révisions métier [réviseur de rôle système (métier)] des modèles soumis.
Les Administrateurs peuvent exécuter toutes les transitions. Ils sont responsables du maintien du processus de validation. Seuls les Administrateurs peuvent archiver manuellement les modèles (lorsqu’une nouvelle version d’un modèle est publiée, la version précédente est automatiquement archivée).
Ensuite, le circuit de validation des modèles est prêt à être utilisé.
Configuration définie par l’utilisateur
Pour utiliser une configuration définie par l’utilisateur, les étapes suivantes sont nécessaires :
Configurez le circuit de validation des modèles. Ajoutez de nouveaux rôles système (par exemple A, B, C, ...) sur la page Configurer les rôles.
Ajoutez des utilisateurs aux rôles système correspondants selon leur tâche dans le circuit de validation.
Ensuite, le circuit de validation des modèles est prêt à être utilisé.
Veuillez consulter la section Gérer les membres des rôles système pour en savoir plus sur la manière d’attribuer les rôles système aux utilisateurs.
Configurer le circuit de validation des modèles.
Pour configurer le circuit de validation des modèles :
- Cliquez sur Configurations > Circuit de validation des modèles > Paramètres généraux.
L’assistant de configuration du circuit de validation des modèles comporte 5 pages :
Ces pages sont abordées plus en détail dans les sections suivantes.
Configurer le mapping
La première page de l’assistant de configuration du circuit de validation des modèles vous permet de sélectionner les types de modèles, les relations de modèle et les attributs.
N’utilisez pas les droits sur le métamodèle pour restreindre l’accès aux attributs configurés ici, car ces attributs sont nécessaires au fonctionnement du circuit de validation des modèles.
Vous pouvez consulter et éditer les données suivantes :
Configuration principale
- Dans le champ Nom de la configuration, modifier les noms spécifiques au langage du circuit de validation des modèles pour tous les langages disponibles dans ADONIS. Ces noms sont visibles sur l’interface utilisateur, par exemple dans le filtre sur les statuts.
Sélection du type de modèle
- Sélectionnez les types de modèles qui devraient être disponibles dans le circuit de validation des modèles.
Lorsque vous configurez une transition spécifique, vous pouvez spécifier pour quels types de modèles cette transition est activée. Cependant, vous ne pouvez choisir que parmi les modèles disponibles ici.
Configuration de la version
- Définissez le format de la version mineure et le format de la version majeure attribués aux modèles lors du versionnage.
Configuration de la prolongation des dates de validité
Pour activer ou désactiver la fonction de prolongation, cochez ou décochez la case Actif.
Dans la case Vérification de validité quotidienne à (hh), tapez ou sélectionnez l’heure de la journée (au format 24 heures) lorsque la validité de toutes les versions de modèles est automatiquement vérifiée sur le serveur d’applications d'ADONIS. Le paramètre par défaut est chaque nuit à 1h00 heure locale.
Fonction d'Historique des modifications
Pour activer ou désactiver la fonction historique des versions, cochez ou décochez la case Actif.
Sélectionnez le nombre maximum d’entrées dans l’historique des versions. Lorsque cette somme est atteinte, les entrées les plus anciennes sont retirées du tableau.
Fonctions de responsables de processus
Pour activer ou désactiver la fonctions de responsables de processus, cochez ou décochez la case Actif.
Sélectionnez les attributs Pilote du processus, Administrateur du processus, Responsable révision et Expert métier. Ces attributs représentent les parties prenantes responsables d’un processus.
Les attributs Responsable additionnel 1, 2 et 3 vous permettent de définir jusqu’à trois attributs supplémentaires représentant les responsables des processus.
Si la fonctionnalité responsable des processus est activée, vous pouvez définir diverses conditions , vérifications et actions qui ne sont pas disponibles autrement. Vous pouvez, par exemple, spécifier que seuls les modèles dont le Pilote du processus est défini dans leur Notebook peuvent passer à un nouveau statut.
Après avoir terminé ces paramètres, sélectionnez la page 2 dans le menu de navigation en haut pour passer à la page suivante de l’assistant de configuration du circuit de validation des modèles.
Configurer les statuts
La deuxième page de l’assistant de configuration du circuit de validation des modèles affiche tous les statuts du workflow, ainsi que leurs détails. Vous pouvez éditer et créer de nouveaux statuts.
Les options suivantes sont disponibles :
Éditer le statut: À droite du statut, cliquez sur
Plus, puis sur Éditer.
Maintenant, vous pouvez configurer le statut.Supprimer le statut: À droite du statut, cliquez sur
Plus, puis sur Supprimer.Ajouter le statut: Cliquez sur Ajouter un nouveau statut. Maintenant, vous pouvez configurer le statut.
Changer l’ordre des statuts: Utilisez l’icône
 avec trois
lignes horizontales à gauche d’un statut pour le déplacer à une nouvelle position.
avec trois
lignes horizontales à gauche d’un statut pour le déplacer à une nouvelle position.
Vous pouvez modifier certains détails de statut directement sur la page Configurer les statuts, notamment Type, Icône et Couleur.
Éditer ou ajouter le statut de transition
Lorsque vous ajoutez ou éditez un statut sur la page Configurer les statuts, un formulaire apparaît. Vous pouvez consulter et éditer les données suivantes :
Nom indépendant de la langue
- Un nom indépendant de la langue qui identifie de manière unique le statut est appliqué automatiquement en fonction des valeurs d’énumération de l’attribut du statut.
Noms dépendant de la langue
- Modifier les noms spécifiques à chaque langue pour toutes les langues disponibles dans ADONIS. Ces noms sont visibles sur l’interface utilisateur.
Icône
- Éditer l’icône du statut directement dans la boîte de texte. Si ADONIS est installé, vous pouvez trouver une liste complète d’icônes en ajoutant /fonts/awesome/icon-index.html à l’URL de ADONIS, par exemple http://localhost:8000/ADONIS16_0/fonts/awesome/icon-index.html. Le mot-clé « axw-fa » (espace après axw-fa) doit être ajouté comme préfixe au nom de l’icône.
Couleur
- Modifiez la couleur de l’icône du statut et la couleur du statut dans les graphiques circulaires. Cliquez sur le cercle de couleur et choisissez une couleur, ou entrez manuellement une valeur de couleur hexagonale spécifique.
Type
Sélectionnez le type du statut prédéfini qui correspond à ce statut. Les types de statut incluent la logique pour l’interaction avec le circuit de validation du processus, les vérifications de validation, etc. Chaque type de statut regroupe certains comportements de circuit de validation.
« Brouillon » : Sélectionnez si le statut représente des versions provisoires de modèles. Sur les modèles avec un statut de type « Brouillon », il est assuré que les objets versionnés contenus sont automatiquement présents dans la dernière version publiée ou version brouillon. Les objets contenus sont mis à jour lorsqu’une nouvelle version brouillon est publiée ou lorsqu’une nouvelle version est publiée.
Exemple
Lorsque vous créez une nouvelle version brouillon d’un Processus, le nouvel objet remplace l’objet d’origine dans toutes les Cartes des processus qui sont en statut « Brouillon ».
« Révision » : Sélectionnez si le statut représente des modèles actuellement en cours de révision. Dans les modèles avec un statut du type « Révision », il est assuré que les objets versionnés contenus sont automatiquement présents dans la dernière version publiée.
« Publié » : Sélectionnez si le statut représente les modèles publiés (publiés, validés, etc.). Dans les modèles avec un statut du type « Publié », il est assuré que les objets versionnés contenus sont automatiquement présents dans la dernière version publiée.
« Archivé » : Sélectionnez si le statut s’applique aux modèles archivés. Le statut des objets versionnés contenus ne change pas dans les modèles en statut « Archivé ». Les objets archivés restent archivés et ne sont pas remplacés par de nouvelles versions publiées.
Statut comme groupe de modèles
Sélectionnez Représenter le statut comme groupe de modèles pour que les modèles fassent défiler les dossiers avec le nom du statut actuel lors du versionnage. Toutes les autres options dans cette zone sont inactives à moins que vous ne cochiez cette case.
Depuis la liste Utiliser le groupe de modèles de statut référencé, vous pouvez référencer un autre statut. Les modèles en statut actuel apparaîtront désormais dans le groupe de modèles du statut référencé.
Cliquez sur Nom personnalisé du groupe pour spécifier un nom personnalisé pour le groupe de modèles. Entrez un nom spécifique à chaque langue disponible dans ADONIS.
Exemple « Représenter le statut comme groupe de modèles »
Les modèles en statut « En révision formelle » et « En révision métier » devraient apparaître dans le même groupe de modèles personnalisés (« En révision »). Pour ce faire, procédez comme suit :
Statut « En révision formelle »
Cochez la case Représenter le statut comme groupe de modèles.
Le nom du groupe personnalisé est « En cours de révision ».
« En révision métier »
Cochez la case Représenter le statut comme groupe de modèles.
Depuis la liste Utiliser le groupe de modèle du statut référencé, sélectionnez le statut « En révision formelle ».
Après avoir terminé ces configurations, sélectionnez la page 3 dans le menu de navigation en haut pour passer à la page suivante de l’assistant de configuration du circuit de validation des modèles.
Configurer les rôles
La troisième page de l’assistant de configuration du circuit de validation des modèles montre tous les rôles système spécifiques au circuit de validation (= rôles RWF ou rôles du circuit de validation). Vous pouvez modifier et créer de nouveaux rôles.
Ajoutez des utilisateurs aux rôles système correspondants selon leur tâche dans le circuit de validation.
Les options suivantes sont disponibles :
Éditer le rôle système: À droite du rôle, cliquez sur
Plus, puis sur Éditer. Maintenant, vous pouvez configurer le rôle.Supprimer le rôle: À droite du rôle, cliquez sur
Plus, puis sur Supprimer.Ajouter un rôle: Cliquez sur Ajouter un nouveau rôle. Maintenant, vous pouvez <l5>configurer le rôle</l5>.
Autorisé à créer de nouveaux modèles: Sélectionnez Autorisé à créer de nouveaux modèles afin que les utilisateurs ayant un rôle spécifique puissent créer des modèles pour les types de modèles pour lesquels le circuit de validation des modèles est activé. Notez que cette configuration ne s’applique qu’aux types de modèles qui font partie du circuit de validation et n’a aucun effet sur les autres types de modèles.
Éditer ou ajouter un rôle
Lorsque vous ajoutez ou éditez un rôle sur la page Configurer les rôles, un formulaire apparaît. Vous pouvez consulter et éditer les données suivantes :
Nom indépendant de la langue
- Ajoutez un nom indépendant de la langue qui identifie de manière unique le rôle système.
Noms dépendant de la langue
- Modifier les noms spécifiques à chaque langue pour toutes les langues disponibles dans ADONIS. Ces noms sont visibles sur l’interface utilisateur.
Après avoir terminé ces configurations, sélectionnez la page 4 dans le menu de navigation en haut pour passer à la page suivante de l’assistant de configuration du circuit de validation des modèles.
Configurer les droits
La quatrième page de l’assistant de configuration du circuit de validation des modèles vous permet de définir les droits d’accès aux modèles dans le circuit de validation des modèles selon le rôle système et le statut.
Droits d’accès pour les modèles
- Sélectionnez les droits d’accès aux modèles dans chaque statut dans les listes déroulantes correspondantes.
Vous pouvez définir des droits d’accès pour chaque rôle de circuit de validation et pour les utilisateurs sans rôle de circuit de validation (« Tous les autres »).
Les utilisateurs sans rôle de circuit de validation ne devraient pas avoir accès en écriture au circuit de validation des modèles, car ils peuvent l’utiliser pour contourner les mécanismes du circuit de validation.
Les types d’accès suivants sont disponibles :
Lecture: L’utilisateur peut accéder à cet élément mais n’est pas autorisé à effectuer des modifications.
Écriture: L’utilisateur peut utiliser, modifier, sauvegarder et supprimer l’élément comme il le souhaite.
Lire les modèles avec l'option de traduction: L’utilisateur ne peut pas modifier le modèle en structure et en taille, mais il peut traduire les valeurs d’attributs existantes dans d’autres langages de contenu.
Aucun accès: Cet élément n’est pas disponible pour l’utilisateur (il est invisible pour lui dans les différentes listes et catalogues).
Droits par défaut (hérités): Les autorisations pour les modèles tels que définis au niveau des groupes d’utilisateurs ou directement au niveau utilisateur s’appliquent. Consultez la section relative aux Droits d'accès pour en savoir plus.
Après avoir terminé ces configurations, sélectionnez la page 5 dans le menu de navigation en haut pour passer à la page suivante de l’assistant de configuration du circuit de validation des modèles.
Configurer les transitions
La cinquième page de l’assistant de configuration du circuit de validation de modèles liste toutes les transitions dans le circuit de validation. Pour chaque transition, le statut source du modèle avant la transition et le statut cible du modèle après la transition sont affichés. Vous pouvez modifier et créer de nouvelles transitions.
Les options suivantes sont disponibles :
Modifier la transition: À droite de la transition, cliquez sur
Plus, puis sur Modifier.
Maintenant, vous pouvez configurer la transition.Supprimer la transition: À droite de la transition, cliquez sur
Plus, puis sur Supprimer.Ajouter une transition: Cliquez sur Ajouter une nouvelle transition. Maintenant, vous pouvez configurer la transition.
Changer l’ordre des transitions: Utilisez
l’icône avec trois
lignes horizontales à gauche d’une transition pour la déplacer à une nouvelle position.
Modifier ou ajouter une transition
Lorsque vous modifiez une transition existante ou en ajoutez une nouvelle, une fenêtre de dialogue contenant les onglets suivants s’ouvre :
Ces onglets sont abordés plus en détail dans les sections suivantes.
Paramètres généraux
L’onglet Paramètres généraux contient les paramètres suivants :
Éditer le nom indépendant de la langue et les noms spécifiques à la langue de la transition directement dans les champs de texte respectifs.
Sélectionnez si ADONIS doit créer un élément de menu pour la transition sur l’interface utilisateur.
Lorsque vous exécutez une transition dans ADONIS, l’icône du statut du statut cible est affichée dans les menus et dans le tableau de bord du scénario « Relire & Valider ». Pour remplacer l’icône du statut par une autre, modifiez l’icône (qui remplace l’icône du statut cible) directement dans le champ de texte correspondant. Si ADONIS est installé, vous pouvez trouver une liste complète d’icônes en ajoutant /fonts/awesome/icon-index.html à l’URL de ADONIS, par exemple http://localhost:8000/ADONIS16_0/fonts/awesome/icon-index.html. Le mot-clé « axw-fa » (espace après axw-fa) doit être ajouté comme préfixe au nom de l’icône.
Configurer les statuts
Configurez les statuts de la transition :
Sélectionner le statut source et le statut cible vous permet de sélectionner un ou plusieurs statuts sources et un statut cible.
La transition initiale signifie que le statut d’un modèle sans statut source change par rapport au statut initial du circuit de validation des modèles (par exemple. « Brouillon ») lorsque cette transition est effectuée.
La transition est valide dans chaque statut signifie que cette transition peut être effectuée quel que soit le statut source du modèle cible.
Lorsqu’une transition est configurée pour être une transition initiale, les notifications sont désactivées.
Lorsqu’une transition est configurée pour être valide dans chaque statut, toutes les actions sont désactivées et réinitialisées sauf :
Paramètres d'historique
Afficher un message de réussite pour la transition
Transition du système
Dans certains scénarios, il est nécessaire que les transitions correspondent à un certain type. Chaque transition de système apporte avec elle une certaine logique. Pour l’instant, ADONIS prend en compte les types de transitions système suivants :
Aucune indication : Cette configuration est désactivée. La transition n’est pas une transition systémique.
Rappel : Lorsque la validité du modèle doit être revérifiée, des rappels sont envoyés à l’utilisateur ou aux utilisateurs responsables.
RemarqueLorsqu’une transition est configurée comme une transition système de rappels, l’onglet Rappel sera activé, vous permettant de mieux configurer les détails du rappel.
Accepter : Lorsque la date « Valide à partir » est atteinte, le statut du modèle passe à « Valide ».
Invalidé : Lorsque la date « Valide jusqu’à » est atteinte, le statut du modèle passe à « Invalide ».
Vote : Activez ce paramètre si la transition représente un vote.
RemarqueLorsqu’une transition est configurée comme une transition système de vote, l’onglet Vote sera activé, vous permettant de mieux configurer le processus de vote.
Prolonger : Activez ce paramètre si la transition représente une action de prolongation (= prolonger la période de validité).
RemarqueLorsqu’une transition est configurée comme une transition système Prolonger, il est possible de définir diverses actions qui ne seraient autrement pas disponibles.
Les transitions système Rappel, Accepter et Invalider sont exécutées automatiquement sans aucune interaction de l’utilisateur. Chaque soir à 1h00 du matin, heure locale, le serveur d’application d'ADONIS vérifie si les modèles respectent les conditions spécifiées. Si oui, la transition système est exécutée.
Conditions
L’onglet Conditions contient les paramètres suivants :
Les rôles RWF autorisés à exécuter cette transition
- Définissez les rôles système autorisés à exécuter cette transition.
Vous ne pouvez sélectionner que parmi les rôles système configurés pour le circuit de validation sur la page Configurer les rôles.
Sélection du type de modèle
- Définissez pour quels types de modèles cette transition est activée.
Vous ne pouvez sélectionner que parmi les types de modèles disponibles pour le circuit de validation de modèle dans la section Sélection de type de modèle sur la page Configurer le Mapping.
Responsable du processus autorisé à réaliser la transition
- Dans ce domaine, vous pouvez spécifier que seuls les responsables du processus peuvent exécuter cette transition. L’utilisateur doit également avoir le rôle système approprié.
Vous pouvez combiner plusieurs conditions. La transition ne peut être exécutée que si toutes les conditions sont remplies (opérateur ET logique).
Vérifications
L’onglet Vérifications contient les paramètres suivants :
Sélectionnez la case Ne pas exécuter d’action de vérification pour ignorer toutes les vérifications, ou effacez-la afin de définir plusieurs vérifications à effectuer avant l’exécution de la transition.
Sélectionnez la case Ne pas autoriser les modèles vides pour exiger que le modèle contienne au moins un objet avant que la transition puisse être exécutée, ou effacez-la pour permettre des transitions avec des modèles vides.
Responsable du processus
Dans ce domaine, vous pouvez spécifier que seuls les modèles dont un processus responsable est défini dans leur Notebook peuvent passer au statut cible. Vous pouvez également spécifier si un responsable de processus doit être basé sur l’utilisateur (un objet Utilisateur référencé), basé sur un rôle (un objet Rôle référencé) ou peut être les deux.
Si l’option Avertir si des rôles attribués sont disponibles pour le lecteur est activée, ADONIS affiche un avertissement lors de l’exécution de la transition, et la condition suivante est remplie : Un objet Rôle utilisé dans le circuit de validation des modèles en tant que responsable de processus est marqué comme Disponible pour le lecteur (attribut de l'objet dans le chapitre « Informations générales » du Notebook). L’utilisateur ne peut pas exécuter la transition.
Relations entrantes
Si l’option Ne pas autoriser les relations entrantes est activée, un dialogue apparaîtra lorsque la transition sera exécutée et que le modèle contient des relations entrantes. La transition ne peut pas être exécutée par l’utilisateur.
Si l’option Informer si des relations entrantes existent est activée, un dialogue apparaîtra lorsque la transition sera exécutée et que le modèle contient des relations entrantes. La transition peut être exécutée par l’utilisateur ou annulée.
Relations sortantes
Si l’option Avertir si les modèles sous-jacents ne sont pas publiés est activée, un avertissement s’affiche lors de l’exécution de la transition, et la condition suivante est remplie : Le modèle contient au moins un sous-processus qui relie à un diagramme de collaboration qui n’est pas publié. La transition peut être exécutée par l’utilisateur ou annulée.
Sélectionnez Inclure les modèles associés afin que les modèles associés passent également au statut cible. C’est par exemple le cas lorsqu’un modèle est relié dans un diagramme de collaboration en tant que sous-processus.
Si cette option est activée, vous devez choisir une stratégie pour gérer les modèles associés en cas de conflit. Inclure tout ou rien signifie que la transition ne sera exécutée que si tous les modèles associés ont le statut requis pour la transition. Inclure avec le meilleur des efforts signifie que tous les modèles associés qui ne peuvent pas être transitionnés seront ignorés et la transition sera autorisée pour le reste des modèles. L’utilisateur décide permet à l’utilisateur de choisir entre les options suivantes : Ne pas inclure les modèles associés, Inclure tout ou rien ou Inclure avec le meilleur effort.
Si l'option Ne pas permettre si la période de validité est invalide est activée, la transition ne peut pas être exécutée si la fin de la période de validité est passée.
Si l'option Ne pas autoriser s’il n’y a pas d’accès au groupe de modèles cible, est activée, la transition ne peut être exécutée que si l’utilisateur dispose d’un accès en écriture au groupe dans lequel le modèle apparaîtra après la transition.
Si l'option Afficher un message de succès pour les vérifications est activée, une boîte de dialogue s’affiche lorsque toutes les vérifications ont été effectuées avec succès.
Vérifications
- Dans la section Vérifications, vous pouvez configurer quelles vérifications sont effectuées lors de la soumission des modèles pour révision. De plus, vous pouvez définir le comportement lorsque la vérification montre que les modèles ne sont pas valides : soit la transition peut ne pas être exécutée du tout (Bloquer la transition), soit une simple notification apparaît (Confirmer la transition).
Actions
L’onglet Actions contient les paramètres suivants :
Cochez la case Ne pas exécuter d’action d’exécution pour ignorer toutes les actions, ou décochez-la afin de pouvoir définir différentes actions à effectuer après l’exécution de la transition.
Vous pouvez définir si la version mineure ou la version majeure du modèle doit être augmentée après l’exécution de la transition.
Paramètres d'historique
Précisez si l’utilisateur doit créer un commentaire lors de l’exécution de la transition. Ce commentaire est enregistré dans l’historique des versions du modèle (attribut dans le chapitre « Cycle de vie » du Notebook) :
Aucune entrée d’historique signifie qu’aucune entrée ne sera créée dans l’historique des versions.
Un Commentaire facultatif par l’utilisateur signifie que la transition sera exécutée que l’utilisateur saisisse ou non un commentaire.
Un Commentaire obligatoire par l’utilisateur signifie que la transition ne sera effectuée que si l’utilisateur saisit un commentaire.
Créer une entrée d’historique automatiquement signifie qu’un commentaire est généré et enregistré automatiquement dans l’historique des versions du modèle. Définissez le contenu de l’entrée historique via une boîte de dialogue de support en cliquant sur le bouton Paramètres historiques....
Les Paramètres d’historique n’ont d’impact que si la fonctionnalité historique des versions est activée et configurée sur la page Configurer le mapping. Dans le cas contraire, les commentaires ne peuvent pas être enregistrés dans l’historique des versions du modèle.
Assigner le responsable de processus
Pour assigner automatiquement l’utilisateur qui exécute cette transition comme responsable du processus, cochez la case Assigner l’utilisateur actuel comme responsable du processus, puis sélectionnez l’attribut concerné.
Exemple
Lorsque la configuration par défaut du circuit de validation des modèles est en place, l’utilisateur actuel est automatiquement assigné comme « Expert métier » lorsqu’il crée un processus (transition initiale).
Le paramètre Assigner un responsable de processus n’est disponible que lorsqu’une transition est configurée comme une transition initiale dans l’onglet Paramètres généraux.
Sélectionner les transitions référencées (par ex. : Pour archiver les modèles en arrière plan)
- Sélectionnez les transitions référencées pour le modèle ou son modèle prédécesseur. Cela est utile par exemple pour archiver la version du modèle prédécesseur en arrière-plan.
Nouvelle version
- Sélectionnez si une nouvelle version du modèle est créée. Cette copie du modèle original peut, par exemple, être adaptée et publiée ultérieurement avec un numéro de version augmenté.
Dates de validité et de prolongation
Cochez la case Définir les dates de validité pour définir la période de validité lors de l’exécution de la transition :
Le modèle est valide immédiatement (date « valide à partir de »).
Cochez la case Remplacer la date de début de validité existante par la date actuelle afin de définir explicitement qu’un modèle publié est valide lorsque cette transition est exécutée. Cela permet à vos utilisateurs de modifier le statut d’un modèle qui reste autrement bloqué en statut « Publié » en attendant l’arrivée d’une date programmée « Valide à partir de ». Par défaut, cette option n’est activée que pour la transition spéciale Définir comme valide.
Cochez la case Définir la date de validité à la fin du mois pour préciser que la période de validité se termine toujours le dernier jour d’un mois.
Par défaut, un modèle reste valable pendant 12 mois après sa validation (date « valable jusqu’à »). Vous pouvez adapter ce paramètre dans la case Durée de la période de validité (mois).
La « Date de resoumission » (attribut du modèle dans le chapitre Cycle de vie du Notebook) indique à l’utilisateur ou aux utilisateurs responsables quand la validité du modèle doit être revérifiée. Dans la case Date de resoumission (mois avant la date de fin de validité), sélectionnez combien de mois avant la fin de la période de validité cette date est atteinte.
La période de validité n’affecte pas le circuit de validation du modèle tant que le scénario de prolongation n’est pas actif. Par exemple, aucun rappel automatique n’est envoyé avant qu’un modèle ne devienne invalide, etc.
Cochez la case Prolonger pour prolonger la validité lors de l’exécution de la transition :
- La durée de validité est augmentée de 12 mois par défaut (date « valable jusqu’à »). Vous pouvez adapter ce paramètre dans la case Durée de la période de validité (mois).
Les deux dernières options dans cette zone, Prolongation et Durée de la période de validité (mois), ne sont disponibles que lorsqu’une transition a été configurée comme une Prolongation de la transition système dans l’onglet Paramètres généraux.
Sélectionnez si les relations entrantes du modèle prédécesseur sont transférées vers la nouvelle version du modèle.
Sélectionnez si vous voulez briser les relations sortantes du modèle cible. Cette fonction est importante, par exemple lors de l’archivage de modèles. En prenant la perspective d’un autre modèle, vous pouvez vous assurer qu’il ne contiendra aucune relation entrante provenant d’un modèle archivé.
Si l’option Réinitialiser les ToDos de validation est activée, tous les ToDos sont reconvertis en incomplets lors de l’exécution de la transition.
Si l’option Afficher un message de succès pour la transition est activée, une boîte de dialogue s’affiche lorsque toutes les actions ont été effectuées avec succès.
Notifications
L’onglet Notifications n’est PAS disponible lorsqu’une transition est configurée comme transition initiale dans l’onglet Paramètres généraux.
L’onglet Notifications contient les paramètres suivants :
Envoyer des messages
- Définissez si ADONIS envoie automatiquement des messages après la transition. Des messages peuvent être envoyés pour notifier les responsables du processus et les rôles RWF chargés d’exécuter la prochaine transition dans le processus de validation.
Envoyer des courriels
Définissez si ADONIS envoie automatiquement des emails après la transition (vers, en copie ou en copie cachée). Sélectionnez une ou plusieurs des options suivantes :
Envoyez des e-mails pour informer les responsables du processus.
RemarqueLes responsables de processus peuvent être basés sur l’utilisateur (un objet utilisateur associé) ou basés sur un rôle (un objet de rôle associé). Si la responsabilité est définie via un rôle, des e-mails sont envoyés à tous les utilisateurs de ce rôle.
Envoyez des e-mails pour informer les rôles RWF, responsables de l’exécution de la prochaine transition dans le processus de validation.
Définissez que les emails sont envoyés ad hoc et permettent ainsi à l’utilisateur d’accéder à ADONIS pour sélectionner eux-mêmes les destinataires.
Envoyez des emails à une liste d’utilisateurs prédéfinie que vous pouvez préparer via un dialogue de support en cliquant sur le bouton Ajouter.
Envoyez des e-mails à des destinataires spécifiques. Saisissez les adresses e-mail des destinataires dans les cases Envoyer à, Inclure en CC et Inclure en BCC. Séparez plusieurs entrées avec un point-virgule.
Pour des informations détaillées sur la manière dont les destinataires influencent les notifications par email, voir Impact des destinataires sur les notifications par email pour les circuits de validation.
Envoyer la configuration des courriels
Vous pouvez définir le contenu de l’e-mail via un dialogue de support en cliquant sur les boutons Texte de l’e-mail... et Objet de l’e-mail... Sinon, un e-mail préconfiguré est envoyé.
Utilisez du texte brut ou du code HTML avec du CSS en ligne.
Vous pouvez utiliser les espaces réservés suivants qui seront remplacés par des données réelles lors de l’envoi de l’email :
%VERSIONHISTORY %: L’attribut Historique des versions.%MODELNAME%: Le nom du modèle.%STATE %: Le statut du modèle.%URL %: L’URL pour ouvrir le modèle.%SENDER %: Le nom de l’utilisateur qui a exécuté la transition.%NAME%: Le prénom du destinataire de l’e-mail.%LASTNAME%: Le nom de famille du destinataire de l’e-mail.%VALID_FROM %: L’attribut Valide à partir de.%VALID_UNTIL %: L’attribut Valide jusqu’à.%RESUBMISSION_DATE %: L'attribut Date de resoumission.
Avant qu’il soit possible d’envoyer des notifications par e-mail, les paramètres d’e-mail et l’URL de base doivent être correctement configurés.
Les messages et les e-mails ne peuvent être envoyés automatiquement aux responsables de processus que si la fonctionnalité responsable du processus a été activée sur la page Configurer le mapping.
ADONIS n’enverra pas de messages ni d’e-mails aux membres du rôle système Administrateur . Cela permet d’éviter de spammer ces utilisateurs. Les Administrateurs n’ont pas de zone de responsabilité prédéfinie dans le processus de validation. Ils sont responsables du maintien du processus de validation.
Rappel
L’onglet Rappel n’est disponible QUE lorsqu’une transition a été configurée comme une transition système Rappel dans l’onglet Paramètres généraux.
L’onglet Rappel contient les paramètres suivants :
Sélectionnez la case Envoyer un rappel pour envoyer un rappel à l’utilisateur responsable lorsque la validité du modèle doit être revérifiée :
Dans la case Date de référence, sélectionnez si le rappel doit être envoyé « Lors de la resoumission », avant la date « Valide jusqu’à », après la date « Jusqu’à » ou après le « Changement de statut ».
Dans la section Mois/Jours, choisissez combien de mois ou de jours avant/après la date de référence le rappel est envoyé. Par exemple, si « Après changement de statut » est sélectionné comme date de référence et 7 jours comme intervalle, le rappel sera envoyé 7 jours après que le modèle ait changé de statut. Cette option n’est pas disponible lorsque le rappel est envoyé « Lors de la resoumission ».
Dans la liste Intervalles, sélectionnez l’intervalle auquel les rappels sont envoyés.
Dans la case Occurrence, choisissez combien de rappels sont envoyés.
Concertation
L’onglet Vote n’est disponible QUE lorsqu’une transition a été configurée comme une transition système Vote dans l’onglet Paramètres généraux.
L’onglet Vote contient les paramètres suivants :
Cochez la case Actif pour lancer un processus de vote sur le modèle avant l’exécution de la transition. Toutes les autres options dans la zone de vote sont inactives à moins que vous ne cochiez cette case.
Parmi la liste des responsables qui représente les électeurs, sélectionnez qui sont les personnes responsables pouvant voter. Tous les utilisateurs ou rôles référencés dans le Notebook du modèle dans la relation sélectionnée peuvent voter.
InfoUn seul titulaire de rôle peut voter par rôle.
Cliquez sur le bouton Définir la question de vote pour définir quel texte est affiché lorsque les électeurs sont invités à voter sur un modèle. Saisissez un texte pour chaque langue disponible dans ADONIS. Sinon, ADONIS affiche un texte préconfiguré.
Pour préciser que les utilisateurs doivent créer un commentaire lorsqu’ils votent avec Oui ou Non, sélectionnez le Activer le commentaire obligatoire si l’utilisateur a voté avec une case à cocher, puis sélectionnez les cases appropriées. Ce commentaire est enregistré dans l’historique des versions du modèle (attribut dans le chapitre « Cycle de vie » du Notebook) :
Dans la section Définir les transitions de suivi, sélectionnez les transitions après le vote.
Dans la liste Transition en cas de résultat de vote négatif, sélectionnez la transition si le vote échoue.
Dans la liste Transition en cas de résultat de vote positif, sélectionnez la transition si le vote est réussi.
Pour ces deux options, cochez la case Démarrer automatiquement afin que la transition de suivi soit exécutée automatiquement après le vote.
RemarqueSi vous désactivez Démarrer automatiquement, la transition de suivi doit être exécutée manuellement. Dans ce cas, les deux transitions suivantes (... résultat négatif et ... résultat positif) sera disponible.
Dans la zone Transition disponible pendant que le vote est en cours, sélectionnez quelles transitions peuvent être exécutées pour interrompre le processus de vote. Ces transitions doivent avoir le même statut source que la transition de vote.
Dans la section stratégie de vote, vous pouvez définir quand le processus de vote prend fin :
Tous les votes reçus signifient que tous les électeurs doivent absolument voter.
Le seuil atteint signifie qu’un pourcentage minimum de votes positifs doit être reçu. Le vote prend également fin lorsque trop d’électeurs ont voté négativement et que le vote ne peut plus être couronné de succès. Vous pouvez spécifier le pourcentage minimum dans la case Seuil (pourcentage minimum de votes positifs) ( %) ci-dessous.
Dans la case Seuil (pourcentage minimum de votes positifs) ( %), spécifiez le pourcentage minimum de votes positifs nécessaire pour que le vote soit réussi. Si l’option seuil atteint est sélectionnée, le vote prendra fin dès que le seuil sera dépassé.
Configurer le vote
Les processus de vote peuvent être utilisés dans des scénarios sophistiqués de circuit de validation. En général, un groupe de personnes décide si un modèle sera publié. Lorsque la configuration par défaut du circuit de validation du modèle est utilisée, cette fonctionnalité est désactivée.
Dans ADONIS, un processus de vote est représenté par une transition. Après la fin du vote, différentes transitions de suivi peuvent être effectuées selon que le résultat du vote était positif ou négatif (par exemple Rejeter ou Publier). Vous pouvez configurer plusieurs processus de vote dans le circuit de validation des modèles.
Un seul processus de vote peut être configuré par statut cible.
Variantes de configuration
Selon la configuration du circuit de validation utilisée, différentes étapes sont nécessaires pour configurer le vote. Les variantes suivantes sont possibles :
Activez le vote pour la validation
Utilisez-vous la configuration par défaut du circuit de validation des modèles ? Dans ce cas, vous pouvez activer un processus de vote préconfiguré sur les modèles avant leur validation. Pour ce faire, procédez comme suit :
Ouvrez la page Configurer les transitions.
Ouvre la transition Vote pour la validation en vue de modification.
Passez à l’onglet Actions.
Dans la section Vote, cochez la case Actif, puis cliquez sur Enregistrer.
Cliquez sur Enregistrer.
Le processus de vote est activé et prêt à être utilisé. Tous les utilisateurs ou rôles référencés dans le Notebook du modèle en tant que Administrateurs du processus peuvent voter.
Un seul titulaire de rôle peut voter par rôle.
Une fois tous les votes reçus, le vote prend fin. Le Pilote du processus peut alors exécuter manuellement la transition de suivi (soit Rejeter, soit Publier en fonction du résultat).
Configurez le vote pour toute transition particulière
Les étapes suivantes sont nécessaires pour configurer le vote pour toute transition particulière :
Cartographiez la relation de modèle qui représentera les électeurs
Créer une transition - Paramètres généraux
Créer une transition - Conditions
Créer une transition - Actions
Cartographiez la relation qui représentera les électeurs
Pour cartographier la relation qui représentera les électeurs :
Ouvre la page Configurer le mapping.
Dans la zone de fonctionnalité Responsable du processus, sélectionnez la case à cocher Actif.
Assurez-vous que la relation qui représente les électeurs est définie ici. Vous pouvez soit utiliser l’attribut Pilote du processus, Administrateur du processus ou Expert métier, soit définir un attribut supplémentaire.
Créer une transition - Paramètres généraux
Afin de créer une transition représentant le processus de vote et de configurer les paramètres généraux :
Ouvrez la page Configurer les transitions.
Cliquez sur le bouton Ajouter une nouvelle transition.
Dans la case Nom indépendant de la langue, tapez un nom pour la transition. Ce nom indépendant de la langue identifie de manière unique la transition.
Dans les boîtes de texte spécifiques à la langue, tapez un nom pour chaque langue disponible dans ADONIS. Ces noms sont visibles sur l’interface utilisateur.
Cochez la case Créer un élément du menu.
Dans le champ Configurer les statuts, changez à la fois le statut source et le statut cible pour le statut dans lequel le processus de vote a commencé.
Exemple
Vous voulez configurer un processus de vote sur les modèles publiés avant qu’ils ne soient archivés. Changez le statut source et le statut cible en Publié.
Dans le champ transition système, sélectionnez Vote dans la liste.
Créer une transition - Conditions
Pour configurer les conditions du processus de vote :
Passez à l’onglet Conditions.
Dans le champ Rôles RWF autorisés à exécuter cette zone de transition, définissez les rôles système autorisés à exécuter cette transition. Les électeurs doivent avoir au moins un de ces rôles dans le système.
Dans le champ Sélection des types de modèles, définissez pour quels types de modèles cette transition est activée.
Dans le champ Responsables de processus autorisés à exécuter la zone de transition, sélectionnez la case Actif, puis sélectionnez la relation représentant les électeurs.
Créer une transition - Actions
Pour configurer les actions du processus de vote :
Passez à l’onglet Actions.
Dans la section Vote, cochez la case Actif.
Dans la liste des Responsables qui représente la liste des électeurs, sélectionnez la relation qui représente les électeurs. Tous les utilisateurs ou rôles référencés dans le Notebook du modèle dans la relation sélectionnée peuvent voter.
InfoUn seul titulaire de rôle peut voter par rôle.
Dans la liste Transition, en cas de résultat de vote négatif, sélectionnez quelle transition peut être exécutée si le vote échoue.
Exemple
Vous voulez configurer un processus de vote sur les modèles publiés avant qu’ils ne soient archivés. Changer la Transition en cas de résultat de vote négatif en Pas de transition sélectionnée (= modèle reste en statut Publié).
Dans la liste Transition en cas de résultat de vote positif, sélectionnez quelle transition peut être exécutée si le vote réussit, puis cliquez sur OK
Exemple
Vous voulez configurer un processus de vote sur les modèles publiés avant qu’ils ne soient archivés. Changez la transition en cas de résultat de vote positif en Archive.
Cliquez sur Enregistrer, puis sur Enregistrer.
Le processus de vote est activé et prêt à être utilisé.
Les autres paramètres sont optionnels (vous pouvez utiliser la configuration par défaut). Par exemple, vous pouvez spécifier que la transition de suivi commence automatiquement à la fin du vote, etc.
Configurez l’attribution des responsables de révision spécifiques
Par défaut, tous les utilisateurs ayant le rôle système « Contributeur (révision formelle) » peuvent effectuer des révisions formelles sur tous les modèles. L’attribut Contributeur (révision formelle) permet une meilleure attribution de responsabilité du révision. Il permet d’assigner des contributeurs (révision formelle) spécifiques aux modèles si la configuration du circuit de validation des modèles est adaptée en conséquence.
Les étapes suivantes sont nécessaires pour configurer l’attribution de contributeurs (révision formelle) spécifiques :
Adapter la transition « Soumettre à une révision formelle »
Adapter la transition « Soumettre à une révision métier »
Dernières étapes
La procédure décrite ici n’est valable que si la configuration par défaut du circuit de validation des modèles est en usage. Si vous utilisez une autre configuration, les étapes requises dépendent de la conception des transitions de circuit de validation.
Adapter la transition « Soumettre à une révision formelle »
Pour adapter la transition « soumettre à une révision formelle » :
Ouvrez la page Configurer les transitions.
Ouvrez la transition Soumettez à une révision formelle pour modification.
Passez à l’onglet vérification.
Dans la section Processus responsable, cochez la case Contributeur (révision formelle), puis cliquez sur les deux.
Passez à l’onglet Notifications.
Dans la section Envoyer des messages, faites ce qui suit :
Sélectionnez la case Envoyer des messages pour traiter les responsables, puis sélectionnez la case Contributeur (révision formelle).
Supprimez la case Envoyer des messages vers les rôles RWF.
Dans la section Envoyer des e-mails, faites ce qui suit :
Cochez la case Envoyer des e-mails pour traiter les responsables, puis cochez la case Contributeur (révision formelle).
Supprimez la case Envoyer des e-mails aux rôles RWF.
Cliquez sur Enregistrer.
Adapter la transition « Soumettre à une révision métier »
Pour adapter la transition « Soumettre à une révision métier » :
Toujours sur la page Configurer les transitions, ouvrez la section de transition Soumettre à la révision métier pour modification.
Passez à l’onglet Conditions.
Dans le champ responsables du processus autorisés à exécuter la zone de transition, cochez la case Actif , puis cochez la case Contributeur (révision formelle).
Cliquez sur Enregistrer, puis sur Enregistrer.
Dernières étapes
Effectuez les étapes finales suivantes :
- Redémarrez le serveur d’applications d'ADONIS.
L’affectation de contributeurs (révision formelle) spécifiques est activée et prête à l’emploi.
Configurer la prolongation
Lorsque le mécanisme de prolongation est en usage, un modélisateur peut fixer une date à partir de laquelle un modèle sera valide après sa validation. Par défaut, un modèle est valable pendant un an après sa validation. Avant que le modèle ne devienne invalide, un rappel est envoyé au(x) utilisateur(s) responsable(s). Un contributeur (réviseur) peut alors prolonger le modèle. Si le contributeur (réviseur) demande des modifications, le Modélisateur peut créer une nouvelle version brouillon afin d’adapter le modèle. Alternativement, le modèle peut être archivé.
Lorsque le mécanisme de prolongation est activé, chaque nuit à 1h00 du matin, la validité locale de tous les modèles versionnés est automatiquement vérifiée sur le serveur d’applications d'ADONIS. Cette vérification de validité a deux effets :
Lorsque la date « Valide à partir de » est atteinte, le statut des modèles versionnés passe à « Valide ».
Lorsque la date « Valide jusqu’à » est atteinte, le statut des modèles versionnés passe à « Invalide ».
Variantes de configuration
Selon la configuration du circuit de validation utilisée, différentes étapes sont nécessaires pour utiliser le mécanisme de prolongation. Les variantes suivantes sont possibles :
Configuration par défaut du circuit de validation des modèles ou :
Configuration par défaut adaptée du circuit de validation des modèles ou :
Configuration spécifique du circuit de validation des modèles
Configuration par défaut du circuit de validation des modèles
Pour utiliser le mécanisme de prolongation lorsque la configuration par défaut du circuit de validation des modèles est en cours :
Importez la configuration du circuit de validation étendu qui inclut la configuration du mécanisme de prolongation (Importer les paramètres des composants). Le fichier correspondant
ADONIS 16.0 - RWF Standard config (incl. prolongation mechanism).axsse trouve dans le dossier « 04 Sample Data\Component Settings » du paquet d’installation. Écraser la configuration existante avec le contenu du fichier d’import.Redémarrez le serveur d’applications d'ADONIS.
Le mécanisme de prolongation est activé et prêt à être utilisé.
Configuration par défaut adaptée du circuit de validation des modèles
Utilisez-vous une configuration par défaut qui a été adaptée (statuts supplémentaires ou rôles système, etc.) ? Les étapes suivantes sont nécessaires pour utiliser le mécanisme de prolongation :
Activer le mécanisme de prolongation
Adapter les statuts sources des transitions existantes
Adapter le statut de transition « Publier »
Adapter la transition « Définir comme valide »
Dernières étapes
Activer le mécanisme de prolongation
Pour activer le mécanisme de prolongation :
Ouvre la page Configurer le mapping.
Dans le champ Configuration de prolongation, cochez la case Actif.
Les autres réglages dans cette zone sont optionnels (vous pouvez utiliser la configuration par défaut).
Adapter les statuts sources des transitions existantes
Afin d’adapter les statuts sources des transitions existantes :
Accédez la page Configurer les transitions, puis ouvrez la transition Nouvelle version de brouillon pour la modifier.
Dans l’onglet Paramètres généraux, supprimez le statut source Publié, puis cliquez sur Enregistrer.
Répétez les étapes 1 à 2 pour les transitions Archiver et Archiver le modèle (système).
Adapter le statut de transition « Publier »
Pour adapter la transition « Publier » :
Toujours sur la page Configurer les transitions, ouvrez la transition Publier pour la modifier.
Passez à l’onglet Actions.
Dans la liste de transition de modèles, remplacez la transition Aucune transition sélectionnée par Définir comme valide au point de départ de la validité. Le statut cible du modèle changera automatiquement de Publié à Valide lorsque la date « Valide à partir du » sera atteinte.
Dans la liste Transition du modèle prédécesseur, remplacez la transition Archiver le modèle (système) par Aucune transition sélectionnée.
Décochez la case Transférer les relations depuis le modèle prédécesseur, puis cliquez sur Enregistrer.
Adapter la transition « Définir comme valide »
Pour adapter la transition « Définir comme valide » :
Toujours sur la page Configurer les transitions, ouvrez le Définir comme valide pour la modifier.
Dans l’onglet Paramètres généraux, cochez la case Créer un élément du menu.
Cliquez sur Enregistrer, puis sur Enregistrer.
Dernières étapes
Effectuez les étapes finales suivantes :
- Redémarrez le serveur d’applications d'ADONIS.
Le mécanisme de prolongation est activé et prêt à être utilisé.
Configuration spécifique du circuit de validation des modèles
Si vous utilisez une configuration spécifique, les étapes nécessaires pour activer le mécanisme de prolongation dépendent de la conception des transitions de circuit de validation.
Une présentation exhaustive de toutes les options de configuration sort du cadre de ce manuel. Veuillez contacter votre consultant ADONIS. Ils vous aideront à obtenir une nouvelle configuration de circuit de validation incluant le mécanisme de prolongation.
Configurez les droits utilisateur pour le circuit de validation des modèles
Dans cette section, les paramètres de droits pour deux scénarios typiques lors de l’utilisation du circuit de validation des modèles sont résumés.
Paramètres globaux des droits : Un ensemble de droits d'accès est appliqué dans toute l’organisation
Paramètres de droits basés sur les départements: Les droits d'accès varient selon l’unité commerciale ou le département
Toutes les descriptions de cette section font référence à la configuration par défaut du circuit de validation des modèles. Si vous utilisez une configuration différente, adaptez les paramètres de droits comme indiqué ici.
Paramètres globaux des droits
Un ensemble de droits d'accès est appliqué à l’ensemble de l’organisation (et de ses départements). Ce scénario s’applique souvent aux organisations plus petites et/ou gérées de manière centralisée.
Description du scénario
- Seuls les Modélisateurs peuvent créer de nouveaux modèles ou de nouvelles versions des modèles publiés.
Cela ne s’applique qu’aux types de modèles configurés pour être utilisés dans le circuit de validation des modèles. L’utilisation d’autres types de modèles n’est pas restreinte.
Les Modélisateurs ont un accès en écriture aux modèles en statut Brouillon dans tous les départements.
Les modèles qui ne sont pas en statut Brouillon sont en lecture seule pour tous les utilisateurs ayant un rôle de circuit de validation des modèles.
Les Contributeurs (révision) peuvent examiner les modèles soumis en révision dans tous les départements.
Les Lecteurs ont un accès en lecture aux modèles de tous les départements. Dans le Référentiels d'Entreprise, les lecteurs n’ont accès qu’aux modèles publiés.
Procédure pour la définition des droits nécessaires
Les départements sont représentés par des groupes de modèles.
Ajoutez des utilisateurs aux rôles système correspondants selon leur tâche dans le circuit de validation. Les Lecteurs n’ont pas de rôle de circuit de validation.
Ajoutez des utilisateurs aux groupes suivants :
Assignez des Modélisateurs à un groupe d’utilisateurs qui dispose d’un accès en écriture à tous les groupes de modèles contenant des modèles en statut Brouillon. Cela est nécessaire pour que les Modélisateurs puissent créer de nouvelles versions de modèles.
Assignez des Lecteurs à un groupe d’utilisateurs avec uniquement un accès en lecture à tous les groupes de modèles.
Paramètres de droits basés sur les départements
Les droits d'accès attribués varient selon le domaine de responsabilité de l’utilisateur et le département auquel il appartient. Ce scénario s’applique aux organisations plus grandes et/ou gérées de manière décentralisée.
Description du scénario
- Seuls les Modélisateurs peuvent créer de nouveaux modèles ou de nouvelles versions des modèles publiés.
Cela s’applique au sous-ensemble des types de modèles configurés pour être utilisés dans le circuit de validation des modèles. L’utilisation d’autres types de modèles n’est pas restreinte.
- Les Modélisateurs ont un accès en écriture aux modèles en statut Brouillon uniquement dans leur département. Ils n’ont pas accès en écriture aux modèles dans d’autres département.
Exemple
Le modélisateur A peut créer des modèles dans « BU1 ». Il dispose uniquement d’un accès en lecture aux modèles dans « BU2 » et n’a aucun accès aux modèles dans « BU3 ».
Les modèles qui ne sont pas en statut Brouillon sont accessibles en lecture seule pour tous les utilisateurs.
Les Contributeurs (révision) peuvent examiner les modèles soumis en révision dans tous les départements.
Les Lecteurs ont un accès en lecture aux modèles de tous les départements. Dans le Référentiels d'Entreprise, les lecteurs n’ont accès qu’aux modèles publiés.
Certains Lecteurs (ou groupes de lecteurs) peuvent ne pas être autorisés à voir tous les modèles publiés, mais seulement ceux de certains départements.
Procédure pour la définition des droits nécessaires
Les départements sont représentés par des groupes de modèles.
Ajoutez des utilisateurs aux rôles système correspondants selon leur tâche dans le circuit de validation. Les Lecteurs n’ont pas de rôle de circuit de validation.
Ajoutez des utilisateurs aux groupes suivants :
Assignez des Modélisateurs à un groupe d’utilisateurs qui dispose d’un accès en écriture à tous les groupes de modèles contenant des modèles de leur département en statut Brouillon. Cela est nécessaire pour que les Modélisateurs puissent créer de nouvelles versions de modèles.
Assignez des Lecteurs à un groupe d’utilisateurs avec uniquement un accès en lecture à tous les groupes de modèles. Le cas échéant, restreignez davantage les droits et n’accordez pas l’accès à certains groupes modèles.
Lecteur (Référentiel d'Entreprise)
À partir d’ADONIS 15.0, le Référentiel d’Entreprise n’est plus disponible pour les nouveaux clients. Les clients existants disposant de licences qui incluent le Référentiel d’Entreprise peuvent continuer à l’utiliser.
Le Référentiel d'Entreprise permet aux employés de votre organisation d’accéder facilement et intuitivement aux modèles disponibles dans la base de données d'ADONIS. Les tableaux de bord personnalisés et autres fonctionnalités avancées ne sont pas inclus dans le Référentiel d'Entreprise.
Le Référentiel d'Entreprise est en lecture seule. Les utilisateurs n’ont pas d’accès en écriture au contenu du référentiel (y compris tous les modèles, objets et leurs relations).
Créer un accès au Référentiel d'Entreprise
Pour accéder au Référentiel d'Entreprise, il faut préparer au moins un compte utilisateur avec le rôle système correspondant. Les étapes suivantes sont nécessaires pour configurer la configuration par défaut :
Créez le groupe d’utilisateurs de premier niveau suivant :
- Lecteur
Modifiez les droits d’accès du groupe d’utilisateurs « Lecteur » pour les groupes suivants au niveau supérieur, juste en dessous des groupes racines :
Accès en lecture au groupe de modèles « Modèles »
Accès en lecture au groupe d’objets « Objets »
Créez le compte utilisateur suivant et ajoutez-le au nouveau groupe d’utilisateurs créé :
- Nom d’utilisateur : Lecteur, et un mot de passe de votre choix. Activez la connexion de confiance et attribuez le référentiel standard actuel à l’utilisateur.
Attribuez le rôle système préconfiguré suivant au nouveau groupe d’utilisateurs créé :
- Lecteur (Référentiel d'Entreprise)
Par défaut, le rôle système « Référentiel d'Entreprise » n’a accès qu’aux modules suivants :
- Référentiel d'Entreprise BPMS
Les configurations ci-dessus représentent la configuration minimale. Vous pouvez attribuer des modules supplémentaires au rôle système « Référentiel d'Entreprise ». Gardez cependant à l’esprit que si un utilisateur a accès à plus de fonctionnalités via des modules supplémentaires, la complexité du Référentiel d'Entreprise dans son ensemble augmente.
Le serveur d’applications d'ADONIS doit être redémarré si ces paramètres sont modifiés. Sinon les modifications ne sont pas prises en compte.
Configurer le Référentiel d'Entreprise
Pour configurer le Référentiel d'Entreprise :
- Accédez à Configurations > Référentiel d'Entreprise > Paramètres généraux.
L’assistant de configuration du Référentiel d'Entreprise compte 2 pages :
Ces pages sont abordées plus en détail dans les sections suivantes.
Le serveur d’applications d'ADONIS doit être redémarré si ces paramètres sont modifiés. Sinon les modifications ne sont pas prises en compte.
Paramètres généraux
La première page de l’assistant de configuration du Référentiel d'Entreprise vous permet d’accorder ou de refuser un accès anonyme au Référentiel d'Entreprise et de sélectionner quels statuts de modèle doivent être visibles.
Configuration de l’accès
Les paramètres suivants sont disponibles :
- Autoriser l’accès anonyme: Choisissez d’activer l’accès anonyme au Référentiel d'Entreprise, permettant ainsi aux utilisateurs d’accéder sans avoir à fournir leurs identifiants. Désactiver cette option est utile dans le cas de déploiements accessibles publiquement lorsque l’accès au Référentiel d'Entreprise sans authentification n’est pas souhaitable.
La désactivation de cette option a les effets suivants :
Seuls les utilisateurs authentifiés ayant le rôle système « Référentiel d'Entreprise » peuvent se connecter au Référentiel d'Entreprise.
Le lien pour accéder au Référentiel d'Entreprise sur la page de connexion d'ADONIS n’est pas affichée.
L’accès au Référentiel d'Entreprise via des URL spécifiques à l’utilisateur est désactivé.
L’entrée du menu Référentiel d'Entreprise depuis le menu déroulant pour la sélection de scénarios dans ADONIS est désactivée.
Les options de configuration du Référentiel d'Entreprise : Accès via le lien sur la page de connexion du client web, Utilisateur par défaut pour un accès anonyme et Activation de l’URL spécifique à l’utilisateur deviennent inactifs.
Accès via le lien sur la page de connexion du client web: Sélectionnez si un lien est affiché sur la page de connexion d'ADONIS qui permet aux utilisateurs d’accéder au Référentiel d'Entreprise. L’utilisateur Standard (voir ci-dessous) est utilisé dans ce cas.
Utilisateur par défaut pour un accès anonyme: Sélectionnez quel compte utilisateur est utilisé lorsque les utilisateurs accèdent au Référentiel d'Entreprise via le lien sur la page de connexion d'ADONIS.
Configuration du filtre sur le statut
Le filtre sur les statuts du modèle vous permet de contrôler la visibilité des modèles dans le Référentiel d'Entreprise. Vous pouvez sélectionner quels statuts de modèle doivent être visibles et pour quels types de modèles le filtre doit être appliqué.
Choisissez les types de modèles auxquels le filtre sur les statuts doit être appliqué: Sélectionnez les types de modèles pour lesquels le filtre doit être appliqué. Les types de modèles non sélectionnés seront visibles quel que soit le statut.
Sélectionnez les statuts à afficher: Sélectionnez les statuts du modèle qui devraient être visibles si le filtre sur les statuts du modèle est appliqué.
Configurer le modèle de démarrage
La deuxième page de l’assistant de configuration du Référentiel d'Entreprise vous permet de configurer des points d’entrée spécifiques à l’utilisateur et au référentiel du Référentiel d'Entreprise, ainsi que d’établir un modèle de démarrage pour chacun de ces points d’entrée.
Utilisateurs
Cet onglet liste tous les comptes utilisateurs avec le rôle système « Référentiel d'Entreprise ».
Vous pouvez configurer différents utilisateurs (différents paramètres pour le Référentiel d'Entreprise et différents droits d’utilisateur). Cela vous permet de fournir plusieurs points d’entrée au Référentiel d'Entreprise et de restreindre l’accès au contenu disponible du référentiel pour les employés de votre organisation.
La connexion de confiance est une condition préalable pour les comptes utilisateurs utilisés pour accéder anonymement au Référentiel d'Entreprise.
Nom: La première colonne contient le nom du compte utilisateur.
Adresse URL spécifique à l'utilisateur: Cette colonne contient l’URL qui permet aux utilisateurs d’accéder anonymement au Référentiel d'Entreprise, sans avoir à fournir des identifiants. Les droits d’accès aux modèles dans la base de données sont basés sur le compte utilisateur utilisé et sur les paramètres du Référentiel d'Entreprise.
L’URL est composée de l’URL de base et du suffixe ?reader=<user account>, par exemple http://server:8000/ADONIS16_0?reader=Reader2.
Cliquez sur
 Copier pour
copier l’URL dans le presse-papiers, puis collez l’URL à l’endroit souhaité.
Copier pour
copier l’URL dans le presse-papiers, puis collez l’URL à l’endroit souhaité.Référentiel sélectionné: Si un modèle de démarrage a été sélectionné pour cette URL spécifique à l’utilisateur, le référentiel contenant le modèle de démarrage sera affiché ici.
Modèle de départ: Ici, vous pouvez spécifier un modèle de démarrage qui apparaîtra sur la page d’accueil du Référentiel d'Entreprise. Cliquez sur Configurer le modèle de démarrage, puis choisissez un référentiel et le modèle de démarrage que vous souhaitez. Si un modèle de démarrage a déjà été sélectionné pour cette URL spécifique à l’utilisateur, il sera affiché ici.
Il y a une gestion spéciale de secours lorsque vous importez les paramètres de composants Référentiel d'Entreprise depuis ADONIS 14.1 ou versions inférieures. Le modèle de départ pour l’utilisateur par défaut pour l’accès anonyme (voir ci-dessus) sera également affiché sur la page d'accueil du scénario « Consulter & Explorer » tant qu’aucun modèle de départ spécifique pour « Consulter & Explorer » n'a été défini (voir le scénario Consulter & Explorer ).
Accès au Référentiel d'Entreprise: Sélectionnez si un accès anonyme au Référentiel d'Entreprise avec cet utilisateur est possible. Cette option est utile si vous souhaitez désactiver temporairement un point d’entrée vers le Référentiel d'Entreprise au lieu de le supprimer définitivement.
Lorsque vous désactivez cette option, l’URL spécifique à l’utilisateur pour accéder au Référentiel d'Entreprise avec cet utilisateur est désactivée. De plus, dans le cas de l’utilisateur standard (voir ci-dessous), le lien pour accéder au Référentiel d'Entreprise sur la page de connexion d' ADONIS n’est pas affiché et le menu Référentiel d'Entreprise n’est pas affiché dans le menu déroulant pour la sélection de scénarios dans ADONIS est désactivé.
Référentiels
Cet onglet liste tous les référentiels. Vous pouvez définir une configuration de secours pour chacun de ces référentiels. Ces configurations de secours sont utilisées lorsque l’option Activer le basculement vers le référentiel est activée.
- Activer le basculement vers le référentiel: Cochez cette case pour activer un mécanisme de secours pour les utilisateurs authentifiés avec le rôle système « Référentiel d'Entreprise » qui ne disposent PAS de configuration spécifique au Référentiel d'Entreprise. Lorsque ces utilisateurs se connectent à ADONIS, une configuration de secours est utilisée. Cela est utile dans le cas de déploiements où un grand nombre d’utilisateurs ayant le rôle système « Référentiel d'Entreprise » sont automatiquement créés, mais où leur configuration individuelle n’est pas réalisable.
Modèle de départ: Ici, vous pouvez spécifier un modèle de démarrage qui apparaîtra sur la page d’accueil du Référentiel d'Entreprise. Cliquez sur Configurer le modèle de démarrage, puis choisissez le modèle de démarrage que vous souhaitez. Si un modèle de démarrage a déjà été sélectionné pour cette configuration de secours, il sera affiché ici.
Actif: Sélectionnez si l’accès au Référentiel d'Entreprise avec cette configuration de secours est possible. Cette option est utile si vous souhaitez désactiver temporairement un point d’entrée vers le Référentiel d'Entreprise au lieu de le supprimer définitivement.
Absence de modèle de démarrage et impact du circuit de validation des modèles
Explorez les implications de ne pas configurer un modèle de démarrage pour le Référentiel d'Entreprise et comprenez l’influence du circuit de validation des modèles sur les modèles de démarrage. Lisez la suite pour en savoir plus.
Aucun modèle de démarrage configuré
Lorsqu’aucun modèle de démarrage n’a été configuré pour le Référentiel d'Entreprise, les éléments suivants s’appliquent :
- Dans le Référentiel d'Entreprise, l’affichage de la page de démarrage change. La section « Page d'accueil » avec le modèle de démarrage n’est pas affichée. À la place, la section « Processus » apparaîtra comme page d’accueil.
Modèle de démarrage et Circuit de validation des modèles
Lorsque le circuit de validation des modèles est en cours, le modèle de démarrage du Référentiel d'Entreprise est automatiquement mis à jour pour utiliser la dernière version publiée d’un modèle.
Exemple
Vous avez défini un Carte des processus (numéro de version « 1.00 ») comme modèle de démarrage. Une nouvelle version de cette Carte des processus est publiée. Le nouveau modèle (numéro de version « 2.00 ») sera affiché comme modèle de démarrage au lieu de la version prédécesseure archivée.
Configurer les restrictions IP pour le Référentiel d'Entreprise
Si vous souhaitez limiter les IP pouvant accéder au Référentiel d'Entreprise, vous devez adapter les paramètres de sécurité dans l'Administration ADONIS :
Rendez-vous sur la Page d'accueil > Plus d’options, puis cliquez sur Préférences du système.
Cliquez sur Paramètres de sécurité. Éditez les paramètres et enregistrez les modifications par la suite.
Le paramètre suivant doit être modifié :
- orgportal_ip_restrictions: Ce paramètre est optionnel. Vous pouvez restreindre les adresses IP autorisées à accéder au Portail d'Organisation ou Référentiel d'Entreprise (Consultez la section Comment utiliser les contraintes IP pour en savoir plus). Mettez chaque règle entre des guillemets.
Exemple
Refusez toutes les adresses IP commençant par 192., refusez l’adresse IP 193.168.0.1, autorisez toutes les autres adresses IP :
"deny 192.*","deny 193.168.0.1","allow all"
Autorisez toutes les adresses IP commençant par 178. refuser toutes les autres adresses IP, sauf 178.6.6.6 :
"deny 178.6.6.6","allow 178.*"
Analyse des processus et optimisation
Vous pouvez définir ici les valeurs par défaut des paramètres de simulation ainsi que les paramètres généraux pour l’analyse de processus (simulation de processus et processus pas à pas).
Ouvrir les paramètres d’analyse des processus et d'optimisation
Pour ouvrir les paramètres d’analyse des processus et d’optimisation :
- Allez dans Configurations > Analyse des processus et optimisation > Paramètres généraux.
Configurer l’analyse des processus et optimisation
Les paramètres suivants sont disponibles :
Jours ouvrables par an: Spécifiez le nombre de jours ouvrables par an utilisés pour estimer les ressources requises et les valeurs de temps agrégées. Valeur par défaut: 220 jours.
Heures travaillées par jour: Spécifiez le nombre d’heures de travail par jour utilisées pour estimer les ressources requises et agréger les valeurs du temps. Entrez les valeurs souhaitées dans les champs Heures et Minutes. Par défaut, c’est 8 heures.
Avancé (heures ouvrables et heures travaillées différentes): Cochez cette case si vous souhaitez que les options avancées (voir ci-dessous) soient développées par défaut dans ADONIS.
Options avancées
Les paramètres de simulation dans ce domaine sont nécessaires si les horaires d’ouverture de votre entreprise et les horaires individuels sont différents.
Jours de travail par an (employé): Précisez le nombre moyen de jours dans une année où un employé effectue un travail. Valeur par défaut: 220 jours.
Heures de travail par jour (employé): Spécifiez le nombre moyen d’heures par jour pendant lesquelles un employé effectue du travail. Entrez les valeurs souhaitées dans les champs Heures (employé) et Minutes (employé). Par défaut, c’est 8 heures.
Jours travaillés par an (entreprise): Indiquez le nombre de jours par an durant lesquels l’activité est exercée et les processus sont exécutés. Valeur par défaut: 365 jours.
Heures travaillées par jour (entreprise): Indiquez le nombre d’heures par jour durant lesquelles l’activité est exercée et les processus sont exécutés. Entrez les valeurs souhaitées dans les champs Heures (entreprise) et Minutes (entreprise). Par défaut, c’est 24 heures.
- Ne pas autoriser les utilisateurs à modifier les paramètres par défaut lors de l’exécution de la simulation: Cochez cette case pour empêcher les utilisateurs de modifier les jours et heures de travail lors de l’exécution d’une simulation. Lorsque vous cochez cette case, les utilisateurs peuvent adapter ces paramètres comme ils le souhaitent.
La disponibilité de la fonctionnalité de simulation des processus dépend de la licence.
Filtres sur les notebooks
Les filtres de propriétés déterminent quelles propriétés (= attributs et relations) sont visibles dans les sections suivantes :
Éditeur tabulaire
Notebooks
Restitutions
Comparaison de modèles
Vous pouvez définir différents filtres de propriétés selon les rôles et scénarios système.
Ouvrir les paramètres du filtre sur les notebooks
Pour ouvrir les paramètres du filtre sur les notebooks
- Allez dans les Configurations > Filtre sur les notebooks > Paramètres généraux.
Ajouter et configurer le filtre sur les notebooks
Pour ajouter un nouveau filtre sur les Notebooks :
Cliquez sur le bouton Ajouter un filtre.
Dans le champ Nom indépendant de la langue , tapez un nom pour le filtre sur les Notebooks. Ce nom indépendant de la langue identifie de manière unique le filtre.
Dans le champ Noms affichés, tapez un nom pour chaque langue disponibles dans ADONIS. Ces noms sont visibles sur l’interface utilisateur.
Dans le champ Ordre, sélectionnez l’ordre des entrées lorsqu’un utilisateur sélectionne un filtre sur les Notebooks dans ADONIS.
Dans le champ Affectations pour les rôles, sélectionnez les rôles système auxquels vous souhaitez assigner ce filtre.
Dans le champ Affectations des scénarios, sélectionnez les scénarios auxquels vous souhaitez assigner ce filtre.
Dans les onglets Types de modèles, Classes et Classes de relation, sélectionnez les propriétés qui doivent être visibles lorsqu’un filtre sur les Notebooks est actif. Vous pouvez également désactiver des chapitres entiers du Notebook ou même toutes les propriétés d’un Notebook spécifique à la fois.
Cliquez sur Ajouter un filtre, puis sur Enregistrer. Le nouveau filtre sur les Notebooks est ajouté et les paramètres du composant sont enregistrés.
En option, vous pouvez également procéder comme suit :
- Sélectionnez une configuration existante comme modèle pour votre nouveau filtre sur les
Notebooks. Sur la page Paramètres généraux, dans le champ Filtres sur les Notebooks,
recherchez le filtre que vous souhaitez utiliser. À droite du filtre sur les Notebooks, cliquez
sur Plus, puis sur Copier.
Vous pouvez combiner des attributions de rôles système et des attributions de scénarios. Un filtre sur les Notebooks n’est visible que si toutes les conditions sont remplies (logique ET opérateur).
Éditer ou supprimer le filtre sur les notebooks
Vous pouvez modifier les filtres sur les notebooks pour les affiner, et supprimer ceux dont vous n’avez plus besoin :
- Sur la page Paramètres généraux, dans la section Filtres de propriété, trouvez le filtre que
vous souhaitez. À droite du filtre des propriétés, cliquez sur
Plus, puis sur
Modifier le filtre ou Supprimer.
Paramètres par scénario
Dans cette section, vous pouvez configurer quel filtre de propriété doit être activé par défaut dans ADONIS. Vous avez la possibilité de définir le filtre par défaut pour tous les scénarios (« Globale ») et de définir différents filtres par défaut pour des scénarios spécifiques selon les besoins.
Globale
Dans l’onglet « Globale », vous pouvez définir le filtre par défaut pour tous les scénarios. Les paramètres suivants sont disponibles :
Filtre par défaut: Sélectionnez quel filtre de propriété doit être activé par défaut. Si un utilisateur n’a pas accès au filtre sélectionné, le premier filtre de la liste est activé, puis le second filtre, et ainsi de suite.
Activer le filtre 'Intégral': Cochez cette case pour rendre le filtre Intégral accessible à tous les utilisateurs. Lorsque le filtre Intégral est actif, toutes les propriétés sont visibles.
Activer le filtre 'Masquer les attributs vides' dans les notebooks en 'mode lecture': Cochez cette case pour rendre le filtre Masquer les attributs vides disponible à tous les utilisateurs. Lorsque le filtre Masquer les attributs vides est actif, aucune propriété vide n’est visible dans les Notebooks en mode lecture.
Paramètres de filtre spécifiques au scénario
Dans les onglets pour des scénarios individuels tels que « Consulter & Explorer » ou « Cartographier & Documenter », vous pouvez définir des paramètres de filtre spécifiques à chaque scénario. Les paramètres suivants sont disponibles :
Utiliser les paramètres par défaut: Décochez cette case pour activer les paramètres de filtre spécifiques au scénario.
Filtre par défaut: Sélectionnez quel filtre de propriété doit être activé par défaut dans ce scénario.
Lorsqu’un filtre est défini comme par défaut pour un scénario, passer à ce scénario définit toujours ce filtre par défaut, quel que soit le filtre actif auparavant.
- Activer le filtre 'Intégral': Cochez cette case pour rendre le filtre Afficher tout accessible à tous les utilisateurs dans ce scénario.
Le scénario « Consulter & Explorer »
Le scénario Consulter & Explorer est un scénario en lecture seule dans ADONIS où les utilisateurs peuvent consulter les processus et les instructions de travail. Vous pouvez configurer différents paramètres pour ce scénario. Par exemple, vous pouvez choisir si les widgets et tableaux de bord affichent les données en fonction des Rôles ou des Entités Organisationnelles. Vous pouvez également sélectionner l’éditeur de modèles par défaut et choisir quel modèle de départ apparaîtra dans la page d’accueil du scénario Consulter & Explorer .
Ouvrir les paramètres du scénario Consulter & Explorer
Pour ouvrir les paramètres du scénario Consulter & Explorer
- Cliquez sur Configurations > le scénario Consulter & Explorer > Paramètres généraux.
Paramètres généraux
Les paramètres suivants sont disponibles :
Mes processus basés sur :: Sélectionnez les données à afficher dans les widgets et tableaux de bord du scénario « Consulter & Explorer ». Les processus catégorisés comme « Mes processus » peuvent provenir de l’attribution des Utilisateurs à des Rôles, ou à des Entités Organisationnelles.
Activer l'affectation des rôles par les lecteurs: Cette option n’est disponible que si l'attribut Mes processus basés sur est défini sur Rôles. Dans le scénario « Consulter & Explorer » dans ADONIS, en haut du tableau de bord Mon BPM, les Rôles associés au champ de responsabilité de l’utilisateur actuel sont affichés (« Mes rôles »). Cochez la case pour permettre aux utilisateurs d’ajouter des Rôles issus d’autres domaines de responsabilité. Le choix des Rôles détermine quelles données seront chargées dans les widgets du « Consulter & Explorer ».
RemarqueLes Rôles pertinents pour le scénario « Consulter & Explorer » sont des objets Rôle reliés dans le Notebook de l’objet Utilisateur. Ils ne doivent pas être confondus avec les rôles système.
Activer la vue textuelle comme vue par défaut: Sélectionnez cette option pour définir la vue textuelle comme éditeur par défaut dans le scénario « Consulter & Explorer ». Tous les types de modèles avec une configuration en vue textuelle seront ouverts par défaut dans la vue textuelle. Lorsque vous activez cette option, l’éditeur graphique sera l’éditeur par défaut pour tous les types de modèles.
Activer le filtre (affiche uniquement les modèles et les objets publiés): Cochez cette case pour n’afficher que les modèles et objets en statut « Publié » dans le scénario « Consulter & Explorer » Les types de modèle et d’objet sans statut défini par un circuit de validation ne sont pas affectés.
Autoriser les utilisateurs à configurer le modèle de démarrage: Cochez cette case afin que les utilisateurs puissent choisir leur modèle de démarrage pour la page d’accueil du scénario « Consulter & Explorer ». Cette option ne fonctionne que si Activer le modèle de départ (voir ci-dessous) est également activé pour le référentiel.
Sélectionner le modèle de départ par référentiel
Ici, vous pouvez définir le modèle de départ qui sera affiché sur la page d’accueil du scénario « Consulter & Explorer » Vous pouvez définir une configuration pour chaque référentiel.
Les paramètres suivants sont disponibles :
+ Sélectionner un référentiel: Choisissez le référentiel pour lequel un modèle de départ doit être configuré
Afficher un modèle par défaut: Indiquez si un modèle de départ doit être affiché.
+ Sélectionner le modèle: Si Activer le modèle de démarrage est activé, vous pouvez sélectionner le modèle de démarrage ici.
Service de recommandation
Le service de recommandation est conçu pour améliorer l’expérience dans ADONIS en suggérant des modèles qui peuvent se compléter. Cette fonctionnalité est accessible dans le scénario Consulter & Explorer, en particulier dans l’éditeur graphique, ce qui permet aux utilisateurs de découvrir plus facilement les modèles pertinents et de s’inspirer du travail de leurs collègues au sein de l’organisation.
Ouvrir les paramètres du service de recommandation
Pour ouvrir les paramètres du service de recommandation
- Allez dans Configurations > Service de recommandation > Paramètres généraux.
Configurer le service de recommandation
Les paramètres suivants sont disponibles :
- Activer le service de recommandation par référentiel: Sélectionnez les référentiels pour lesquels le service de recommandation doit être activé.
Déclaration de confidentialité et d’utilisation des données pour le service de recommandation
ADONIS
Le service de recommandation pour ADONIS est un microservice déployé dans le cloud AWS (eu-central-1) et est conçu pour aider les utilisateurs à naviguer dans les modèles de leur propre référentiel dans ADONIS. Il le fait en apprenant du comportement des utilisateurs précédents et en recommandant des modèles à visiter ensuite, en se basant sur des modèles déjà visités.
Après l’activation du service, ADONIS collecte des données anonymes sur les modèles de votre référentiel ouverts et dans quel ordre. Ces données sont conservées jusqu’à ce que les données plus récentes soient téléchargées sur le service (généralement dans un délai de deux semaines). Pour fournir ce service, les données strictement anonymes suivantes sont utilisées :
UUID du référentiel ADONIS
Dans quel ordre les modèles spécifiques ont été ouverts
UUID des modèles ouverts
Informations sur les modèles ouverts lors d’une session utilisateur
Ces données ne sont pas liées à des utilisateurs spécifiques et sont utilisées uniquement dans votre référentiel. Les utilisateurs de votre référentiel ne recevront pas de recommandations basées sur le comportement des utilisateurs d’autres référentiels, et inversement.
Ces données ne sont pas liées à des utilisateurs spécifiques et sont utilisées uniquement dans votre référentiel.
UUID du référentiel ADONIS pour lequel la recommandation est générée.
UUID des modèles précédemment ouverts (jusqu’à 5)
Ordre des modèles précédemment ouverts
BOC se réserve le droit d’interrompre ou de mettre en pause le service de recommandation à tout moment.
API REST
ADONIS propose une API REST générique et extensible qui permet un accès authentifié aux fonctionnalités exposées. L’API REST peut être utilisée par exemple pour envoyer des requêtes GET à des requêtes de requête ADONIS pour les données.
La disponibilité de cette fonctionnalité dépend de la licence. L’accès à l’interface de programmation d’applications (API) est limité à 500 requêtes par heure.
Activer l’accès à l’API REST
Les instructions pour activer l’accès à l’API REST sont présentées ici dans le Aide sur l’administration.
Vous devez d’abord effectuer les étapes suivantes :
Créer un utilisateur technique (OAuth 2.0 utilisant uniquement >Client Credentials Flow et l’authentification basée sur jetons)
Vous pouvez ensuite configurer la méthode d’authentification que vous souhaitez utiliser pour communiquer avec l’API REST :
Ces étapes sont expliquées dans les sections suivantes.
Vous avez besoin d’aide pour choisir une méthode d’authentification adaptée ? Consultez la section Choisir une méthode d’authentification pour un bref aperçu de chaque méthode.
Utiliser l’API REST
Pour plus d’informations sur l’utilisation de l’API REST, consultez le Portail des développeurs ADOxx.
Créer un utilisateur technique
Souhaitez-vous utiliser l’authentification OAuth 2.0 via le Client Credentials Flow pour authentifier les requêtes vers l’API REST, ou une authentification basée sur des jetons via le Client Credentials Flow ? Si oui, vous devez créer un utilisateur technique maintenant.
Un utilisateur technique n’est PAS nécessaire pour l’authentification de base, l’authentification OAuth 2.0 utilisant le flux de code d’autorisation et l’authentification JWT.
Pour créer l’utilisateur technique dans l'Administration ADONIS :
Accédez à la page Utilisateurs et cliquez sur Nouvel utilisateur.
Commencez par renseigner les informations du compte dans l’onglet Paramètres généraux :
Saisissez un nom pour l’utilisateur technique, par exemple « Technical_StandardRESTfulServices ».
Saisissez et confirmez un mot de passe de votre choix.
Ensuite, accédez à l’onglet Groupes et rôles :
- Dans la section Groupes d’utilisateurs, cliquez sur Sélectionner les groupes d’utilisateurs et assignez l’utilisateur au groupe par défaut.
Ensuite, accédez à l’onglet Référentiel :
- Cliquez sur Sélectionner un référentiel et n’attribuez que ( !) le référentiel à l’utilisateur qui contient les données à rechercher.
Cliquez sur Créer pour terminer le processus de création utilisateur.
Une fois la création de l’utilisateur terminée, vous pouvez activer la connexion de confiance pour cet utilisateur :
Passez la souris au-dessus de l’utilisateur, cliquez sur
Plus, puis sélectionnez
Modifier.Dans l’onglet Paramètres généraux, sous Connexion de confiance, sélectionnez Activé.
Attribuer des droits d’accès à l'Administration ADONIS
Si vous souhaitez utiliser des API d’écriture utilisateur, vous devez attribuer des droits d’accès à l’utilisateur dans l'Administration ADONIS dans le contexte duquel les requêtes doivent être exécutées.
Cela peut être soit l’utilisateur technique (pour l’authentification OAuth 2.0 utilisant le Client Credentials Flow et l’authentification basée sur jetons), soit tout autre utilisateur ADONIS (pour l’authentification de base, l’authentification OAuth 2.0 utilisant le flux de code d’autorisation et l’authentification JWT).
Pour attribuer des droits d’accès au Administration ADONIS :
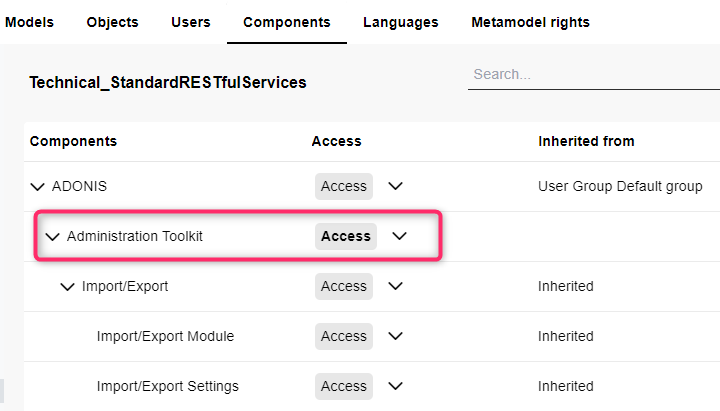
Accédez à la page Droits d'accès.
Dans le catalogue Utilisateurs / Groupes sur la gauche, sélectionnez l’utilisateur à qui vous souhaitez accorder des droits d’accès à l'Administration ADONIS.
Allez dans l’onglet Composants.
Dans l’espace de travail, recherchez le composant « Module d’administration ».
Dans la colonne Accès, cliquez sur
 Modifier les droits d'accès,
puis choisissez Accès.
Modifier les droits d'accès,
puis choisissez Accès.
Modifier les paramètres du Client Web
Il faut maintenant définir quelques paramètres techniques contrôlant la fonctionnalité de base dans l'Administration ADONIS. Pour modifier les paramètres Système :
Allez dans Configurations > Paramètre du Client Web > Système.
Dans le champ URL de base, saisissez l’URL où ADONIS est accessible depuis d’autres machines.
Souhaitez-vous utiliser l’authentification OAuth 2.0 via le Client Credentials Flow ou l’authentification basée sur des jetons ? Si oui, cliquez sur Sélectionner des utilisateurs et sélectionnez l’utilisateur technique que vous avez créé, par exemple « Technical_StandardRESTfulServices » (voir Créer un utilisateur technique).
Cliquez sur Enregistrer.
Exemple d’URL de base
Vous configurez ADONIS 16.0. L’adresse IP du serveur Tomcat est 10.2.100.68 et le port est 8000. L’URL doit ressembler à ceci :
"http://10.2.100.68:8000/ADONIS16_0"
Configurer les paramètres généraux
Les paramètres généraux de l’API REST doivent maintenant être adaptés dans l'Administration ADONIS :
- Allez dans Configurations > Services RESTful standard > Paramètres généraux.
Ces paramètres s’appliquent à toutes les méthodes d’authentification :
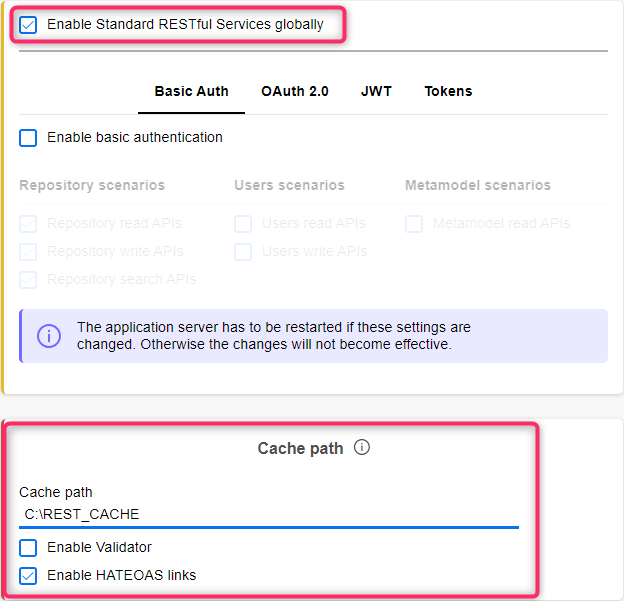
Activer globalement les services RESTful standard: Cochez cette case pour activer l’API REST. Tous les autres paramètres de cette zone sont inactifs à moins que vous ne sélectionniez cette option.
Chemin d’accès au cache: Ce paramètre est optionnel. Entrez le chemin absolu vers le répertoire dans lequel les fichiers de cache doivent être stockés. L’utilisateur sous lequel le service serveur web Apache Tomcat fonctionne doit avoir un accès en écriture à ce répertoire. Si le répertoire n’existe pas, il sera créé par ADONIS.
Avantages de l’utilisation du paramètre Chemin d'accès au cache :
Les images de modèle et les cartes d’images de modèles ne sont générées qu’une seule fois puis mises en cache. Chaque fois que l’image ou la carte image du modèle est demandée, une vérification est effectuée pour vérifier si le modèle a changé. S’il n’y a pas de changements, les informations sont chargées depuis le système de fichiers. Sinon, le cache est mis à jour en premier. En conséquence, les réponses à ce type de requêtes sont plus rapides et consomment moins de ressources serveur.
Pour les recherches, l’avantage est que les requêtes créées sont sauvegardées dans des fichiers de cache et peuvent être réutilisées après un redémarrage du serveur. Sans le chemin du cache, les requêtes ne sont sauvegardées que en mémoire et sont perdues lors du redémarrage.
Activer le validateur: Ce paramètre est optionnel. Sélectionnez cette option pour activer la validation syntaxique et sémantique des réponses XML et JSON. Activer ce paramètre peut ralentir l’exécution des requêtes et entraîner une forte consommation de mémoire et une utilisation élevée du CPU sur le serveur web.
Activer les liens HATEOAS: Ce paramètre est activé par défaut. Lorsque vous activez cette option, les réponses aux demandes n’incluront pas de liens HATEOAS qui vous aideront à trouver des ressources connexes.
Configurer l’authentification de base
Vous devez activer l’authentification de base dans les paramètres des Services RESTful standard (voir Configurer les paramètres pour l’authentification de base) et dans les paramètres de sécurité (voir Activer l’authentification de base pour ADONIS).
Configurer les paramètres pour l’authentification de base
Pour configurer les paramètres pour l’authentification de base pour l'API REST dans l'Administration ADONIS :
Allez dans Configurations > Services RESTful standard > Paramètres généraux.
Modifier les paramètres dans l’onglet Authentification de base.
Les paramètres suivants sont disponibles :
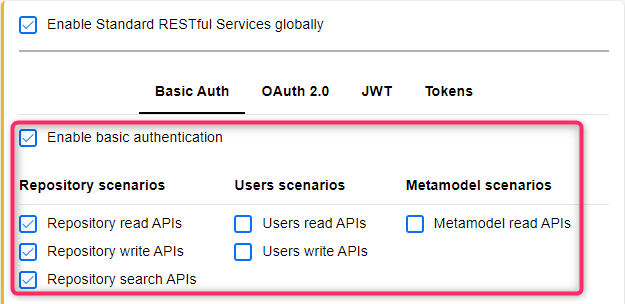
- Activer l'authentification de base: Cochez cette case pour activer l’authentification de base. Tous les autres paramètres de cet onglet sont inactifs à moins que vous ne cochiez cette case.
- Scénarios de Référentiel | Scénarios Utilisateurs | Scénarios du Métamodèle: Dans cette zone, vous pouvez activer des scénarios REST spécifiques. Si un scénario n’est pas activé, toutes les requêtes vers ses points de terminaison restitueront un statut 403 FORBIDDEN. Les liens HATEOAS qui vous aident à trouver des ressources connexes sont également concernés. Par exemple, la réponse à une demande d’accès à des informations utilisateur peut contenir un lien HATEOAS pour supprimer l’utilisateur. Si le scénario de l’API d’écriture utilisateur est désactivé, une requête vers ce lien renverra le code de statut 403 FORBIDDEN.
Pour savoir quels points de terminaison sont attribués aux scénarios REST, consultez la référence API dans le portail développeur ADOxx où ils sont regroupés selon les scénarios.
Activer l’authentification de base pour ADONIS
Pour des raisons de sécurité, l’authentification de base est désactivée par défaut dans ADONIS. Si vous souhaitez utiliser l’API REST avec une authentification de base, vous devez adapter les paramètres de sécurité dans l'Administration ADONIS :
Rendez-vous sur la Page d'accueil > Plus d’options, puis cliquez sur Préférences du système.
Cliquez sur Paramètres de sécurité. Éditez les paramètres et enregistrez les modifications par la suite.
Les paramètres suivants doivent être modifiés :
- basicauth_ip_restrictions: Spécifiez les adresses IP autorisées à envoyer des requêtes avec authentification de base vers l’API REST (Consultez la section Comment utiliser les contraintes IP pour en savoir plus). Mettez chaque règle entre des guillemets.
Exemple
Refusez toutes les adresses IP commençant par 192., refusez l’adresse IP 193.168.0.1, autorisez toutes les autres adresses IP :
"deny 192.*","deny 193.168.0.1","allow all"
Autorisez toutes les adresses IP commençant par 178. refuser toutes les autres adresses IP, sauf 178.6.6.6 :
"deny 178.6.6.6","allow 178.*"
- basicauth_roles: Ce paramètre est optionnel. Définissez une liste des rôles système, séparés par des virgules que
l’utilisateur doit détenir (au moins un) pour utiliser l’API REST avec authentification de base.
Entrez les noms uniques des rôles système. Exemple :
[« Common », « Reviewer »].
Pour connaître le nom unique d’un rôle système :
Allez à la page des rôles système dans l'Administration ADONIS.
Sélectionnez le rôle système que vous souhaitez, puis cochez la case Nom unique.
Aucun redémarrage n’est nécessaire lors de la modification de ces paramètres.
Configurer l’authentification OAuth 2.0
Vous devez activer l’authentification OAuth 2.0 dans les paramètres Services RESTful standard (voir Configurer les paramètres pour OAuth 2.0) et dans les paramètres OAuth 2.0 (voir Activer OAuth 2.0 pour ADONIS).
Configurer les paramètres pour OAuth 2.0
Pour configurer l’authentification OAuth 2.0 pour l’API REST dans l'Administration ADONIS :
Allez dans Configurations > Services RESTful standard > Paramètres généraux.
Modifiez les paramètres dans l’onglet OAuth 2.0.
Les paramètres suivants sont disponibles :
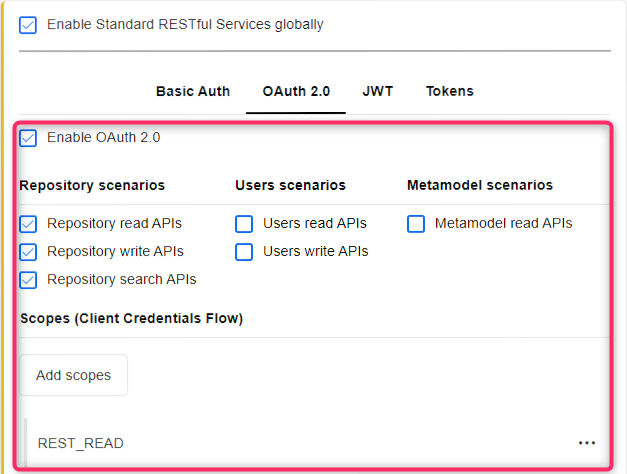
- Activer OAuth 2.0: Cochez cette case pour activer l’authentification OAuth 2.0. Tous les autres paramètres de cet onglet sont inactifs à moins que vous ne cochiez cette case.
- Scénarios de Référentiel | Scénarios Utilisateurs | Scénarios du Métamodèle: Dans cette zone, vous pouvez activer des scénarios REST spécifiques. Si un scénario n’est pas activé, toutes les requêtes vers ses points de terminaison restitueront un statut 403 FORBIDDEN. Les liens HATEOAS qui vous aident à trouver des ressources connexes sont également concernés. Par exemple, la réponse à une demande d’accès à des informations utilisateur peut contenir un lien HATEOAS pour supprimer l’utilisateur. Si le scénario de l’API d’écriture utilisateur est désactivé, une requête vers ce lien renverra le code de statut 403 FORBIDDEN.
Pour savoir quels points de terminaison sont attribués aux scénarios REST, consultez la référence API dans le portail développeur ADOxx où ils sont regroupés selon les scénarios.
Périmètres (flux d'informations d'identification du client)
OAuth 2.0 propose plusieurs flux. ADONIS prend en charge le flux de code d’autorisation ainsi que le flux d'informations d'identification du client.
Voulez-vous utiliser le flux d'informations d'identification du client ? Si oui, vous devez définir au moins un périmètre :
Ajouter des périmètres: Pour ajouter un nouveau périmètre, cliquez sur Ajouter des périmètres.
Éditer ou supprimer le périmètre: À droite du périmètre, cliquez sur
Plus, puis sur Éditer ou
Supprimer.
Un périmètre se compose des parties suivantes :
nom
Contraintes IP
Utilisateur technique
Les services RESTful ADONIS prennent en charge plusieurs périmètres. Au moins un périmètre est requis.
Quand voudriez-vous utiliser plusieurs périmètres ? Vous pouvez exécuter des requêtes avec les droits d’accès de différents utilisateurs techniques ou depuis différentes plages IP. Lors de l’exécution, vous pouvez choisir quels périmètres prédéfinis doivent être utilisés.
Jetons un coup d’œil détaillé aux configurations :
Nom: Ce paramètre représente le nom du périmètre. Entrez un nom descriptif, par exemple « REST_READ ».
Contraintes IP: Ce paramètre est optionnel. Vous pouvez restreindre les adresses IP qui devront accéder à un périmètre en définissant un schéma de contraintes IP (Consultez la section Comment utiliser les contraintes IP pour en savoir plus).
Exemple
Refusez toutes les adresses IP commençant par 192., refusez l’adresse IP 193.168.0.1, autorisez toutes les autres adresses IP :
refuser 192.*,refuser 193.168.0.1,autoriser tout
Autorisez toutes les adresses IP commençant par 178. refuser toutes les autres adresses IP, sauf 178.6.6.6 :
refuser 178.6.6.6,autoriser 178.*
- Utilisateur technique: Sélectionnez l’utilisateur technique que vous avez créé, par exemple « Technical_StandardRESTfulServices » (voir Créer un utilisateur technique).
Activer OAuth 2.0 pour ADONIS
Si vous souhaitez utiliser l’API REST avec OAuth 2.0, vous devez activer OAuth 2.0 et configurer un client dans l'Administration ADONIS :
Accédez à la Page d'accueil > Plus d’options, puis cliquez sur Authentification puis sur OAuth 2.0.
Cochez la case Activé sous Clients OAuth 2.0 pour activer OAuth 2.0.
Cliquez sur Télécharger des logos pour télécharger un logo représentant l’application cliente.
Cliquez sur Ajouter
 pour
ajouter un nouveau client.
pour
ajouter un nouveau client.Remplissez le formulaire Données Client qui apparaît. Vous pouvez saisir et éditer les données suivantes :
Type : sélectionnez le type de client. Les clients confidentiels sont par exemple des applications centralisées basées sur serveur, capables de stocker en toute sécurité des secrets clients. Les clients publics sont par exemple des applications purement basées sur le client et des applications natives qui ne sont pas capables de stocker en toute sécurité des secrets clients.
ID : ID du système client. Doit être unique parmi les clients, doit rester simple car les caractères spéciaux doivent être encodés en URL.
Nom : nom de l’application cliente. Sera affiché sur l’interface utilisateur.
URI de redirection : URL d’un point de terminaison de redirection à l’intérieur de l’application cliente qui sera appelé par le serveur d’autorisation lors de l’émission d’un code d’autorisation.
RemarqueL’URI de redirection n’est pas nécessaire lors de l’utilisation du flux d’informations d’identification client, mais le formulaire Données client nécessite que ce champ soit rempli (obligatoire pour le flux de code d’autorisation).
Logo : sélectionnez un logo pour représenter l’application cliente (doit d’abord être téléchargé sur la page OAuth 2.0). Sera affiché sur l’interface utilisateur.
Validité du jeton d’accès (secondes) : durée en secondes de validité d’un jeton d’accès jusqu’à son expiration. Valeur par défaut : 1800s = 30 minutes.
Validité du jeton d’actualisation (secondes) : durée en secondes de validité d’un jeton d’actualisation jusqu’à son expiration. Valeur par défaut : 1209600s = 14 jours.
Secret : secret à utiliser pour l’authentification du client. Vous pouvez cliquer sur Générer pour générer un nouveau secret ou en spécifier un manuellement.
De retour sur la page OAuth 2.0, cliquez sur Enregistrer les modifications pour enregistrer toutes les modifications effectuées sur cette page.
Configurer l’authentification JWT
Vous devez activer l’authentification JWT dans les paramètres Services RESTful standards (voir Configurer les paramètres pour l’authentification JWT) et dans les paramètres JWT (REST) (voir Activer l’authentification JWT pour ADONIS).
Configurer les paramètres pour l’authentification JWT
Pour configurer l’authentification JWT de l’API REST dans l'Administration ADONIS
Allez dans Configurations > Services RESTful standard > Paramètres généraux.
Modifiez les paramètres dans l’onglet JWT.
Les paramètres suivants sont disponibles :
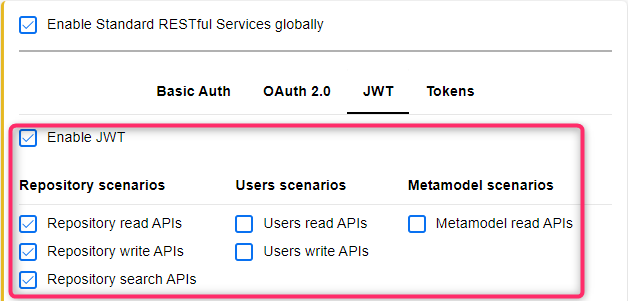
- Activer JWT: Cochez cette case pour activer l’authentification JWT. Tous les autres paramètres de cet onglet sont inactifs à moins que vous ne cochiez cette case.
- Scénarios de Référentiel | Scénarios Utilisateurs | Scénarios du Métamodèle: Dans cette zone, vous pouvez activer des scénarios REST spécifiques. Si un scénario n’est pas activé, toutes les requêtes vers ses points de terminaison restitueront un statut 403 FORBIDDEN. Les liens HATEOAS qui vous aident à trouver des ressources connexes sont également concernés. Par exemple, la réponse à une demande d’accès à des informations utilisateur peut contenir un lien HATEOAS pour supprimer l’utilisateur. Si le scénario de l’API d’écriture utilisateur est désactivé, une requête vers ce lien renverra le code de statut 403 FORBIDDEN.
Pour savoir quels points de terminaison sont attribués aux scénarios REST, consultez la référence API dans le portail développeur ADOxx où ils sont regroupés selon les scénarios.
Activer l’authentification JWT pour ADONIS
Pour configurer l'API REST ADONIS afin qu’elle accepte un JSON Web Token (JWT) d’un fournisseur d’identité (IdP) pour l’authentification, vous devez ajuster les paramètres dans l'Administration ADONIS :
- Accédez à la Page d'accueil > Plus d’options, puis cliquez sur JWT (REST).
Les configurations nécessaires sont décrites ci-dessous.
Activer l’authentification JWT pour ADONIS
Pour des raisons de sécurité, l’authentification de base est désactivée par défaut dans ADONIS. Pour activer l’authentification JWT :
- Sélectionnez JWT activé.
Créez une configuration JWT
Ensuite, vous devrez ajouter une nouvelle configuration JWT et modifier les propriétés pour qu’elles correspondent à votre jeton :
- Cliquez sur Ajouter pour
ajouter une nouvelle configuration. La fenêtre affichant les données JWT apparaît.
Adaptez les paramètres suivants dans la fenêtre de données JWT et enregistrez les modifications ensuite :
Objet « Validation de la revendication » (propriétés : ISS, AUD): Ensemble de revendications qui doivent être contenues dans la charge utile du jeton. La revendication « iss » (émetteur) identifie l’émetteur JWT (obligatoire). La revendication « aud » (audience) identifie le destinataire prévu du jeton (facultatif).
nom: Le Nom représente l’identifiant de cette configuration.
objet « signature_validation » (propriétés : ECDSA_public_key, etc.): Ensemble de paramètres pouvant être utilisés pour la validation de la signature JWT. Le choix de ces paramètres dépend de l’algorithme utilisé pour générer la signature dans l’en-tête du jeton. Au moins un paramètre doit être configuré.
HMAC_shared_secret: Secret partagé codé en Base64. Il est utilisé dans les algorithmes de signature HS256, HS384 et HS512.
RSA_public_key: Clé publique encodée en Base64. Il est utilisé dans les algorithmes de signature RS256, RS384, RS512, PS256, PS384 et PS512.
ECDSA_public_key: Clé publique encodée en Base64. Il est utilisé dans les algorithmes de signature ES256, ES384 et ES512.
JWKS_uri : URL du serveur d’autorisation JWK défini, elle contient la ou les clés de signature que le client doit utiliser pour valider les signatures du serveur d’autorisation.
OIDC_uri : URL du fournisseur de métadonnées OpenID Connect telle qu’elle est spécifiée dans OpenID Connect Discovery 1.0.
Objet « user_mapping » (Propriété : revendication): Une revendication qui doit être contenue dans la charge utile du jeton. La revendication « claim » identifie l’utilisateur que vous souhaitez authentifier. La valeur de cette revendication doit correspondre au nom d’utilisateur d’un utilisateur dans ADONIS (doit avoir une connexion de confiance).
De retour sur la page JWT (REST), cliquez sur Enregistrer les modifications pour enregistrer toutes les modifications effectuées sur cette page. Vous pouvez maintenant utiliser l’API REST avec l’authentification JWT. Ajoutez votre JWT à l’en-tête d’autorisation, formaté en Bearer.
Configurer l’authentification basée sur le jeton
Pour configurer l’authentification basée sur jeton pour l’API REST dans l'Administration ADONIS :
Allez dans Configurations > Services RESTful standard > Paramètres généraux.
Modifiez les paramètres dans l’onglet Jetons.
Les paramètres suivants sont disponibles :
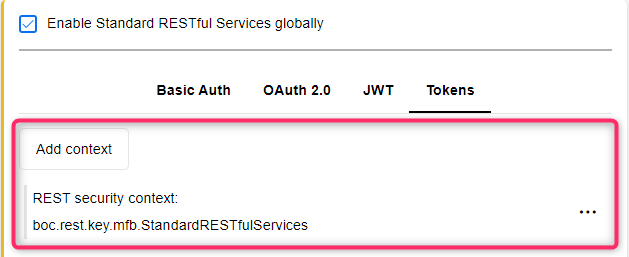
Définir le contexte de sécurité REST
Vous devez définir au moins un contexte de sécurité REST pour l’authentification basée sur des jetons :
Ajouter du contexte: Pour ajouter un nouveau contexte de sécurité, cliquez sur Ajouter un contexte.
Modifier ou supprimer le contexte: À droite du contexte de sécurité, cliquez sur
Plus, puis sur Éditer ou
Supprimer.
Un contexte de sécurité se compose des parties suivantes :
Clé
Secret
Utilisateur technique
Scénarios REST
Les services RESTful ADONIS prennent en charge plusieurs contextes de sécurité. Au moins un contexte de sécurité est requis.
Quand voudriez-vous utiliser plusieurs contextes de sécurité ? Par exemple, vous pouvez configurer un contexte de sécurité permettant la modification des utilisateurs, et un autre avec accès au référentiel. Vous pouvez exécuter des requêtes avec les droits d’accès de différents utilisateurs techniques. Lors de l’exécution, vous pouvez choisir quels contextes de sécurité prédéfinis doivent être utilisés.
Jetons un coup d’œil détaillé aux configurations :
Clé (pour l'authentification par système cible): Ce paramètre représente le nom de la clé utilisée pour communiquer avec l’application web à l’aide d’API REST authentifiées. Saisissez un nom descriptif, par exemple « boc.rest.key.mfb.StandardRESTfulServices ».
Clé secrète (pour l'authentification par le système cible): Ce paramètre représente la valeur secrète de la clé utilisée pour la communication avec l’application web via des API REST authentifiées. Cliquez sur Générer une clé secrète pour générer la valeur de la clé.
Utilisateur technique: Sélectionnez l’utilisateur technique que vous avez créé, c’est-à-dire « Technical_StandardRESTfulServices » (voir Créer un utilisateur technique).
Scénarios de Référentiel | Scénarios Utilisateurs | Scénarios du Métamodèle: Dans cette zone, vous pouvez activer des scénarios REST spécifiques. Si un scénario n’est pas activé, toutes les requêtes vers ses points de terminaison restitueront un statut 403 FORBIDDEN. Les liens HATEOAS qui vous aident à trouver des ressources connexes sont également concernés. Par exemple, la réponse à une demande d’accès à des informations utilisateur peut contenir un lien HATEOAS pour supprimer l’utilisateur. Si le scénario de l’API d’écriture utilisateur est désactivé, une requête vers ce lien renverra le code de statut 403 FORBIDDEN.
Pour savoir quels points de terminaison sont attribués aux scénarios REST, consultez la référence API dans le portail développeur ADOxx où ils sont regroupés selon les scénarios.
Choisir une méthode d’authentification
ADONIS propose une gamme de méthodes d’authentification pour sécuriser la communication avec son API REST. Le choix de votre méthode d’authentification peut dépendre de plusieurs facteurs, notamment des exigences de sécurité, de l’infrastructure existante et des capacités de vos applications clientes. Cette section offre un bref aperçu de chaque méthode afin de vous aider à choisir la méthode d’authentification la plus adaptée.
Authentification de base
L’authentification de base est la méthode la plus simple pour l’authentification. Cela implique d’envoyer un nom d’utilisateur et un mot de passe à chaque requête. Ces identifiants sont encodés en Base64 et envoyés dans l’en-tête d’autorisation HTTP.
Un utilisateur technique n’est PAS nécessaire pour une authentification de base. Les requêtes peuvent être exécutées dans le contexte de n’importe quel utilisateur standard du produit.
Bien que simple, il est crucial d’assurer une transmission sécurisée. Comme les identifiants ne sont que codés et non chiffrés, il est fortement recommandé d’utiliser l’authentification de base uniquement en combinaison avec HTTPS, c’est-à-dire le serveur Tomcat sur lequel l’application web d'ADONIS est déployée doit être configuré pour utiliser SSL/TLS pour chiffrer la communication entre le client et le serveur web.
Dans quels cas utiliser l’authentification de base
L’authentification de base s’avère être un choix adapté pour les tests et pour les applications clientes nécessitant une méthode d’authentification simple et nécessitant d’authentifier les utilisateurs rapidement et sans effort. Elle est très utile pour les applications clientes où un utilisateur doit se connecter avant d’avoir accès à des ressources spécifiques.
Authentification OAuth 2.0
L’authentification OAuth 2.0 offre un cadre d’autorisation flexible et sécurisé, permettant l’accès à l’API REST au nom de l’utilisateur sans avoir besoin du mot de passe de l’utilisateur. À la place, chaque requête est accompagnée d’un jeton d’accès pour confirmer l’identité de l’utilisateur et garantir la validité de la requête. L’authentification de l’utilisateur est effectuée par un fournisseur d’identité externe (IdP).
Deux flux principaux peuvent être configurés :
Flux de code d’autorisation : Adapté aux situations où le consentement de l’utilisateur est requis. Un utilisateur technique n’est PAS nécessaire. Les requêtes peuvent être exécutées dans le contexte de n’importe quel utilisateur standard du produit.
Flux d'informations d'identification du client : Idéal pour la communication machine à machine (M2M) sans implication utilisateur. Un utilisateur technique doit être créé. Les requêtes sont exécutées dans le contexte de cet utilisateur technique.
Dans quels cas utiliser l’authentification OAuth 2.0
L’authentification OAuth 2.0 est couramment utilisée dans les situations où les applications tierces ont besoin d’un accès limité à ADONIS au nom d’un utilisateur. En offrant un moyen sécurisé et standardisé pour que les applications accèdent aux ressources avec le consentement de l’utilisateur,, elle permet de contrôler de manière précise le niveau d’accès accordé.
Authentification JWT
L’authentification JWT permet l’utilisation d’un fournisseur d’identité externe (IdP) pour l’authentification de l'utilisateur. Une fois que l’utilisateur a acquis un JSON Web Token (JWT) auprès de l’IdP, il peut l’inclure dans les requêtes de l’en-tête d’autorisation HTTP en tant que jeton porteur. ADONIS validera le JWT pour déterminer si le client dispose des autorisations nécessaires pour accéder à la ressource.
Un utilisateur technique n’est PAS nécessaire pour l’authentification JWT. Les requêtes peuvent être exécutées dans le contexte de n’importe quel utilisateur standard du produit.
Compacts, autonomes et compatibles avec des signatures numériques pour une sécurité accrue, les JWT peuvent inclure des informations supplémentaires (revendications) au-delà de l’authentification.
Dans quels cas utiliser l’authentification JWT
L’authentification JWT est considérée comme une approche flexible, sécurisée et évolutive. Si la sécurité est une priorité absolue et que des fonctionnalités supplémentaires comme l’absence d’état (statelessness) et des réclamations supplémentaires sont nécessaires, l’authentification JWT peut être le meilleur choix pour votre application cliente.
Authentification basée sur un jeton
L’authentification basée sur un jeton est une méthode d’authentification propriétaire de BOC Group qui permet d’accéder à l’API REST au nom d’un utilisateur en fournissant un jeton au lieu d’un nom d’utilisateur et d’un mot de passe. Elle consiste à envoyer un hash de sécurité créé à partir de l’identifiant public du client, de sa clé secrète, d’un GUID, de l’horodatage de la requête et des paramètres transmis avec celle-ci. Cela empêche toute utilisation non autorisée de l’API ainsi que la transmission répétée et d’autres abus de requêtes.
Un utilisateur technique doit être créé pour l’authentification basée sur des jetons. Les requêtes sont exécutées dans le contexte de cet utilisateur technique.
Cette méthode d’authentification est disponible uniquement pour les applications clients Java.
Dans quels cas utiliser l’authentification basée sur un jeton
BOC Group envisage de rendre cette méthode d’authentification obsolète dans le futur. En conséquence, nous encourageons les utilisateurs à explorer des méthodes d’authentification alternatives pour une approche durable et pérenne.
Paramètres du Client Web
Dans cette zone, vous gérez les options de configuration suivantes pour ADONIS :
Paramètres généraux
Ces paramètres généraux influencent le comportement fondamental d'ADONIS.
Paramètres généraux ouverts
Pour ouvrir ces paramètres généraux :
- Allez dans Configurations > Paramètre du Client Web > Paramètres généraux.
Configurez ensuite les paramètres paramètres généraux
Les paramètres suivants sont disponibles :
Autoriser le renommage des éléments du catalogue: Cochez cette case pour permettre le renommage des éléments du catalogue affichés dans ADONIS.
Autoriser la création de nouveaux objets: Cochez cette case pour permettre la création de nouveaux objets dans ADONIS via le catalogue ou via les contrôles de relations.
Masquer les types de modèle lors de la création de nouveaux objets: Cochez cette case pour afficher tous les types d’objets dans une liste simple lors de la création d’un objet dans l’Explorateur. Lorsque vous décochez cette case, les types d’objets sont regroupés par type de modèle.
Autoriser la création de groupes de modèles: Cochez cette case pour permettre la création de nouveaux groupes de modèles dans ADONIS via le catalogue.
Autoriser la création de groupes d’objets: Cochez cette case pour permettre la création de nouveaux groupes d’objets dans ADONIS via le catalogue.
Autoriser le déplacement d’éléments dans le catalogue: Cochez cette case pour permettre aux utilisateurs d'ADONIS de déplacer des éléments (modèles, objets, groupes) vers d’autres dossiers parents en utilisant la fonctionnalité glisser-déposer.
Autoriser la suppression de modèles et d’objets: Cochez cette case pour permettre la suppression de modèles et d’objets dans ADONIS via le catalogue ou via les contrôles de relations.
Autoriser des modèles de même type à porter le même nom: Cochez cette case pour permettre aux utilisateurs d'ADONIS de créer plusieurs modèles du même type portant le même nom.
Autoriser des objets du référentiel de même type à porter le même nom: Cochez cette case pour permettre aux utilisateurs d'ADONIS de créer plusieurs objets de référentiel du même type sous le même nom.
Afficher les modèles dans le catalogue: Cochez cette case pour afficher les modèles dans le catalogue d'ADONIS.
Afficher les objets dans le catalogue: Cochez cette case pour afficher les objets dans le catalogue d'ADONIS.
Activer le volet Collaboration: Cochez cette case pour permettre l’utilisation du volet collaboration dans ADONIS.
Activer le composant de l’analyse de dépendances: Cochez cette case pour permettre l’utilisation du composant de l'analyse de dépendances dans ADONIS. Des étapes de configuration supplémentaires peuvent être nécessaires.
Activer le composant des favoris: Cochez cette case pour permettre l’utilisation des favoris dans ADONIS.
Activer le composant de traduction: Cochez cette case pour permettre l’utilisation du composant traduction dans ADONIS.
Activer le téléchargement de fichiers vers DMS: Cochez cette case pour permettre l’import de fichiers externes dans la base de données dans ADONIS.
Activer la comparaison graphique des modèles: Cochez cette case pour permettre l’utilisation de la comparaison graphique des modèles dans ADONIS.
Activer la modification du mot de passe: Cochez cette case pour permettre le changement de mot de passe dans ADONIS.
Activer les modèles récemment ouverts: Cochez cette case pour afficher les modèles récemment ouverts dans le composant Accès Rapide de l’Explorateur. Lorsque vous décochez cette case, les modèles ne sont pas affichés dans l’Accès rapide.
Activer les objets récemment ouverts: Cochez cette case pour afficher les objets récemment ouverts dans le composant Accès rapide de l’Explorateur. Lorsque vous décochez cette case, les objets ne sont pas affichés dans l’accès rapide.
Activer automatiquement la recherche: Cochez cette case pour activer le paramètre deRecherche automatiquement dans ADONIS qui est configuré par défaut, c’est-à-dire que les résultats de recherche sont automatiquement ajustés chaque fois que l’utilisateur modifie un filtre de recherche.
Désactiver l’option « Enregistrer sous »: Cochez cette case pour interdire la création de copies de modèles dans ADONIS
Activer la mise en surbrillance pour les relations: Cochez cette case pour mettre en évidence la relation la plus prioritaire lors de la création de relations dans ADONIS. Lorsque vous décochez cette case, aucune relation n’est mise en surbrillance.
Le serveur d’applications d'ADONIS doit être redémarré si ces paramètres sont modifiés. Sinon les modifications ne sont pas prises en compte.
E-mail
ADONIS inclut un composant mail, qui peut être utilisé pour envoyer automatiquement des messages lors de plusieurs événements. Avant qu’il soit possible d’utiliser ce composant, il doit être configuré correctement.
Ouvrir paramètres du service de messagerie
Pour ouvrir les paramètres du service de messagerie :
- Allez dans Configurations > Paramètre du Client Web > E-mail.
Paramètres du service de messagerie
Les paramètres suivants sont disponibles :
Activer le service de messagerie: Cochez cette case pour activer le service de messagerie. Au démarrage du serveur web, celui-ci interrogera périodiquement le serveur d’applications afin de détecter de nouveaux emails.
Adresse IP ou nom du serveur de messagerie: Saisissez l’adresse IP ou le nom d’hôte du client où le serveur de messagerie est installé.
Port du serveur de messagerie: Saisissez le numéro de port utilisé pour accéder au serveur de messagerie. Normalement, c’est le port 25.
Adresse de l'expéditeur système: Saisissez l’adresse e-mail qui doit être utilisée comme adresse d'expéditeur pour les notifications système (par exemple, les utilisateurs reçoivent une notification lorsque leur attention est requise pour une étape du circuit de validation, et l’adresse de l’expéditeur est l’adresse système saisie dans ce champ).
Système de Réponse à: Saisissez l’adresse e-mail à laquelle les réponses aux notifications système doivent être envoyées (si les réponses ne doivent pas être envoyées à l’adresse expéditrice du système).
Codage: Sélectionnez une option de chiffrement si le serveur de messagerie l’exige. Les paramètres suivants sont disponibles :
Aucune : aucun chiffrement n’est utilisé.
StartTLS (optionnel) : Utilisez StartTLS pour passer à une connexion sécurisée. Si le serveur de messagerie ne prend pas en charge StartTLS, une connexion non chiffrée est utilisée.
StartTLS (obligatoire) : Utilisez StartTLS pour passer à une connexion sécurisée. Si le serveur de messagerie ne prend pas en charge StartTLS, l’opération échouera (= les e-mails ne sont pas envoyés).
SSL/TLS : Utilisez SSL ou TLS pour chiffrer la communication. Si le serveur de messagerie ne prend pas en charge SSL/TLS, l’opération échouera (= les emails ne sont pas envoyés).
Le serveur de messagerie nécessite une authentification: Sélectionnez cette option si le serveur de messagerie nécessite une authentification. Normalement, c’est le cas.
Utilisateur: Si le serveur de messagerie nécessite une authentification, le nom d’utilisateur de l’utilisateur du serveur de messagerie doit être saisi ici.
Mot de passe: Si le serveur de messagerie nécessite une authentification, le mot de passe de l’utilisateur du serveur de messagerie doit être saisi ici.
Intervalle en secondes pour le traitement des e-mails: Ce paramètre définit l’intervalle utilisé par le serveur web pour interroger le serveur d’application à la recherche de nouveaux emails. Une valeur de 300 signifie que le serveur web attendra 300 secondes (= 5 minutes) entre chaque requête pour de nouveaux e-mails.
Nombre maximum de tentatives d'envoi échouées (0=illimité): Spécifiez le nombre de tentatives d’envoi après lesquelles les emails qui ne sont pas envoyés (par exemple parce que l’adresse e-mail n’existe plus) sont ignorés.
Avant qu’il soit possible d’envoyer des notifications par e-mail, l’URL de base doit être correctement configurée.
L’application Web ADONIS installée sur le serveur Web doit être redémarrée si ces paramètres sont modifiés. Sinon les modifications ne sont pas prises en compte.
À quel moment ADONIS envoie-t-il des e-mails ?
ADONIS envoie des e-mails dans les cas suivants :
Lorsqu’une personne partage un modèle, un objet, etc., directement depuis ADONIS avec ses collègues.
Dans le cadre des commentaires. Exemple : Lorsqu’une personne est directement mentionnée avec @ dans un commentaire, ou si elle fait partie de la discussion et que quelqu’un d’autre écrit une nouvelle réponse.
Dans le cadre du circuit de validation. Exemple : Après une transition, la personne responsable de la réalisation de la transition suivante dans le processus de validation reçoit un e-mail.
Lorsqu'un utilisateur réinitialise son mot de passe avec la réinitialisation du mot de passe en libre-service.
Si vous souhaitez en savoir plus sur la configuration de la réinitialisation du mot de passe en libre-service, veuillez consulter la section Configurer la réinitialisation du mot de passe en libre-service.
Recherche en texte intégral
Comme l'administrateur ADONIS, vous pouvez configurer divers paramètres de recherche en texte intégral pour ADONIS.
Ouvrir les paramètres de recherche en texte intégral
Pour ouvrir les paramètres de recherche en texte intégral :
- Allez dans Configurations > Paramètre du Client Web > Recherche en texte intégral.
Attributs globaux
Lors de l’utilisation de la fonctionnalité de recherche générale dans ADONIS (Rechercher & Analyser), certains attributs sont considérés comme permettant de trouver des objets ou modèles correspondants. Par défaut, ce sont les attributs Nom, Description, Prénom et Nom de famille.
Les configurations dans ce champ permettent de définir des attributs supplémentaires des types Short String, ADOstring et Long String à considérer.
Sélectionner les attributs à toujours afficher dans les résultats de recherche: Sélectionnez les attributs qui doivent toujours être pris en compte lors de l’utilisation de la fonction de recherche générale.
Le tableau des résultats de recherche affiche une colonne distincte pour chacun de ces attributs. Les termes de recherche trouvés sont surlignés en jaune dans le résultat de la recherche.
Rechercher dans l’Explorateur
Par défaut, seul le Nom est considéré comme permettant de trouver des objets ou modèles correspondants :
lors de l’utilisation de la fonction de recherche dans l’Explorateur
lors de la gestion des relations dans le Notebook, lors de l’utilisation du champ de recherche
Les paramètres de cette zone vous permettent de définir d’autres aspects à prendre en compte.
- Appliquer les attributs globaux pour la recherche dans l’explorateur: Sélectionnez cette option afin que les attributs sélectionnés dans la zone Attributs globaux ci-dessus soient également pris en compte lors de l’utilisation de la fonction de recherche dans l’Explorateur ou dans le Notebook.
Utiliser le schéma de visualisation du nom pour la recherche dans l'Explorateur: Lors du processus de personnalisation d'ADONIS, un schéma de noms peut être défini par un ingénieur de solutions BOC pour un type ou une classe de modèle. Le schéma de nom détermine les composants qui constituent le nom affiché dans l’interface utilisateur.
Sélectionnez cette option afin que les relations faisant partie du modèle de nom défini soient prises en compte lors de l’utilisation de la fonction de recherche dans l’Explorateur ou dans le Notebook.
Exemple : Utilisez le schéma de visualisation des noms pour la recherche dans l'Explorateur
Supposons que votre organisation utilise le schéma de visualisation personnalisé des noms pour les modèles suivants :
{NAME} [{RC_OWNER}]- Nom et relation Pilote du processusPar exemple, si « Carol Process » est défini comme Pilote du processus du modèle « Créer un nouveau compte client », le nom visualisé sur l’interface utilisateur du modèle ressemblera à ceci :
Créer un nouveau compte client [Carol]
Maintenant, l’option Utiliser le schéma de visualisation du nom pour la recherche dans l’Explorateur est sélectionnée. À partir de ce moment, tous les modèles avec « Carol Process » défini comme Pilote du processus seront trouvés lors de la recherche dans l’Explorateur avec le nom « carol ». Cela inclut également le modèle Créer un nouveau client [carol] mentionné ci-dessus.
Le serveur d’applications d'ADONIS doit être redémarré si ces paramètres sont modifiés. Sinon les modifications ne sont pas prises en compte.
Comparaison de modèles
Choisissez les propriétés à évaluer lors de la comparaison de modèles dans ADONIS Cet outil permet de visualiser les différences entre deux modèles, en affichant les objets et connecteurs supprimés et nouveaux, ainsi que les modifications apportées aux attributs. Par exemple, cela peut être utile pour identifier les différences entre deux versions d’un processus.
Ouvrir et configurer les paramètres de comparaison de modèles
Allez dans Configurations > Paramètre du Client Web > Comparaison de modèles.
Dans les onglets Types de Modèles, Classes et Classes de Relations, sélectionnez les attributs qui devraient être visibles lorsqu’un filtre sur les notebooks est actif. Vous pouvez aussi désactiver en même temps des chapitres entiers du Notebook, voire tous les attributs d’un seul Notebook.
Dans les onglets Types de Modèles, Classes et Classes de Relations, sélectionnez les propriétés à prendre en compte lors de la comparaison des modèles. Vous pouvez également utiliser la barre de recherche pour trouver rapidement une propriété spécifique.
Le serveur d’applications d'ADONIS doit être redémarré si ces paramètres sont modifiés. Sinon les modifications ne sont pas prises en compte.
Modélisation
Configurez les paramètres relatives à l'enregistrement automatique, aux options de visualisation disponibles dans ADONIS et d’autres configurations. La plupart de ces configurations peuvent être contournées par des utilisateurs individuels d'ADONIS selon leurs préférences.
Ouvrir les paramètres de modélisation
Pour ouvrir les paramètres de modélisation :
- Allez dans Configurations > Paramètre du Client Web > Modélisation.
Paramètres généraux
Les paramètres suivants sont disponibles :
- Sauvegarde automatique: Activez l'enregistrement automatique des modifications dans les modèles et les objets. Déterminez le nombre de modifications avant la prochaine sauvegarde automatique.
Modélisation
Les paramètres suivants sont disponibles :
Dessiner automatiquement les connecteurs avec des angles droits: Permet à ADONIS de dessiner automatiquement des
 connecteurs à angle droit.
Décochez cette case pour qu' ADONIS dessine plutôt des
connecteurs à angle droit.
Décochez cette case pour qu' ADONIS dessine plutôt des
 connecteurs droits.
Dessiner un pont lorsque des connecteurs se croisent :: Permet à ADONIS de dessiner des ponts si les connecteurs se croisent.
Afficher le curseur pendant la modélisation: Afficher le curseur pendant la modélisation.
Ne déplacer les objets contenus que si la touche Maj est enfoncée <: Les objets redimensionnables et les agrégations peuvent servir d’objets conteneurs pour d’autres objets. Lorsque vous faites glisser un tel conteneur autour de la zone de dessin, les objets placés à l’intérieur sont déplacés si vous appuyez sur la touche <Maj> et la maintenez enfoncée en même temps.
Décochez cette case si vous souhaitez que les objets contenus se déplacent en permanence (sans appuyer simultanément sur la touche <Shift>).
Si vous utilisez la librairie BPMS d'ADONIS, les types d’objets suivants sont des agrégations : Bloc, Groupe, Limite système et l’Agrégation éponyme.
Afficher les sauts de page et les numéros de page: Les sauts de page divisent les modèles en pages séparées lors de l’impression. Ils sont affichés sous forme de lignes pointillées dans l’éditeur graphique. Sélectionnez si les sauts de page et les numéros de page sont visibles, si un utilisateur dispose d’un accès en écriture ou en lecture seule à un modèle.
Activer le rendu du Web Worker: Le rendu web worker signifie que les graphiques des modèles sont rendus dans un processus séparé, qui est plus performant. Lorsque le rendu web worker est désactivé, le modèle est rendu dans le même processus que le reste de l’application côté client, et les graphiques de la zone de dessin se chargent plus lentement. Décochez cette case uniquement si un employé de BOC le demande.
Réduire la zone du modèle uniquement à la largeur et à la hauteur définies du type de modèle: Dans l’éditeur graphique, la taille du modèle s’adapte automatiquement au contenu du modèle. Cela signifie que la surface du modèle s’élargira ou rétrécira selon les besoins pour pouvoir afficher tous les objets.
Décochez cette case si vous souhaitez que la zone du modèle s’étende selon les besoins, mais ne réduisez qu’aux dimensions par défaut spécifiées pour le type de modèle dans le métamodèle, plutôt qu’à la taille minimale qui peut toujours accueillir tous les objets.
Direction de modélisation
Il est possible de pivoter horizontalement (la modélisation se fait de gauche à droite) ou verticalement (la modélisation se fait de haut en bas) le modèle. Vous pouvez définir la direction de modélisation pour chaque type de modèle.
Sélectionnez l’option Modifiable pour permettre aux utilisateurs d'ADONIS de changer la direction de modélisation d’un modèle spécifique dans l’éditeur graphique. Les objets de la zone de dessin sont automatiquement réorganisés.
Lorsque l’on utilise l’Assistant à la modélisation des dépendances dans ADONIS, la direction de modélisation détermine où l’objet suivant est placé :
Horizontal : à droite de l’objet sélectionné
Vertical : en dessous de l’objet sélectionné
Le serveur d’applications d'ADONIS doit être redémarré si ces paramètres sont modifiés. Sinon les modifications ne sont pas prises en compte.
Modules Web
Vous pouvez attribuer des modules (plug-ins) à des rôles système pour accorder des autorisations pour des fonctionnalités spécifiques dans ADONIS. Cela vous permet de définir différents scénarios pour différents groupes d’utilisateurs ou utilisateurs.
Ouvrir les paramètres des modules Web
Pour ouvrir les paramètres des modules Web :
- Allez dans Configurations > Client Web > Modules Web.
Afficher et assigner les modules
Les paramètres des modules présentent tous les modules pouvant être attribués aux utilisateurs sous forme de tableau. Les colonnes suivantes sont affichées :
Nom et description : Affiche le nom et, si disponible, une description du module.
Rôles système : Identifie les rôles système ayant obtenu l’accès au module.
Requiert : Contient des liens vers tout autre module nécessaire au bon fonctionnement du module.
Utilisé par : Contient des liens vers tout autre module qui utilise ou en dépend.
Les options suivantes sont disponibles :
Assigner des modules: Dans la colonne des Rôles système, sélectionnez les rôles système qui doivent bénéficier de l’accès au module. Pour accorder l’accès à tous les utilisateurs, cochez la case Disponible pour tous les utilisateurs. Si certains rôles système ne sont pas disponibles pour la sélection, assurez-vous qu’ils ont accès à tous les rôles système requis.
Filtrer par rôles système: Cliquez sur Tous les rôles, puis sélectionne l’option que tu souhaites. Vous pouvez consulter les modules disponibles pour tous les utilisateurs ou uniquement ceux disponibles pour des rôles système spécifiques.
Rechercher: Dans le champ Rechercher, tapez le texte que vous souhaitez rechercher. Toutes les lignes du tableau contenant la chaîne de recherche dans les colonnes Nom et description, Requiert ou Utilisé par seront affichées.
Le serveur d’applications d'ADONIS doit être redémarré si ces paramètres sont modifiés. Sinon les modifications ne sont pas prises en compte.
Message d’erreur : Rôles système configurés introuvables
La situation suivante peut se présenter lors de l’import des paramètres composants : dans le fichier d’import, les modules sont attribués à des rôles système qui n’existent pas dans votre base de données. Ces rôles système seront mis en évidence en rouge dans les paramètres des modules. Vous pouvez soit recréer les rôles système manquants et faire en sorte que l’attribution fonctionne à nouveau. Ou vous pouvez supprimer l’attribution (décocher la case) et enregistrer les paramètres, et les rôles système qui n’existent pas dans votre base de données seront supprimés de la configuration.
Survol de la souris
Sélectionnez les propriétés que vous souhaitez afficher dans les infobulles des objets dans ADONIS. Ces infobulles fournissent des informations contextuelles lorsqu’un utilisateur ouvre un modèle en lecture seule dans l’éditeur graphique ou dans le Réferentiel d'Entreprise et survole un objet.
Ouvrir et configurer les paramètres de survol de la souris
Allez dans Configurations > Paramètre du Client Web > Survol de la souris.
Sélectionnez les propriétés à afficher dans les infobulles de l'objet. Vous pouvez également utiliser la barre de recherche pour trouver rapidement une propriété spécifique.
Le serveur d’applications d'ADONIS doit être redémarré si ces paramètres sont modifiés. Sinon les modifications ne sont pas prises en compte.
Impression et rapports
Les paramètres d’impression et de rapport permettent de configurer les paramètres pour imprimer des modèles en PDF, de créer des rapports PDF et RTF, et de générer des images dans ADONIS.
Ouvrir les paramètres d’impression et de rapport
Pour ouvrir les paramètres d’impression et de rapport :
- Allez dans Configurations > Paramètre du Client Web > Impression et rapports.
Paramètres généraux
Les paramètres suivants sont disponibles :
- Mise en page par défaut: Sélectionnez une mise en page par défaut pour imprimer les modèles en PDF et créer des rapports PDF et RTF. Les mises en page déterminent l’apparence de l’en-tête et du pied de page.
Si vous utilisez la librairie BPMS dans ADONIS, la mise en page par défaut pour imprimer les modèles en PDF est définie directement dans le métamodèle pour tous les types de modèles et ce paramètre n’est pas évalué. Ce paramètre reste cependant considéré comme un paramètre par défaut pour la création de rapports.
Les utilisateurs ADONIS peuvent choisir leur propre mise en page préférée pour imprimer des modèles
en PDF et créer des rapports (sous ![]() > Préférences > Impression).
> Préférences > Impression).
- Version PDF: Sélectionnez une version PDF pour imprimer des modèles en PDF et créer des rapports PDF. Le PDF est le format par défaut pour une impression de qualité. PDF/A est utilisé pour l’archivage et la conservation à long terme des documents électroniques. La disponibilité des versions PDF dépend de la configuration des modèles d’impression.
Pour plus d’informations sur le PDF/A, veuillez consulter https://www.pdfa.org/pdfa-faq/. Documents PDF/A générés dans ADONIS sont conformes au PDF/A-1b.
Format d'image pour l'impression des modèles au format PDF: Définissez le format d’image pour les images contenues lors de l’impression des modèles au format PDF. Vous pouvez choisir entre PNG (lossless, bigger size pixel-based image format), JPEG (lossy, smaller size pixel-based image format), et SVG (vector-based image format).
Format d'image pour la génération d'image:: Définissez le format d’image pour générer des images (= export des modèles dans l’éditeur graphique sous forme de fichiers graphiques). Vous pouvez choisir entre PNG (lossless, bigger size pixel-based image format), JPEG (lossy, smaller size pixel-based image format), et SVG (vector-based image format).
Nombre de pages limite pour l'impression de modèles: Définissez le nombre maximal de pages pouvant être sélectionnées dans la fenêtre d’aperçu lors de l’impression de modèles en PDF.
Modèles d’impression
Les paramètres suivants sont disponibles :
Template de rapport par défaut: Définissez un modèle d’impression par défaut pour imprimer les modèles en PDF.
Templates de rapport disponibles dans le Client Web: Définissez quels modèles d’impression peuvent être utilisés lors de l’impression de modèles en PDF. Selon la librairie, divers rapports et le modèle d’impression Standard sont disponibles. Les rapports qui ne sont pas destinés à être utilisés comme modèles imprimés ne sont pas affichés.
Paramètres de format papier
Définissez le format du papier qui peut être utilisé lors de l’impression de modèles en PDF :
Ajouter un format de papier: Pour ajouter un nouveau format de papier, cliquez sur Ajouter le format du papier. Puis définissez le nom du format ainsi que la largeur et la hauteur en millimètres (par exemple Lettre, 216, 279).
Éditer ou supprimer le format de papier: À droite du format de papier, cliquez sur
Plus, puis sur Éditer ou
Supprimer.
Système
Les configurations du système permettent à un administrateur ADONIS de définir les paramètres techniques contrôlant la fonctionnalité de base d'ADONIS.
Ouvrir les paramètres du Client Web
Pour ouvrir les paramètres du Client Web :
- Allez dans Configurations > Paramètre du Client Web > Système.
Paramètres généraux
Les paramètres suivants sont disponibles :
URL de base (pour information): Entrez l’URL où ADONIS peut être accessible depuis d’autres machines : "http://<SERVER_NAME>:<TOMCAT_PORT>/ADONIS16_0/".
<SERVER_NAME> est le nom de la machine serveur, <TOMCAT_PORT> est le port de connecteur HTTP/1.1 défini lors de la configuration, auquel Apache Tomcat (et donc ADONIS) est accessible. La valeur par défaut est « 8000 ».
Délai d'expiration de la session (minutes): Spécifiez le nombre de minutes pendant lesquelles une session peut rester inactive avant que le serveur ne la termine automatiquement. La valeur par défaut est 20 minutes.
Délai d’expiration AJAX pour les requêtes du client Web vers le serveur Web (secondes): Indiquez le délai d’attente, en secondes, pour les requêtes du client web (= navigateur) vers le serveur web.
Utilisateurs techniques
Dans cette zone, vous pouvez visualiser et gérer les utilisateurs techniques. Les utilisateurs techniques sont utilisés par divers composants d'ADONIS, par exemple pour la synchronisation d’objets avec d’autres produits BOC Management Office.
Les paramètres suivants sont disponibles :
Sélectionner des utilisateurs: Choisissez les utilisateurs techniques souhaités dans une liste comprenant tous les utilisateurs pour lesquels l’option connexion de confiance est activée.
 Supprimer l'utilisateur: Supprimez les utilisateurs techniques s’ils ne sont plus nécessaires.
Le serveur d’applications d'ADONIS doit être redémarré si ces paramètres sont modifiés. Sinon les modifications ne sont pas prises en compte.
Vue textuelle
La vue textuelle fournit un guide étape par étape à travers un processus, permettant aux utilisateurs de comprendre rapidement le déroulement des activités et des décisions. Elle présente des modèles sous forme de tableaux, listant les objets en lignes selon leur ordre dans le processus, avec des détails essentiels affichés dans les colonnes.
La disponibilité de la vue textuelle pour des types de modèles spécifiques dépend de la librairie et de la configuration du produit. Dans la librairie BPMS d'ADONIS, cette fonctionnalité est disponible par défaut pour les Diagrammes de Collaboration. Les administrateurs ADONIS peuvent créer des configurations supplémentaires de vue textuelle pour d’autres types de modèles dans l'Administration ADONIS.
Configurer la vue textuelle
Pour modifier les paramètres de la vue textuelle :
- Allez dans Configurations > Vue textuelle > Paramètres généraux.
L’assistant de configuration de la vue textuelle comporte 3 pages :
Ces pages sont abordées plus en détail dans les sections suivantes.
Sélectionner le type de modèle
La première page de configuration de la vue textuelle affiche tous les types de modèles qui ont déjà une configuration. Ici, vous pouvez soit modifier une configuration existante, soit en créer une nouvelle. Les paramètres suivants sont disponibles :
Ajouter le type de modèle: Cliquez sur Ajouter le type de modèle pour sélectionner un type de modèle afin de modifier davantage. Vous pouvez maintenant ajouter une configuration pour ce type de modèle.
Ajouter une configuration: Cliquez sur Configurer pour commencer à créer une nouvelle configuration pour un type de modèle. Vous passerez automatiquement à la page 2 de la configuration où vous pouvez sélectionner les types d’objets qui doivent être affichés dans la vue textuelle. Si une configuration existe déjà pour un type de modèle, le bouton Configurer est remplacé par une coche
 .
.Actif: Sélectionnez si la configuration de la vue textuelle pour un type de modèle spécifique est activée ou désactivée. Cette option est utile si vous souhaitez désactiver temporairement une configuration au lieu de la supprimer définitivement.
Éditer la configuration: À droite du type de modèle, cliquez sur
Plus, puis sur Configurer
pour modifier une configuration existante. Vous passerez automatiquement à la page 2 de la
configuration où vous pouvez sélectionner les types d’objets qui doivent être affichés dans la
vue textuelle.Supprimer la configuration: À droite du type de modèle, cliquez sur
Plus, puis sur Supprimer.
Après avoir rempli ces paramètres, sélectionnez la page 2 dans le menu de navigation en haut pour passer à la page suivante de la configuration.
Sélectionner les types d’objets
La deuxième page de configuration de la vue textuelle vous permet de sélectionner les types d’objets qui doivent être affichés dans la vue textuelle. Les paramètres suivants sont disponibles :
Types de modèles: Le type de modèle que vous avez choisi de configurer est indiqué ici. Ajustez-le si nécessaire.
Objets: Sélectionnez les cases à cocher à côté des types d’objets que vous souhaitez afficher dans la vue textuelle.
Pour chaque type d’objet, vous pouvez choisir un attribut nom et un attribut description qui apparaissent dans la colonne Nom et Description de la vue textuelle. De plus, vous pouvez sélectionner une référence à suivre, c’est-à-dire que dans la vue textuelle, le lien vers le Notebook de l’objet est remplacé par un lien vers l’objet/modèle référencé tel qu’il est sélectionné ici.
- Activer la liaison: Sélectionnez cette option pour afficher les liens vers les objets suivants dans la vue textuelle même lorsque les objets intermédiaires entre l’objet source et l’objet cible ne sont pas affichés.
Exemple : Branchement parallèle
Par défaut, le type d’objet Branchement parallèle n’est pas affiché dans la vue textuelle. Si la case Activer la liaison est cochée, la tâche qui relie au branchement pointera directement vers les tâches de suivi connectées à l’extérieur du branchement. Si cette case n’est pas cochée, aucun lien ne sera affiché.
Attributs ordonnancés: Sélectionnez l’attribut utilisé pour ordonner les objets dans le modèle et donc aussi dans la vue textuelle.
Relation du connecteur :: Sélectionnez la relation utilisée pour relier les objets suivants dans un modèle. Grâce à cette relation du connecteur, les liens sont affichés dans la vue textuelle (icône
 ), qui peut être utilisée pour
naviguer vers l’objet ou les objets suivants.
), qui peut être utilisée pour
naviguer vers l’objet ou les objets suivants.Nom: Optionnel : Sélectionnez l’attribut nom de la relation du connecteur. Cet attribut apparaît dans la vue textuelle à gauche du lien vers l’objet suivant.
Après avoir rempli ces paramètres, sélectionnez la page 3 dans le menu de navigation en haut pour passer à la page suivante de la configuration.
Sélectionner les propriétés
La troisième page de configuration de la vue textuelle liste toutes les propriétés qui doivent apparaître dans la vue textuelle. Ici, vous pouvez ajouter ou supprimer des propriétés, et changer leur position. Les paramètres suivants sont disponibles :
Ajouter des propriétés: Cliquez sur Ajouter des propriétés pour ajouter de nouvelles propriétés d’objet à afficher dans la vue textuelle. Ils seront ajoutés en bas de la liste, dans l’ordre dans lequel vous les avez sélectionnés.
Changement d’ordre des propriétés: Utilisez la poignée de déplacement (
) pour faire glisser une
propriété vers un nouvel emplacement.Affiché par défaut: Cochez cette case pour vous assurer qu’une propriété est visible par défaut dans la vue textuelle. Si vous décochez cette case, la colonne correspondante sera masquée par défaut, bien qu’elle puisse toujours être rendue visible en cas de besoin.
Utilisé par: Cochez ici pour afficher quels types d’objets sélectionnés pour la vue textuelle utilisent une propriété.
Supprimer des propriétés: À droite de la propriété, cliquez sur
Plus, puis sur Supprimer.
Une fois ces paramètres terminés, cliquez sur Enregistrer. Les paramètres de vue textuelle sont sauvegardés dans la base de données et immédiatement disponibles dans ADONIS.
Validation
Les fonctions de validation dans ADONIS permettent aux utilisateurs d'ADONIS de contrôler si les modèles et objets respectent les directives de modélisation. Si ces directives ne sont pas respectées, ADONIS affiche les notifications correspondantes.
ADONIS fournit les types de contrôle suivants :
 Erreur,
 alerte et
 informations: Ce sont des contrôles programmatiques qui garantissent la correction syntaxique et l’utilisation
correcte des éléments dans la modélisation. Seuls les développeurs du produit d'ADONIS et les
personnes chargées de la personnalisation peuvent créer de nouveaux contrôles de ce type.
Cependant, en tant qu'Administrateur d' ADONIS, vous pouvez modifier ces contrôles. Par exemple,
vous pouvez modifier le texte affiché lorsqu’un contrôle échoue ou changer la catégorie à
laquelle un contrôle appartient.
informations: Ce sont des contrôles programmatiques qui garantissent la correction syntaxique et l’utilisation
correcte des éléments dans la modélisation. Seuls les développeurs du produit d'ADONIS et les
personnes chargées de la personnalisation peuvent créer de nouveaux contrôles de ce type.
Cependant, en tant qu'Administrateur d' ADONIS, vous pouvez modifier ces contrôles. Par exemple,
vous pouvez modifier le texte affiché lorsqu’un contrôle échoue ou changer la catégorie à
laquelle un contrôle appartient. ToDo: Ces contrôles servent de rappel aux utilisateurs pour qu’ils examinent manuellement et
confirment certaines conditions. Les administrateurs d'ADONIS peuvent créer de nouveaux ToDos à
partir de zéro et les configurer sans aucune restriction.
ToDo: Ces contrôles servent de rappel aux utilisateurs pour qu’ils examinent manuellement et
confirment certaines conditions. Les administrateurs d'ADONIS peuvent créer de nouveaux ToDos à
partir de zéro et les configurer sans aucune restriction.
Configurer la validation
Pour modifier les paramètres de validation :
- Allez dans Configurations > Validation > Paramètres généraux.
L’assistant de configuration de validation comporte 2 pages :
Ces pages sont abordées plus en détail dans les sections suivantes.
Configurer les contrôles
La première page de l’assistant de configuration de validation présente son contenu dans une structure de tableau contenant tous les contrôles simultanément.
Dans l’éditeur, les contrôles sont triés par ordre alphabétique.
La première colonne du tableau indique le type de contrôle (ToDo, Informations, Alerte, Erreur).
La deuxième colonne du tableau contient le nom du contrôle.
La troisième colonne du tableau indique le texte affiché dans la notification.
La quatrième colonne du tableau liste les catégories auxquelles appartient un contrôle.
Les options suivantes sont disponibles :
Ajouter un ToDo: Cliquez sur Nouveau ToDo. Vous pouvez maintenant configurer le contrôle.
Supprimer le contrôle: À droite du contrôle, cliquez sur
Plus, puis sur Supprimer.Éditer le contrôle: À droite du contrôle, cliquez sur
Plus, puis sur Éditer,
Attribuer à la catégorie ou Affecter des types de modèle/objet. Vous pouvez maintenant
configurer le contrôle.
Éditer ou ajouter un contrôle
Lorsque vous ajoutez un nouveau ToDo ou éditez un contrôle sur la page Configurer les contrôles, une fenêtre de dialogue avec trois onglets apparaît. Vous pouvez consulter et éditer les données suivantes :
Configurations
Le type de contrôle est indiqué en haut de la page. Ajustez-le si nécessaire.
Ensuite, vous pouvez définir le contenu qui s’affiche lorsque le contrôle échoue. Pour chaque langue disponible dans ADONIS, vous pouvez modifier le nom du contrôle ainsi que le texte et l’astuce affichés dans la notification.
La modification du type est limitée aux contrôles prédéfinis disponibles dans ADONIS. Le type de ToDos créés par l’utilisateur est fixe et ne peut pas être modifié.
Catégories
- Sélectionnez les catégories auxquelles appartient un contrôle. Vous pouvez également utiliser la barre de recherche pour trouver rapidement une catégorie spécifique.
Types de modèles/d'objets
- Sélectionnez les types de modèles et d’objets qui seront vérifiés.
Pour une liste détaillée de tous les contrôles, voir Aperçu des contrôles de validation.
Réinitialiser les valeurs
Dans n’importe quel onglet, vous pouvez sélectionner Réinitialiser les valeurs pour restaurer les paramètres par défaut d’un contrôle.
Après avoir terminé ces paramètres, sélectionnez la page 2 dans le menu de navigation en haut pour passer à la page suivante de l’assistant de configuration de validation.
Configurer les catégories
La deuxième page de l’assistant de configuration de validation présente son contenu dans une structure de tableau contenant toutes les catégories simultanément.
Chaque ligne représente une #compset-B4000différente.
La première colonne du tableau contient le nom de la catégorie.
La deuxième colonne du tableau contient les noms des rôles système autorisés à effectuer des contrôles de cette catégorie.
Les options suivantes sont disponibles :
Ajouter une catégorie: Cliquez sur Nouvelle catégorie. Vous pouvez maintenant configurer la catégorie.
Supprimer la catégorie: À droite de la catégorie, cliquez sur
Plus, puis sur Supprimer.Éditer la catégorie: À droite de la catégorie, cliquez sur
Plus, puis sur Éditer.
Vous pouvez maintenant configurer la catégorie.Réinitialiser les valeurs: À droite de la catégorie, cliquez sur
Plus, puis sur
Réinitialiser pour restaurer les paramètres par défaut d’une catégorie.Attribuer des contrôles: À droite de la catégorie, cliquez sur
Plus, puis sur Attribuer
des contrôles. Vous pouvez maintenant sélectionner les contrôles qui doivent appartenir à cette
catégorie.
Éditer ou ajouter une catégorie
Lorsque vous ajoutez ou éditez une catégorie sur la page Configurer les catégories, une fenêtre de dialogue apparaît. Vous pouvez consulter et éditer les données suivantes :
Nom: Pour chaque langue disponible dans ADONIS, vous pouvez éditer le nom de la catégorie.
[Attribuer des rôles système: Sélectionnez les rôles système autorisés à effectuer des contrôles de cette catégorie.
Module d'extension: Répertorie le module d’extension qui contient la logique d’exécution des contrôles de cette catégorie.
Les utilisateurs qui exécutent des transitions du circuit de validation doivent accéder aux contrôles de catégorie « Circuit de validation ». Attribuez des rôles système à ces utilisateurs autorisés à effectuer ces contrôles. Ces contrôles sont nécessaires pour que le circuits de validation fonctionne.
Pour plus d’informations sur les catégories disponibles, consultez Catégories de contrôle disponibles dans la librairie BPMS d’ADONIS.
Une fois ces paramètres terminés, cliquez sur Enregistrer. Les paramètres de validation sont sauvegardés dans la base de données et immédiatement disponibles dans ADONIS.
Catégories de vérification disponibles dans la librairie BPMS d'ADONIS
Les catégories de vérifications suivantes sont disponibles si vous utilisez la librairie BPMS d'ADONIS :
Conventions méthodologiques: Les contrôles « Conventions méthodologiques » garantissent la lisibilité, la clarté et la compréhensibilité des modèles.
Syntaxe BPMN: Les contrôles « Syntaxe BPMN » évaluent le modèle en fonction de sa conformité syntaxique avec la norme BPMN et les règles syntaxiques définies dans celle-ci.
Mise en forme BPMN: Les contrôles « Mise en forme BPMN » sont utilisés pour garantir une apparence uniforme.
Conventions graphiques: Des contrôles « Conventions graphiques » garantissent le respect des directives méthodologiques et l’intégrité du portefeuille de modèles.
Architecture Métier: Les contrôles « Architecture Métier » évaluent si le processus est ancré dans l’architecture métier.
Confirmation de la validation: Il s’agit d’une liste de contrôle des points qui doivent être remplis au plus tard lors de la publication du processus.
Logique du flux de processus: Ces contrôles garantissent que le processus respecte le niveau de détail requis.
Règles de relation: Ces contrôles garantissent que les relations respectent les règles de modélisation.
Circuit de validation: Il s'agit de type de contrôle dans le cadre du circuit de validation du modèle, qui garantissent un niveau minimal d’information pour les parties prenantes impliquées dans le circuit de validation et lecteurs du processus.
Pour une liste détaillée de tous les contrôles dans les différentes catégories de contrôles, consultez la section Aperçu des contrôles de validation.