Utilisateurs
La page Utilisateurs vous permet de créer, modifier et supprimer des utilisateurs, ainsi que d’attribuer des groupes d’utilisateurs et des rôles système. De plus, vous pouvez suivre les actions administratives, à condition que le journal d’audit soit activé. Grâce à son interface intuitive et ses fonctionnalités avancées, la page Utilisateurs vous permet de gérer les comptes utilisateurs de votre équipe de manière efficace et efficiente, en veillant à ce qu’ils aient les droits d'accès nécessaires pour travailler de manière productive dans ADONIS.
Super administrateur
Lors de l’installation d'ADONIS, un compte utilisateur est créé automatiquement : L’utilisateur Administrateur (avec le mot de passe de départ) est un super-utilisateur chargé d’administrer ADONIS. Il a un accès complet à tous les composants de l’outil et au contenu de la base de données. Ses droits ne peuvent être restreints.
Afficher les utilisateurs
Lorsque vous ouvrez la page Utilisateurs, une liste de tous les groupes d’utilisateurs principaux est la première chose que vous verrez. Vous pouvez élargir la hiérarchie pour révéler les groupes subordonnés, ainsi que les utilisateurs au sein de ces groupes.
Recherche et filtrage
Pour vous aider à trouver rapidement un groupe d’utilisateurs ou un utilisateur, les options suivantes sont disponibles :
Rechercher un modèle ou un objet: Dans le champ Rechercher, tapez le texte que vous souhaitez rechercher. Tous les groupes d’utilisateurs et les utilisateurs dont le nom contient le texte recherché sont affichés.
Afficher ou masquer les groupes d’utilisateurs: Cliquez sur Afficher les groupes
 pour afficher ou masquer les
groupes d’utilisateurs. Choisissez entre une liste simple de tous les utilisateurs ou la vue
hiérarchique classique avec des groupes et sous-groupes contenant des utilisateurs.
pour afficher ou masquer les
groupes d’utilisateurs. Choisissez entre une liste simple de tous les utilisateurs ou la vue
hiérarchique classique avec des groupes et sous-groupes contenant des utilisateurs.
Examiner la liste des utilisateurs
Les colonnes suivantes sont affichées par défaut :
Nom: Le nom du groupe d’utilisateurs ou de l’utilisateur. On distingue deux types d’utilisateurs. Les utilisateurs standards ADONIS
 sont créés manuellement dans l'Administration ADONIS, tandis que les utilisateurs
 système sont importés depuis
un système de gestion externe des utilisateurs.
système sont importés depuis
un système de gestion externe des utilisateurs.E-mail: Affiche l’adresse e-mail associée à l’utilisateur.
Utilisateur système: Indique si l’utilisateur est un utilisateur
système.Connecté: Indique si l’utilisateur est actuellement connecté à ADONIS.
Certaines colonnes sont masquées par défaut :
Dernière connexion: Indique la date et l’heure de la dernière connexion de l’utilisateur.
Informations spécifiques à l'utilisateur: Affiche des informations supplémentaires sur l’utilisateur pouvant être attribuées lors de la création ou de la modification de l’utilisateur.
Afficher ou masquer les colonnes
Pour modifier les colonnes affichées :
- En haut à droite de la liste des utilisateurs, cliquez sur
 Plus, pointez vers Afficher
/ masquer les colonnes, puis choisissez les colonnes que vous souhaitez.
Plus, pointez vers Afficher
/ masquer les colonnes, puis choisissez les colonnes que vous souhaitez.
Copier l'identifiant dans le presse-papiers
Pour copier l’identifiant d’un groupe d’utilisateurs ou d’un utilisateur dans le presse-papiers :
- Survolez l’élément, cliquez sur
Plus, puis sélectionnez
Copier l'identifiant dans le presse-papiers.
Gérer les groupes d’utilisateurs
Les utilisateurs ADONIS sont organisés en groupes d’utilisateurs pour une meilleure vue d’ensemble et gestion des droits d’accès. Veuillez noter que les groupes d’utilisateurs ADONIS ne contiennent pas directement les utilisateurs, mais les référencent : un même utilisateur peut être référencé simultanément par n’importe quel nombre de groupes d’utilisateurs (et donc en faire partie).
Créer un groupe d'utilisateurs
Pour créer un groupe d’utilisateurs :
Allez sur la page Utilisateurs.
Choisissez ensuite l’une des actions suivantes :
Pour créer un groupe d’utilisateurs de niveau supérieur, sélectionnez la flèche
 à côté de Nouvel
utilisateur, puis sélectionnez Nouveau groupe d’utilisateurs de niveau supérieur.
à côté de Nouvel
utilisateur, puis sélectionnez Nouveau groupe d’utilisateurs de niveau supérieur.Pour un groupe imbriqué, survolez le groupe parent où vous souhaitez créer un sous-groupe, cliquez sur
Plus, puis
sélectionnez Créer un groupe d’utilisateurs.
Dans le champ Entrer le nom, saisissez un nom pour votre groupe d’utilisateurs, puis cliquez sur OK.
Ajuster les groupes d’utilisateurs
Les groupes d’utilisateurs peuvent être supprimés, copiés, collés, et plus encore :
Allez sur la page Utilisateurs.
Cherchez le groupe d’utilisateurs que vous souhaitez ajuster.
Survolez le groupe d’utilisateurs, cliquez sur
Plus, puis sélectionnez
l’option que vous souhaitez :Attribuer des rôles système
Renommer
Supprimer
Couper, copier et coller
Passer au niveau supérieur (groupes imbriqués uniquement)
Partager ou retirer les utilisateurs sélectionnés avec le référentiel
<active repository>
Gérer les utilisateurs
Les sections suivantes offrent un aperçu des fonctionnalités les plus importantes pour la gestion des utilisateurs.
Créer un utilisateur
Voici ce que vous devez faire pour créer un utilisateur :
Accédez à la page Utilisateurs et cliquez sur Nouvel utilisateur.
Commencez par renseigner les informations du compte dans l’onglet Paramètres généraux :
Entrez le nom du nouvel utilisateur.
Saisissez et confirmez le mot de passe.
En option, fournissez des informations supplémentaires telles que le prénom, le nom de famille et l’adresse e-mail.
Choisissez des paramètres supplémentaires en fonction du type d’utilisateur que vous souhaitez créer :
Cochez la case L'utilisateur doit changer son mot de passe pour forcer l’utilisateur à changer son mot de passe lors de la prochaine connexion.
Cochez la case Compte désactivé pour empêcher l’utilisateur de se connecter à ADONIS.
L'option Connexion de confiance ne peut être activée qu’après la création de l’utilisateur (voir ci-dessous).
Ensuite, allez dans l’onglet Groupes et rôles pour assigner les groupes d’utilisateurs et les rôles système :
Dans la section Groupes d’utilisateurs, cliquez sur Sélectionner des groupes d’utilisateurs et choisissez au moins un groupe d’utilisateurs auquel assigner l’utilisateur.
Si vous voulez que cette personne ait accès aux fonctionnalités d'ADONIS (par exemple, scénarios applicatifs, graphiques, circuits de validation, etc.), sous Rôles système, cliquez sur Sélectionner les rôles système et attribuez les rôles système pertinents à l’utilisateur.
Ensuite, allez dans l’onglet Référentiel pour assigner des référentiels :
- Cliquez sur Sélectionner un référentiel et choisissez au moins un référentiel à assigner comme celui dans lequel l’utilisateur pourra créer et sauvegarder du contenu.
Les paramètres de l’onglet Utilisateur nommé ne peuvent être modifiés qu’après la création de l’utilisateur (voir ci-dessous).
Cliquez sur Créer pour terminer le processus de création utilisateur.
Un utilisateur peut avoir des droits d’accès à un nombre quelconque de référentiels. Les utilisateurs ayant des droits d’accès à plus d’un référentiel se voient présenter une fenêtre de sélection lors de la connexion.
Paramètres après la création de l’utilisateur
Une fois la création de l’utilisateur terminée, vous pouvez configurer les paramètres suivants :
Activez la Connexion de confiance pour les utilisateurs qui en ont besoin. La connexion de confiance signifie qu’un utilisateur peut effectuer des actions sans avoir à saisir un nom d’utilisateur ni un mot de passe. Cette configuration n’est pertinente que dans des scénarios spécifiques.
Si une licence de scénario est utilisée, vous pouvez désigner l’utilisateur comme utilisateur nommé pour un ou plusieurs scénarios.
Procédez comme suit :
Passez la souris au-dessus de l’utilisateur, cliquez sur
Plus, puis sur Éditer.Allez dans l’onglet Paramètres généraux et activez la connexion de confiance si l’utilisateur en a besoin.
Allez dans l’onglet Utilisateur nommé, cliquez sur Sélectionner les scénarios, puis assignez les scénarios pertinents pour garantir l’accès à l’utilisateur.
Éditer l'utilisateur
De temps en temps, il peut être nécessaire de modifier les données des utilisateurs (mots de passe oubliés, un nouveau référentiel est disponible, l’utilisateur passe à un autre département de l’entreprise et, dans le cadre de tout cela, son alter ego virtuel rejoint un nouveau groupe d’utilisateurs...).
Pour éditer un utilisateur :
Allez sur la page Utilisateurs.
Cherchez l’utilisateur que vous souhaitez éditer.
Passez la souris au-dessus de l’utilisateur, cliquez sur
Plus, puis sélectionnez
Modifier.Modifiez les données des utilisateurs selon les besoins.
Cliquez sur Modifier.
Vous pouvez trouver plus d’informations sur les différentes données utilisateur dans la section Créer un utilisateur.
Cloner utilisateur
En utilisant la fonctionnalité Cloner l’utilisateur, une copie exacte d’un utilisateur déjà existant peut être créée. Le nouvel utilisateur adopte toutes les affectations et droits d'accès de l’utilisateur original, à l’exception du nom d’utilisateur et des paramètres personnels stockés dans le profil de l'utilisateur (par exemple, les paramètres de langue ou de dialogue).
Pour cloner un utilisateur :
Allez sur la page Utilisateurs.
Choisissez l’utilisateur que vous souhaitez cloner.
Survolez l’utilisateur, cliquez sur
Plus, puis cliquez sur
Cloner.Dans le champ Entrer le nom, saisissez le nom du nouvel utilisateur, puis cliquez sur OK.
Veuillez noter que l’utilisateur cloné commence également avec le même mot de passe que l’utilisateur original !
Ajuster les utilisateurs
Les utilisateurs peuvent être supprimés, copiés, collés, et plus encore :
Allez sur la page Utilisateurs.
Choisissez les utilisateurs que vous souhaitez ajuster.
Choisissez ensuite l’une des actions suivantes :
Pour ajuster un seul utilisateur, survolez l’utilisateur, cliquez sur
Plus, puis sélectionnez
l’option que vous souhaitez.Pour ajuster plusieurs utilisateurs simultanément, sélectionnez les cases à cocher à gauche des utilisateurs, cliquez sur Actions groupées, puis sélectionnez l’option que vous souhaitez.
Les options suivantes sont disponibles :
Supprimer
Couper, copier (puis coller dans un groupe d’utilisateurs)
Partager ou retirer les utilisateurs sélectionnés avec le référentiel
<active repository>
L’administrateur super utilisateur ne peut pas être supprimé.
Supprimer le profil de l'utilisateur
Chaque utilisateur a un profil d'utilisateur. Lors de l'utilisation d'ADONIS, diverses informations sont stockées dans le profil de l'utilisateur : modèles ouverts et leurs paramètres actuels, paramètres de dialogue, chemins pour sauvegarder les fichiers, etc. Après que des problèmes de base de données soient survenus ou lorsque de grandes quantités de modèles sont réorganisées, ainsi qu’avant des scénarios de migration (par exemple, mises à jour de produits ou modifications de base de données), il peut être avantageux de supprimer les profils des utilisateurs afin de réduire la taille de la base de données, d’améliorer les performances et d’éviter des problèmes généraux.
Pour supprimer un profil de l'utilisateur :
Allez sur la page Utilisateurs.
Choisissez l’utilisateur dont vous souhaitez supprimer le profil.
Survolez l’utilisateur, cliquez sur
Plus, puis sur Supprimer le
profil de l'utilisateur.
Après une invite de sécurité, le profil de l’utilisateur est supprimé et réinitialisé à ses paramètres par défaut.
Affecter ou révoquer le référentiel actuel
En tant qu' Administrateur d'ADONIS, vous pouvez affecter ou révoquer le référentiel actuel pour des utilisateurs individuels ou même des groupes entiers. Cela garantit que les utilisateurs ont accès au bon référentiel tout en accomplissant leurs tâches. Lorsque vous affectez ou révoquez le référentiel actuel au niveau du groupe, tous les utilisateurs du groupe seront affectés. Pour savoir comment procéder :
Il est important de noter que le référentiel actuel fait référence à celui qui est actif et dans lequel vous travaillez actuellement. Si vous avez plusieurs référentiels, c’est celui que vous avez sélectionné lors de la connexion. De plus, lors de la création ou de l’édition d’un utilisateur, vous pouvez affecter tous les référentiels auxquels il pourrait avoir besoin, en plus du référentiel actuel.
Partager ou annuler le partage de l’utilisateur depuis le référentiel actif
Il est nécessaire de partager les utilisateurs avec un référentiel pour les rendre disponibles comme objets de modélisation dans ADONIS par exemple, afin qu’un modéliseur puisse les assigner comme responsables d’une application (dans le Notebok de l’application).
En tant qu'Administrateur d'ADONIS, vous pouvez partager ou annuler le partage des utilisateurs ou même des groupes entiers avec le référentiel actuellement actif. Lorsque vous partagez ou annulez le partage des utilisateurs au niveau du groupe, tous les utilisateurs du groupe seront affectés. Pour savoir comment procéder :
Export des comptes utilisateurs
Pour la sauvegarde de données externes et le transfert des données utilisateurs vers des administrateurs ADONIS non connectés au réseau, il est possible d’enregistrer les comptes utilisateurs dans un fichier AXR externe.
Pour exporter les utilisateurs :
Allez à la page Utilisateurs > Plus d’options, puis cliquez sur Exporter des utilisateurs.
Sélectionnez les utilisateurs et/ou groupes d’utilisateurs que vous souhaitez exporter. Pour afficher tous les utilisateurs, sélectionnez Masquer les groupes d’utilisateurs. Cliquez sur Suivant.
RemarquePour exporter des groupes ET tous les utilisateurs de ces groupes, vous n’avez pas besoin de sélectionner manuellement chaque utilisateur. Il suffit de sélectionner les groupes que vous souhaitez et de passer à la page suivante. Ensuite, dans la liste Filtre, sélectionnez Exporter groupes d’utilisateurs et utilisateurs. De plus, sélectionnez Récursivité (sous-groupes) pour inclure les sous-groupes et les utilisateurs qui en font partie.
Dans la liste Filtre, sélectionnez si vous souhaitez exporter uniquement les utilisateurs, uniquement les groupes d’utilisateurs, ou les deux.
Optionnel : Si vous exportez des groupes d’utilisateurs, sélectionnez Récursivité (sous-groupes) pour élargir le champ pour l'export :
Si Exporter des groupes d’utilisateurs seulement est choisi dans la liste Filtre, tous les sous-groupes seront inclus dans le fichier exporté.
Si Exporter groupes d’utilisateurs et utilisateurs est choisi dans la liste Filtre, tous les utilisateurs des groupes sélectionnés, ainsi que les sous-groupes et les utilisateurs des sous-groupes, seront également inclus dans le fichier importé.
Définissez quelles données supplémentaires inclure dans le fichier exporté. Spécifiez les options suivantes :
Sélectionnez Inclure les rôles pour exporter tous les rôles système pour les utilisateurs et les groupes d’utilisateurs.
Sélectionnez Inclure les droits sur le métamodèle pour exporter tous les droits sur le métamodèle ainsi que les rôles système.
Sélectionnez Inclure les droits d'accès pour exporter tous les droits utilisateurs ainsi que les utilisateurs.
Sélectionnez Inclure les messages pour exporter les utilisateurs ainsi que leurs messages.
Sélectionnez Inclure les favoris pour exporter tous les favoris ainsi que les utilisateurs.
Sélectionnez Inclure les paramètres de sécurité pour exporter les paramètres de sécurité avec les utilisateurs.
Optionnel : Sélectionnez Protéger le fichier exporté par un mot de passe pour chiffrer le fichier.
Cliquez sur Exporter. Les données sont exportées.
Lorsque l’export est terminé, un message de réussite apparaît. Fermez le message pour terminer le processus.
L'utilisateur spécial qui est l’administrateur ne peut pas être exporté.
Import des comptes utilisateurs
Les utilisateurs précédemment exportés peuvent être importés et enregistrés dans la base de données d'ADONIS.
Pour importer des utilisateurs :
Allez à la page Utilisateurs > Plus d’options, puis cliquez sur Importer des utilisateurs.
Cliquez sur Parcourir et sélectionnez le fichier que vous souhaitez importer. Vous pouvez également faire glisser un fichier de votre ordinateur vers la zone Faites glisser et déposez des fichiers ici pour les télécharger.
Optionnel : Si le fichier importé est chiffré, saisissez le mot de passe et cliquez sur Suivant.
Sélectionnez les éléments que vous souhaitez importer, puis sélectionnez le groupe cible pour l’import. Pour voir les utilisateurs inclus dans les groupes ciblés, sélectionnez Afficher les utilisateurs contenus dans les groupes. Cliquez sur Suivant.
Optionnel : Si vous importez des groupes d’utilisateurs, sélectionnez Récursivité (incluant tous les utilisateurs subordonnés et les groupes d’utilisateurs) pour élargir le champ pour l'export. Tous les utilisateurs des groupes sélectionnés, ainsi que les sous-groupes et les utilisateurs des sous-groupes, seront également inclus dans le fichier importé.
Définissez quelles données supplémentaires inclure dans le fichier importé. Spécifiez les options suivantes :
Sélectionnez Inclure les rôles pour importer tous les rôles système pour les utilisateurs et les groupes d’utilisateurs.
Sélectionnez Inclure les droits sur le métamodèle pour importer tous les droits sur le métamodèle ainsi que les rôles système.
Sélectionnez Inclure les messages pour importer tous les utilisateurs avec leurs messages.
Sélectionnez Inclure les favoris pour importer tous les favoris ainsi que les utilisateurs.
Sélectionnez Inclure les paramètres de sécurité pour importer les paramètres de sécurité avec les utilisateurs.
Sélectionnez Assigner automatiquement le référentiel actuel pour vous assurer que les utilisateurs importés auront accès au référentiel actif dans lequel vous travaillez actuellement (voir Affecter ou révoquer le référentiel actuel).
D’après la stratégie Conflit, si un utilisateur dans le fichier existe déjà dans la liste de gestion utilisateur, sélectionnez le comportement si un utilisateur existe déjà :
Ajouter (Des nouvelles données sont ajoutées. Les données existantes seront écrasées.) : Insère l’utilisateur, combinant les informations des deux sources (sélection par défaut).
Écraser (les données utilisateur du fichier importé écraseront celles de l’utilisateur existant) : Écrase l’utilisateur dans la base de données.
Ignorer (Les utilisateurs du fichier importé ne seront pas importés) : Ignore les données du fichier importé, préservant l’utilisateur original.
Cliquez sur Importer. Les données sont importées.
Lorsque l’import est terminé, un message de réussite apparaît. Fermez le message pour terminer le processus.
Export des paramètres de sécurité
Cette procédure permet d’exporter les paramètres de sécurité (paramètres de force du mot de passe et paramètres de connexion) vers un fichier AXR externe pour les sauvegardes et le partage.
Pour exporter les paramètres de sécurité :
Allez à la pageUtilisateurs > Plus d’options, puis cliquez sur Exporter des paramètres de sécurité.
Optionnel : Sélectionnez Protéger le fichier exporté par un mot de passe pour chiffrer le fichier.
Cliquez sur Exporter. Les données sont exportées.
Lorsque l’export est terminé, un message de réussite apparaît. Fermez le message pour terminer le processus.
Import des paramètres de sécurité
Cette procédure permet d’importer des paramètres de sécurité (paramètres de force du mot de passe et paramètres de connexion) dans la base de données ADONIS.
Pour importer les paramètres de sécurité :
Allez à la page Utilisateurs > Plus d’options, puis cliquez sur Importer les paramètres de sécurité.
Cliquez sur Parcourir et sélectionnez le fichier que vous souhaitez importer. Vous pouvez également faire glisser un fichier de votre ordinateur vers la zone Faites glisser et déposez des fichiers ici pour les télécharger.
Optionnel : Si le fichier importé est chiffré, saisissez le mot de passe.
Cliquez sur Importer. Les données sont importées.
Lorsque l’import est terminé, un message de réussite apparaît. Fermez le message pour terminer le processus.
Importer des utilisateurs à partir d’Excel
La page Utilisateurs permet aux administrateurs d'ADONIS d'importer des utilisateurs depuis Excel.
Vous pouvez télécharger un fichier Excel modèle contenant des colonnes pour les informations nécessaires à la création d’un nouvel utilisateur. Vous pouvez créer des utilisateurs avec ce modèle, puis importer des utilisateurs de manière groupée.
Ouvrir l’assistant d’import
Pour ouvrir l’assistant d’import :
- Cliquez sur Utilisateurs > Plus d’options, puis sur Importer des utilisateurs à partir d'Excel.
Obtenir le modèle
Pour télécharger le fichier Excel :
- Dans la liste Modèle, sélectionnez le modèle que vous souhaitez, puis cliquez sur le bouton
 Obtenir le modèle.
Vous pouvez télécharger un modèle XLSX ou CSV.
Créer des utilisateurs
Les colonnes suivantes doivent être renseignées pour créer un utilisateur :
Nom de connexion : Le nom d’utilisateur pour la connexion.
Prénom : Le prénom du nouvel utilisateur.
Nom de famille : Le nom de famille de l’utilisateur.
Email : L’adresse e-mail du nouvel utilisateur.
Informations spécifiques à l’utilisateur : Ajoutez des informations supplémentaires qui peuvent être consultées dans le Notebook de l’objet utilisateur.
Import des comptes utilisateurs
Pour effectuer l’import d'un utilisateur :
Pour mettre à jour les utilisateurs existants avec les données du modèle, cochez la case Mettre à jour les utilisateurs.
Pour activer la connexion de confiance si les utilisateurs en ont besoin, cochez la case Connexion de confiance.
Dans la liste des groupes d’utilisateurs, sélectionnez les groupes auxquels les utilisateurs doivent appartenir.
Dans la zone Référentiels et groupes d’objets, sélectionnez au moins un référentiel pour l’assigner aux utilisateurs comme espace de travail. De plus, définissez un groupe d’objets par référentiel où les objets utilisateurs doivent être ajoutés pour les rendre disponibles en tant qu’objets de modélisation (voir Partager ou ne plus partager des utilisateurs avec un référentiel actif).
Cliquez sur Télécharger le fichier et choisissez le fichier Excel que vous avez préparé. Le nombre d’utilisateurs à traiter sera indiqué. Cliquez sur Oui pour continuer.
Les utilisateurs seront importés dans ADONIS.
Afficher le rapport importé
Une fois l’import des utilisateurs dans ADONIS est terminé, un rapport s’affiche. Il contient les colonnes d’information suivantes :
Nom d’utilisateur, Prénom, Nom de famille, Email et Informations spécifiques à l’utilisateur : pour vous permettre de vérifier que les données du modèle ont été utilisées correctement.
CRUD : Indique si une opération de création, lecture, mise à jour ou suppression a été effectuée.
Résultat : Montre si l’opération a été un succès.
Détails : Fournit plus de détails si l’opération n’a pas réussi.
Gérer les utilisateurs nommés.
Si vous désignez un utilisateur comme un utilisateur nommé, cet utilisateur bénéficie d’un accès garanti à un scénario applicatif spécifique dans ADONIS. Sinon, l’utilisateur sera un utilisateur concurrent. Les utilisateurs concurrents partagent les créneaux disponibles et peuvent se connecter tant que des créneaux libres sont disponibles.
Cette fonctionnalité n’est disponible que si une licence de scénario est utilisée.
Pour gérer les utilisateurs nommés :
- Cliquez sur Utilisateurs > Plus d’options, puis sur Utilisateur nommé.
Effectuez l’une des actions suivantes :
- Afficher les utilisateurs nommés: Développez n’importe quel scénario pour afficher une liste des utilisateurs désignés comme utilisateurs nommés pour celui-ci.
Un utilisateur peut être désigné comme utilisateur nommé pour un scénario, mais en raison de ses
rôles actuels dans le système, il n’a pas accès au scénario. Dans ce cas, le message d’avertissement
![]() « Assignation de rôle manquante
» sera affiché à côté du nom d’utilisateur.
« Assignation de rôle manquante
» sera affiché à côté du nom d’utilisateur.
Pour en savoir plus sur les rôles système nécessaires permettant d'accéder aux scénarios applicatifs, consultez la section sur les Rôles système par défaut.
- Ajouter des utilisateurs nommés: Sélectionnez un scénario, puis cliquez sur Ajouter des utilisateurs nommés. Ajoutez des utilisateurs nommés dans le catalogue d'utilisateurs, puis cliquez sur OK.
Si le nombre d’utilisateurs sélectionnés dépasse le nombre d’utilisateurs nommés gratuits pour un scénario, l’attribution échouera.
- Supprimer les utilisateurs nommés: Cliquez sur le X pour chaque utilisateur que vous souhaitez supprimer. Pour supprimer plusieurs utilisateurs simultanément, sélectionnez les cases à cocher à gauche des utilisateurs, cliquez sur Actions groupées, puis sélectionnez Supprimer les utilisateurs nommés.
Journal d'audit
ADONIS vous permet de suivre les actions administratives, telles que
création et suppression des utilisateurs,
modifications des droits d’accès et
import et export des données du référentiel.
Pour une liste complète des actions enregistrées, veuillez consulter le chapitre Journal d’audit - Actions enregistrées.
Lorsque le journal d’audit est activé, les résultats sont stockés dans la base de données. Le contenu du journal d’audit peut être exporté dans un fichier CSV.
Activer le journal d’audit
Pour permettre la traçabilité des actions administratives :
Allez dans la Page d'accueil > cliquez sur Plus d’options, puis sur Préférences du système.
Passez à l’onglet Journal d’audit.
Cochez la case Journalisation activée.
Pour enregistrer le nom de l’administrateur qui a effectué le changement, cochez la case Auteur du journal. Si vous cochez cette case, ces actions seront enregistrées de manière anonyme et ne pourront pas être reliées à l’administrateur.
Confirmez en cliquant sur OK.
Les actions administratives seront désormais enregistrées.
Exporter le journal d'audit
Pour exporter le journal d’audit :
Cliquez sur Utilisateurs > Plus d’options, puis sur Exporter journal d’audit.
Pour exporter des entrées pour une période spécifique, dans la Plage temporelle, sélectionnez un Jour de début et une Heure de début, ainsi qu’un Jour de fin et une Heure de fin. Si vous ne précisez pas de plage temporelle, toutes les entrées seront exportées.
Pour afficher les horodatages dans le journal d’audit à l’heure locale, cochez la case Exporter avec l’heure locale. Sinon, les horodatages sont affichés en UTC.
Dans la liste Langue, choisissez la langue dans laquelle le le contenu (type d’action, modèles et objets ainsi que groupes de modèles et groupes d’objets, etc.) sera affiché dans le fichier exporté.
Dans la liste Séparateur, choisissez le caractère à utiliser pour séparer chaque champ dans le fichier exporté.
Cliquez sur Exporter.
Examiner le journal d’audit
Une fois l’export terminé, vous pouvez examiner les résultats. Le journal d’audit contient les colonnes d’information suivantes :
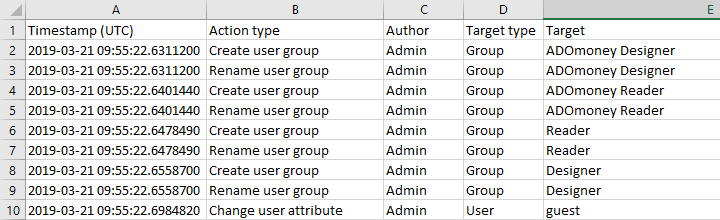
Horodatage: L’horodatage de la date et de l’heure de l’événement, en heure locale ou UTC.
Type d'action: Le type d’action exécutée par l’administrateur.
RemarquePour une liste complète des actions enregistrées, veuillez consulter le chapitre Journal d’audit - Actions enregistrées.
Auteur du document (Personne responsable): Identifie l’administrateur qui a effectué l’action.
Type de cible: Identifie le type de cible d’action.
Cible: Identifie la cible de l’action.
ID cible: L’identifiant unique de la cible de l’action.
Aspect: Identifie plus précisément ce qui est affecté à la cible.
ID Aspect: L’identifiant unique de l’aspect de la cible où l’action a lieu.
Contexte global: L’identifiant unique du contexte global où l’action a lieu, par exemple le référentiel ou la librairie.
Contexte local: L’identifiant unique du contexte local où l’action a lieu, par exemple le groupe d’utilisateurs où un droit d'accès est modifié.
ID de la langue: Identifie la langue dans laquelle le changement a eu lieu.
Ancienne valeur: Identifie la valeur de l’élément avant la modification.
Nouvelle valeur: Identifie la valeur de l’élément après la modification.
Supprimer les entrées du journal d'audit
Les entrées antérieures à une date et une heure spécifiques peuvent être définitivement supprimées du journal d’audit. Cette action ne peut pas être annulée.
Pour supprimer les entrées du journal d’audit :
Cliquez sur Utilisateurs > Plus d’options, puis cliquez sur Supprimer les entrées du journal d’audit
Pour supprimer les entrées antérieures à une date et une heure spécifiques, dans Supprimer les entrées jusqu’à, sélectionnez un Jour et une Heure. Si vous ne précisez pas de date et d’heure, toutes les actions administratives enregistrées seront marquées comme devant être supprimées.
Cliquez sur OK. Une fenêtre de dialogue apparaîtra pour demander si vous souhaitez supprimer les entrées sélectionnées. Cliquez sur Oui pour supprimer les entrées.
Anonymiser les données d'audit
Il est possible d’anonymiser les entrées du journal d’audit pour certains utilisateurs afin de prévenir toute identification. Lors de l’anonymisation, le nom d’utilisateur sera remplacé par « #### » dans toutes les colonnes du journal d’audit. Cette action ne peut pas être annulée.
Pour anonymiser un nom d’utilisateur dans le journal d’audit :
Cliquez sur Utilisateurs > Plus d’options, puis sur Anonymiser les données d’audit
Dans la case Nom d’utilisateur, saisissez le nom de l’utilisateur.
Pour anonymiser les entrées antérieures à une date et une heure spécifiques, dans Anonymiser uniquement les entrées avant, choisissez un Jour et une Heure. Sinon, toutes les participations seront anonymisées.
Cliquez sur OK. Une fenêtre de dialogue apparaîtra pour vous demander si toutes les entrées de l’utilisateur sélectionné doivent être anonymisées. Cliquez sur Oui pour anonymiser les entrées.