Rôles système
La page Rôles Système est conçue pour permettre aux administrateurs de gérer efficacement les rôles système dans ADONIS. Vous pouvez créer, éditer et supprimer des rôles système, et assigner des utilisateurs individuels et des groupes entiers d’utilisateurs aux rôles système. De plus, vous pouvez importer et exporter des rôles système.
À quoi servent les rôles système ?
Les rôles système remplissent deux fonctions dans ADONIS. Vous pouvez les utiliser pour :
Accorder l’accès à des fonctionnalités dans ADONIS. Par exemple, vous pouvez spécifier si les utilisateurs peuvent créer des diagrammes comme les matrices ou quels scénarios applicatifs leur sont disponibles dans ADONIS.
Assigner des droits d'accès pour les éléments de métamodèle disponibles (= droits de métamodèle). Par exemple, vous pouvez spécifier si les utilisateurs peuvent créer des modèles d’un certain type ou ne les ouvrir qu’en lecture seule.
À propos de la page Rôles Système
La page Rôles du système se compose de deux volets, le catalogue et l’espace de travail :
Catalogue: Le catalogue se trouve dans le panneau gauche de la page Rôles du système. Sélectionnez un rôle système ici pour afficher ses détails et les utilisateurs assignés dans l’espace de travail.
Espaces de travail: L’espace de travail se trouve dans le volet droit de la page Rôles Système. Vous pouvez modifier ici les détails des rôles du système, comme le nom et la description. De plus, vous pouvez ajouter ou supprimer des utilisateurs des rôles système.
Rôles par défaut
Les rôles système par défaut sont toujours disponibles lorsque vous utilisez la librairie BPMS d'ADONIS.
Vous trouverez ci-dessous les rôles par défaut :
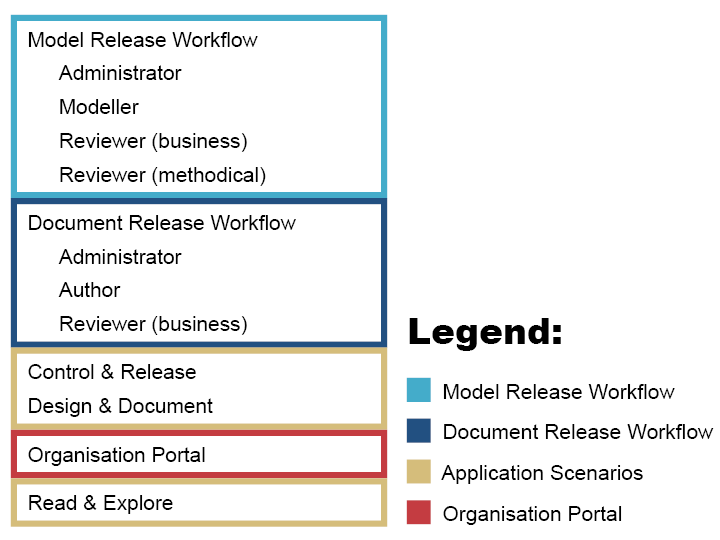
Circuit de validation des modèles
Modélisateur: Les Modélisateurs créent et soumettent des modèles pour révision. Ils peuvent également créer de nouvelles versions de modèles déjà publiés afin de les adapter.
Réviseur (métier, formel): Les Réviseurs effectuent des révisions formelles et métier des modèles soumis.
Administrateur: Les Administrateurs peuvent exécuter toutes les transitions. Ils sont responsables du maintien du processus de validation. Seuls les Administrateurs peuvent archiver les modèles.
Circuit de validation des documents
Auteur du document (Personne responsable): Les Auteurs créent et soumettent des documents à réviser. Ils peuvent également créer de nouvelles versions de documents déjà publiés afin de les adapter.
Réviseur (métier): Les Réviseurs effectuent des révisions métier des documents soumis et les publient.
Administrateur: Les Administrateurs peuvent exécuter toutes les transitions. Ils sont responsables du maintien du processus de validation. Seuls les Administrateurs peuvent archiver des documents.
Scénarios d’application
Cartographier & Documenter: Les membres du rôle système « Cartographier & Documenter » auront accès au scénario « Cartographier & Documenter ». Via ce scénario, ils seront en mesure de modéliser et de créer de la transparence de manière structurée.
Relire & Valider: Les membres du rôle système « Relire & Valider » auront accès au scénario « Relire & Valider ». L’objectif de ce scénario est de permettre aux utilisateurs de gérer le cycle de validation des modèles et leurs versions.
Consulter & Explorer: Les membres du rôle système « Consulter & Explorer » auront accès au scénario « Consulter & Explorer ». L’objectif de ce scénario est de permettre aux utilisateurs de visualiser les processus et les instructions de travail.
Le scénario « Consulter & Explorer » est en lecture seule. Les utilisateurs n’ont pas d’accès en écriture au contenu du référentiel (y compris tous les modèles, objets et leurs relations).
Lecteur (Référentiel d'Entreprise)
- Lecteur (Référentiel d'Entreprise): En règle générale, un seul utilisateur technique aura ce rôle système. Ce compte utilisateur est utilisé lorsque les utilisateurs accèdent au Référentiel d'Entreprise via le lien figurant sur la page de connexion d'ADONIS .
Le Référentiel d'Entreprise est en lecture seule. Les utilisateurs n’ont pas d’accès en écriture au contenu du référentiel (y compris tous les modèles, objets et leurs relations).
Le Référentiel d'Entreprise, et par conséquent, le rôle « Référentiel d'Entreprise », ne sont plus disponibles pour les nouveaux clients à partir d’ADONIS 15.0. Les clients existants disposant de licences qui incluent le Référentiel d’Entreprise peuvent continuer à l’utiliser et auront accès au rôle « Référentiel d’Entreprise ».
Créer un rôle système
Pour créer un rôle système
Allez sur la page des rôles système et cliquez sur Créer un rôle système.
Dans le champ Nom unique, tapez un nom unique pour le rôle système, puis cliquez sur Créer. Ce nom indépendant de la langue identifie de manière unique le rôle du système.
Dans la section Détails au centre, remplissez les détails du rôle :
Cochez la case Rôle par défaut si ce rôle système doit être appliqué à tous les utilisateurs lors de la connexion.
Saisissez un nom pour chaque langue disponible dans ADONIS. Ces noms seront visibles sur l’interface utilisateur.
Saisissez une description.
Cliquez sur Ajouter des membres et ajoutez des groupes d’utilisateurs ou des utilisateurs individuels à partir du catalogue d’utilisateurs. Cliquez sur Ajouter.
Cliquez sur Enregistrer.
Le nouveau rôle système est ajouté au catalogue des rôles système.
Éditer le rôle
Pour éditer un rôle système :
Accédez à la page Rôles système.
Dans le catalogue des rôles système à gauche, sélectionnez le rôle système que vous souhaitez modifier. Les détails du rôle système et des utilisateurs assignés seront affichés dans l’espace de travail.
Modifiez les données de rôle selon les besoins.
Cliquez sur Enregistrer.
La modification des données de rôle est limitée aux rôles système créés par l’utilisateur. Les rôles système par défaut prédéfinis fournis avec ADONIS sont en lecture seule et ne peuvent pas être modifiés ; Vous ne pouvez qu'assigner ou supprimer des utilisateurs.
Vous pouvez trouver plus d’informations sur les différentes données de rôle dans la section Créer un rôle système.
Gérer les utilisateurs du rôle système
Pour gérer les utilisateurs des rôles système :
Accédez à la page Rôles système.
Dans le catalogue des rôles système à gauche, sélectionnez le rôle système dont vous souhaitez gérer les utilisateurs. Les détails du rôle système et des utilisateurs assignés seront affichés dans l’espace de travail.
Maintenant, procédez comme suit :
Pour assigner des utilisateurs à un rôle système, cliquez sur Ajouter des utilisateurs et ajoutez des groupes d’utilisateurs ou des utilisateurs individuels à partir du catalogue d’utilisateurs.
Pour supprimer un utilisateur d’un rôle système, cliquez sur
 Supprimer un utilisateur.
Pour supprimer tous les utilisateurs d’un rôle système en même temps, cliquez sur Supprimer tout.
Cliquez sur Enregistrer.
Attribuer des droits d'accès aux rôles système
Divers droits d'accès peuvent être attribués aux rôles système. Lorsque vous assignez des utilisateurs à un rôle système, ils obtiennent tous les droits d'accès de ce rôle système, leur permettant ou leur restreignant l’accès à des fonctionnalités et actions spécifiques dans ADONIS
Rôles par défaut: ADONIS fournit des rôles système par défaut avec des droits d'accès prédéfinis qui ne peuvent pas être modifiés. Ces rôles système donnent aux utilisateurs accès à différents scénarios applicatifs et aux circuits de validations dans ADONIS.
Modules Web: Vous pouvez assigner des modules (plug-ins) à des rôles système pour donner accès à des fonctionnalités spécifiques dans ADONIS. Par exemple, cela vous permet de gérer les droits d'accès pour créer des matrices ou effectuer des imports Excel. Pour assigner ces modules, accédez à la page Configurations.
Gérer les droits sur le métamodèle: Les droits sur le métamodèle vous permettent de contrôler l’accès aux éléments du métamodèle, tels que les types et attributs de modèle, dans ADONIS. Pour attribuer des droits sur le métamodèle à un rôle système, accédez à la page consacrée aux Droits d'accès.
Supprimer un rôle
Pour supprimer un rôle système :
Accédez à la page Rôles système.
Dans le catalogue des rôles système à gauche, cherchez le rôle système que vous souhaitez supprimer.
Survolez le rôle système, cliquez sur
 Plus, puis sur Supprimer.
Les rôles système par défaut prédéfinis créés par ADONIS sont en lecture seule et ne peuvent pas être supprimés.
Importer des rôles
Pour importer les rôles système :
Accédez à Rôles système > Plus d’options, puis cliquez sur Importer des rôles système.
Cliquez sur Parcourir et sélectionnez le fichier avec les rôles système que vous souhaitez importer. Vous pouvez également faire glisser un fichier de votre ordinateur vers la zone Faites glisser et déposez des fichiers ici pour les télécharger. Cliquez sur Suivant.
Optionnel : Si le fichier importé est chiffré, saisissez le mot de passe et cliquez sur OK.
Sélectionnez les rôles système que vous souhaitez importer. Pour sélectionner rapidement tous les rôles système, cliquez sur Sélectionner tout. Cliquez sur Suivant.
Optionnel : Sélectionnez Inclure les droits sur le métamodèle pour importer tous les droits sur le métamodèle ainsi que les rôles système.
D’après la stratégie Conflit, si un rôle système dans le fichier existe déjà dans la liste du référentiel, sélectionnez le comportement si un rôle système existe déjà :
Insérer (les nouvelles données de rôle système du fichier importé sont ajoutées, les données existantes sous une forme différente sont mises à jour) : insère le rôle système, combinant les informations des deux sources (sélection par défaut).
Écraser (le rôle système du fichier importé remplace celui de la base de données) : Écrase le rôle système dans la base de données.
Ignorer (le rôle système dans la base de données reste intact) : Ignore les données dans le fichier importé, préservant le rôle système original.
Cliquez sur Importer. Les rôles système sont importés.
Une fois l’import terminée, un message de confirmation s’affiche. Fermez le message pour terminer le processus.
Exporter des rôles
Pour exporter des rôles
Cliquez sur Rôles système > Plus d’options, puis sur Exporter les rôles.
Sélectionnez les rôles système que vous souhaitez exporter. Pour sélectionner rapidement tous les rôles système, cliquez sur Sélectionner tout. Cliquez sur Suivant.
Optionnel : Sélectionnez Exporter avec les droits sur le métamodèle pour exporter tous les droits sur le métamodèle ainsi que les rôles système.
Optionnel : Sélectionnez Protéger le fichier exporté par un mot de passe pour chiffrer le fichier.
Cliquez sur Exporter. Les rôles système sont exportés.
Lorsque l’export est terminé, un message de réussite apparaît. Fermez le message pour terminer le processus.
Copier les informations de rôle dans le presse-papiers
Pour copier les informations de rôle système dans le presse-papiers :
Accédez à la page Rôles système.
Dans le catalogue des rôles système à gauche, cherchez le rôle système dont vous souhaitez copier.
Passez la souris sur le rôle système, cliquez sur
Plus, puis sur Copier les
informations de rôle dans le presse-papiers.
Une représentation JSON du rôle système, incluant des détails comme le mfbID nécessaire pour créer
un mapping de l'utilisateur pour des mécanismes d’authentification spécifiques, sera copiée dans
votre presse-papiers.