Import/Export Objects
Objects can be imported from other applications into ADONIS and exported from ADONIS into other applications.
Import Objects from Excel
ADONIS provides a configurable Excel interface for quick data acquisition. Via the Excel interface, you can import or update objects and their attributes from an Excel spreadsheet. The structure of the Excel spreadsheet is described in an XML configuration file.
The XML configuration file needs to be imported in the Administration Toolkit before you can perform an Excel import. If you are using the ADONIS BPMS Application Library, one or more sample configurations will already be provided for you in the Administration Toolkit. For each sample configuration, a suitable Excel template file is included. The template is available for download in the Excel import dialog in the web client.
In order to import objects from Excel:
Select the object group in which the new objects shall be created in the Object Catalogue.
Right-click the object group, point to Import/Export, and then click Import objects from Excel. A dialogue window opens.
Select the desired configuration from the drop-down list Select configuration.
Enter the path and name of the import file into the field Excel file (either manually or via the Select file… support dialogue
 ).
).Click Next. Another dialogue window containing an Import preview opens. Review the information to verify that the collected data is processed properly.
Confirm with Import. The data is imported and a confirmation box appears. Click Details to verify if the import was successful. Then close the box.
Additionally, you can:
- Download a suitable Excel file as a template. In order to do so, click the Download template
button
 . You can capture
objects with this template, and then import the objects.
. You can capture
objects with this template, and then import the objects.
Synchronise Objects with ADOIT
ADONIS offers synchronisation of objects between ADONIS and ADOIT via the BOC Management Office Integration (MOI) interface.
In typical scenarios, certain objects (such as Application Components in ADOIT or Processes and Roles in ADONIS) are only maintained in one of the two products. By synchronising these objects, they are made available in the respective other product.
Configuration
ADONIS administrators can configure which object types should be exported and in which target group received objects should be placed.
Synchronisation
Synchronisation can be triggered manually in the Connect Center. It is also possible for ADONIS administrators to configure the synchronisation to run automatically on a scheduled basis in the Administration Toolkit.
This feature is only available in the ADONIS Enterprise Edition. The availability of this feature also depends on the licence.
Connect Center
The Connect Center is a dashboard in ADONIS. It provides a transfer log of all transfers of objects between ADONIS and ADOIT. You can also trigger the synchronisation manually here.
Open Connect Center
To open the Connect Center:
- On the toolbar at the top of the screen, click Setup
 .
.
Synchronise Objects Manually
To synchronise objects between ADONIS and ADOIT in the Connect Center:
In the left pane, under Connectors > MOI, select the configuration you want (e.g. "General").
Click Start Transfer.
BPM Elements will be sent to ADOIT. EA Elements will be imported into ADONIS. When the synchronisation is complete, a success message appears.
How Imported Objects Appear in ADONIS
Within the target group defined in the Administration Toolkit, received objects will be placed in subgroups according to their type.
Received objects are read-only. They can only be edited in ADOIT.
Which Objects Are Synchronised?
ADONIS/ADOIT Administrators can configure in the Administration Toolkit which object types should be exported to the other product. For example:
Application Components may be transferred from ADOIT to ADONIS.
Processes and Roles may be transferred from ADONIS to ADOIT.
Queries can be defined by ADONIS customising to further narrow which objects to export. Otherwise, ALL objects based on the object types defined in the configuration are sent.
The default configuration ("General") contains a query which specifies that only objects in the
state " Released" (icon ![]() ) are
sent.
) are
sent.
View Transfer Log
The transfer log ("Recent Transfers") is the first thing shown when you open the Connect Center. It shows all transfers of objects between ADONIS and ADOIT. Whenever you synchronise objects, a new entry is added to the log.
Examine the Transfer Log
The transfer log contains the following columns of information:
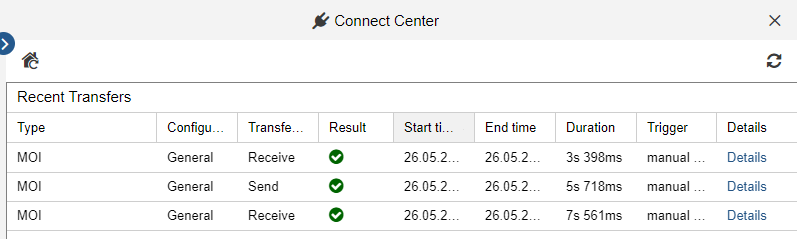
Type: Identifies the type of the transfer.
noteAll entries for synchronising objects with other BOC Management Office products are marked with the abbreviation "MOI" (Management Office Integration).
Configuration ID: The name of the configuration.
Transfer ID: The type of action executed (send or receive).
Result: Identifies whether the transfer was successful or failed.
Start time: Time stamp at the beginning of the transfer (date and time, in local time).
End time: Time stamp at the end of the transfer (date and time, in local time).
Duration: The duration of the transfer in seconds and milliseconds.
Trigger: Identifies whether the transmission was triggered manually or run automatically on a scheduled basis, and the user who performed the action.
Details: Click to open a dialogue with details about the transfer (number of created, changed and deleted objects etc.).