Comments
Comments allow ADONIS users to leave feedback and suggestions that can help improve models and objects. As other users respond and a discussion unfolds, you will be able to see the entire conversation, with the original message at the top and replies below it.
Comments are an essential part of the process management cycle for creating and modifying processes, as well as for providing valuable feedback on released processes and elements in general. They allow for collaboration and discussion, helping to ensure that processes are effective and efficient. Additionally, comments can serve as documentation for future reference, providing valuable information about the reasoning and decisions behind a particular process.
View Comments
To view comments on a model or object:
Open the model, or open the Notebook of the object.
Click the Comments button
 in
the menu bar.
in
the menu bar.
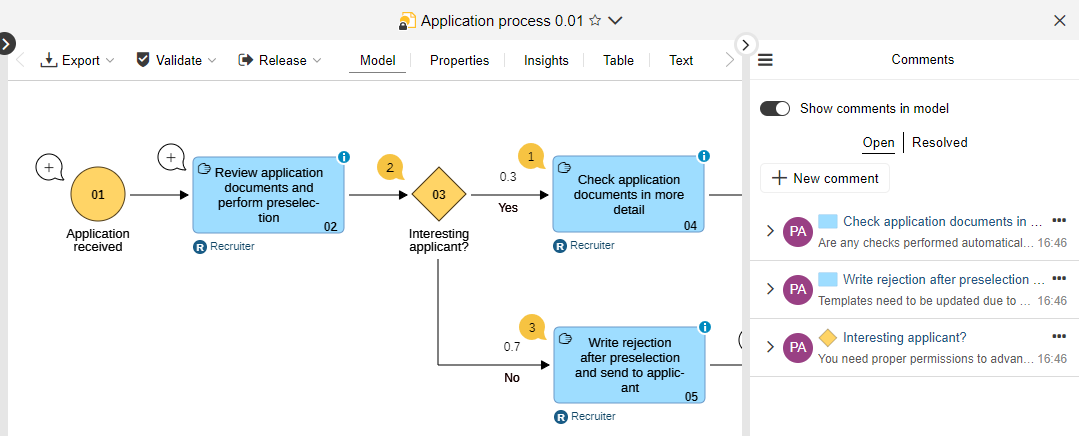
The Comments pane opens. You can use it to both read comments by your colleagues and create your own comments on models and objects.
When a model is open in the graphical editor, a bubble will appear next to each object in the model.
The number in the bubble shows how many comments an object has
![]() . Objects with no comments display
a bubble with a plus icon inside
. Objects with no comments display
a bubble with a plus icon inside ![]() .
You can add a comment by clicking on a bubble.
.
You can add a comment by clicking on a bubble.
Add a Comment
Add a Comment to a repository object or a model as a whole in the Comments pane. Or add a comment to a specific modelling object directly in the graphical editor.
To add a comment:
In the Comments Pane
Click the New Comment button
 .
.If you add a comment to a model, choose what you want to comment on. From the Choose element list that opens, select the model itself, or an object in the model.
In the Add a comment box, type your comment. Use @ to mention someone, and they will receive an email notification. To format text, select the text and you can make it bold, italic, etc. When you are done, click the Send button
 or press <Enter>.
In the Graphical Editor
Click the comment bubble
 next
to the object you want to comment on.
next
to the object you want to comment on.In the Add a comment box, type your comment. Use @ to mention someone, and they will receive an email notification. To format text, select the text and you can make it bold, italic, etc. When you are done, click the Send button
or press <Enter>.
Before ADONIS can send emails, the mail settings must be set correctly in the Administration Toolkit and users must have an email address associated with their account.
Leave a Reply
In the Comments pane, you can find all comments on a model or object. You can expand a conversation to see any replies. Also, you can directly access the comments for a specific modelling object in the graphical editor using the comment bubbles.
To leave a reply:
In the Comments Pane
Click a conversation to expand or collapse it.
Type your comment in the Leave a reply box to respond.
In the Graphical Editor
Click the comment bubble
 next
to an object to view all conversations.
next
to an object to view all conversations.Click a conversation to expand or collapse it.
Type your comment in the Leave a reply box to respond.
Edit or Delete Comments
You can edit or delete your own comments.
Edit Comment
To edit a comment:
Double-click the comment or:
Click the More button
 at the
top right corner of the comment, and then click Edit.
at the
top right corner of the comment, and then click Edit.
Delete Comment
To delete a comment:
- Click the More button at the
top right corner of the comment, and then click Delete.
Delete Conversation
To delete the entire conversation (the comment and any replies to it):
- Click the More button at the
top right corner of the conversation, and then click Delete.
For detailed information on who can edit or delete comments, see Permissions and Notifications.
Open and Resolved Comments
You can resolve a comment when a discussion is finished. The entire conversation will move to the Resolved catalogue in the Comments pane, but will not be deleted.
Switch between Open and Resolved Comments
To switch between open and resolved comments:
- Click the Open or Resolved button at the top of the Comments pane.
When a model is open in the graphical editor, the bubbles in the model are updated as you switch.
Depending on the selected catalogue, the bubbles will show the number of open or resolved
comments ![]() . Speech bubbles with a
plus sign
. Speech bubbles with a
plus sign ![]() are displayed only when
open comments are selected.
are displayed only when
open comments are selected.
Resolve Comment
To resolve a comment:
- Click the More button at the
top right corner of the conversation, and then click Resolve.
Resolved conversations will be deleted when a model is released as part of the model release workflow.
Reopen comment
To reopen a conversation:
- Click the More button at the
top right corner of the conversation, and then click Reopen.
Show or Hide Comments in Model
You can hide the bubbles ![]() in the
graphical editor, and show them again at any time:
in the
graphical editor, and show them again at any time:
- In the Comments pane, click the Show comments in model button.
Show or Hide Comments Pane
You can hide the Comments pane to increase your workspace, and show it again at any time:
To hide the pane, click the icon
 at the top left corner of the
widget.
at the top left corner of the
widget.To show the pane again, click the icon
 .
.
Permissions and Notifications
Who can modify my comments? Will I receive an email when someone responds to my comment? Read on for the details.
Permissions
The following permissions apply to comments:
You can edit or delete your own comments.
Anyone can resolve or reopen a comment.
Additionally, if you are responsible for an object or model, you can delete comments.
Notifications
You will receive email notifications in the following situations:
If someone uses @ to mention you directly.
If you are responsible for an object or model, and someone writes a comment on it.
If you are part of a conversation, and someone posts a new reply.
If you are part of a conversation, and someone resolves or reopens the comment.
Someone is responsible for an object or model if they are assigned as:
Process owner (Business Process Diagram, Process Landscape or Process object)
Owner (any other type of model)
Responsible person (any other type of repository object)
All of these attributes can be found in the Notebook chapter "Organisation".