New Features in ADOIT 15.0
The BOC Group is pleased to announce that ADOIT 15.0 is a long-term support release (LTS). These releases are specially marked major releases which are maintained longer than normal releases as part of corrective maintenance.
Corrective maintenance (technical support for incidents, providing workarounds and bugfixes) for LTS releases is guaranteed until approximately 6 months after the release of the following LTS release.
New Features for All Users
New Filter Options in the Explorer
We have included new filter options to help you quickly find a model or object in the Explorer:
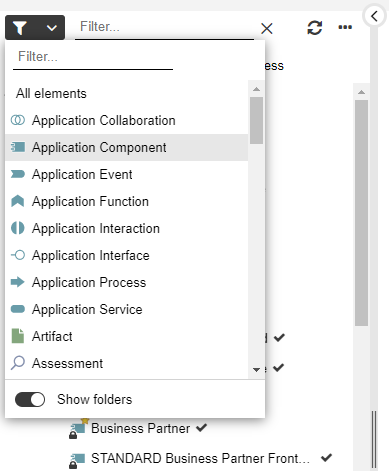
Filter by Type
Select the object or model type you want (multiple selection is possible). Additionally, you can display All elements.
Show/Hide Folders
Show a flat list of artefacts, instead of the regular hierarchy of folders and subfolders.
For details, please refer to the section "Search and Filter in Explorer" in the User Manual.
Chart Improvements
Charts, which underwent a vast redesign in ADOIT 14.0, have been further improved in ADOIT 15.0. Read on and find out what new features have been introduced!
New Chart Type: Bar Chart
Bar charts represent data as bars, with the lengths proportional to the values they represent.
As with the other chart types (Box-in-Box, Bubble, etc.), an Analysis serves as the basis for creating bar charts. You can either select a template or configure the chart manually, as well as apply colouring to objects in the chart.
Aggregate Data
If the bar chart contains multiple levels, you can use the following aggregation methods to group the results across different levels: Sum, Maximum, Minimum, and Average.
For example, the following bar chart shows the average Operating cost of Application Components that realise a
Capability:

New Chart Type: Radar
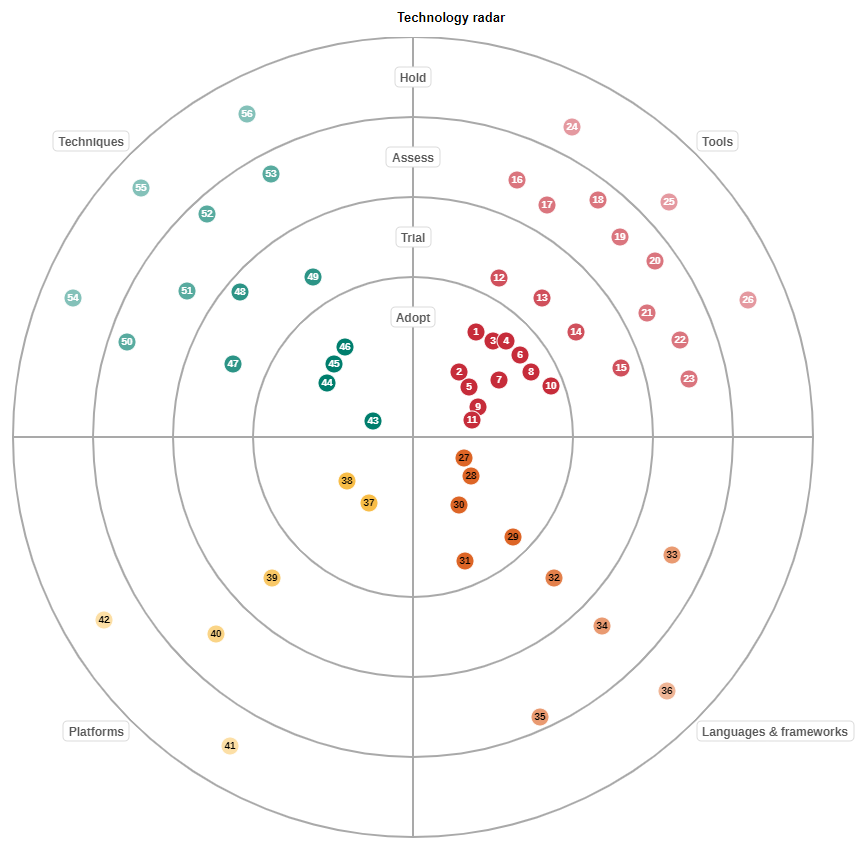
Radar charts visualise objects in a circular chart. Based on two attributes, the objects are categorised into segments and rings.
To add a radar chart to an Analysis , you can either use a template or choose which object type and attributes will appear in the radar chart.
Each object appears as a 'blip' on the radar chart and is given a number that uniquely identifies it. The object names and the corresponding numbers are listed right below the chart.
Technology Radar
A typical use case is the identification and assessment of technologies for new software development projects along a so-called technology radar. To facilitate creating charts of this type, the new Technology type and Adoption stage attributes have been added to the ArchiMate Application Library.
Box-in-Box & Gantt Chart: Add New Parent Levels
Box-in-box and Gantt chart hierarchies can now be configured with greater flexibility.
Previously, you could only expand the configuration downwards and add subordinate levels. In ADOIT 15.0 you can also expand the configuration upwards and - if the top level is selected - add a level above it.
Matrix Chart: Configuration Enhancements
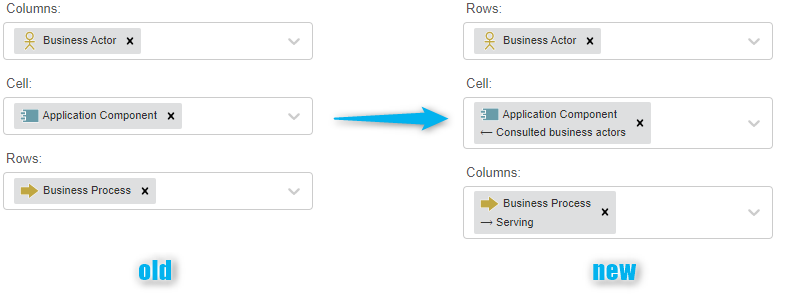
Usually, matrix charts are read from row to column. Therefore, the order of the configuration options has changed. Now you start by configuring the rows of the Matrix chart based on the dataset. Then you choose a connection for the cells and the object types you want to show in the columns.
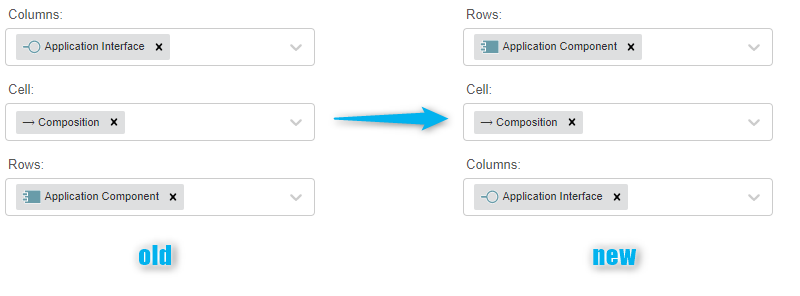
When you select an object type for the matrix cells, the relationships connecting it to the objects in the rows and columns are now displayed.
The layout options Hide "No references" column, Hide "No references" row and Colour cells with multiple occurrences are only relevant if objects are displayed in the matrix cells. They will be hidden now if you select a relation for the matrix cells.

Matrix Chart: Better Visualisation of Relations
The graphical representation of a relation is now correctly shown in cells in Matrix charts, including the direction of the relation.
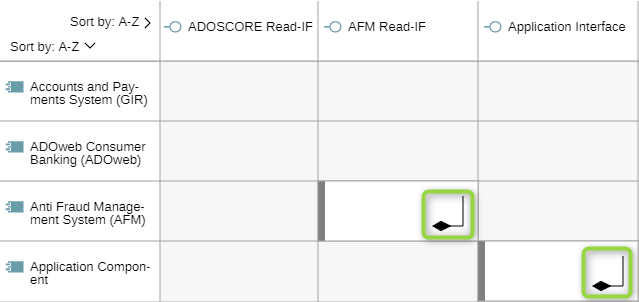
This also applies to the legend in read mode.
Export Charts with Additional Options
More options are now available when exporting charts.
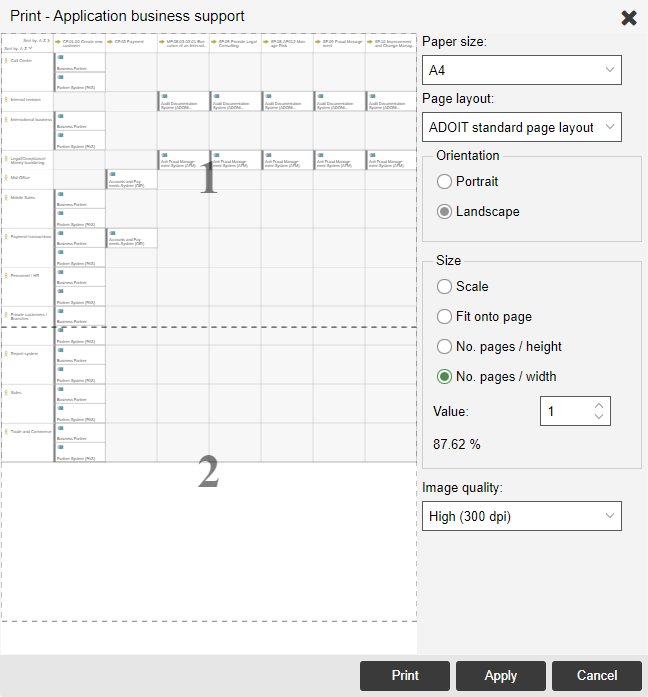
Previously, when printing a chart to PDF, you could select the page layout and orientation. Now, the full set of print options known from the graphical editor is available. You can select the paper size, scale and image quality as well.
The same holds true for exporting charts as graphic files (PNG or SVG). In addition to the image format, you can now select the scale and image quality. Additionally, you can crop the image and only export the selected detail.
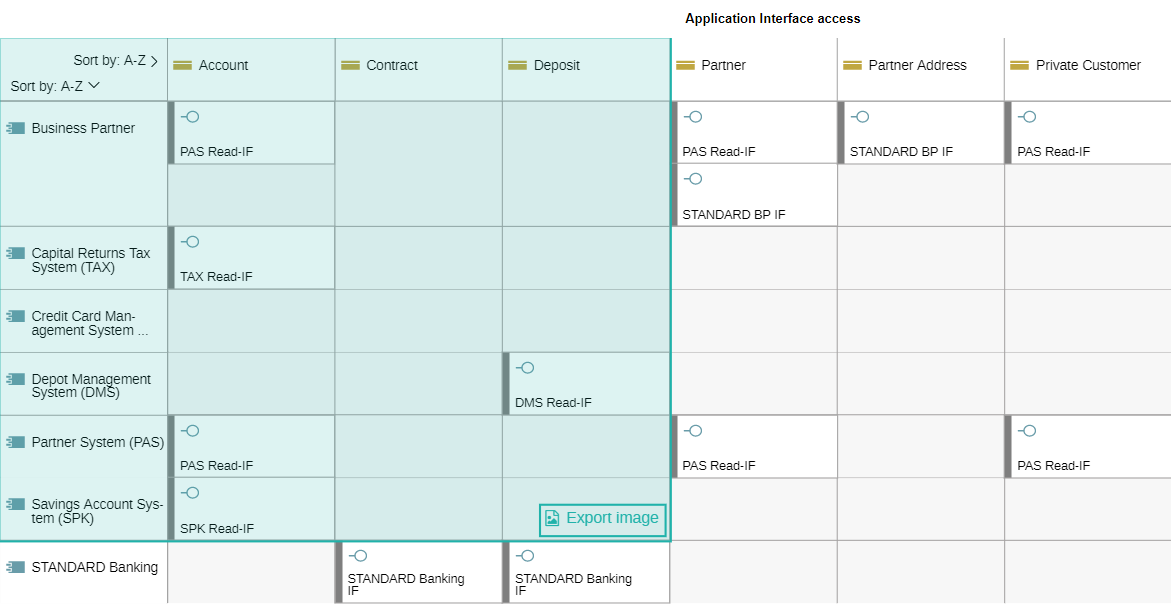
For details, please refer to the section "Working with Charts" in the User Manual.
Improved Colouring Options for Models and Charts
In the graphical editor and in charts, you may colour objects based on the value of an attribute, for example creating heatmaps on the fly.
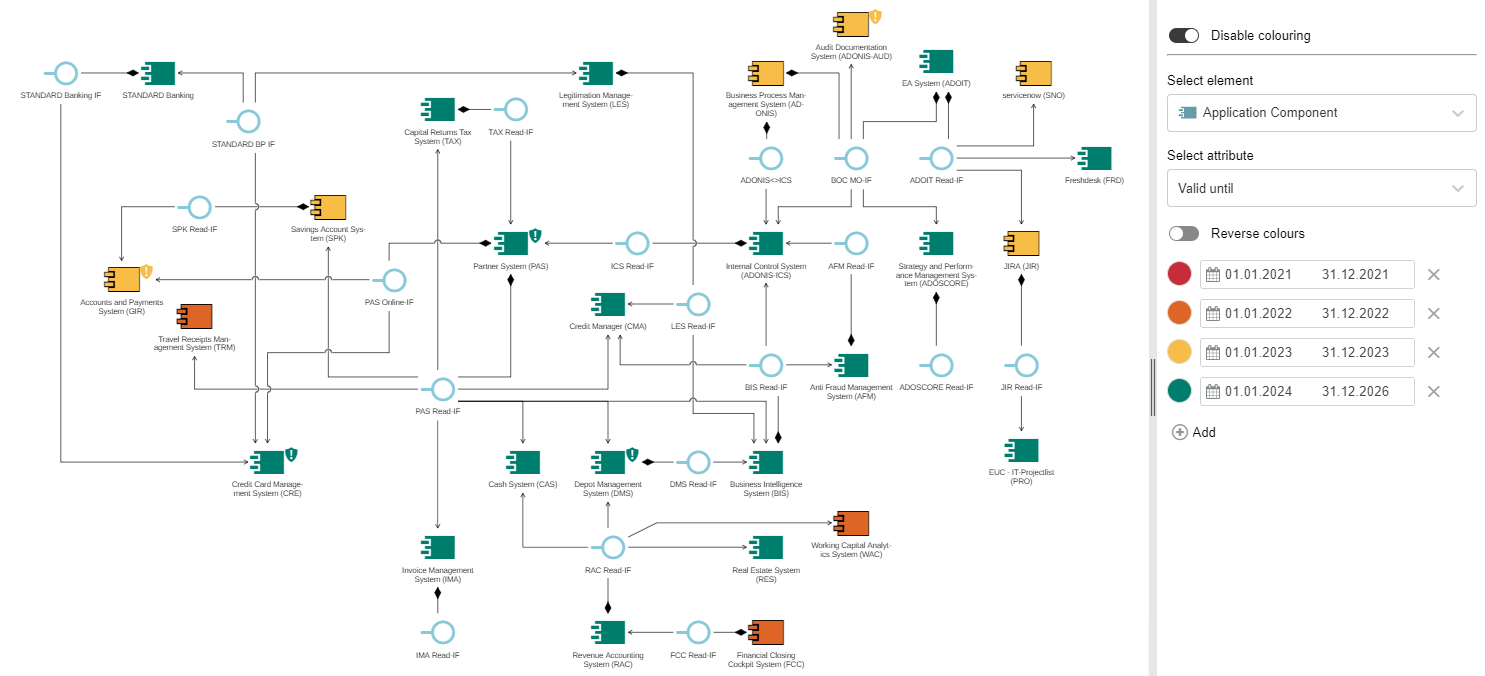
Previously, you could only use this feature with enumeration attributes. In ADOIT 15.0, you can also use attributes that represent a number or a date.
You can define up to 5 different value ranges (for numbers) or time periods (for dates) and assign them a colour.
Save
In ADOIT 15.0, the colouring of the objects is saved along with the model. This allows other users to see the selected colouring.
Export
When you export the heatmap as a PDF or graphic file, the heatmap legend is also included.
For details, please refer to the sections "Make Objects Coloured and Create Heat Maps" and "Apply Colouring to Charts" in the User Manual.
Better Hints for Creating Relations in the Notebook
To make it more obvious that relations can easily be created by drag & drop, we have provided new hints in the Notebook:
- When you open the Notebook
- When a reference attribute does not yet contain a relation
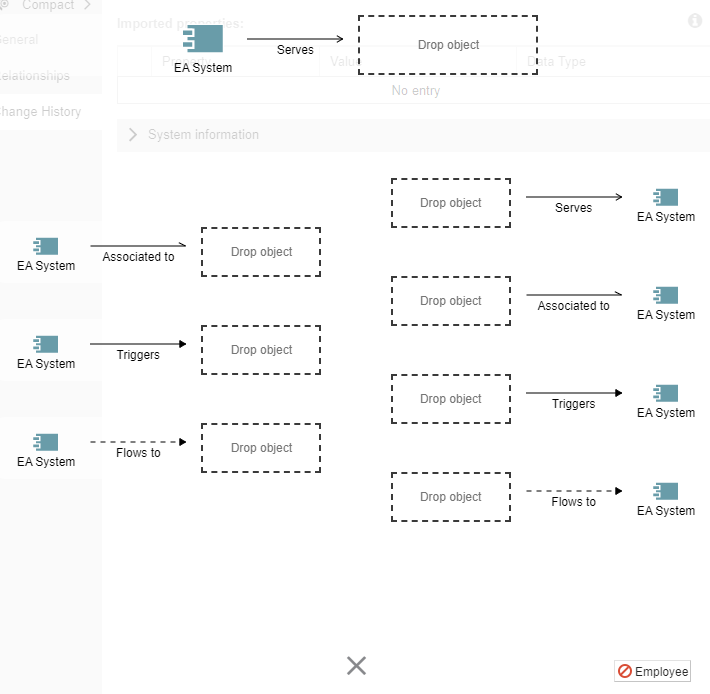
Additionally, we have improved the interactive overlay when you drag a model or object from the explorer to the Notebook to create a relation. For a better overview in case of many possibilities, outgoing relations are displayed on the left and incoming relations on the right. If ADOIT recommends a specific relation, it will be shown at the top.
Set Preferred Email Language
In your preferences, you can now select your preferred language for email notifications. ADOIT automatically sends out email notifications when specific events occur. For example, users are notified when they have to perform tasks as part of a release workflow.
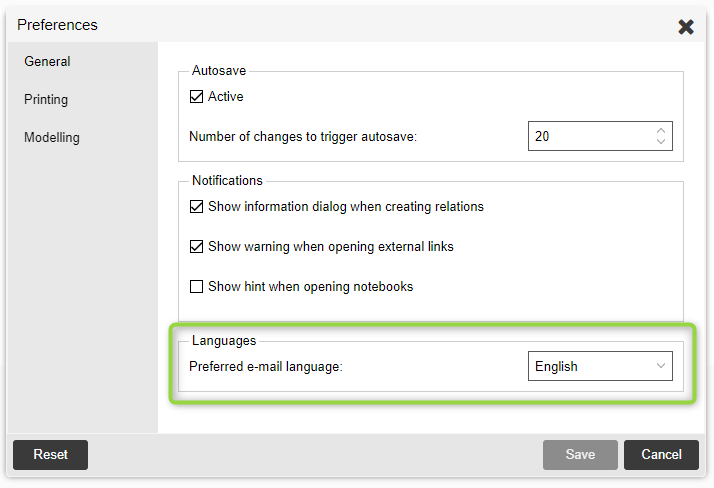
For details, please refer to the section "Preferences > General" in the User Manual.
Additional Improvements to Existing Features
In addition to the major changes, ADOIT 15.0 also includes numerous minor improvements, including:
HTML Publishing: Images in SVG Format
When you generate an HTML publication of your models and objects in ADOIT 15.0, you can enjoy especially high-resolution images: All included model graphics are now in SVG format and thus allow zooming without loss of quality.
Organisation Portal: Authenticated Users Can Change Password.
If access to the Organisation Portal in your organisation is not anonymous but requires a user account, you can now change your password in the Organisation Portal. The prerequisite is that the standard login page where the user can enter their username and password) is used.
Active Area Indicator
When you open any of New, Find and Analyse areas, the currently active area is now indicated in the toolbar at the top of the screen.
Better Support for High Resolution Displays
Text in the graphical editor will now always appear sharp on monitors with a resolution higher than 1920x1080 (Full HD).
"+ Create Analysis" Button Colour Changed
The colour of the + Create analysis button in the Analyse area has been changed from white to black to make it stand out more.
Search & Analysis: Search Options and Filters Always Shown
When you perform a search, the handy search options and filters are now always shown and don't need to be expanded first.
Switch between Components in the Right-Side Pane
A list of available components is now displayed when the right-side pane is opened empty. From this list you can choose the component you want to open. Additionally, you can switch between components using the icon in the upper-left corner.
Dependency Analysis Renamed to Dependency Modeller
The dependency analysis is now called dependency modeller. Functionally, nothing changes.
New Features for Users of the ArchiMate Application Library
Read & Explore Replaces Explore & Contribute
The Explore & Contribute scenario has been renamed to Read & Explore scenario in ADOIT 15.0 and adapted to better serve its purpose.
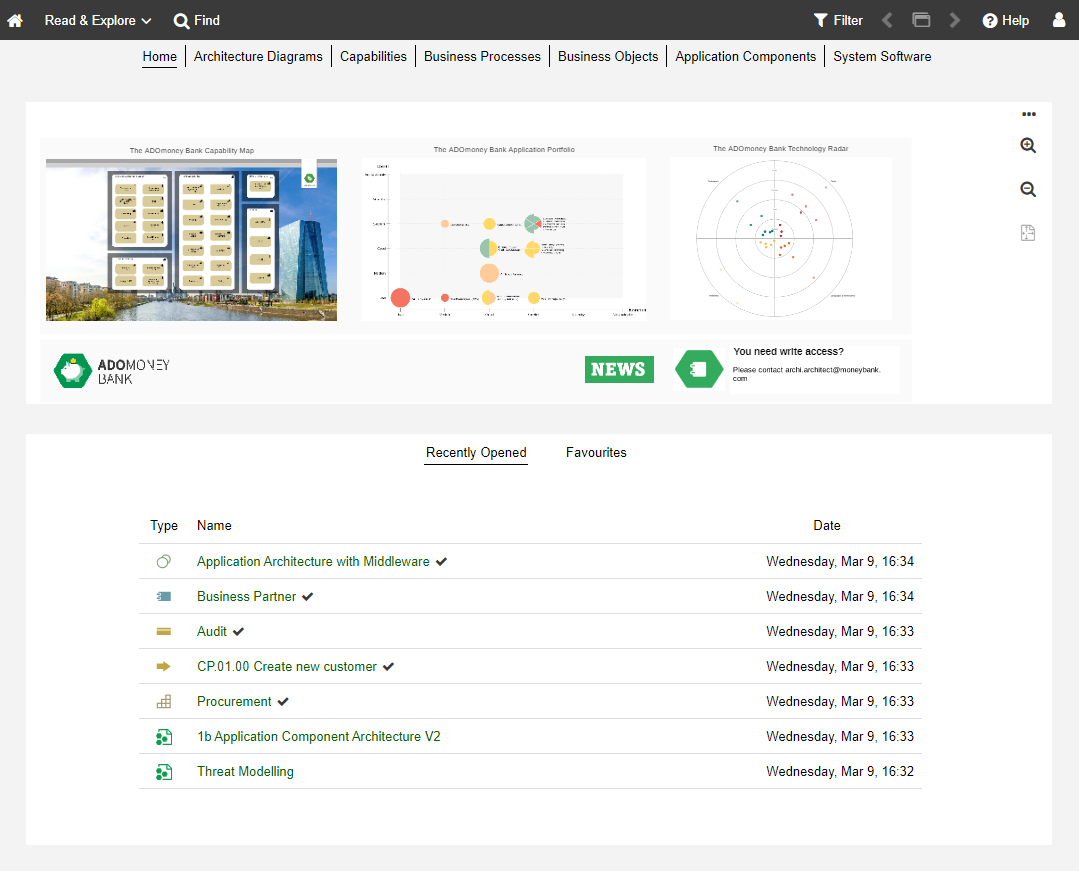
The role of this scenario as a read-only scenario similar to the Organisation Portal, but with personalised access, is further emphasized. Users can save favourites and search queries, but they cannot edit elements. Thus, it is ideal for users who want to get a quick overview of architecture artefacts in ADOIT.
As users of the Read & Explore scenario are not expected to contribute to the gathering of enterprise architecture information, the Analyse area and the My Objects list have been removed.
A new feature, on the other hand, is that all Analyses are now listed in the Achitecture Diagrams dashboard.
For details, please refer to the section "The "Read & Explore" Scenario" in the User Manual.
Formatted Annotations in Models
Previous ADOIT versions already allowed using Notes to provide annotations to the reader of a model. However, the formatting options were limited. In ADOIT 15.0, on the other hand, a full-fledged inline editor is available that allows you to freely format the annotation text.
A slow double-click on the Note opens the text editor. Change the font or font size, pick a text colour, or make the text bold, italic, etc:
When you're done, just click outside of the text editor to close it.
Legacy Formatting Options
All previous formatting options for Notes are still available for compatibility reasons, but disabled by default. They can be found in the Notebook chapter "General" in the group "Legacy formatting options" and will be removed in a future release of ADOIT.
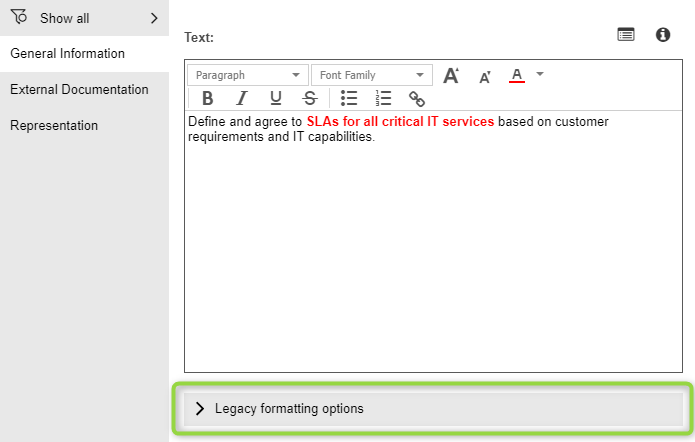
- The following attribute has moved here directly from the "General" chapter:
- Title
- The following attributes have been moved here from the "Representation" chapter:
- "Font" group (attributes Font size, Bold, Italic)
- "Font colour" group (attributes Adapt font colour, Font colour)
- Alignment
- Display title
- The following option is new, allowing you to use the older formatting options instead of the new inline editor functionality:
- Use legacy formatting options
For details, please refer to the section "Display Formatted Annotations in Models" in the User Manual.
Insights Dashboards Improvements
ADOIT 15.0 includes a number of improvements for the Insights dashboards in the ArchiMate Application Library.
Open Model or Object Notebook
The type icon and name in the Insights dashboard header are now interactive:
![]()
- A model can be opened in the graphical editor with one click.
- For objects, the Notebook opens.
Share Insights
You can generate a URL for an Insights dashboard now. This way you can e.g. easily share it with your colleagues via email.
Open in ADONIS
You can jump directly to the source object in ADONIS from the Insights dashboard of an object that was imported from ADONIS to ADOIT via the BOC Management Office Integration (MOI) interface.
The new thing here is that the Insights dashboard of the synchronised object is opened in ADONIS as well. Previously, the Notebook was opened.
For details, please refer to the section "Insights Dashboards" in the User Manual.
System Software: Technology Radar Attributes Added
The Notebook of System Software elements has been extended. The new "Technology Radar" group has been added to the "Classification" chapter. This group contains the new Technology type and Adoption stage attributes.
When these attributes are populated, System Software elements can be visualised in a technology radar using the new Radar chart.
New Features for ADOIT Administrators
ArchiMate Library: Default System Roles Updated
The default system roles in the ArchiMate Library 15.0 have been updated:

What has changed?
- The Enterprise Architect and Contributor system roles have been replaced by the new User system role. Members of this system role have access to the "Design & Document" and "Control & Release" scenarios. For users who model the EA infrastructure in ADOIT.
- The Reader system role is new. Members of this system role have access to the "Read & Explore" scenario. For users who want to view architecture artefacts in ADOIT.
- The MM and Integration Administrator system role is also new. Members of this system role can choose between various predefined metamodel profiles in the web client. For power users that should have control over the modelling method.
- The Application Owner system role has been removed. It served as a template for assigning user rights for the available metamodel elements (= metamodel rights).
The default user groups that you can optionally import have also been updated:
- Enterprise Architect -> User
- Contributor -> Reader
- Reader -> Organisation Portal Reader
After the migration from an earlier version to ADOIT 15.0, users will have the same system roles (and user groups) as before. (Optionally) You can transfer the users to the new standard system roles User, Reader and MM and Integration Administrator. For details, see Transfer Users to the New Standard System Roles.
New Authentication Mechanism: OIDC
OpenID connect (OIDC) is an authentication layer on top of the OAuth 2.0 authorization framework that can be used to securely sign in a user to ADOIT. Authentication and authorization is performed using the Authorization Code Flow.
A precondition for this scenario is an account with an OpenID Connect provider (OP) such as Microsoft Azure AD or Google to verify the identity of your users.
To log on to the web client, the user is redirected to the OP. Depending on the configuration of the OP, the authentication is carried out via single sign-on or by entering access data (username and password, certificates, etc.).
Claims are used to transport all relevant user data (name, e-mail address, etc.) to ADOIT. If the user does not exist yet, it will be created in the ADOIT database and assigned to specific user groups and system roles (depending on the configuration and the data supplied).
Specific configuration steps are necessary when setting up the ADOIT web client for this authentication mechanism. For instructions, see the chapter "Set Up OIDC Authentication" in the Installation Manual.
Migration Package with Multiple Repositories
If your organisation is working with multiple repositories, you can export them in one go and import them again later. This prevents errors and reduces complexity when migrating all ADOIT data to a new version.
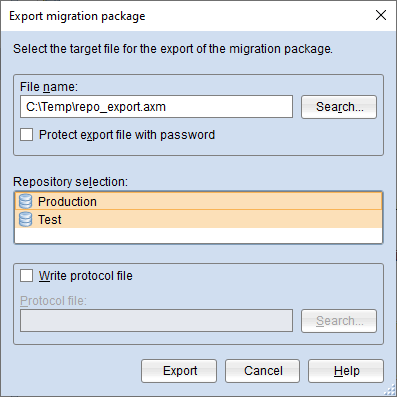
For details, please refer to the sections "Import Migration Package with Multiple Repositories" and "Export Migration Package with Multiple Repositories" in the Administration Manual.
Full IPv6 Support
ADOIT now fully supports IPv6 across the whole platform (including for example the base URL of the web client and the IP address of the mail server).
REST API Improvements
ADOIT provides a generic, extensible REST API that allows authenticated access to exposed functionality. In ADOIT 15.0, this REST API has been improved as follows:
JWT Authentication
In ADOIT 15.0, the REST API has been expanded to accept JSON Web Tokens (JWTs) from an Identity Provider for authentication.
OAuth 2.0 Authentication using the Client Credentials Flow
In addition to the Authorization Code Flow, we have added support for the Client Credentials Flow in ADOIT 15.0.
When using the Client Credentials Flow, at least one scope needs to be defined. You can restrict the IP addresses that shall be able to access a scope by passing an IP constraint pattern.
Better Access Control for Basic Authentication
In ADOIT 15.0, you do not have to globally enable or disable basic authentication in a configuration file anymore. Instead, you can define IP addresses and system roles on the Admin Page for access control.
For information on how to activate and configure access to the REST API, please refer to the section "REST API" in the Administration Manual.
Migration from an Earlier Version of ADOIT to ADOIT 15.0
Migration from ADOIT 14.0 to ADOIT 15.0 (ArchiMate Library)
If you upgrade from ADOIT 14.0 to ADOIT 15.0, you do not have to create a new database and import a migration package if you are using the ArchiMate Library.
This approach is also valid if you are using an ArchiMate Library with changes in the metamodel.
If you are using ADOIT 14.0 with the ADOIT Standard Application Library or another specific library, read on here.
Prerequisites
- You will need the installation package for a successful and complete migration.
- Before you start the migration, we strongly recommend creating a backup of the database.
Migration
The migration consists of the following steps:
Stop the ADOIT 14.0 application server and the Apache Tomcat web server.
Export the library-specific component settings.
Back up comments and deployment-specific configuration settings.
Install ADOIT 15.0 according to the ADOIT 15.0 Installation Manual:
a. Install the rich client for use as an application server and for using the Administration Toolkit.
b. Install the web client to host ADOIT 15.0 as a web application.
Start the ADOIT 15.0 Administration Toolkit and log in to the ADOIT database.
Update the application library:
If you are using the ArchiMate Library: Databases created with ADOIT 14.0 can still be used with ADOIT 15.0. However, you will not have access to improvements in the ArchiMate Library. (Optionally) Update the library in the ADOIT database. A new version of the ArchiMate Library can be found in the folder "04 Sample Data\Library" in the installation package.
If you are using an ArchiMate Library with changes in the metamodel: Databases created with ADOIT 14.0 can still be used with ADOIT 15.0. However, you will not have access to improvements in the ArchiMate Library. (Optionally) Contact your ADOIT consultant to upgrade your application library.
Import the library-specific component settings if you updated the application library.
Migrate comments and deployment-specific configuration settings.
In the ADOIT 15.0 Administration Toolkit, execute the script 15.0 - repo 1.js (menu Settings - Execute JavaScript file). The respective file can be found in the folder "05 Migration" on the installation medium. For details on this script, see Executing the Script "15.0 - repo 1.js".
Start the ADOIT 15.0 application server and the Apache Tomcat web server. If ADOIT 15.0 is working properly, you can uninstall ADOIT 14.0.
After the migration, users will have the same system roles (and user groups) as before. (Optionally) You can transfer the users to the new standard system roles User, Reader and MM and Integration Administrator. For details, see Transfer Users to the New Standard System Roles.
For further information and details on the above steps, please refer to the Installation Manual and to the sections "Make a Manual Backup" , "Restore a Manual Backup" and "Update Library" in the Administration Manual.
Migration from ADOIT 11.0/11.1/12.0/12.1/13.0 to ADOIT 15.0 (ArchiMate Library)
A migration from ADOIT 11.0/11.1/12.0/12.1/13.0 to ADOIT 15.0 without further assistance by BOC is possible if you are using the ArchiMate Library. You will have to create a new database and import a migration package.
This approach is also valid if you are using an ArchiMate Library with changes in the metamodel. You will need a new version of your library. Please contact your ADOIT consultant to upgrade your library.
If you are using ADOIT 11.0/11.1/12.0/12.1/13.0 with the ADOIT Standard Application Library or another specific library, read on here.
Prerequisites
- You will need the installation package for a successful and complete migration.
Migration
The migration consists of the following steps:
Stop the ADOIT 11.0/11.1/12.0/12.1/13.0 application server and the Apache Tomcat web server.
Export the library-specific component settings and a migration package.
Back up comments and deployment-specific configuration settings.
Install ADOIT 15.0 according to the ADOIT 15.0 Installation Manual:
a. Install the rich client for use as an application server and for using the Administration Toolkit.
b. Install the web client to host ADOIT 15.0 as a web application.
Create a database:
If you are using the ArchiMate Library: A new version of the ArchiMate Library can be found in the folder "04 Sample Data\Library" in the installation package. Initialize the new ADOIT database with this library file.
If you are using an ArchiMate Library with changes in the metamodel: Please contact your ADOIT consultant to upgrade your application library. Initialize the new ADOIT database with the new library file you have received from your ADOIT consultant.
Start the ADOIT 15.0 Administration Toolkit and log in to the new database.
Import the migration package and the library-specific component settings.
Migrate comments and deployment-specific configuration settings.
In the ADOIT 15.0 Administration Toolkit, execute the script 15.0 - repo 1.js (menu Settings - Execute JavaScript file). The respective file can be found in the folder "05 Migration" on the installation medium. For details on this script, see Executing the Script "15.0 - repo 1.js".
Start the ADOIT 15.0 application server and the Apache Tomcat web server. If ADOIT 15.0 is working properly, you can uninstall ADOIT 11.0/11.1/12.0/12.1/13.0.
After the migration, users will have the same system roles (and user groups) as before. (Optionally) You can transfer the users to the new standard system roles User, Reader and MM and Integration Administrator. For details, see Transfer Users to the New Standard System Roles.
For further information and details on the above steps, please refer to the Installation Manual and to the sections "Make a Manual Backup" and "Restore a Manual Backup" in the Administration Manual.
Migration from ADOIT 14.0 to ADOIT 15.0 (Standard Library)
If you upgrade from ADOIT 14.0 to ADOIT 15.0, you do not have to create a new database and import a migration package if you are using the ADOIT Standard Application Library.
This approach is also valid if you are using an ADOIT Standard Application Library with changes in the metamodel or functional extensions or another specific library.
If you are using ADOIT 14.0 with the ArchiMate Application Library, read on here.
Prerequisites
- You will need the installation package for a successful and complete migration.
Migration
The migration consists of the following steps:
Stop the ADOIT 14.0 application server and the Apache Tomcat web server.
Back up comments and deployment-specific configuration settings.
Install ADOIT 15.0 according to the ADOIT 15.0 Installation Manual:
a. Install the rich client for use as an application server and for using the Administration Toolkit.
b. Install the web client to host ADOIT 15.0 as a web application.
Migrate comments and deployment-specific configuration settings.
Start the ADOIT 15.0 application server and the Apache Tomcat web server. If ADOIT 15.0 is working properly, you can uninstall ADOIT 14.0.
For further information and details on the above steps, please refer to the Installation Manual and to the sections "Make a Manual Backup" and "Restore a Manual Backup" in the Administration Manual.
Migration from ADOIT 11.0/11.1/12.0/12.1/13.0 to ADOIT 15.0 (Standard Library)
A migration from ADOIT 11.0/11.1/12.0/12.1/13.0 to ADOIT 15.0 without further assistance by BOC is possible if you are using the ADOIT Standard Application Library. You will have to create a new database and import a migration package.
This approach is also valid if you are using an ADOIT Standard Application Library with changes in the metamodel or functional extensions or another specific library. You will need a new version of your library. Please contact your ADOIT consultant to upgrade your library.
If you are using ADOIT 11.0/11.1/12.0/12.1/13.0 with the ArchiMate Application Library, read on here.
Prerequisites
- You will need the installation package for a successful and complete migration.
Migration
The migration consists of the following steps:
Stop the ADOIT 11.0/11.1/12.0/12.1/13.0 application server and the Apache Tomcat web server.
Export the library-specific component settings and a migration package.
Back up comments and deployment-specific configuration settings.
Install ADOIT 15.0 according to the ADOIT 15.0 Installation Manual:
a. Install the rich client for use as an application server and for using the Administration Toolkit.
b. Install the web client to host ADOIT 15.0 as a web application.
Create a database:
If you are using the ADOIT Standard Application Library: A new version of the ADOIT Standard Application Library can be found in the folder "04 Sample Data\Library" in the installation package. Initialize the new ADOIT database with this library file.
If you are using an ADOIT Standard Application Library with changes in the metamodel or functional extensions or another specific library: Please contact your ADOIT consultant to upgrade your application library. Initialize the new ADOIT database with the new library file you have received from your ADOIT consultant.
Start the ADOIT 15.0 Administration Toolkit and log in to the new database.
Import the migration package and the library-specific component settings.
Migrate comments and deployment-specific configuration settings.
Start the ADOIT 15.0 application server and the Apache Tomcat web server. If ADOIT 15.0 is working properly, you can uninstall ADOIT 11.0/11.1/12.0/12.1/13.0.
For further information and details on the above steps, please refer to the Installation Manual and to the sections "Make a Manual Backup" and "Restore a Manual Backup" in the Administration Manual.
Migration from All Other Versions to ADOIT 15.0
If you are using ADOIT 10.0/10.1 or earlier versions, the migration to ADOIT 15.0 requires support by BOC.
For details on the necessary steps to migrate your version of ADOIT to ADOIT 15.0, please contact your ADOIT consultant.
Switch to ArchiMate Library
If you are using ADOIT 14.0 or earlier versions, and want to switch to using the ArchiMate Application Library, the migration to ADOIT 15.0 requires support by BOC.
For details on the necessary steps to migrate your version of ADOIT to ADOIT 15.0, please contact your ADOIT consultant.
How to Install a Hotfix for ADOIT 15.0
Hotfixes resolve software errors and security issues. Please note that the most current hotfix always includes the modifications of previous hotfixes. Only the latest hotfix has to be installed to get all fixes.
If you install a hotfix for ADOIT 15.0, you do not have to create a new database and import a migration package.
Downloading a Hotfix
In the majority of cases, you are notified of hotfixes by your ADOIT consultant.
The version format of a hotfix is 15.0.x (for example: 15.0.1 or 15.0.2).
Download the hotfix from the BOC website (your ADOIT consultant will email you a link).
The installation utilizes a full, standalone release package.
Installing a Hotfix
Installing a hotfix consists of the following steps:
Stop the ADOIT 15.0 application server and the Apache Tomcat web server.
Backup comments and deployment-specific configuration settings.
Install ADOIT 15.0.x according to the ADOIT 15.0 Installation Manual:
a. Install the rich client for use as an application server and for using the Administration Toolkit.
b. Install the web client to host ADOIT 15.0.x as a web application.
Migrate comments and deployment-specific configuration settings.
Start the ADOIT 15.0.x application server and the Apache Tomcat web server. If ADOIT 15.0.x is working properly, you can uninstall ADOIT 15.0.
For further information and details on the above steps, please refer to the Installation Manual and to the sections "Make a Manual Backup" and "Restore a Manual Backup" in the Administration Manual.
Update Scripts
Executing the Script "15.0 - repo 1.js"
This script updates the repository. The following changes are made:
Note
Enables the option Use legacy formatting options for all Notes that have been migrated to ADOIT 15.0. This will ensure that all models containing
Notes will look as they did before.
Newly created Notes use the new and improved formatting options in ADOIT 15.0 (see Formatted Annotations in Models). To also use the improved formatting options for migrated
Notes, Use legacy formatting options needs to be turned off (in the Notebook chapter "General" in the group "Legacy formatting options").
Transfer Users to the New Standard System Roles
If you migrate from an earlier version of ADOIT to ADOIT 15.0, you can transfer the users to the new standard system roles User, Reader and MM and Integration Administrator. You will need to execute three scripts in the Administration Toolkit.
For more information about the new default system roles, see ArchiMate Library: Default System Roles Updated.
Prerequisites
- You are using using the ArchiMate Library.
- The migration to ADOIT 15.0 has been successfully completed.
- Before you start, we strongly recommend creating a backup of the database.
Procedure
- In the ADOIT 15.0 Administration Toolkit, execute the following scripts in the listed order (menu Settings - Execute JavaScript file):
15.0 - repo 2 (role migration).js15.0 - repo 3 (cmp settings role migration).js15.0 - repo 4 (old role removal).js
These scripts can be found in the folder "05 Migration" on the installation medium. How the scripts work is described in the sections below.
15.0 - repo 2 (role migration).js
This script changes the role assignment of users. It makes sure that users are transferred to the new standard system roles:
- Users with the Enterprise Architect system role will have the new User and MM and Integration Administrator system roles assigned.
- Users with the Contributor system role will have the new User system role assigned.
- After successful completion, the assignment to the old Enterprise Architect and Contributor system roles will be removed.
15.0 - repo 3 (cmp settings role migration).js
This script changes the role assignment to component settings. It makes sure that users can access the same functionalities in the ADOIT web client as they could before:
If the following component settings have the Enterprise Architect and/or Contributor system roles assigned, the new system role User will be assigned:
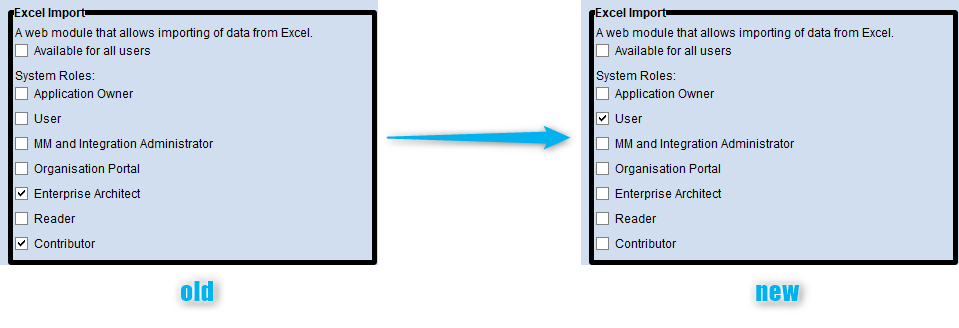
Authentication (role assignment in user mapping)
Property Filter
Reporting Board
Validation
Web Modules (with three exceptions, see below)
If the following component settings have the Enterprise Architect and/or Contributor system roles assigned, the new system role MM and Integration Administrator will be assigned:
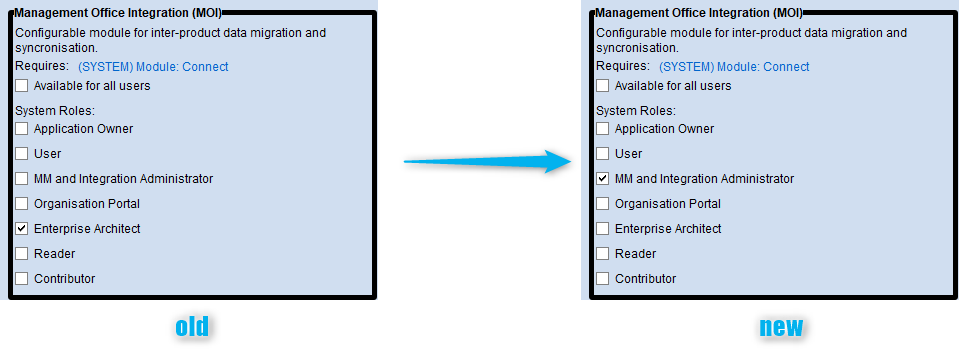
- Web Module "Generic Connector" (and other Integration Framework connectors, if available)
- Web Module "Metamodel Profiles"
- Web Module "Management Office Integration (MOI)"
After successful completion, the assignment to the old Enterprise Architect and Contributor system roles will be removed.
15.0 - repo 4 (old role removal).js
After the preceding migration scripts have been executed, this script permanently removes the Enterprise Architect and Contributor system roles as they are no longer needed.
