New Features in ADOIT 12.0
New Features for All Users
User Interface Redesign
The user interface has been restructured and fundamentally reworked. The goal: To make working with ADOIT easier and more intuitive. For this purpose, we took to heart the feedback that especially new users provided. Listed below are the most important changes:
New, Find and Analyse Areas
The biggest change concerns the structuring of the workplace into the areas New, Find and Analyse that can be accessed from the buttons on the newly designed global toolbar:
These areas cover the most frequently used functionalities:
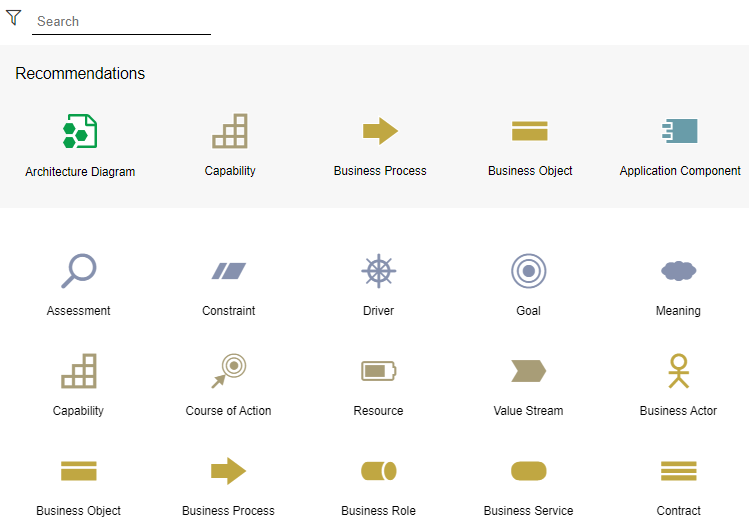
New: Create new models and objects. Filter by topic so that only a limited selection of options is displayed. The list of recommendations (defined by the ADOIT administrator) provides another source of assistance.
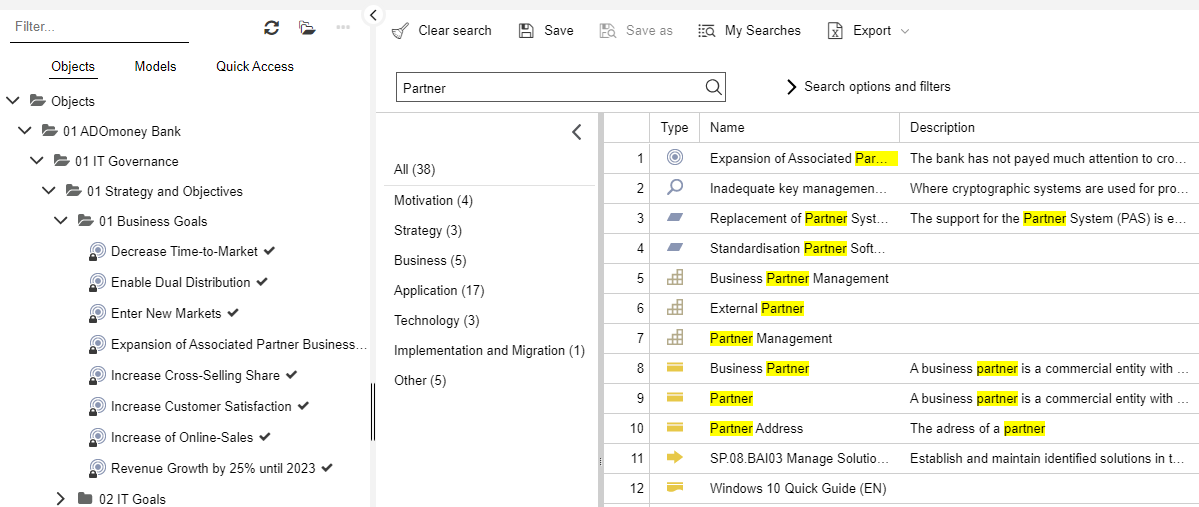
Find: Open the Explorer and the search in ADOIT. Multiple search and filtering options help you to quickly find the element you are looking for.
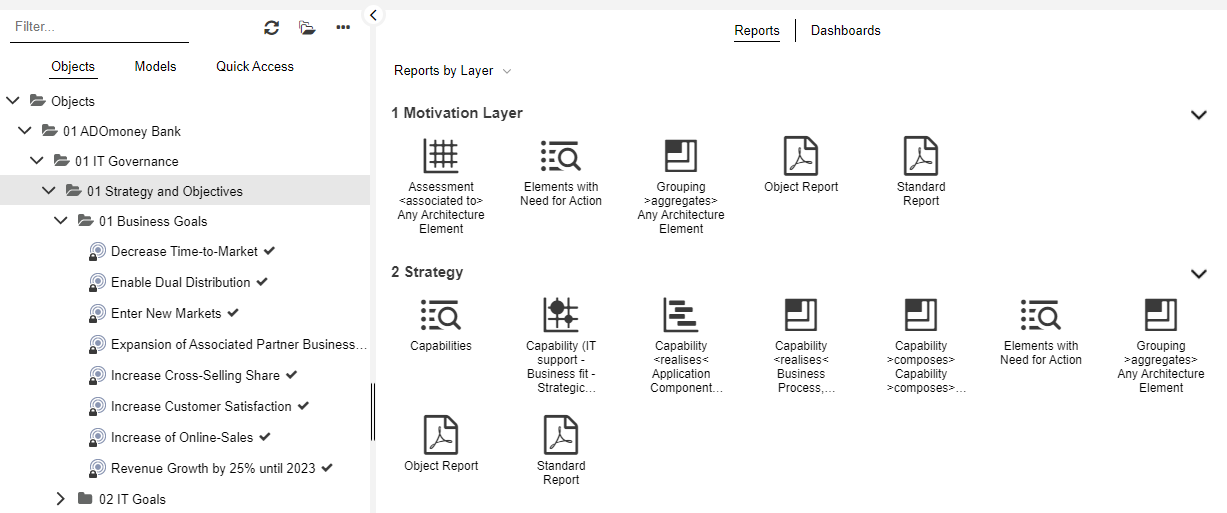
Analyse: Run predefined search queries or generate views and reports. Open various scenario-specific dashboards.
Redesigned Scenarios
ADOIT is organised into a number of scenarios that accommodate different stakeholders' needs. These scenarios have been significantly redesigned. For further information, see these topics:
Changes in Scenario Selection
The scenario selection page has been removed. As you work, you can select the desired scenario from the dropdown menu in the global toolbar.
Navigation Bar Removed
The navigation bar on the left side of the program window has been retired. Access to the features of ADOIT is now available through the areas New, Find and Analyse.
Changes in the Graphical Editor
The graphical editor sports a new menu bar with clearly labelled buttons. The drawing border has been removed because users found it annoying. Instead, the model size now automatically adjusts to the model content.
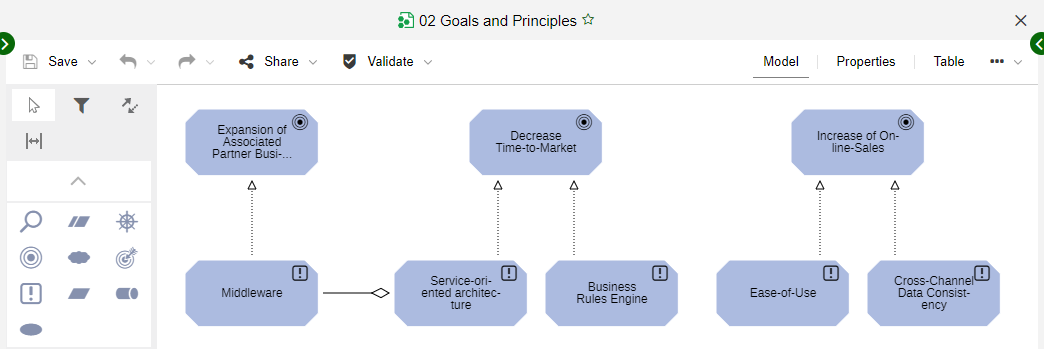
Explorer: Search in All Catalogues
The search filter is applied to all three catalogues simultaneously when searching for elements (Objects, Models and Quick Access).
Changes in the Validation Functionality
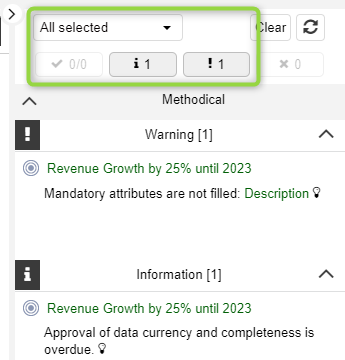
You can adjust which check categories are displayed at any time. The total number of warnings, errors, etc. is now displayed directly at the filter. Because the validation widget is now more closely tied to a specific model or object, you can no longer validate multiple artefacts at once.
Modelling Improvements
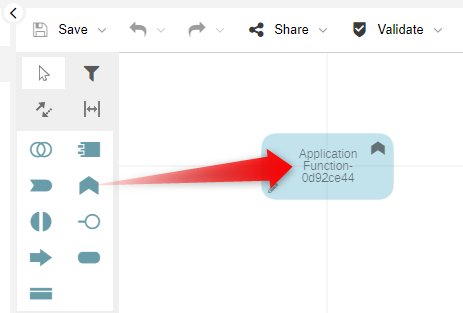
You can now create objects more easily. Just drag an object from the modelling bar onto the drawing area. Alternatively, you can continue working as before (select the object, and then click where you want it to be).
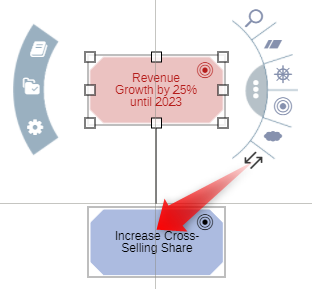
In addition, you can now create connectors by drag and drop when using the Hover Modelling Assistant.
Finally, selecting container objects (e.g. a Swimlane) is easier now. You can simply click on the header of the container object to select it and - for instance - drag it to a different location. As before, you can also click and hold until the container object turns red.
New Online Help
Visit our new online help. Starting with ADOIT 12.0, we have begun moving our PDF documentation to the web. The first documents that are available online are the User Manual, the Installation Manual, and the Administration Manual.
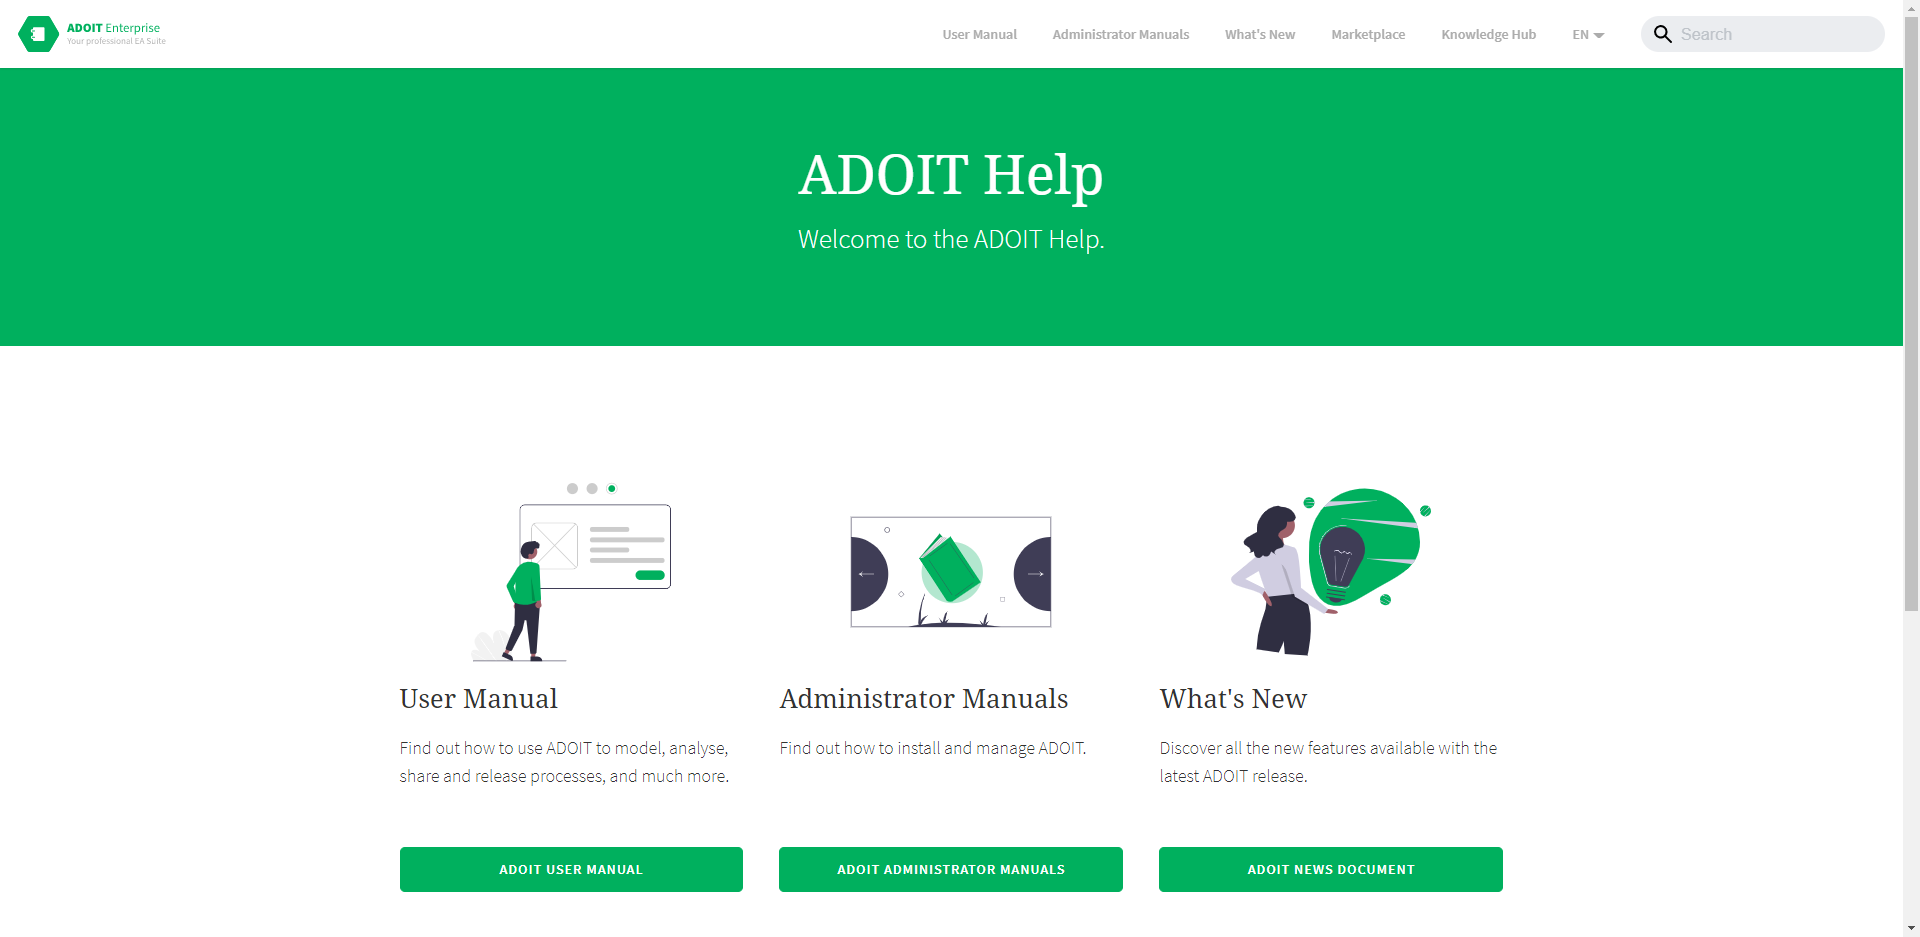
The new online help is searchable and cross-linked for easy use. The documentation is also fully responsive (automatically adjusts to small screens), allowing you to access our software documentation whenever and wherever you need it.
Generate URLs for Saved Queries
You may now generate a URL for a search query. When you share this URL with a colleague and they click it, the saved query is run, and the result is displayed.
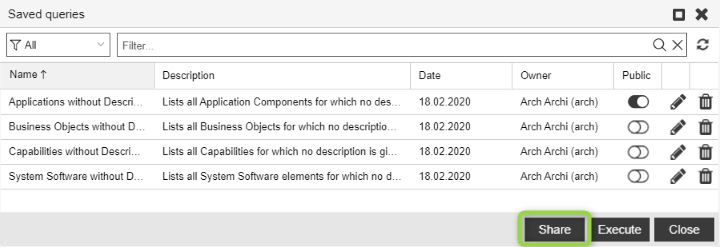
If the search query is private, it will be published (= become visible to all users) when you generate a URL for it.
For details, please refer to the section "Manage Saved Queries" in the User Manual.
Self-Service Password Reset
Forgotten your password? Do not worry. The new self-service password reset allows you to fix this problem without contacting the help desk. Just click on the "Forgot Password?" link on the login page, and you will receive an email with a link to reset your password.
Tabular Editor: Object Type Filter Passed with Generated URL
When you generate a URL for a model in the tabular editor to share it with your colleagues, the generated URL now contains the current object type filter as a parameter. When the URL is called, only objects of the type you selected in the modelling bar are displayed.
For details, please refer to the section "Generate URL" in the User Manual.
Performance Improvements
ADOIT 12.0 introduces some notable performance improvements. Release workflow transition times have been substantially reduced, validation is up to 50 per-cent faster, and graphical editor operations like open or save model are processed significantly faster. These improvements are especially noticeable when working with big models or a large number of objects.
New Features for Users of the ArchiMate Application Library
Redesigned Scenarios (ArchiMate Library)
Take a look at one completely new and two fundamentally revised scenarios in ADOIT 12.0.
New: Explore & Contribute
The Explore & Contribute scenario is ideal for users who want to get a quick overview of architecture artefacts in ADOIT and contribute to the gathering of enterprise architecture information.
The "Explore & Contribute" Scenario replaces the "Govern & Manage" scenario.
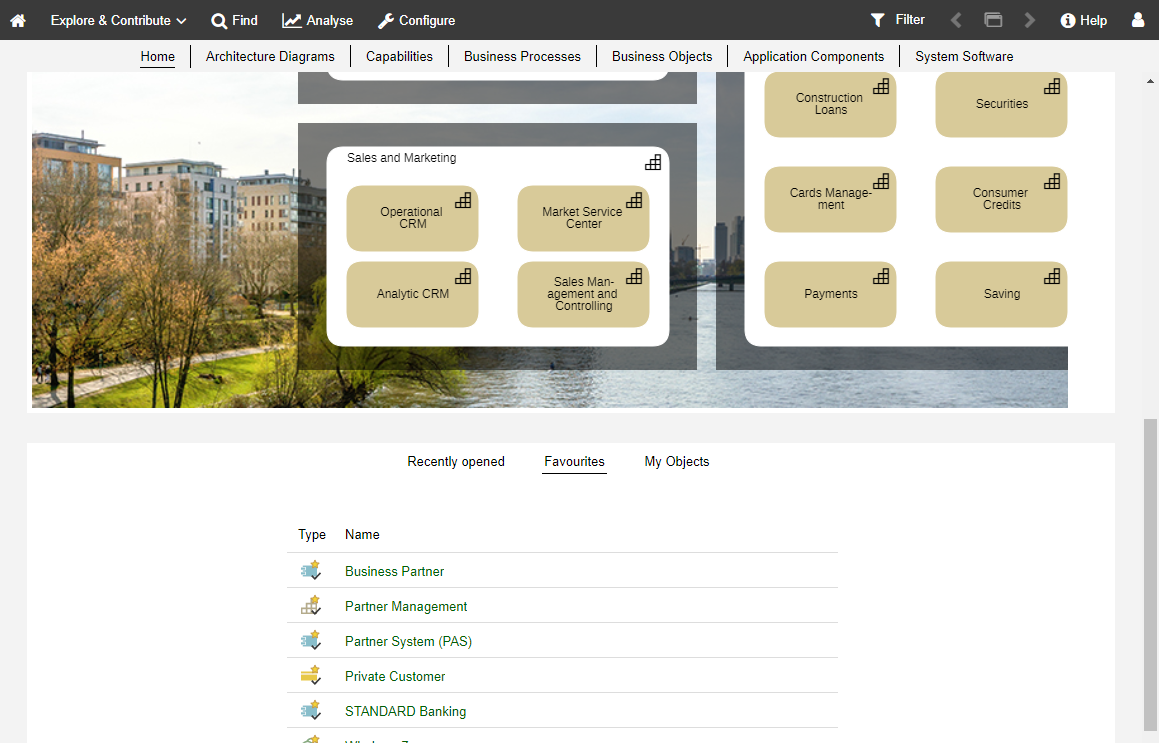
This scenario has been designed as a read-only scenario similar to the Organisation Portal, but with personalised access. This means that visitors can save favourites and search queries and (if access rights are set accordingly) edit elements for which they are assigned as responsible.
The start page contains a configurable start model. You have direct access to your recently opened models and objects, and your favourites. There is also a compact list of all repository objects for which you are responsible. The quick links at the top of the page provide access to a set of interactive dashboards with data and information on the models and objects in ADOIT.
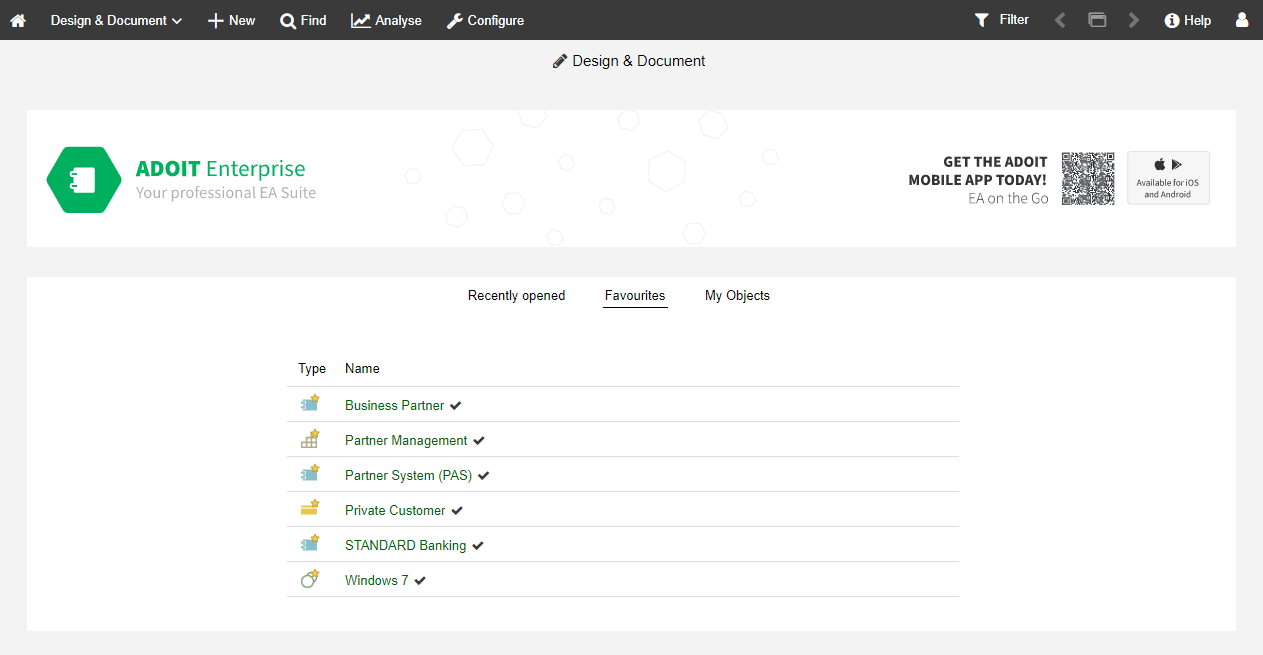
Design & Document
The new start page gives direct access to your recently opened models and objects, and your favourites. There is also a compact list of all repository objects for which you are responsible. At the top there is a customisable area where each organisation can display a graphic in their corporate design.
Organisation Portal
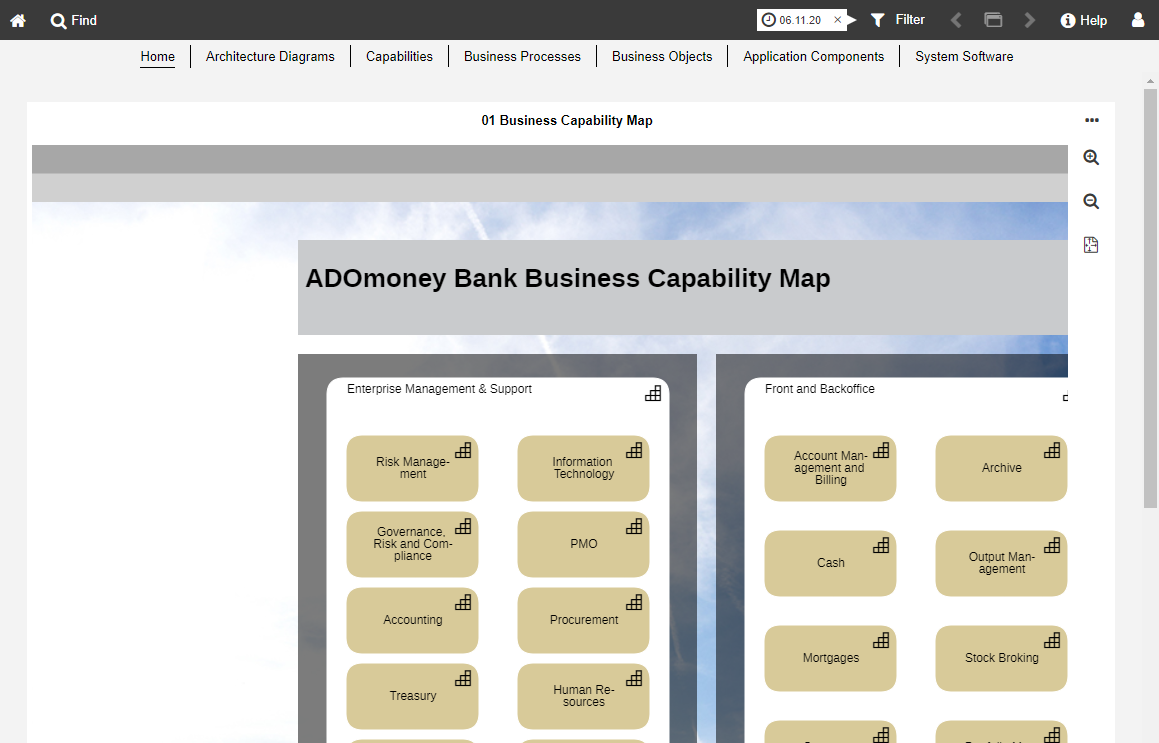
This release unveils a new design for the Organisation Portal. The start page contains a configurable start model. The quick links at the top of the page provide access to a set of dashboards. These dashboards allow employees of your organisation easy and intuitive access to the objects in ADOIT. The Reporting Board has been removed from the Organisation Portal.
For details on using the scenarios, please refer to the section "Application Scenarios when Using the ArchiMate Library" in the User Manual.
Metamodel Profile Configurator
The Metamodel Profile Configurator allows power users to choose between various predefined metamodel profiles in the web client. Metamodel profiles reduce the number of available metamodel elements and are applied to all users on login.
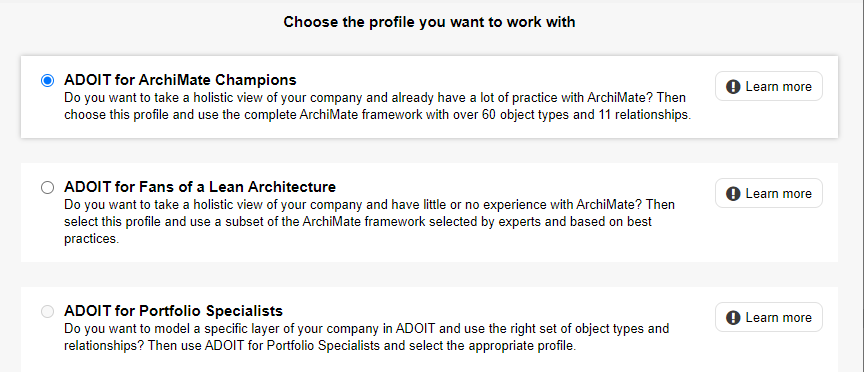
For details, please refer to the section "Metamodel Profile Configurator" in the User Manual.
"My Objects" Dashboard Improvements
The "My Objects" dashboard has been improved to provide more detail:
The widget filter was removed. Now, all elements directly assigned to you AND all elements assigned to your Business Actors are displayed simultaneously.
The RACI columns have been merged into one.
The new "Affiliation" column shows the User or Business Actor that the objects are assigned to.
The new "Grouping" column shows all
Grouping elements that aggregate your objects.
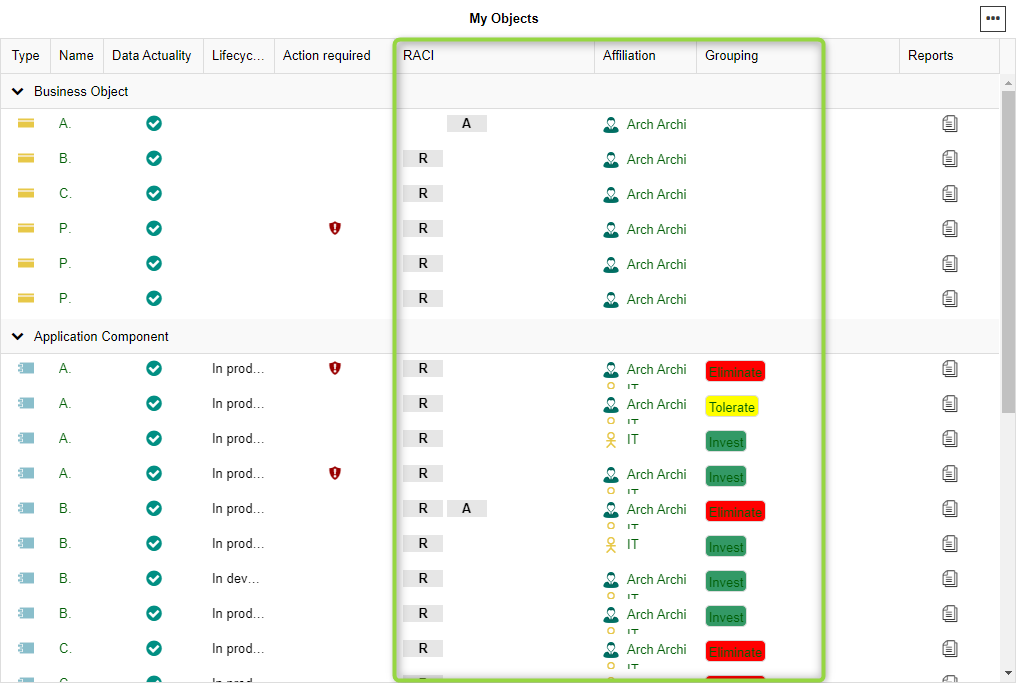
For details on using the dashboard, please refer to the section "My Objects" in the User Manual.
Influence Matrix
The new Influence Matrix shows the strength of Influence relationships between Principles and other elements. The strength can be set via the Strength attribute of the Influence relation.
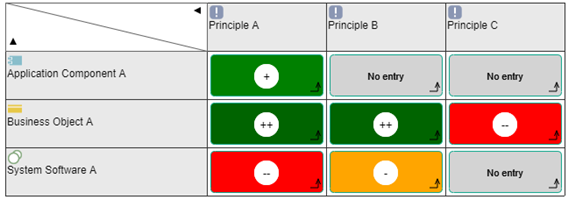
To show the special Influence Matrix representation with coloured values and matching symbols, click the Change visualisation button, and then select Assessment.
For details on using Matrix Views, please refer to the section "The Matrix View" in the User Manual.
Grouping Elements Visualised in Insights Dashboards
In the header of all Insights Dashboards, ADOIT 12.0 shows you tags for the Grouping elements that aggregate the element you are interested in. The tag colour can be set via the Tag colour attribute of the
Groupings.

For details on using the Insights dashboards, please refer to the section "Insights Dashboards" in the User Manual.
Application Component Insights Improvements
The representation of the lifecycle state and the investment strategy has been improved, using larger titles and larger graphics to display the attribute values.
For details on using the dashboard, please refer to the section "Insights Dashboard for Application Components [ArchiMate Library]" in the User Manual.
System Software Insights Improvements
The "Alternative Technologies" widget has been extended:
- The new "Category" column shows the category that the
System Software belongs to.
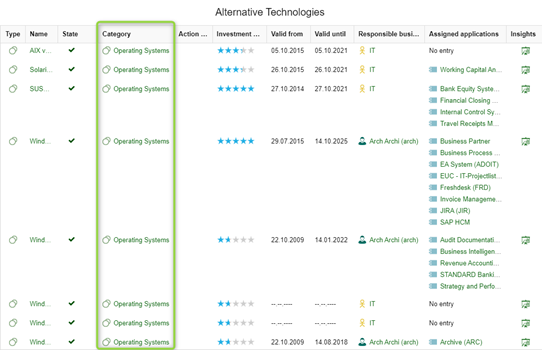
For details on using the dashboard, please refer to the section "Insights Dashboard for System Software Elements [ArchiMate Library]" in the User Manual.
Methodical Improvements in the ArchiMate Library 12.0
Grouping: Tag Colour in Header
The graphical representation of the Grouping element has been extended. The Tag colour attribute is now displayed as part of the header.
Realisation: Specialisation Attribute
The attribute Specialisation has been added to the Notebook of the Realization relation (in the chapter "General Information"):
On the drawing area, you can see what specialisation is selected (New = green, Changed = yellow, Decommissioned = red).
Application Component: Specialisation Attribute
The attributes Specialisation and Type in the Notebook of Application Components (in the chapter "General") have been merged:
The Type attribute (value range No entry – Application group – Application – Sub application) was removed from the Notebook.
The value range of the Specialisation attribute has changed from No entry – Logical – Physical to No entry – Application group – Application – Sub application.
On the drawing area, you can see what specialisation is selected:
Driver: Specialisation Attribute
The value range of the attribute Specialisation in the Notebook of Drivers (in the chapter "General") has been extended:
- The new values Pain, Gain and Risk have been added.
Requirement: Specialisation Attribute
The value range of the attribute Specialisation in the Notebook of Requirements (in the chapter "General") has been extended:
- The new values Gain creator and Pain reliever have been added.
Business Service: Specialisation Attribute
The value range of the attribute Specialisation in the Notebook of Business Services (in the chapter "General") has been changed:
- The value range has changed from No entry – Business decision – Other to No entry – Business – IT – Other.
Assessment: Specialisation Attribute
The value range of the attribute Specialisation in the Notebook of Assessments (in the chapter "General") has been changed:
The value Weakness/Vulnerability has been separated into the two distinct values Weakness and Vulnerability.
The new value Experience has been added
System Software &
Device: Fitness Attributes Added
The Business fit and IT fit attributes have been added to the Notebook of System Software elements and
Devices (in the chapter "Classification").
Security Requirements: CIA Triad Attributes Now in Proper Order
Confidentiality, integrity and availability, the CIA triad attributes, now appear in correct order in the Notebooks of various object types (in the chapter "Classification").
Distribution Network Can Realise
Paths
As defined in the ArchiMate specification, a Distribution Network can now realize one or more
Paths.
Group: Improved Visualisation Options
In the ArchiMate Application Library 12.0, visualisation options have been improved for Groups. Use the Colour attribute in the Notebook chapter "Representation" to adjust the colour of the
Group on the drawing area.
User: Telephone Number Added to Notebook
The phone number of a User is now displayed in the Notebook (in the chapter "General").
New Features for Users of the ADOIT Standard Application Library
Redesigned Scenarios (Standard Library)
The following scenarios have been significantly redesigned:
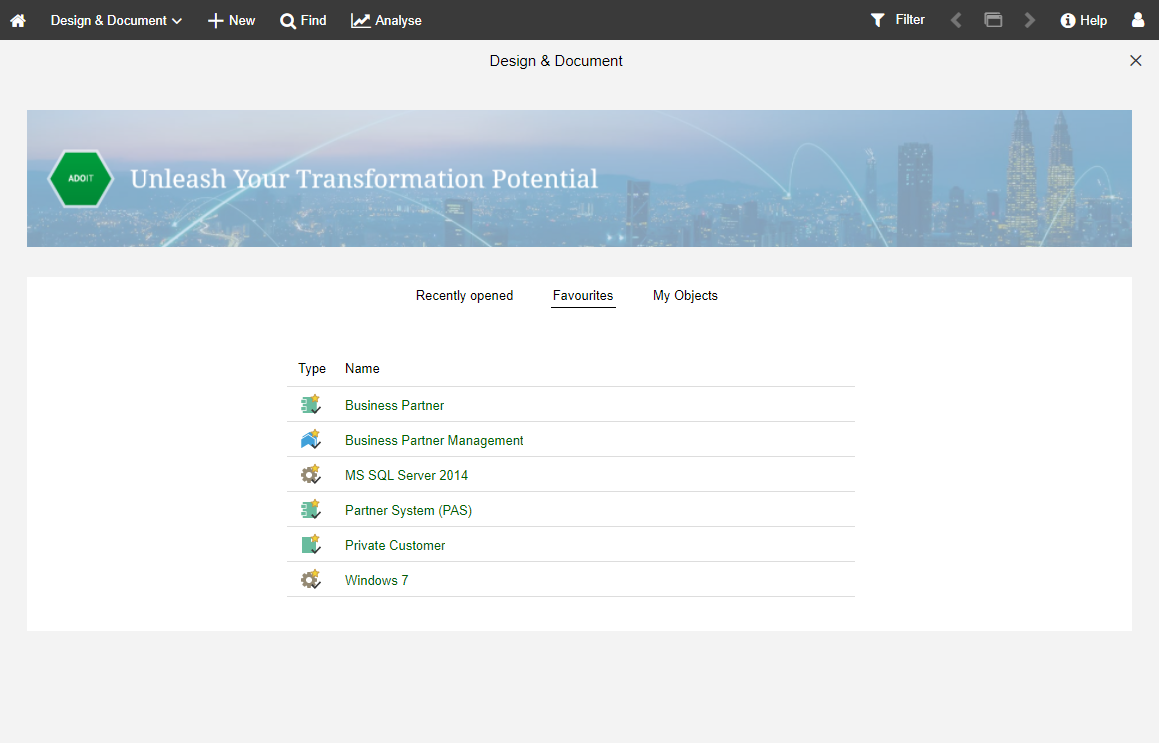
Design & Document: The new start page gives direct access to your recently opened models and objects, and your favourites. There is also a compact list of all repository objects for which you are responsible. At the top there is a customisable area where each organisation can display a graphic in their corporate design.
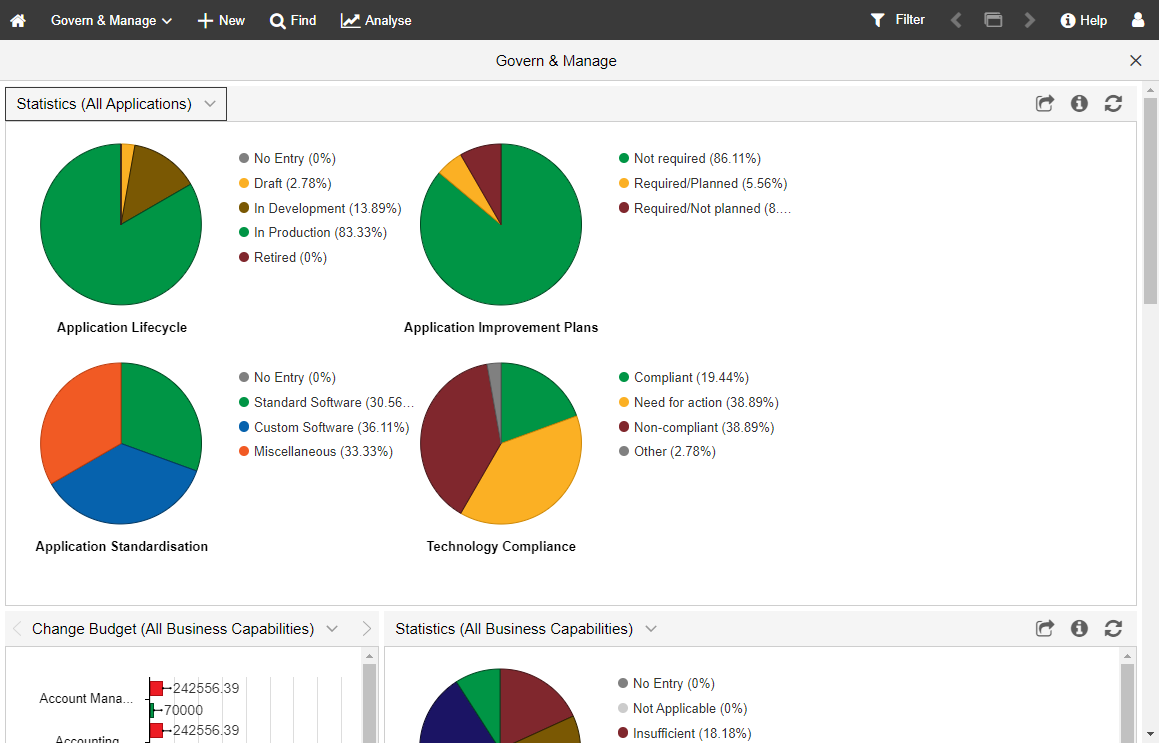
Govern & Manage: The pie charts and spider diagrams on the start page visualise the status of architecture artefacts such as Applications,
Business Capabilities,
Technologies and related
Risks.
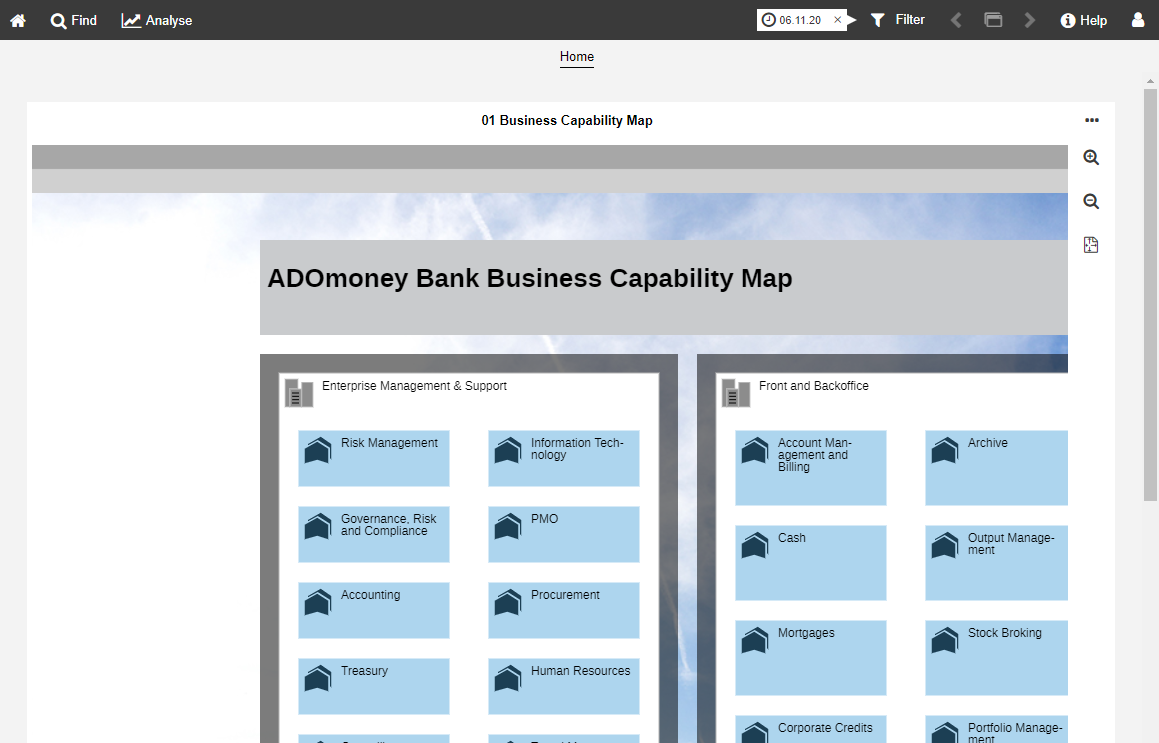
Organisation Portal: This release unveils a new design for the Organisation Portal. The start page contains a configurable start model. The quick links at the top of the page provide access to a set of dashboards. The Analyse area allows employees of your organisation access to the Reporting Board, where PDF and RTF reports or graphical views can be created.
For details on using the scenarios, please refer to the section "Application Scenarios when Using the Standard Library" in the User Manual.
Better Hover Modelling for Process Flow Models
The Hover Modelling Assistant now works better with Process Flow models and provides more meaningful suggestions for which object might be added next.
For details on using the modelling assistant, please refer to the sections "Create Objects in the Graphical Editor" and "Connect Objects" in the User Manual.
New Features for ADOIT Administrators
Self-Service Password Reset
The new self-service password reset lets your users reset their own passwords without having to contact you each time.
This functionality is available if the mail component is configured and the Standard connector is used (= standard login page where the user can enter his or her username and password).
The following users CANNOT reset their password themselves:
Administrators (users with global administrator rights)
Technical users
Users from an external user management system
Users without email address
On the Admin Page, you can enable/disable the self-service password reset and configure how long a password reset link is valid.
For details, please refer to the section "Configure Self-Service Password Reset" in the Administration Manual.
Design & Document: Upload Banner
Choose a banner image that represents your organisation and upload it in the Administration Toolkit. The banner will be displayed at the top of the "Design & Document" start page and will be the first thing modellers see when they log in.
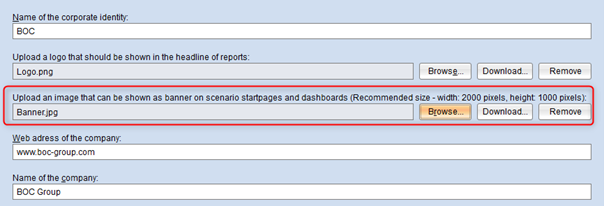
For details, please refer to the section "Corporate Identity" in the Administration Manual.
Organisation Portal and Explore & Contribute: Configure Start Model
Choose a start model that provides an overview of your organisation's process architecture. This model will be displayed on the Organisation Portal start page and on the "Explore & Contribute" scenario start page.
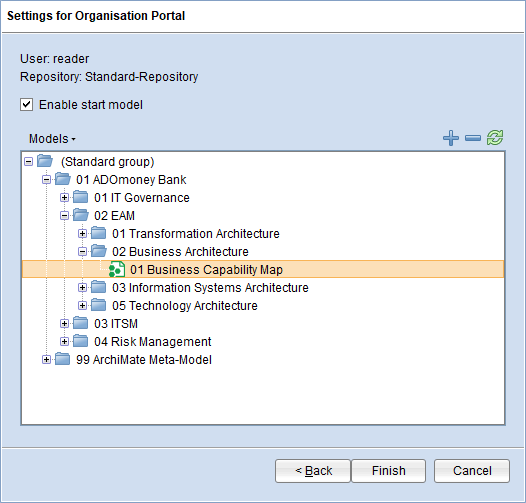
For details, please refer to the section "Configure Organisation Portal" in the Administration Manual.
+ New: Configure Recommendations
You can provide guidance to web client users when they create new models and objects. Define a set of model and object types that will be placed in the Recommendations pane of the New page.
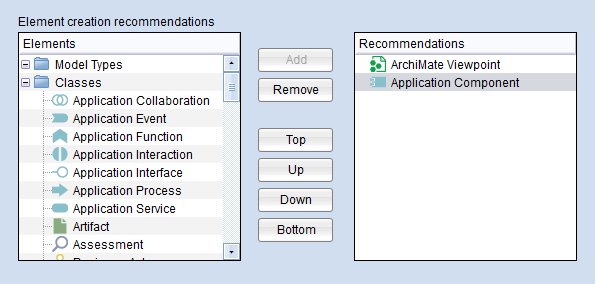
For details, please refer to the section "Element Creation Configuration" in the Administration Manual.
Metamodel Profile Configurator
The Metamodel Profile Configurator allows power users to choose between various predefined metamodel profiles in the web client. As an ADOIT administrator, you can set up access to the Metamodel Profile Configurator.
This feature is only available if you are using the ArchiMate Application Library. For details, please refer to the section "Set up Access to Metamodel Profile Configurator" in the Administration Manual.
Data Actuality: Configure by Object Type
In ADOIT 12.0, you can define global threshold values as usual to evaluate data actuality. These settings apply to all object types.
What is completely new, however, is that you can now also define individual threshold values for certain object types and thus override the global threshold values.
You have specified that objects are marked yellow after 30 days and red after 60 days. However, stricter rules apply for applications. They are marked yellow after 15 days and red after 30 days.
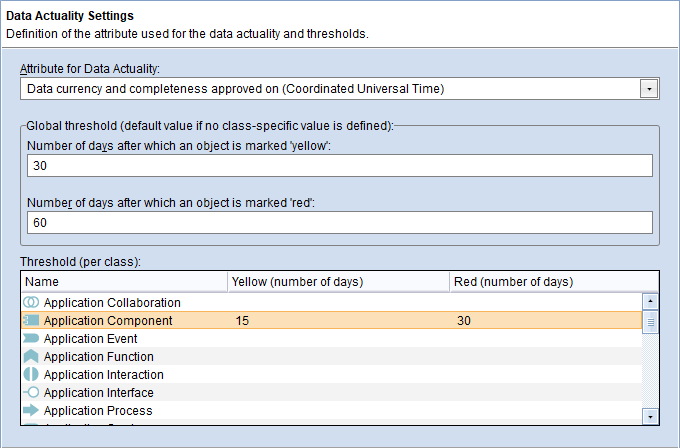
For details, please refer to the section "Data Actuality" in the Administration Manual.
Rights Management: "Change Rights" to Model/Object Groups
ADOIT 12.0 offers a clear improvement for organisations where a Sub Admin with limited administration rights should be responsible for a specific business unit or department.
Before: Sub Admins can change the access rights of specific users/user groups to all model/object groups
Now: Sub Admins can change the access rights of specific users/user groups to specific model/object groups
The "Change rights" permission is used to configure this. This permission can no longer only be set on the side on the user side, but also on the model/object side. To enable a Sub Admin to change the access rights of users/user groups to models and objects, "Change rights" must be activated on both sides.
For details, please refer to the section "Types of Access Permissions" in the Administration Manual.
Metamodel Rights: Restrict Target Classes of Relations
In context of models and objects, you can now specify for outgoing relations which target classes are available to members of a system role.
Starting from the source object Application Component, you can define e.g. for the relation Responsible business actors, that a User is available as target object, but a Business Actor is not.
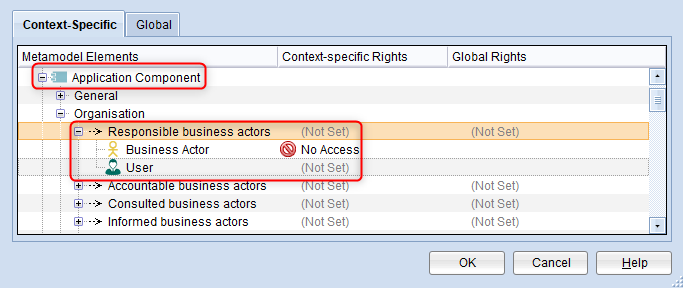
For details, please refer to the section "Edit Metamodel Rights" in the Administration Manual. :::
Management Office Integration Improvements
ADOIT offers synchronisation of objects with other BOC Management Office products. Now this functionality has been improved.
Improved Validation of Configuration Parameters
When you edit a Management Office Integration configuration in the Administration Toolkit, ADOIT will now warn you when certain parameters are not set correctly.

For details, please refer to the document "Management Office Integration" on the ADOIT installation medium in the folder "02 Rich Client\BOC\ADOIT 12.0\books\english".
Reset Authentication Configuration
On the Admin Page, you can now reset the authentication settings to the factory settings delivered with the product. Any previously applied modifications will be lost.
For details, please refer to the section "Authentication" in the Administration Manual.
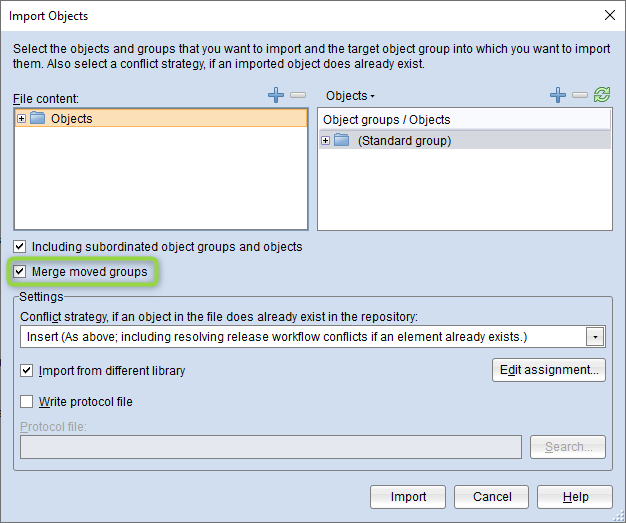
New Import Option: Merge Moved Groups
When you import objects, models, or entire repositories, you can now select the option "Merge moved groups". This option is useful when you import a backup where some groups have been moved to another location. The groups and ALL contained artifacts will be merged (while without this option, only the artifacts that exist in both groups are merged).
For details, please refer to the chapter "Import/Export" in the Administration Manual.
System Roles: Set Default Role
When you edit a system role, you can now select the option "Default role" so that this system role is applied to all users on login.
For details, please refer to the section "Create System Roles and Assign Users" in the Administration Manual.
Removed Features
This section lists features that have been removed from ADOIT 12.0.
Enter/Leave Fullscreen Mode
The fullscreen option has been removed from ADOIT 12.0.
Dock/Undock Notebook
The dock/undock option has been removed from ADOIT 12.0.
Navigator
The Navigator has been removed from ADOIT 12.0 (the zoom function is still available).
Migration from an Earlier Version of ADOIT to ADOIT 12.0
Changes to Software Requirements
Please note the following changes to the software requirements for running ADOIT when migrating from previous versions:
- SQL Server 2019
SQL Server 2019 is supported by ADOIT 11.0 or higher.
- ODBC Driver »SQL Server«
The ODBC driver »SQL Server« is no longer supported in ADOIT 12.0. Use the »ODBC Driver for SQL Server« or the »SQL Server Native Client« driver to establish a connection between your Microsoft SQL Server database and ADOIT instead.
Migration from ADOIT 11.0 to ADOIT 12.0 (ArchiMate Library)
A migration from ADOIT 11.0 to ADOIT 12.0 without further assistance by BOC is possible if you are using the ArchiMate Library. You will have to create a new database and import a migration package.
This approach is also valid if you are using an ArchiMate Library with changes in the metamodel. You will need a new version of your library. Please contact your ADOIT consultant to upgrade your library.
If you are using ADOIT 11.0 with the ADOIT Standard Application Library or another specific library, read on here.
Prerequisites
- You will need the installation medium for a successful and complete migration.
Migration
The migration consists of the following steps:
Stop the ADOIT 11.0 application server and the Apache Tomcat web server.
Export the library-specific component settings and a migration package.
Back up comments and deployment-specific configuration settings.
In earlier versions of ADOIT, you also had to back up the favourites (= favourite models and objects of the users) at this point. As of ADOIT 10.0, this step is no longer necessary since the favourites are stored in the database and will be exported as part of the migration package.
Similarly, you do not need to back up the file auth-config.xml. As of ADOIT 10.0, the settings for authentication in ADOIT are stored as a library-specific component setting and will be exported along with the other component settings.
Install ADOIT 12.0 according to the ADOIT 12.0 Installation Manual:
a. Install the rich client for use as an application server and for using the Administration Toolkit.
b. Install the web client to host ADOIT 12.0 as a web application.
Create a database:
If you are using the ArchiMate Library: A new version of the ArchiMate Library can be found in the folder "04 Sample Data\Library" on the installation medium. Initialize the new ADOIT database with this library file.
If you are using an ArchiMate Library with changes in the metamodel: Please contact your ADOIT consultant to upgrade your application library. Initialize the new ADOIT database with the new library file you have received from your ADOIT consultant.
Start the ADOIT 12.0 Administration Toolkit and log in to the new database.
Import the migration package and the library-specific component settings.
Migrate comments and deployment-specific configuration settings.
Start the ADOIT 12.0 application server and the Apache Tomcat web server. If ADOIT 12.0 is working properly, you can uninstall ADOIT 11.0.
For further information and details on the above steps, please refer to the Installation Manual and to the sections "Make a Manual Backup" and "Restore a Manual Backup" in the Administration Manual.
For further information and details on the above steps, please refer to the Installation Manual and to the sections "Make a Manual Backup" and "Restore a Manual Backup" in the Administration Manual.
Migration from ADOIT 10.0/10.1 to ADOIT 12.0 (ArchiMate Library)
A migration from ADOIT 10.0/10.1 to ADOIT 12.0 without further assistance by BOC is possible if you are using the ArchiMate Library. You will have to create a new database and import a migration package.
This approach is also valid if you are using an ArchiMate Library with changes in the metamodel. You will need a new version of your library. Please contact your ADOIT consultant to upgrade your library.
If you are using ADOIT 10.0/10.1 with the ADOIT Standard Application Library or another specific library, read on here.
Prerequisites
- You will need the installation medium for a successful and complete migration.
Migration
The migration consists of the following steps:
Stop the ADOIT 10.0/10.1 application server and the Apache Tomcat web server.
Export the library-specific component settings and a migration package.
Back up comments and deployment-specific configuration settings.
In earlier versions of ADOIT, you also had to back up the favourites (= favourite models and objects of the users) at this point. As of ADOIT 10.0, this step is no longer necessary since the favourites are stored in the database and will be exported as part of the migration package.
Similarly, you do not need to back up the file auth-config.xml. As of ADOIT 10.0, the settings for authentication in ADOIT are stored as a library-specific component setting and will be exported along with the other component settings.
Install ADOIT 12.0 according to the ADOIT 12.0 Installation Manual:
a. Install the rich client for use as an application server and for using the Administration Toolkit.
b. Install the web client to host ADOIT 12.0 as a web application.
Create a database:
If you are using the ArchiMate Library: A new version of the ArchiMate Library can be found in the folder "04 Sample Data\Library" on the installation medium. Initialize the new ADOIT database with this library file.
If you are using an ArchiMate Library with changes in the metamodel: Please contact your ADOIT consultant to upgrade your application library. Initialize the new ADOIT database with the new library file you have received from your ADOIT consultant.
Start the ADOIT 12.0 Administration Toolkit and log in to the new database.
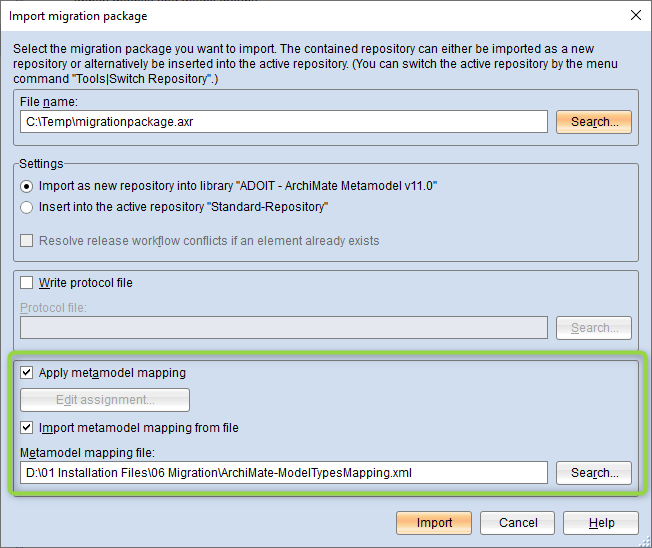
Import the migration package. All models MUST be converted to the new model type ArchiMate Viewpoint. Proceed as follows:
a. In the "Import migration package" dialogue, select the options "Apply metamodel mapping" and "Import metamodel mapping from file".
b. In the "Metamodel mapping file" box, select the metamodel mapping file ArchiMate-ModelTypesMapping.xml. This file can be found in the folder "06 Migration" on the installation medium.
Import the library-specific component settings.
Migrate comments and deployment-specific configuration settings.
Start the ADOIT 12.0 application server and the Apache Tomcat web server. If ADOIT 12.0 is working properly, you can uninstall ADOIT 10.0/10.1.
For further information and details on the above steps, please refer to the Installation Manual and to the sections "Make a Manual Backup" and "Restore a Manual Backup" in the Administration Manual.
Migration from ADOIT 11.0 to ADOIT 12.0 (Standard Library)
A migration from ADOIT 11.0 to ADOIT 12.0 without further assistance by BOC is possible if you are using the ADOIT Standard Application Library. You will have to create a new database and import a migration package.
This approach is also valid if you are using an ADOIT Standard Application Library with changes in the metamodel or functional extensions or another specific library. You will need a new version of your library. Please contact your ADOIT consultant to upgrade your library.
If you are using ADOIT 11.0 with the ArchiMate Application Library, read on here.
Prerequisites
- You will need the installation medium for a successful and complete migration.
Migration
The migration consists of the following steps:
Stop the ADOIT 11.0 application server and the Apache Tomcat web server.
Export the library-specific component settings and a migration package.
Back up comments and deployment-specific configuration settings.
In earlier versions of ADOIT, you also had to back up the favourites (= favourite models and objects of the users) at this point. As of ADOIT 10.0, this step is no longer necessary since the favourites are stored in the database and will be exported as part of the migration package.
Similarly, you do not need to back up the file auth-config.xml. As of ADOIT 10.0, the settings for authentication in ADOIT are stored as a library-specific component setting and will be exported along with the other component settings.
Install ADOIT 12.0 according to the ADOIT 12.0 Installation Manual:
a. Install the rich client for use as an application server and for using the Administration Toolkit.
b. Install the web client to host ADOIT 12.0 as a web application.
Create a database:
If you are using the ADOIT Standard Application Library: A new version of the ADOIT Standard Application Library can be found in the folder "04 Sample Data\Library" on the installation medium. Initialize the new ADOIT database with this library file.
If you are using an ADOIT Standard Application Library with changes in the metamodel or functional extensions or another specific library: Please contact your ADOIT consultant to upgrade your application library. Initialize the new ADOIT database with the new library file you have received from your ADOIT consultant.
Start the ADOIT 12.0 Administration Toolkit and log in to the new database.
Import the migration package and the library-specific component settings.
Migrate comments and deployment-specific configuration settings.
Start the ADOIT 12.0 application server and the Apache Tomcat web server. If ADOIT 12.0 is working properly, you can uninstall ADOIT 11.0.
For further information and details on the above steps, please refer to the Installation Manual and to the sections "Make a Manual Backup" and "Restore a Manual Backup" in the Administration Manual.
Migration from ADOIT 10.0/10.1 to ADOIT 12.0 (Standard Library)
A migration from ADOIT 10.0/10.1 to ADOIT 12.0 without further assistance by BOC is possible if you are using the ADOIT Standard Application Library. You will have to create a new database and import a migration package.
This approach is also valid if you are using an ADOIT Standard Application Library with changes in the metamodel or functional extensions or another specific library. You will need a new version of your library. Please contact your ADOIT consultant to upgrade your library.
If you are using ADOIT 10.0/10.1 with the ArchiMate Application Library, read on here.
Prerequisites
- You will need the installation medium for a successful and complete migration.
Migration
The migration consists of the following steps:
Stop the ADOIT 10.0/10.1 application server and the Apache Tomcat web server.
Export the library-specific component settings and a migration package.
Back up comments and deployment-specific configuration settings.
In earlier versions of ADOIT, you also had to back up the favourites (= favourite models and objects of the users) at this point. As of ADOIT 10.0, this step is no longer necessary since the favourites are stored in the database and will be exported as part of the migration package.
Similarly, you do not need to back up the file auth-config.xml. As of ADOIT 10.0, the settings for authentication in ADOIT are stored as a library-specific component setting and will be exported along with the other component settings.
Install ADOIT 12.0 according to the ADOIT 12.0 Installation Manual:
a. Install the rich client for use as an application server and for using the Administration Toolkit.
b. Install the web client to host ADOIT 12.0 as a web application.
Create a database:
If you are using the ADOIT Standard Application Library: A new version of the ADOIT Standard Application Library can be found in the folder "04 Sample Data\Library" on the installation medium. Initialize the new ADOIT database with this library file.
If you are using an ADOIT Standard Application Library with changes in the metamodel or functional extensions or another specific library: Please contact your ADOIT consultant to upgrade your application library. Initialize the new ADOIT database with the new library file you have received from your ADOIT consultant.
Start the ADOIT 12.0 Administration Toolkit and log in to the new database.
Import the migration package and the library-specific component settings.
Migrate comments and deployment-specific configuration settings.
Start the ADOIT 12.0 application server and the Apache Tomcat web server. If ADOIT 12.0 is working properly, you can uninstall ADOIT 10.0/10.1.
For further information and details on the above steps, please refer to the Installation Manual and to the sections "Make a Manual Backup" and "Restore a Manual Backup" in the Administration Manual.
Migration from All Other Versions to ADOIT 12.0
If you are using ADOIT 9.0/9.1 or earlier versions, the migration to ADOIT 12.0 requires support by BOC.
For details on the necessary steps to migrate your version of ADOIT to ADOIT 12.0, please contact your ADOIT consultant.
Switch to ArchiMate Library
If you are using ADOIT 11.0 or earlier versions, and want to switch to using the ArchiMate Application Library, the migration to ADOIT 12.0 requires support by BOC.
For details on the necessary steps to migrate your version of ADOIT to ADOIT 12.0, please contact your ADOIT consultant.
How to Install a Hotfix for ADOIT 12.0
Hotfixes resolve software errors and security issues. Please note that the most current hotfix always includes the modifications of previous hotfixes. Only the latest hotfix has to be installed to get all fixes.
If you install a hotfix for ADOIT 12.0, you do not have to create a new database and import a migration package.
Downloading a Hotfix
In the majority of cases, you are notified of hotfixes by your ADOIT consultant.
The version format of a hotfix is 12.0.x (for example: 12.0.1 or 12.0.2).
Download the hotfix from the BOC website (your ADOIT consultant will email you a link).
The installation utilizes a full, standalone release package.
Installing a Hotfix
Installing a hotfix consists of the following steps:
Stop the ADOIT 12.0 application server and the Apache Tomcat web server.
Backup comments and deployment-specific configuration settings.
Install ADOIT 12.0.x according to the ADOIT 12.0 Installation Manual:
a. Install the rich client for use as an application server and for using the Administration Toolkit.
b. Install the web client to host ADOIT 12.0.x as a web application.
Migrate comments and deployment-specific configuration settings.
Start the ADOIT 12.0.x application server and the Apache Tomcat web server. If ADOIT 12.0.x is working properly, you can uninstall ADOIT 12.0.
For further information and details on the above steps, please refer to the Installation Manual and to the sections "Make a Manual Backup" and "Restore a Manual Backup" in the Administration Manual.