New Features in ADOIT 13.0
New Features for Users of the ArchiMate Application Library
Insights Dashboards Improvements
We have improved the Insights dashboards in the ArchiMate library so that you can get even more insights from your data.
Insights Dashboards for all Repository Objects
First things first: You can now open an Insights dashboard for all repository objects! Regardless of which object you select, the following default widgets will always be displayed:
- Involved Users and Business Actors: Shows the responsibilities of
Users or
Business Actors for the element according to a RACI matrix.
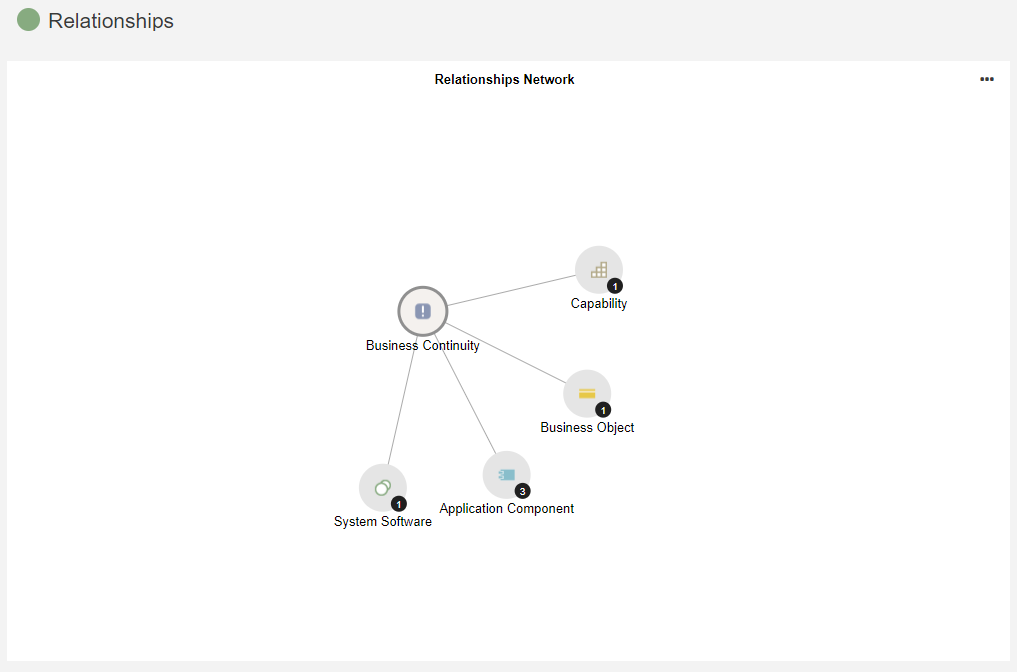
- Relationships Network and Relationships Details: Overview of all elements with a relationship to the currently examined element, once in the form of a network diagram, once as a table.
- Timeline: Shows the lifecycle of the currently viewed element.
- Associated Models: Evaluation of the path Element > Associated models > Model.
- Usage in Models: Shows all models that contain the currently viewed element.
What Happens to the Existing Insights Dashboards?
You are already familiar with the following Insights dashboards from previous ADOIT versions:
- Insights dashboard for
Application Components
- Insights dashboard for
Capabilities
- Insights dashboard for
Business Objects
- Insights dashboard for
System Software elements
Of course, these dashboards will remain. They keep their original widgets and have also been expanded with the new default widgets.
Additionally, the following changes apply:
- The names of some widgets have been aligned and the order in which the widgets are displayed has changed (no functional changes).
- The Insights dashboard for
Application Components now also includes the Replaced by widget. This widget shows all Application Components that replace the currently viewed Application Component.
Plateau Insights
The new Insights dashboard for Plateau type elements contains all default widgets and some additional widgets:
- Surrounding Plateaus: Shows surrounding
Plateaus that trigger or are triggered by the currently viewed
Plateau.
- Related Architecture Elements: Lists elements which are realised by the currently viewed
Plateau.
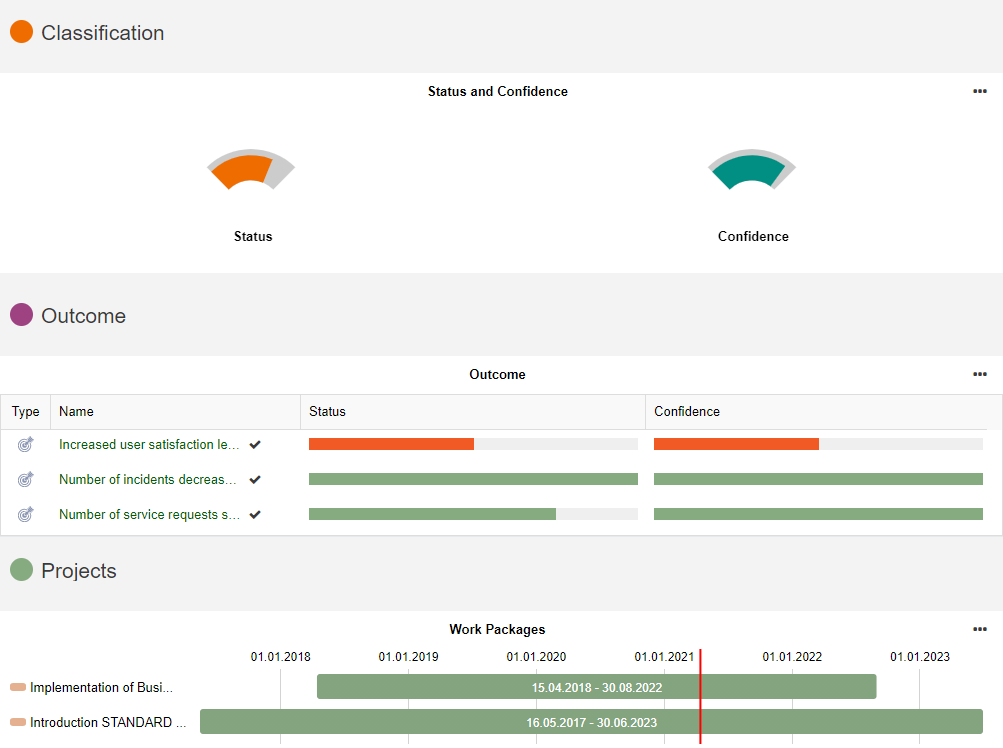
- Status and Confidence: Gauge chart showing the current value of the following Status and Confidence attributes.
- Outcome: Lists all
Outcomes which are realized by the currently viewed
Plateau.
- Work Packages: This Gantt chart displays all
Work Packages which realize the currently viewed
Plateau.
Header: More Information and Attribute Editing
The header, i.e. the area at the top of every Insights dashboard, has been expanded.

In addition to the name of the element, the following information is now also displayed:
- the date of last change
- the last editor
- an assessment of the data actuality (by clicking on the icon you can confirm the data actuality right away)
- the description of the object
Additionally, by clicking the Properties button, you can open the Notebook and edit the object's attributes.
Tables: Opening Other Insights Dashboards Directly and State Icon
So you want to directly view essential information about a specific object in a table? Simply move the mouse pointer over that object and an icon to open the Insights dashboard for that object will appear.
Are you using the EA workflow? All tables in Insights dashboards now display the release workflow state for listed items.
![]()
Graphical Editor: Open Insights Dashboard of Element
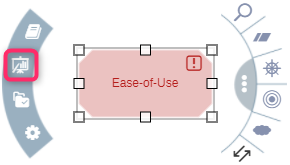
Insights dashboards of specific elements may now be opened directly from the graphical editor. This new feature is seamlessly integrated into the Hover Modelling Assistant.
My Objects: New Filtering Options
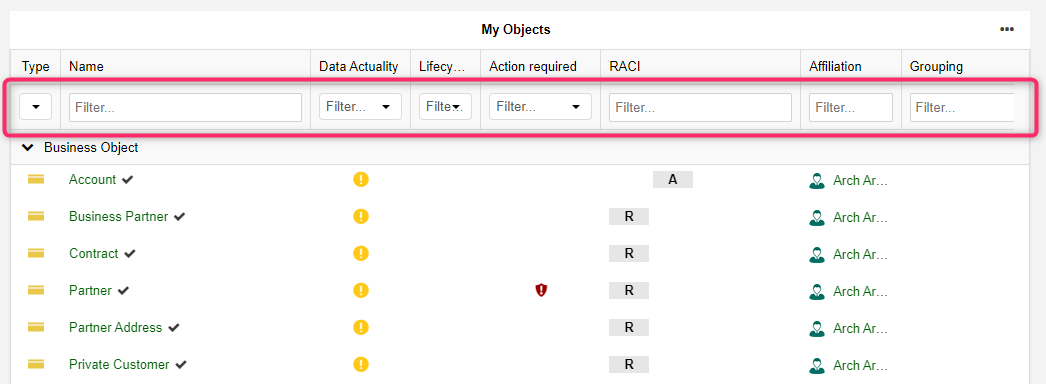
New filter options have been added to the My Objects dashboard, making your Business Objects,
Application Components, etc. even easier to find. You can filter by one or more columns. The dashboard will be updated continuously as you type. It's easy to temporarily hide irrelevant information and focus on the data that you want to see!
Methodical Improvements in the ArchiMate Library 13.0
Document Costs of Applications
Our customers have asked for a way to document the costs of applications in ADOIT.
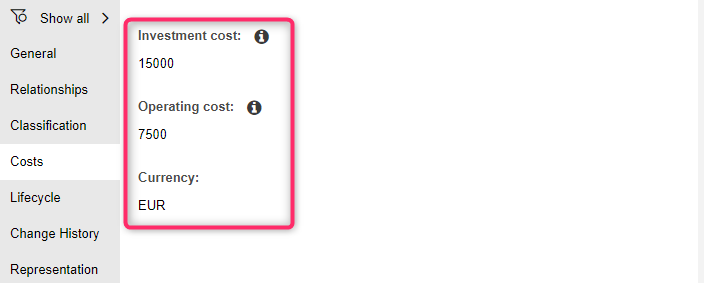
For this purpose, we have added the following attributes in the Notebook of Application Components:
- Investment Cost
- Operating Cost
- Currency
All of these attributes can be found in the new chapter "Costs".
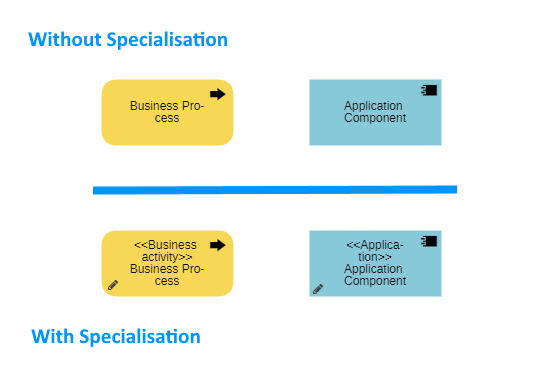
Show or Hide Specialisation Attribute
The Specialisation attribute can be found in the Notebook of elements like Application Components and
Business Processes in the chapter "General".
Previously, the selected specialisation was always displayed in the model. With the new ArchiMate Application Library 13.0, however, you can show or hide the specialisation as desired. Use the new attribute Show specialisation in the Notebook chapter "Representation" for this purpose.
System Software & Technology Collaboration: Attribute "Roadmap Status" Changed
The attribute Roadmap status in the Notebook of System Software elements and
Technology Collaborations has been changed.
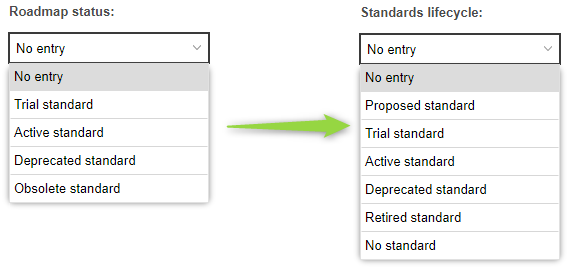
The name of the attribute has changed:
- The Roadmap status attribute is now called Standards lifecycle.
The name of a value of the enumeration attribute has changed:
- Obsolete standard -> Retired standard
In addition, the value range of the attribute has been adjusted. The following values have been added:
- Proposed standard
- No standard
Technology Collaboration: "Standard" Attribute Removed
The Standards attribute determines whether a Technology Collaboration is considered standard for the entire organisation. With the changes and extension to the Roadmap status attribute (see section above), this attribute is no longer necessary and has been removed from the Notebook.
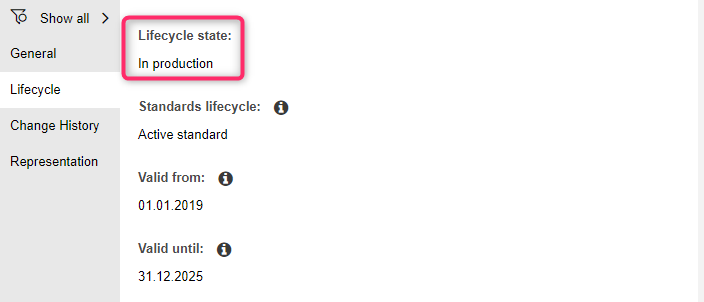
Node, System Software & Technology Collaboration: Set Lifecycle State
The Lifecycle State attribute has been added to the Notebook of Nodes,
System Software elements and
Technology Collaborations (in the chapter "Lifecycle").
Business Actor: Incoming RACI Relations Renamed
To improve clarity, the following incoming relations have been renamed in the Notebook of Business Actors:
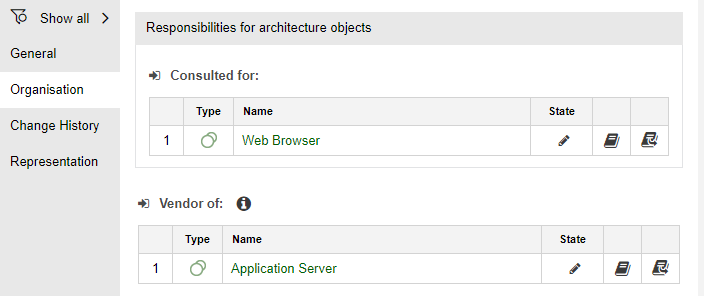
- Incoming Relation: Requester -> Requester of
- Incoming Relation: Vendor -> Vendor of
- Incoming Relation: Responsible business actors -> Responsible for
- Incoming Relation: Accountable business actors -> Accountable for
- Incoming Relation: Consulted business actors -> Consulted for
- Incoming Relation: Informed business actors -> Informed for
All of these relations can be found in the Notebook chapter "Organisation".
Plateau & Outcome: Document Progress and Health Check
For Plateaus and
Outcomes, the Progress can now be documented and a Health check performed (new attributes in the Notebook chapter "General").

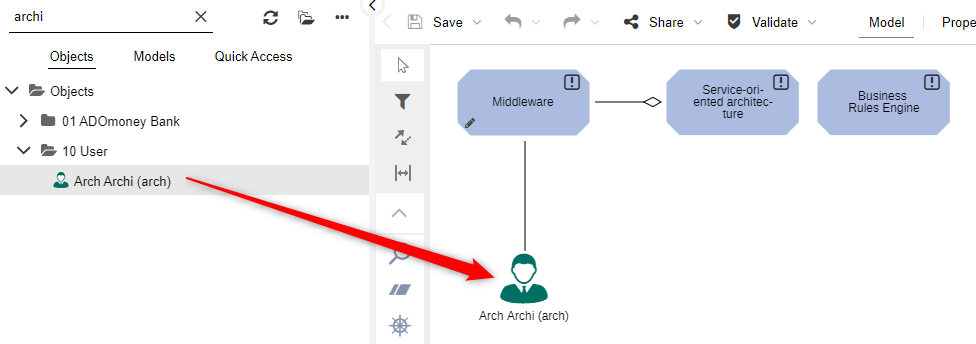
Add User Objects to Models
So you want to visualise the responsibilities of Users for specific elements in a model? No problem!
Simply drag the desired User object from the Object Catalogue onto the drawing area. Assuming there are already relationships to other objects in the model, the corresponding connectors will be drawn automatically.
Aggregate Models with the Grouping Element
It's now possible to group models that belong together. The Grouping element is used for this. Previously, it was only possible to group elements.

To aggregate an Architecture Diagram under a
Grouping element, use the Aggregates models relation in the Notebook chapter "Relationships" of the
Grouping. This relation is also shown at the
Architecture Diagram as an incoming relation (Grouped by in the chapter "General information").
New Features for All Users
Notebook: Format Headings
You can now choose between different headings when formatting attribute texts in the Notebook:
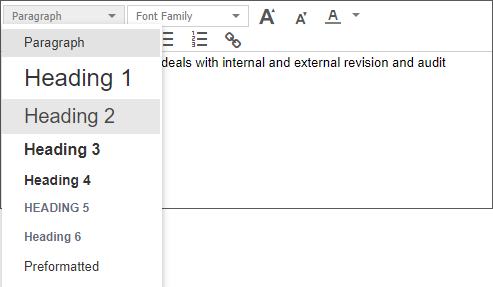
When inserting text from Microsoft Word, the original headings are carried over and can be adapted in ADOIT if desired.
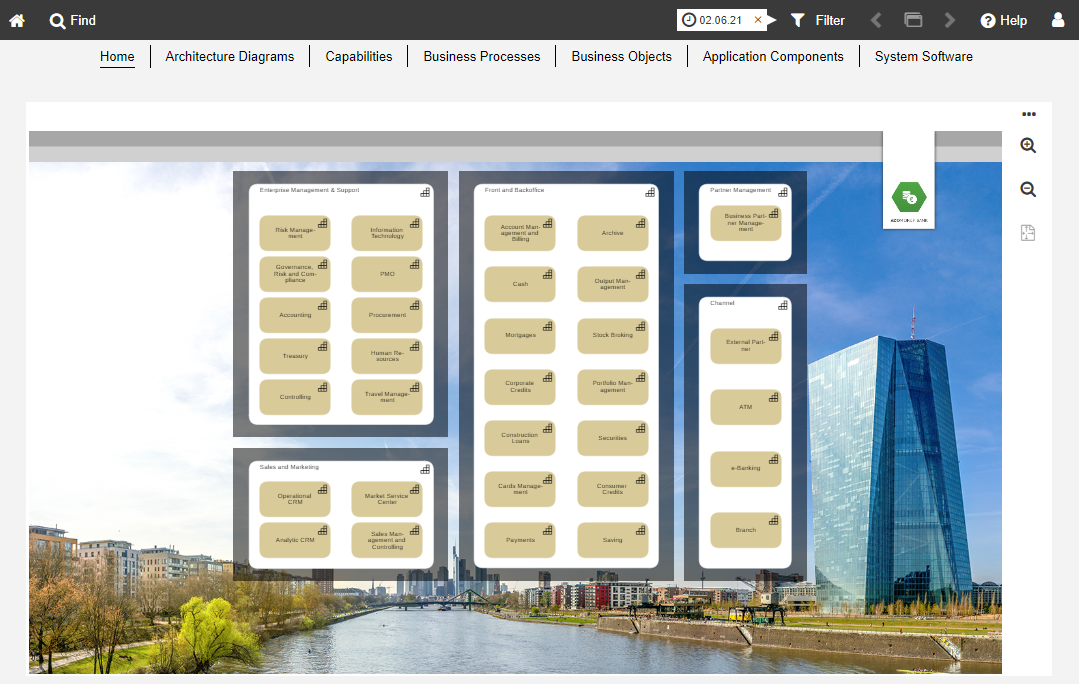
Organisation Portal: Start Model Automatically Fit to Window Size
In the Organisation Portal, the start model is now automatically fit to the window size instead of being displayed in its original size (zoom value 100%). This allows you to see the entire model at one time.
Model Comparison: Optimized Menu Bar
In ADOIT 13.0, the model comparison menu bar has been simplified and tidied up. Fewer entries ensure a better overview.
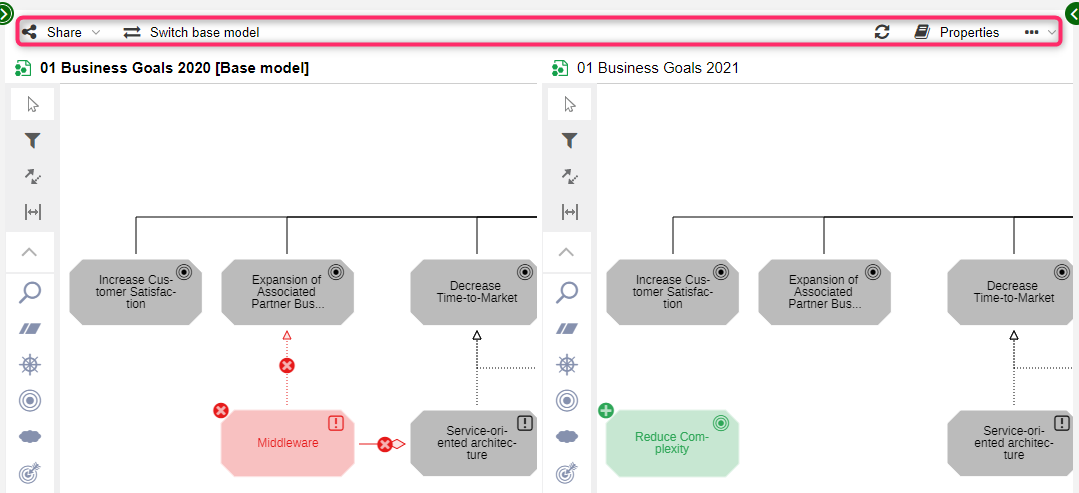
All necessary functions (Share, Switch base model, Properties) are of course retained. The following buttons have been removed as part of that process:
Save
Undo and
redo
Property filter
Connect Center
The Connect Center is a new dashboard in ADOIT. It shows:
- which objects have been synchronized between ADOIT and its sister product ADONIS via the BOC Management Office Integration (MOI) interface
- which objects have been synchronized between ADOIT and other applications such as ServiceNow via the Integration Framework (HTTP, ext_connect)

New Features for ADOIT Administrators
Automatically Assign Named Use Licences
A user can be assigned as a named user for a scenario. Named users have guaranteed access to the selected scenario in ADOIT. Otherwise, the user will be a concurrent user and will share the available slots with other concurrent users.
Synchronisation with a Directory Service
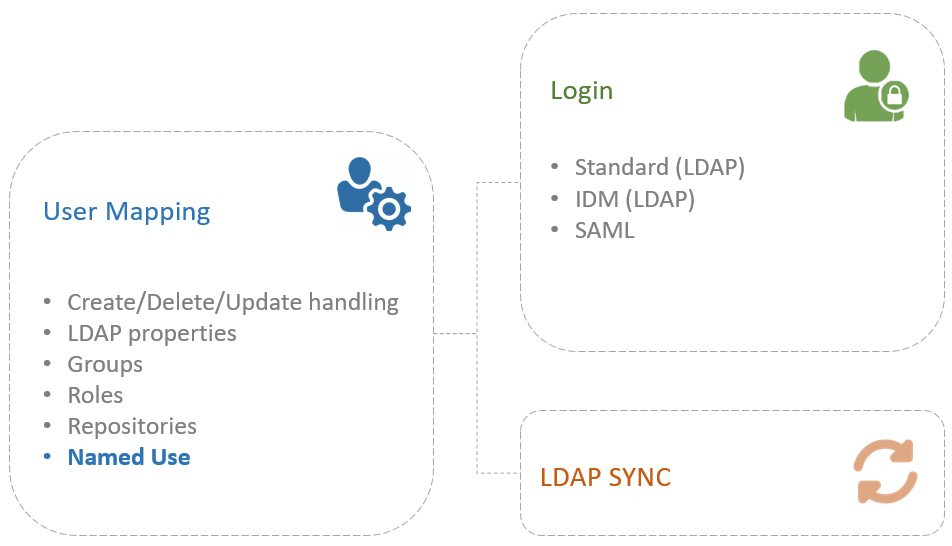
Previously, named users could only be assigned manually in the Administration Toolkit. This restriction no longer applies in ADOIT 13.0. Named users can now be updated automatically during synchronisation with a directory service. For this purpose, the user mapping, which is part of the authentication settings, needs to be adjusted on the Admin Page.
Configure Licence Warnings
Also on the Admin Page, you can configure an automated email notification when most of the available named users (default: 80%) are already assigned for a specific scenario and action should be taken to extend the licence.
Progress Bar and Report during LDAP Synchronisation
On the Admin Page, you can start the synchronization of users with an LDAP-compliant directory service. This feature has been improved in ADOIT 13.0:
- During the synchronization, a progress bar provides information on the current status. This is especially useful if synchronisation takes a long time and you want to know what is actually happening.
- After the synchronisation, all newly synchronised users and any error codes are displayed for each domain.
Management Office Integration Improvements
ADOIT offers synchronisation of objects with other BOC Management Office products. Now this functionality has been improved.
Skip Adding Change History Entries during Import
Use this setting to prevent the technical user from adding entries to the change history of an object during import (such as Last synchronisation date). This setting is optional.
Settings for Deletion Handling
A deletion handling for objects can now be defined by customising. In addition to the standard behaviour (delete imported objects when they have been removed from the source product), they can also be marked or moved to a specific folder.
The following deletion behaviour has been defined for the synchronization of objects between the standard libraries shipped with the product:
- In general, imported objects are deleted during synchronization if they have been removed from the source product in the meantime.
- However, if relations have been added to the imported objects in the target system, they are not deleted, but moved to the "Obsolete objects" folder. An exception to this rule are the relations Responsible business actors and Responsible person. Although a relation of this type was added in the target system, imported objects will be deleted anyway.
Migration from an Earlier Version of ADOIT to ADOIT 13.0
Changes to Software Requirements
Please note the following changes to the software requirements for running ADOIT when migrating from previous versions:
Support has been dropped for:
- Apache Tomcat 7
Migration from ADOIT 11.1/12.0/12.1 to ADOIT 13.0 (ArchiMate Library)
If you upgrade from ADOIT 11.1/12.0/12.1 to ADOIT 13.0, you do not have to create a new database and import a migration package if you are using the ArchiMate Library.
Prerequisites
- You will need the installation medium for a successful and complete migration.
- Before you start the migration, we strongly recommend creating a backup of the database.
Migration
The migration consists of the following steps:
Stop the ADOIT 11.1/12.0/12.1 application server and the Apache Tomcat web server.
Export the library-specific component settings.
Back up comments and deployment-specific configuration settings.
Install ADOIT 13.0 according to the ADOIT 13.0 Installation Manual:
a. Install the rich client for use as an application server and for using the Administration Toolkit.
b. Install the web client to host ADOIT 13.0 as a web application.
Start the ADOIT 13.0 Administration Toolkit and log in to the ADOIT database.
Update the application library:
If you are using the ArchiMate Library: Databases created with ADOIT 11.1/12.0/12.1 can still be used with ADOIT 13.0. However, you will not have access to improvements in the ArchiMate Library. (Optionally) Update the library in the ADOIT database. A new version of the ArchiMate Library can be found in the folder "04 Sample Data\Library" on the installation medium.
If you are using an ArchiMate Library with changes in the metamodel: Databases created with ADOIT 11.1/12.0/12.1 can still be used with ADOIT 13.0. However, you will not have access to improvements in the ArchiMate Library. (Optionally) Contact your ADOIT consultant to upgrade your application library.
(Optionally) Import the library-specific component settings if you updated the application library.
Migrate comments and deployment-specific configuration settings.
Start the ADOIT 13.0 application server and the Apache Tomcat web server. If ADOIT 13.0 is working properly, you can uninstall ADOIT 11.1/12.0/12.1.
For further information and details on the above steps, please refer to the Installation Manual and to the sections "Make a Manual Backup" , "Restore a Manual Backup" and "Update Library" in the Administration Manual.
Migration from ADOIT 11.0 to ADOIT 13.0 (ArchiMate Library)
A migration from ADOIT 11.0 to ADOIT 13.0 without further assistance by BOC is possible if you are using the ArchiMate Library. You will have to create a new database and import a migration package.
This approach is also valid if you are using an ArchiMate Library with changes in the metamodel. You will need a new version of your library. Please contact your ADOIT consultant to upgrade your library.
If you are using ADOIT 11.0 with the ADOIT Standard Application Library or another specific library, read on here.
Prerequisites
- You will need the installation medium for a successful and complete migration.
Migration
The migration consists of the following steps:
Stop the ADOIT 11.0 application server and the Apache Tomcat web server.
Export the library-specific component settings and a migration package.
Back up comments and deployment-specific configuration settings.
Install ADOIT 13.0 according to the ADOIT 13.0 Installation Manual:
a. Install the rich client for use as an application server and for using the Administration Toolkit.
b. Install the web client to host ADOIT 13.0 as a web application.
Create a database:
If you are using the ArchiMate Library: A new version of the ArchiMate Library can be found in the folder "04 Sample Data\Library" on the installation medium. Initialize the new ADOIT database with this library file.
If you are using an ArchiMate Library with changes in the metamodel: Please contact your ADOIT consultant to upgrade your application library. Initialize the new ADOIT database with the new library file you have received from your ADOIT consultant.
Start the ADOIT 13.0 Administration Toolkit and log in to the new database.
Import the migration package and the library-specific component settings.
Migrate comments and deployment-specific configuration settings.
Start the ADOIT 13.0 application server and the Apache Tomcat web server. If ADOIT 13.0 is working properly, you can uninstall ADOIT 11.0.
For further information and details on the above steps, please refer to the Installation Manual and to the sections "Make a Manual Backup" and "Restore a Manual Backup" in the Administration Manual.
Migration from ADOIT 12.0/12.1 to ADOIT 13.0 (Standard Library)
If you upgrade from ADOIT 12.0/12.1 to ADOIT 13.0, you do not have to create a new database and import a migration package if you are using the ADOIT Standard Application Library.
This approach is also valid if you are using an ADOIT Standard Application Library with changes in the metamodel or functional extensions or another specific library.
If you are using ADOIT 12.0/12.1 with the ArchiMate Application Library, read on here.
Prerequisites
- You will need the installation medium for a successful and complete migration.
Migration
The migration consists of the following steps:
Stop the ADOIT 12.0/12.1 application server and the Apache Tomcat web server.
Back up comments and deployment-specific configuration settings.
Install ADOIT 13.0 according to the ADOIT 13.0 Installation Manual:
a. Install the rich client for use as an application server and for using the Administration Toolkit.
b. Install the web client to host ADOIT 13.0 as a web application.
Migrate comments and deployment-specific configuration settings.
Start the ADOIT 13.0 application server and the Apache Tomcat web server. If ADOIT 13.0 is working properly, you can uninstall ADOIT 12.0/12.1.
For further information and details on the above steps, please refer to the Installation Manual and to the sections "Make a Manual Backup" and "Restore a Manual Backup" in the Administration Manual.
Migration from ADOIT 11.1 to ADOIT 13.0 (Standard Library)
If you upgrade from ADOIT 11.1 to ADOIT 13.0, you do not have to create a new database and import a migration package if you are using the ADOIT Standard Application Library.
This approach is also valid if you are using an ADOIT Standard Application Library with changes in the metamodel or functional extensions or another specific library. Please contact your ADOIT consultant to clarify if a new version of your application library is required before you proceed.
If you are using ADOIT 11.1 with the ArchiMate Application Library, read on here.
Prerequisites
- You will need the installation medium for a successful and complete migration.
- Before you start the migration, we strongly recommend creating a backup of the database.
Migration
The migration consists of the following steps:
Stop the ADOIT 11.1 application server and the Apache Tomcat web server.
Export the library-specific component settings.
Back up comments and deployment-specific configuration settings.
Install ADOIT 13.0 according to the ADOIT 13.0 Installation Manual:
a. Install the rich client for use as an application server and for using the Administration Toolkit.
b. Install the web client to host ADOIT 13.0 as a web application.
Start the ADOIT 13.0 Administration Toolkit and log in to the ADOIT database.
Update the application library:
- If you are using the ADOIT Standard Application Library: Databases created with ADOIT 11.1 can still be used with ADOIT 13.0. However, you will not have access to improvements in the ADOIT Standard Application Library. (Optionally) Update the library in the ADOIT database. A new version of the ADOIT Standard Application Library can be found in the folder "04 Sample Data\Library" on the installation medium.
- If you are using an ADOIT Standard Application Library with changes in the metamodel: Databases created with ADOIT 11.1 can still be used with ADOIT 13.0. However, you will not have access to improvements in the ADOIT Standard Application Library. (Optionally) Contact your ADOIT consultant to upgrade your application library.
- If you are using an ADOIT Standard Application Library with functional extensions or another specific library: Please contact your ADOIT consultant to clarify if a new version of your specific library is required before you proceed. Update the library in the ADOIT database if you received a new library file.
(Optionally) Import the library-specific component settings if you updated the application library.
Migrate comments and deployment-specific configuration settings.
Start the ADOIT 13.0 application server and the Apache Tomcat web server. If ADOIT 13.0 is working properly, you can uninstall ADOIT 11.1.
For further information and details on the above steps, please refer to the Installation Manual and to the sections "Make a Manual Backup" , "Restore a Manual Backup" and "Update Library" in the Administration Manual.
Migration from ADOIT 11.0 to ADOIT 13.0 (Standard Library)
A migration from ADOIT 11.0 to ADOIT 13.0 without further assistance by BOC is possible if you are using the ADOIT Standard Application Library. You will have to create a new database and import a migration package.
This approach is also valid if you are using an ADOIT Standard Application Library with changes in the metamodel or functional extensions or another specific library. You will need a new version of your library. Please contact your ADOIT consultant to upgrade your library.
If you are using ADOIT 11.0 with the ArchiMate Application Library, read on here.
Prerequisites
- You will need the installation medium for a successful and complete migration.
Migration
The migration consists of the following steps:
Stop the ADOIT 11.0 application server and the Apache Tomcat web server.
Export the library-specific component settings and a migration package.
Back up comments and deployment-specific configuration settings.
Install ADOIT 13.0 according to the ADOIT 13.0 Installation Manual:
a. Install the rich client for use as an application server and for using the Administration Toolkit.
b. Install the web client to host ADOIT 13.0 as a web application.
Create a database:
If you are using the ADOIT Standard Application Library: A new version of the ADOIT Standard Application Library can be found in the folder "04 Sample Data\Library" on the installation medium. Initialize the new ADOIT database with this library file.
If you are using an ADOIT Standard Application Library with changes in the metamodel or functional extensions or another specific library: Please contact your ADOIT consultant to upgrade your application library. Initialize the new ADOIT database with the new library file you have received from your ADOIT consultant.
Start the ADOIT 13.0 Administration Toolkit and log in to the new database.
Import the migration package and the library-specific component settings.
Migrate comments and deployment-specific configuration settings.
Start the ADOIT 13.0 application server and the Apache Tomcat web server. If ADOIT 13.0 is working properly, you can uninstall ADOIT 11.0.
For further information and details on the above steps, please refer to the Installation Manual and to the sections "Make a Manual Backup" and "Restore a Manual Backup" in the Administration Manual.
Migration from All Other Versions to ADOIT 13.0
If you are using ADOIT 10.0/10.1 or earlier versions, the migration to ADOIT 13.0 requires support by BOC.
For details on the necessary steps to migrate your version of ADOIT to ADOIT 13.0, please contact your ADOIT consultant.
Switch to ArchiMate Library
If you are using ADOIT 12.1 or earlier versions, and want to switch to using the ArchiMate Application Library, the migration to ADOIT 13.0 requires support by BOC.
For details on the necessary steps to migrate your version of ADOIT to ADOIT 13.0, please contact your ADOIT consultant.
How to Install a Hotfix for ADOIT 13.0
Hotfixes resolve software errors and security issues. Please note that the most current hotfix always includes the modifications of previous hotfixes. Only the latest hotfix has to be installed to get all fixes.
If you install a hotfix for ADOIT 13.0, you do not have to create a new database and import a migration package.
Downloading a Hotfix
In the majority of cases, you are notified of hotfixes by your ADOIT consultant.
The version format of a hotfix is 13.0.x (for example: 13.0.1 or 13.0.2).
Download the hotfix from the BOC website (your ADOIT consultant will email you a link).
The installation utilizes a full, standalone release package.
Installing a Hotfix
Installing a hotfix consists of the following steps:
Stop the ADOIT 13.0 application server and the Apache Tomcat web server.
Backup comments and deployment-specific configuration settings.
Install ADOIT 13.0.x according to the ADOIT 13.0 Installation Manual:
a. Install the rich client for use as an application server and for using the Administration Toolkit.
b. Install the web client to host ADOIT 13.0.x as a web application.
Migrate comments and deployment-specific configuration settings.
Start the ADOIT 13.0.x application server and the Apache Tomcat web server. If ADOIT 13.0.x is working properly, you can uninstall ADOIT 13.0.
For further information and details on the above steps, please refer to the Installation Manual and to the sections "Make a Manual Backup" and "Restore a Manual Backup" in the Administration Manual.