New Features in ADOIT 14.0
New Features for All Users
A New Approach to Creating Charts
Charts enable you to visualise objects and their attributes and relations in ADOIT. Previously called "Views", they have undergone a vast redesign in ADOIT 14.0.
Read on to find out what's new and improved!
Types of Charts
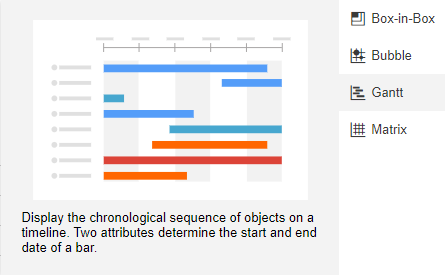
Four different types of charts can be created in ADOIT 14.0:
- Box-in-Box (formerly: Cluster Map): Show dependencies hierarchically between different objects. The objects are arranged as boxes nested within each other.
- Bubble (formerly: Portfolio): Visualise objects as bubbles in a two-dimensional grid. Two attributes represent the X and Y axis and an optional third attribute can be used for the bubble size.
- Gantt: Display the chronological sequence of objects on a timeline. Two attributes determine the start and end date of a bar.
- Matrix: Display dependencies between objects in tabular format. Define object types for the columns and rows and visualise the connections between the objects in the cells.
If you noticed the BIA is not on this list, rest assured it has not been forgotten in the redesign but instead incorporated into the dependency analysis (more on that later).
Analysis: Dataset and Charts Combined
In ADOIT 14.0, you do not just create a chart, you create a comprehensive Analysis. An
Analysis consists of a set of data and selected charts for visualisation. This means that you can evaluate and graphically visualise a data set with multiple charts. You can save an
Analysis for future use and even share it with your colleagues.
Configure Charts to Suit Your Needs
In addition to using the provided configurations, now you can also design your own charts directly in the web client.
First, select the chart type you want:
Then configure the chart to visualise your data. You can customize the chart according to your wishes or simply choose one of the recommended templates for your data. A simple Gantt chart, for example, could be configured as follows to show the lifetime of applications from the beginning to the end:
When you are satisfied with the settings, click OK. The chart is displayed:

Optionally, you can make objects in your chart coloured to highlight some aspects of your data. In the following chart, applications are coloured yellow, for example, if there is a need for action, and grey if there is no need for action.

The Analyses Page
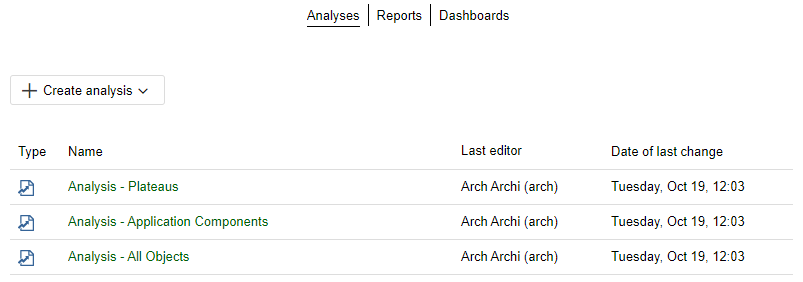
On the toolbar at the top of the screen, click Analyse, and you will see the new Analyses page. It serves as a starting point to run
Analyses on a data set of your choice. All
Analyses that have been created are listed here, and you can create new
Analyses.
Creating an Analysis
When you create a new Analysis, you need to populate your dataset first. You can perform a search or manually add the models or objects you want. Then, you can create charts to visualise your data.
You can also create charts directly, for example in the Explorer or for all objects in a model. For this purpose, select the entry Create charts in the context menu and click on one of the chart types. You can then configure the chart directly; the analysis and the selected data set are generated automatically.
Exporting Charts
Charts can be exported as an Excel spreadsheet (XLSX format), PDF or image file (SVG and PNG format). In all four formats, the graphical representation of the chart and the legend are exported. Additionally, when exporting an Excel spreadsheet, the objects included in the chart are listed on a separate sheet.
Share Analysis
You can generate a URL based on an analysis. This way you can e.g. easily share an analysis with your colleagues or add a specific analysis to your browser's bookmarks.
For details, please refer to the section "Working with Charts" in the User Manual.
BIAs: Templates for the Dependency Analysis
The BIA view (business impact analysis) known from previous versions of ADOIT has been incorporated with the dependency analysis.
BIA configurations are now templates for creating a dependency analysis.
When you use a template, the dependency analysis model is created automatically:
- The template contains an entire hierarchy of object types and dependency relations.
- The swimlanes representing the layers of the hierarchy, and all referenced objects, are added to the model automatically.
For details, please refer to the section "Dependency Analysis" in the User Manual.
Create Heatmaps in the Graphical Editor
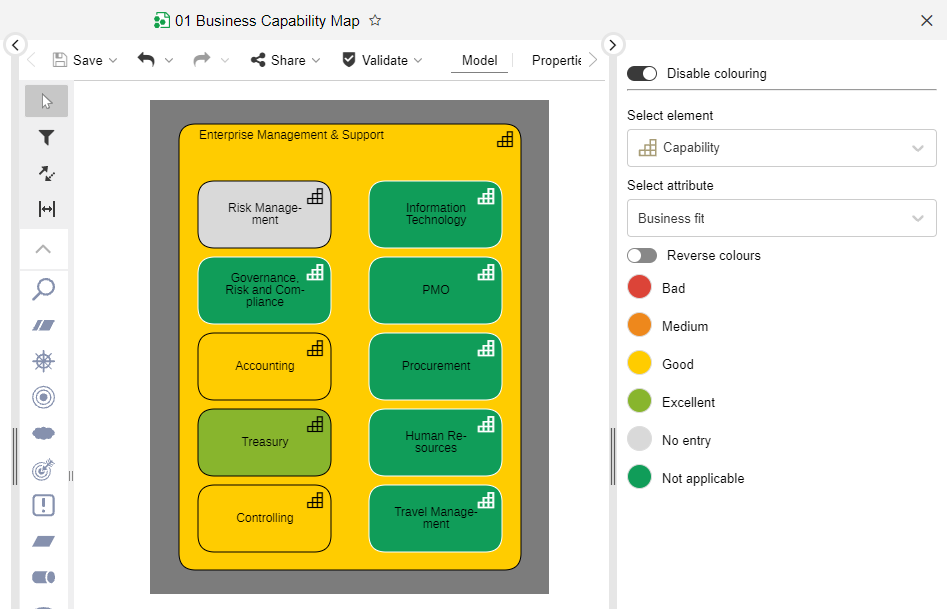
You can make objects in the graphical editor coloured depending on the value of an enumeration attribute to highlight some aspects of your data. This is a great way to create conditional formatting heat maps. For example, Capabilities in an
Architecture Diagram could be coloured green if their business fit is high and red if their business fit is low:
For details, please refer to the section "Make Objects Coloured and Create Heat Maps" in the User Manual.
Reset Translation
You can now reset translations of models and objects, meaning the fallback value will be shown again (normally the text in the organisation's primary language).
For details, please refer to the section "Reset Translation" in the User Manual.
Connect Center: Synchronisation via MOI Interface
You can now trigger the synchronisation of objects between ADOIT and its sister product ADONIS via the BOC Management Office Integration (MOI) interface directly in the Connect Center.
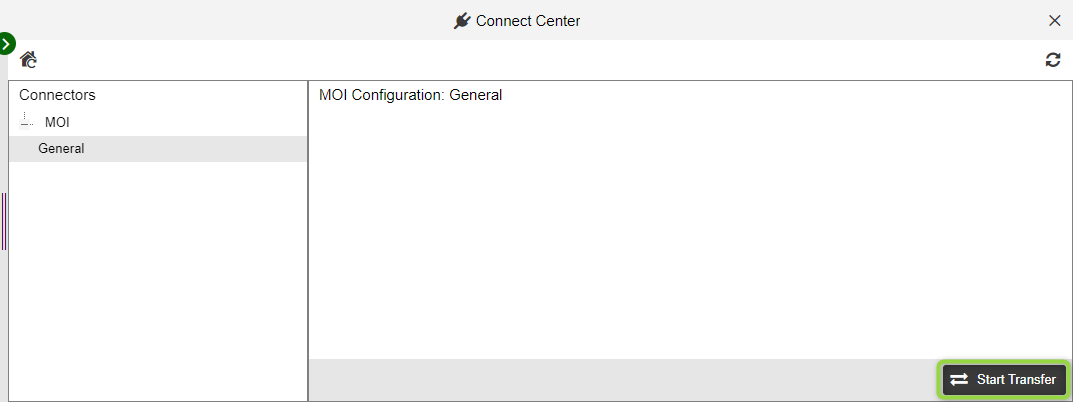
When the transfer is started, a full synchronisation is performed: EA elements are sent from ADOIT to ADONIS and BPM elements are received from ADONIS in ADOIT.
This new functionality replaces all commands that were previously available for synchronisation via the MOI interface in the Object Catalogue. Sending or receiving elements separately is no longer possible.
For details, please refer to the section "Synchronize Objects with ADONIS" in the User Manual.
Additional Improvements to Existing Features
In addition to the major changes, ADOIT 14.0 also includes numerous minor improvements, including:
Object Catalogue: Hover for Insights
Hover over an object in the Object Catalogue to reveal an icon for opening the Insights dashboard.
Export Search Results: More Information on Relations
When you export search results as an Excel file (XLSX format), the model name and type is now shown for relations pointing to modelling objects.
Explore & Contribute: Analyses listed in Architecture Diagrams Dashboard
All Analyses (see A New Approach to Creating Charts) are now listed in the Architecture Diagrams dashboard.
Organisation Portal: No Empty Groups in Explorer
In the Organisation Portal, empty groups are now no longer displayed in the Model Catalogue and the Object Catalogue.
New Features for Users of the ArchiMate Application Library
Insights Dashboards Improvements
ADOIT 14.0 includes a number of improvements for the Insights dashboards in the ArchiMate Application Library.
Navigation Bar
Use the new navigation bar at the top of the Insights dashboard to jump to the section you want to see.
New Widgets for Business Processes
The Insights dashboard for Business Processes includes the following new widgets:
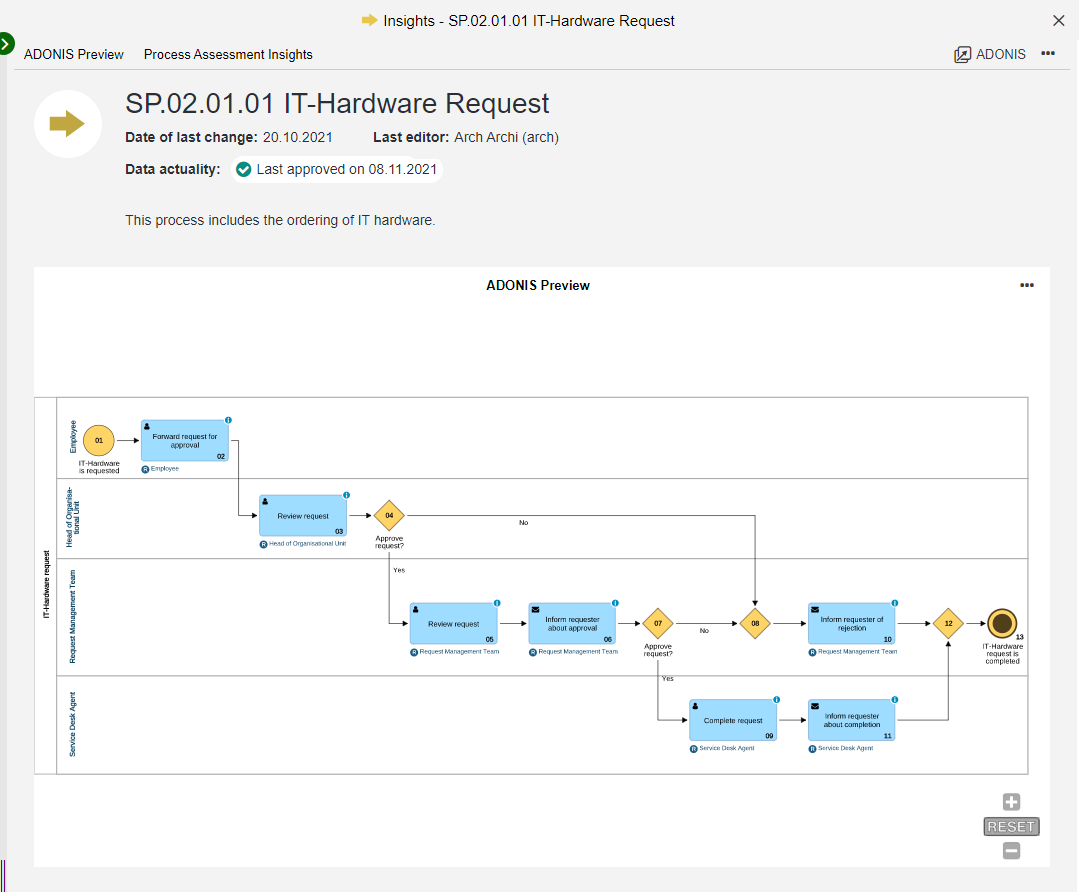
- ADONIS Preview: This widget is only available if a
Business Process was imported from ADONIS into ADOIT via the BOC Management Office Integration (MOI) interface. It shows the model that is referenced in the currently viewed
Business Process on the ADONIS side.
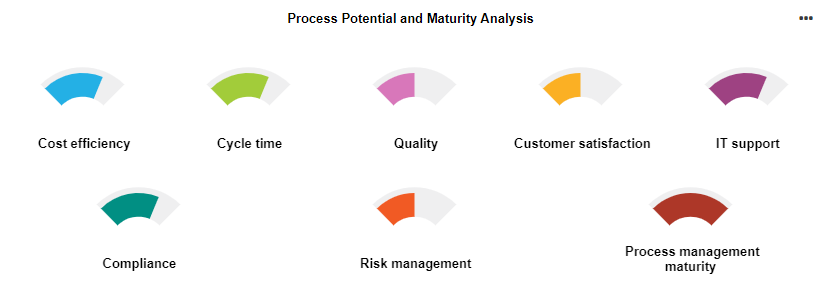
- Process Potential and Maturity Analysis: This gauge chart helps to identify improvement potentials within the
Business Process based on the results of an as-is analysis of various criteria.
Grouping Column Added to Widgets
The new "Grouping" column shows all Grouping elements that aggregate the models listed in the following widgets:
- Associated Models
- Usage in Models

Open in ADONIS
If an object was imported from ADOIT into ADONIS via the BOC Management Office Integration (MOI) interface, you can directly jump to the original object.
Likewise, you can jump to the referenced model from the ADONIS Preview widget in the Insights dashboard for Business Processes (from the
More menu).
For details, please refer to the section "Insights Dashboards" in the User Manual.
Additional Dashboard Improvements
The Strategy, Business, Application and Technology dashboards can be accessed from the Design & Document and Explore & Contribute scenarios. In the ArchiMate Application Library 14.0, they have been improved as follows:
- The responsibility filter (All/My) has been removed from all widgets. Now ALL elements of a type are always displayed in charts and tables.
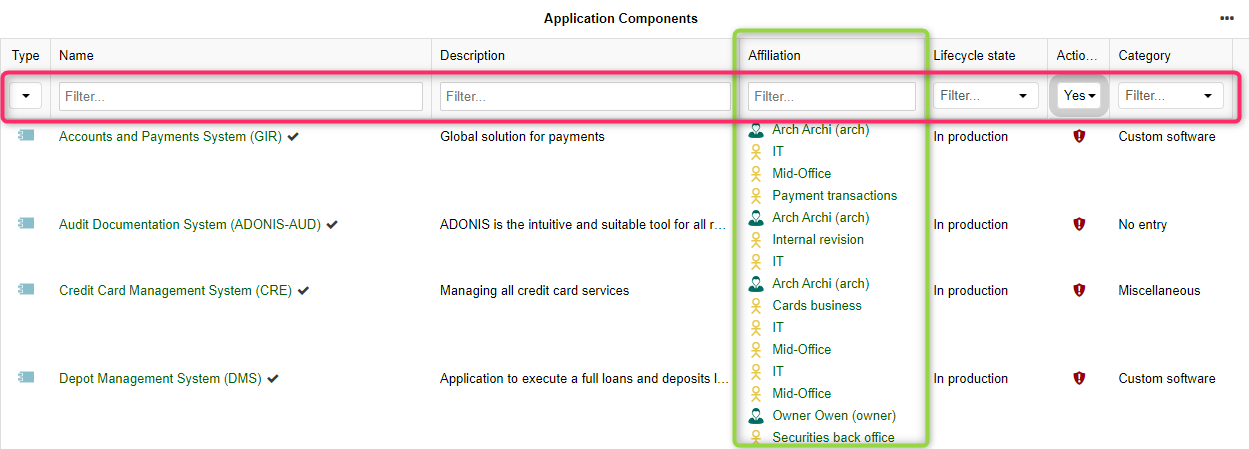
- All tabular widgets contain the new Affiliation column. Here you can see who the listed elements are assigned to according to a RACI matrix (
Users and
Business Actors). This way you can quickly find out if you or another colleague is responsible for an element.
- All tabular widgets have also been extended with new filtering options. You have the option of filtering by one or more columns. As you type, the dashboard will update in real time. It's simple to temporarily hide irrelevant information and concentrate on the data you want to see!
For details, please refer to the section "The "Explore & Contribute" Scenario" in the User Manual.
Organisation Portal Now Read-Only
The Organisation Portal is now read-only.
Users no longer have write access to repository content (including all models and objects and their relations).
Methodical Improvements in the ArchiMate Library 14.0
ArchiMate Relationships: Adjust Connector Colour
In the ArchiMate Application Library 14.0, visualisation options have been improved for all ArchiMate relationships (e.g. Association or
Composition). Use the Colour attribute in the Notebook chapter "Representation" to adjust the colour of the connector on the drawing area.

The Realization relationship constitutes a special case, because the Specialisation attribute of this relationship (in the Notebook chapter "General Information") now behaves differently. Previously, on the drawing area, you could see what specialisation is selected (New = green, Changed = yellow, Decommissioned = red). This is not the case anymore, as you can adjust the colour of the connector as you like using the Colour attribute.
Aggregate Analyses with the Grouping Element
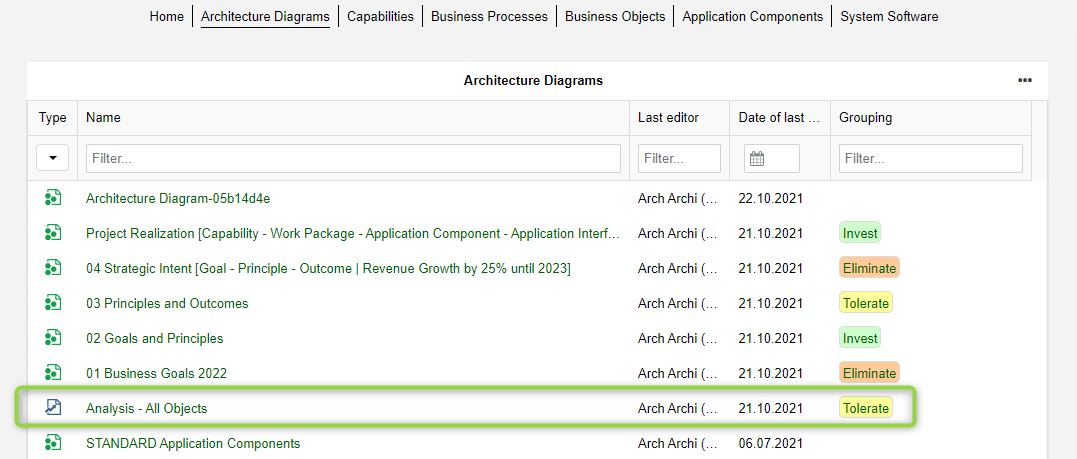
The new Analyses (see A New Approach to Creating Charts) are maintained in the Model Catalogue and can be grouped just like
Architecture Diagrams. For this purpose, the element
Grouping is used.
To aggregate an Analysis under a
Grouping element, use the Aggregates models relation in the Notebook chapter "Relationships" of the
Grouping.
In the Achitecture Diagrams dashboard, ADOIT shows you tags for all Grouping elements that aggregate an
Analysis:
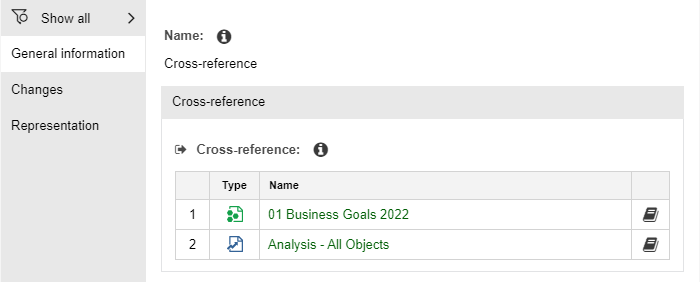
Reference Analyses from Cross-Reference Element
Analyses can be referenced from
Cross-reference elements. For this purpose, the Cross-reference relation in the Notebook chapter "General information" of the
Cross-reference element is used.
Application Component: Investment Strategy Attribute
The value range of the attribute Investment strategy in the Notebook of Application Components (in the chapter "Lifecycle") has been extended:
- The new value Tolerate has been added.
Value Stream: Specialisation Attribute
The attribute Specialisation has been added to the Notebook of Value Streams (in the chapter "General"):
Confirm Data Actuality: Requirements Less Strict
The requirements for confirming data actuality are now handled less strictly than before.
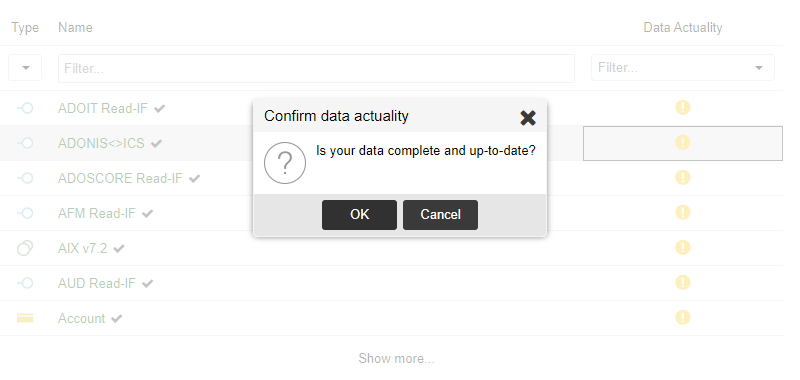
Originally, when using the ArchiMate Library, all Users with write permissions could confirm the data actuality of objects.
Starting with the ArchiMate Library 13.0, we restricted these rights so that only Users who are assigned as responsible business actors can confirm the data actuality.
As this change was felt to be too restrictive by our customers, we have adjusted this functionality yet again in the ArchiMate Library 14.0. Now, everyone who is assigned to an object as responsible, accountable, consulted or informed business actor can confirm the data actuality.
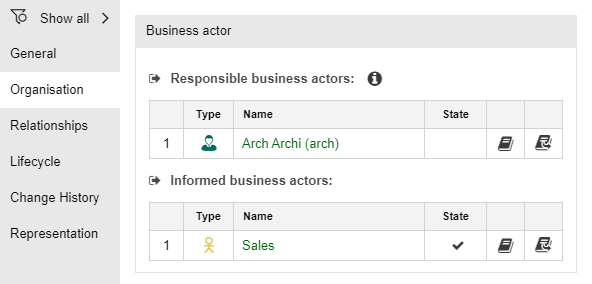
Either the User can be assigned directly, or a
Business actor that aggregates the
User is assigned (relation Aggregation in the Notebook chapter "Relationships" of the Business actor).
New Features for ADOIT Administrators
Mail Component Improvements
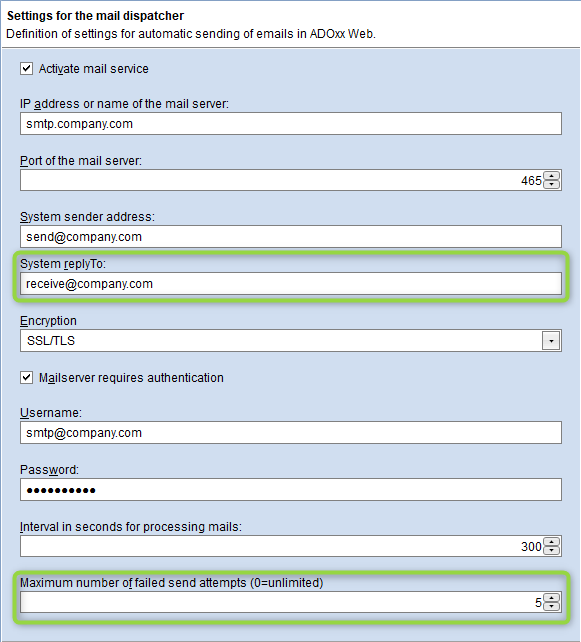
The ADOIT mail component, which can be used to send messages automatically on several events, has been improved.
Configure Reply To Address
You can now configure a reply to address (if replies should not be sent to the sender address).
Configure Maximum Number of Failed Send Attempts
This new setting allows you to specify the number of send attempts after which emails that fail to send (e.g. because the email address does not exist anymore) are skipped.
For details, please refer to the section "Mail" in the Administration Manual.
Extended Logging
The logging output of the mail component is written to the folder "<Tomcat installation >/logs". In addition to the regular technical log file ADOxx_Web_Mail_Component.log, a dedicated audit log is now also written to the file ADOxx_Web_MailAudit.log.
The audit log can be used to verify whether or not a mail has been sent from ADOIT and eventually got lost later on the transport path.
Component Settings: Import Individual Configurations
When importing component settings, individual configurations () can now be selected. Previously, you could import only the complete setting with all contained configurations.
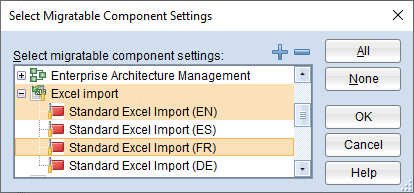
For details, please refer to the section "Import Component Settings" in the Administration Manual.
REST API Improvements
ADOIT provides a generic, extensible REST API that allows authenticated access to exposed functionality. In ADOIT 14.0, this REST API has been improved as follows:
New or Extended APIs
The following REST scenarios contain new APIs, or the APIs have been extended with new parameters.
Repository Search
- Get language-independent values for enumeration attributes and enumeration list attributes
Repository Read
- New dedicated API to get relations of modelling instances and their attributes
- Get additional information about connector attributes when fetching models
- Get attributes for objects inside object groups
- Get bounding data for SVG model images
- Get additional information about release workflow states
Users
- Get information about the current user (only basic authentication and OAuth 2.0 authentication)
Scenarios
- Get list of scenarios enabled for current security context
Views
- Get list of chart types and templates for each chart type
- Get list of analyses
- Get image of chart (based on chart or saved search query)
- Get information about an analysis (available charts)
For information on how to use the REST API, please refer to the ADOxx Developer Portal.
Improved Setup
Token Based Authentication Optional
In previous versions of ADOIT , due to technical reasons, token based authentication had to be enabled before basic authentication or OAuth 2.0 authentication could be configured. This is not necessary anymore.
HATEOAS Links Optional
HATEOAS links that help you find related resources can now be disabled. Previously, they were always included in responses to requests.
For information on how to activate and configure access to the REST API, please refer to the section "REST API" in the Administration Manual.
Enable Page Breaks but Not Page Numbers
Page breaks divide models into separate pages when printing. They are displayed as dashed lines in the graphical editor.
ADOIT administrators can now enable page breaks by default without also activating page numbers. Previously, the Administration Toolkit didn't allow you to do this.
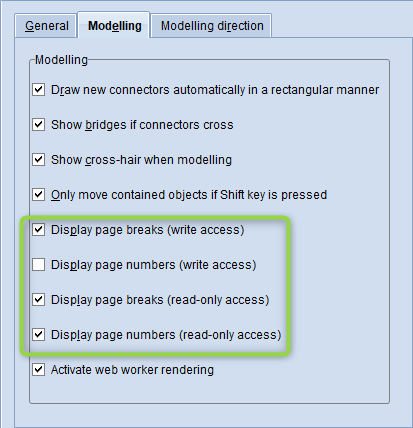
These settings can be overridden by individual users of the ADOIT web client according to their preferences.
For details, please refer to the section "Modelling" in the Administration Manual.
Authentication: Explicitly Assign Users to All Repositories
In ADOIT 14.0, users which are authenticated directly against a directory service can be explicitly assigned to all repositories. Users could only be explicitly assigned to specific repositories in the past.
For details, please refer to the section "User Mapping" in the Installation Manual.
Install Administration Toolkit and Database Administration Separately
The Administration Toolkit, which is used for administrative tasks such as creating users or assigning rights, can now be installed independently of the Database Administration tools, which are used to create and manage databases.
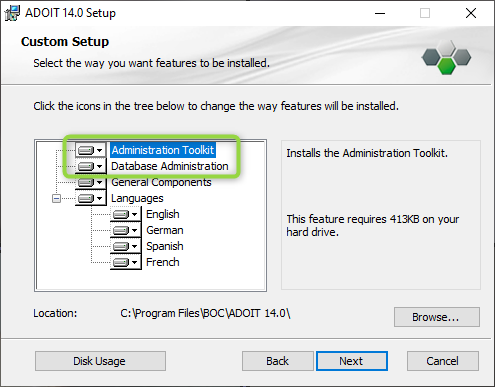
For details, please refer to the section "Install ADONIS" in the Installation Manual.
Migration from an Earlier Version of ADOIT to ADOIT 14.0
Changes to Software Requirements
Please note the following changes to the software requirements for running ADOIT when migrating from previous versions:
Support has been dropped for:
- Internet Explorer 11
Migration from ADOIT 11.0 or higher to ADOIT 14.0 (ArchiMate Library)
A migration from ADOIT 11.0 or higher to ADOIT 14.0 without further assistance by BOC is possible if you are using the ArchiMate Library. You will have to create a new database and import a migration package.
This approach is also valid if you are using an ArchiMate Library with changes in the metamodel. You will need a new version of your library. Please contact your ADOIT consultant to upgrade your library.
If you are using ADOIT 11.0 or higher with the ADOIT Standard Application Library or another specific library, read on here.
Prerequisites
- You will need the installation medium for a successful and complete migration.
Migration
The migration consists of the following steps:
Stop the ADOIT 11.0 or higher application server and the Apache Tomcat web server.
Export the library-specific component settings and a migration package.
Back up comments and deployment-specific configuration settings.
Install ADOIT 14.0 according to the Installation Manual:
a. Install the rich client for use as an application server and for using the Administration Toolkit.
b. Install the web client to host ADOIT 14.0 as a web application.
Create a database:
If you are using the ArchiMate Library: A new version of the ArchiMate Library can be found in the folder "04 Sample Data\Library" on the installation medium. Initialize the new ADOIT database with this library file.
If you are using an ArchiMate Library with changes in the metamodel: Please contact your ADOIT consultant to upgrade your application library. Initialize the new ADOIT database with the new library file you have received from your ADOIT consultant.
Start the ADOIT 14.0 Administration Toolkit and log in to the new database.
Import the migration package and the library-specific component settings.
Migrate comments and deployment-specific configuration settings.
Start the ADOIT 14.0 application server and the Apache Tomcat web server. If ADOIT 14.0 is working properly, you can uninstall ADOIT 11.0 or higher.
For further information and details on the above steps, please refer to the Installation Manual and to the sections "Make a Manual Backup" and "Restore a Manual Backup" in the Administration Manual.
Migration from ADOIT 11.0 or higher to ADOIT 14.0 (Standard Library)
A migration from ADOIT 11.0 or higher to ADOIT 14.0 without further assistance by BOC is possible if you are using the ADOIT Standard Application Library. You will have to create a new database and import a migration package.
This approach is also valid if you are using an ADOIT Standard Application Library with changes in the metamodel or functional extensions or another specific library. You will need a new version of your library. Please contact your ADOIT consultant to upgrade your library.
If you are using ADOIT 11.0 or higher with the ArchiMate Application Library, read on here.
Prerequisites
- You will need the installation medium for a successful and complete migration.
Migration
The migration consists of the following steps:
Stop the ADOIT 11.0 or higher application server and the Apache Tomcat web server.
Export the library-specific component settings and a migration package.
Back up comments and deployment-specific configuration settings.
Install ADOIT 14.0 according to the Installation Manual:
a. Install the rich client for use as an application server and for using the Administration Toolkit.
b. Install the web client to host ADOIT 14.0 as a web application.
Create a database:
If you are using the ADOIT Standard Application Library: A new version of the ADOIT Standard Application Library can be found in the folder "04 Sample Data\Library" on the installation medium. Initialize the new ADOIT database with this library file.
If you are using an ADOIT Standard Application Library with changes in the metamodel or functional extensions or another specific library: Please contact your ADOIT consultant to upgrade your application library. Initialize the new ADOIT database with the new library file you have received from your ADOIT consultant.
Start the ADOIT 14.0 Administration Toolkit and log in to the new database.
Import the migration package and the library-specific component settings.
Migrate comments and deployment-specific configuration settings.
Start the ADOIT 14.0 application server and the Apache Tomcat web server. If ADOIT 14.0 is working properly, you can uninstall ADOIT 11.0 or higher.
For further information and details on the above steps, please refer to the Installation Manual and to the sections "Make a Manual Backup" and "Restore a Manual Backup" in the Administration Manual.
Migration from All Other Versions to ADOIT 14.0
If you are using ADOIT 10.0/10.1 or earlier versions, the migration to ADOIT 14.0 requires support by BOC.
For details on the necessary steps to migrate your version of ADOIT to ADOIT 14.0, please contact your ADOIT consultant.
Switch to ArchiMate Library
If you are using ADOIT 12.1 or earlier versions, and want to switch to using the ArchiMate Application Library, the migration to ADOIT 14.0 requires support by BOC.
For details on the necessary steps to migrate your version of ADOIT to ADOIT 14.0, please contact your ADOIT consultant.
How to Install a Hotfix for ADOIT 14.0
Hotfixes resolve software errors and security issues. Please note that the most current hotfix always includes the modifications of previous hotfixes. Only the latest hotfix has to be installed to get all fixes.
If you install a hotfix for ADOIT 14.0, you do not have to create a new database and import a migration package.
Downloading a Hotfix
In the majority of cases, you are notified of hotfixes by your ADOIT consultant.
The version format of a hotfix is 14.0.x (for example: 14.0.1 or 14.0.2).
Download the hotfix from the BOC website (your ADOIT consultant will email you a link).
The installation utilizes a full, standalone release package.
Installing a Hotfix
Installing a hotfix consists of the following steps:
Stop the ADOIT 14.0 application server and the Apache Tomcat web server.
Backup comments and deployment-specific configuration settings.
Install ADOIT 14.0.x according to the Installation Manual:
a. Install the rich client for use as an application server and for using the Administration Toolkit.
b. Install the web client to host ADOIT 14.0.x as a web application.
Migrate comments and deployment-specific configuration settings.
Start the ADOIT 14.0.x application server and the Apache Tomcat web server. If ADOIT 14.0.x is working properly, you can uninstall ADOIT 14.0.
For further information and details on the above steps, please refer to the Installation Manual and to the sections "Make a Manual Backup" and "Restore a Manual Backup" in the Administration Manual.